The Garage
For general automotive modeling or non-modeling topics.
Porsche campaign anyone?
Szmann
_VISITCOMMUNITY
Netherlands Antilles
Joined: September 02, 2014
KitMaker: 1,977 posts
Auto Modeler: 1,371 posts
Posted: Wednesday, February 27, 2019 - 12:22 PM UTC

Quoted Text

I made time for a quick 20 minute airbrush session tonight to get the base colour on the interior.
It's a bit darker than the instructions call for but I prefer this to the paler shades. Black details will be hand-painted tomorrow night and pinwash applied.

Cheers, D


No complaints here, D.! Looking smooth and nice!

Gabriel
Ray_from_SA
_VISITCOMMUNITY
Connecticut, United States
Joined: December 31, 2007
KitMaker: 47 posts
Auto Modeler: 13 posts
Posted: Thursday, February 28, 2019 - 02:52 AM UTC
Making some steady progress on the 935K2.

Tackled the windows which was pretty straight forward, masked:

Mask removed:

And nobody can resist a test fit:


And then I tackled something that has been bothering me since day one, the front lip of the car. I've always preferred to paint these but Beemax provides a decal so I was thinking of using it, the issue is the color of the decal didn't have me very convinced - it's literally dayglo orange:

Secondary to that, with the complexity of the curve it was going on, it was going to be fun - I tried one side to see how it looked and quickly decided my original thought was correct. Off came the decal and on went the masking tape:

I sprayed the lip with Tamiya chrome yellow, it's a darker yellow and seems pretty close to photos on line, a little cleanup after removing the masking tape is needed:


And then, on to the fun part, decals!
Szmann
_VISITCOMMUNITY
Netherlands Antilles
Joined: September 02, 2014
KitMaker: 1,977 posts
Auto Modeler: 1,371 posts
Posted: Thursday, February 28, 2019 - 03:02 AM UTC
Nice progress there, Ray!

I'm glad to see you get thru with masking and the windows. You remembered me I have to do that one too - I don't have pre-cut masks in my old Tamiya kit - but still should be easy.

Your car started looking gorgeous indeed!

Gabriel
Joel_W
Staff MemberAssociate Editor
AUTOMODELER
_VISITCOMMUNITY
New York, United States
Joined: December 04, 2010
KitMaker: 11,666 posts
Auto Modeler: 2,974 posts
Posted: Thursday, February 28, 2019 - 03:35 AM UTC
Ray,
Excellent job masking and painting those windows. They look perfect.

Like you, I've always shied away from chin and butt decals that have to wrap around corners. just never worked for me. Your masking and painting came out as good as it can get.

Joel
AussieReg
Staff MemberAssociate Editor
AUTOMODELER
#007
_VISITCOMMUNITY
Victoria, Australia
Joined: June 09, 2009
KitMaker: 8,156 posts
Auto Modeler: 2,953 posts
Posted: Thursday, February 28, 2019 - 09:05 AM UTC
Beautiful work Ray, this is going to be one colourful gallery once all of those decals go on!

Cheers, D
AussieReg
Staff MemberAssociate Editor
AUTOMODELER
#007
_VISITCOMMUNITY
Victoria, Australia
Joined: June 09, 2009
KitMaker: 8,156 posts
Auto Modeler: 2,953 posts
Posted: Thursday, February 28, 2019 - 09:56 AM UTC
Well it was a black night for me last night! Masking for black paint, airbrushing black paint, hand detail painting black, pinwashing black (well, mixed with some brown) and finally cleaning up black paint spilled when I knocked the mixing cup

Anyway, little steps moving in the right direction.


Cheers, D
Cosimodo
#335
_VISITCOMMUNITY
Auckland, New Zealand
Joined: September 03, 2013
KitMaker: 1,808 posts
Auto Modeler: 701 posts
Posted: Thursday, February 28, 2019 - 10:42 AM UTC
Nice work on painting the front lip Ray! I did the same on the 934 because Tamiya provided decals but about in 8 pieces and I thought I would never get them to line up.
The windows look very sharp. Did the masks come with the kit or you made them?, neat job if you did.

cheers
Michael
Szmann
_VISITCOMMUNITY
Netherlands Antilles
Joined: September 02, 2014
KitMaker: 1,977 posts
Auto Modeler: 1,371 posts
Posted: Thursday, February 28, 2019 - 12:54 PM UTC
UPDATE

Correction - the silver from Krylon is not too "white". Once the "metallic dust" removed with a cotton cloth, the color reverts to a very nice "sterling silver".

Once the wheels were dry, I inserted the tires and sanded off the seams with a coarse nail buffer:


The wheels added to the bottom pan:


The interior glued to the bottom pan - the Tamiya bottle is serving as weight


I masked the windows prior to spraying the frames:


The window frames sprayed with Tamiya FF-69 NATO Black:


Masks removed and the windows dipped in Green Alien Blood - now they're drying sheltered from dust:


I didn't give up completely the idea of applying CF decals, but more restrained than firstly intended. BLD Checkerboard Pattern v.01, here still drying after the application of Tamiya Mark Fit Strong:


Test fit and "first look" check-up. The fit is very important here because I cannot add any putty between the spoiler and the engine cover. They fit good:


Sorry for the moved picture: I was right, the parting lines are worst in this example that the one I have melted down - still nothing to worry:


Cheers!
Gabriel
AussieReg
Staff MemberAssociate Editor
AUTOMODELER
#007
_VISITCOMMUNITY
Victoria, Australia
Joined: June 09, 2009
KitMaker: 8,156 posts
Auto Modeler: 2,953 posts
Posted: Thursday, February 28, 2019 - 01:15 PM UTC
Good progress Gabriel, nice clean work. I really like the CF finish as well.

Cheers, D
Ray_from_SA
_VISITCOMMUNITY
Connecticut, United States
Joined: December 31, 2007
KitMaker: 47 posts
Auto Modeler: 13 posts
Posted: Thursday, February 28, 2019 - 02:04 PM UTC
Thanks for all the positive comments and encouragement guys, really helping to keep me motivated.

One final picture for today, got one side of the decals finished. The decal quality is impressive and they respond wonderfully to regular Microscale Decal solution really well - no need to pull out the stronger stuff that requires hazmat cleanup if spilled.


You have to really pay attention to the decal guide, since one guide serves two different cars with different sponsors for certain things. The small Bilstein decal below the rear wheel had to be removed - fortunately not an issue.

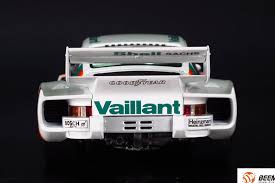
Also, the large Vaillant logo that goes across the back of the car between the tail lights is too big to fit on the car (both versions). I searched around the internet and it looks like other builders have had the same and simply left this logo off.
AussieReg
Staff MemberAssociate Editor
AUTOMODELER
#007
_VISITCOMMUNITY
Victoria, Australia
Joined: June 09, 2009
KitMaker: 8,156 posts
Auto Modeler: 2,953 posts
Posted: Thursday, February 28, 2019 - 02:58 PM UTC
Those decals look great Ray, the colours are strong and I don't see any bubbles or silvering at all. Very well done.

Cheers, D
Joel_W
Staff MemberAssociate Editor
AUTOMODELER
_VISITCOMMUNITY
New York, United States
Joined: December 04, 2010
KitMaker: 11,666 posts
Auto Modeler: 2,974 posts
Posted: Friday, March 01, 2019 - 02:23 AM UTC
Ray,
Excellent decaling job. Both schemes are rather complex, so careful dealing is a necessity, which you achieved perfectly. You handled the front fender brake exhaust louvers quite well, as they look painted on. Not a drop of flash nor silvering anywhere to be seen.

My only question of concern with this kit, because I have it planned for a build this year, and using the kit decals (which is a rarity for me). the large rear Vaillant decal across the back. I've got pictures of both cars and indeed they both had that prominent sponsorship decal. But I've also seen a good 1/2 dozen or so builds, and they had that decal on. I'm wondering if it's a issue with a run of those decals. If it's not, and that issue will be the same with mine, then I'll have to start looking for AM decals, or try to make my rear bumper decal.

Joel
Joel_W
Staff MemberAssociate Editor
AUTOMODELER
_VISITCOMMUNITY
New York, United States
Joined: December 04, 2010
KitMaker: 11,666 posts
Auto Modeler: 2,974 posts
Posted: Friday, March 01, 2019 - 02:30 AM UTC
Gabriel,
Like I said before, the interior tub looks great seating on the chassis. and the rear deck spoiler with the CF decals came out absolutely perfect.

One thing that all of us do (including me) is sand down the middle molding ridge on the tires. That has gotten me thinking that we're actually going about it wrong. Brand new tires have that molding line on them as they're made from a clam shell mold.

So my question to all of is if we're modeling a brand new car, show car, or display car with new tires, why are we completely removing that seam line?

Joel
Joel_W
Staff MemberAssociate Editor
AUTOMODELER
_VISITCOMMUNITY
New York, United States
Joined: December 04, 2010
KitMaker: 11,666 posts
Auto Modeler: 2,974 posts
Posted: Friday, March 01, 2019 - 02:32 AM UTC
D.,
A night spent with Black looks like it paid off in Spades. To bad about the spilled bottle, but just to make you feel better about it, I've knocked over more bottles of paint then I care to admit to.

Joel
Ray_from_SA
_VISITCOMMUNITY
Connecticut, United States
Joined: December 31, 2007
KitMaker: 47 posts
Auto Modeler: 13 posts
Posted: Friday, March 01, 2019 - 02:45 AM UTC

Quoted Text


My only question of concern with this kit, because I have it planned for a build this year, and using the kit decals (which is a rarity for me). the large rear Vaillant decal across the back. I've got pictures of both cars and indeed they both had that prominent sponsorship decal. But I've also seen a good 1/2 dozen or so builds, and they had that decal on. I'm wondering if it's a issue with a run of those decals. If it's not, and that issue will be the same with mine, then I'll have to start looking for AM decals, or try to make my rear bumper decal.

Joel


With good fortune, they may have identified and corrected the issue? I pre-ordered my kit before they were first released so perhaps it's an initial release issue.

I initially wondered if they had got the numbers for the decal on the wing and the back of the car reversed as the one from the wing would fit perfectly on the rear of the car but they one from the rear wouldn't fit the wing.

It shouldn't be hard to verify if yours is OK, just measure the width of the location the decal applies to relative to the decal.
Joel_W
Staff MemberAssociate Editor
AUTOMODELER
_VISITCOMMUNITY
New York, United States
Joined: December 04, 2010
KitMaker: 11,666 posts
Auto Modeler: 2,974 posts
Posted: Friday, March 01, 2019 - 02:56 AM UTC

Quoted Text


Quoted Text


My only question of concern with this kit, because I have it planned for a build this year, and using the kit decals (which is a rarity for me). the large rear Vaillant decal across the back. I've got pictures of both cars and indeed they both had that prominent sponsorship decal. But I've also seen a good 1/2 dozen or so builds, and they had that decal on. I'm wondering if it's a issue with a run of those decals. If it's not, and that issue will be the same with mine, then I'll have to start looking for AM decals, or try to make my rear bumper decal.

Joel


With good fortune, they may have identified and corrected the issue? I pre-ordered my kit before they were first released so perhaps it's an initial release issue.

I initially wondered if they had got the numbers for the decal on the wing and the back of the car reversed as the one from the wing would fit perfectly on the rear of the car but they one from the rear wouldn't fit the wing.

It shouldn't be hard to verify if yours is OK, just measure the width of the location the decal applies to relative to the decal.


Ray,
Now tell me I'm not ready for the Old Age Farm Your suggestion of measuring the decals is perfect. Going to do it in a few (that's code for after breakfast). I'll post the results and let you know how I made out.

Joel
Joel_W
Staff MemberAssociate Editor
AUTOMODELER
_VISITCOMMUNITY
New York, United States
Joined: December 04, 2010
KitMaker: 11,666 posts
Auto Modeler: 2,974 posts
Posted: Friday, March 01, 2019 - 04:48 AM UTC
Ray,
My apologies. I measured the decal and it's nearly 5mm to long!! Someone really screwed up for sure. I've started to check for other decal options, but so far my number 1 AM decal guy hasn't made any of yet.

I guess that I can get a clear decal sheet, scan the decals in, then reduce them by lets say 6mm, and reprint them.

I did a few Google searches for decal issues on the 935K2 and couldn't find a thing. I then went to the Beemax site and found a few pictures of the built up kit. the decal in question fits perfectly. So now I'm more confused then ever.


I did continue to look for alternative decals, and I found quite of a few sheets by IndyCals. Michael does offer the Vaillant cars markings for the K2 in 1/24 scale, and they have several 935 sheets as well. All are K3s which is a different nose clip. So I'm just going to stick with the Vaillant K2 and a combination of kit and IndyCar decals.


Joel
Ray_from_SA
_VISITCOMMUNITY
Connecticut, United States
Joined: December 31, 2007
KitMaker: 47 posts
Auto Modeler: 13 posts
Posted: Friday, March 01, 2019 - 05:52 AM UTC
Joel,

If you're wanting to build the white car, you are welcome to my green Vaillant logos, I think the roof or rear wing logo would be the correct length for the rear.

Ray
Joel_W
Staff MemberAssociate Editor
AUTOMODELER
_VISITCOMMUNITY
New York, United States
Joined: December 04, 2010
KitMaker: 11,666 posts
Auto Modeler: 2,974 posts
Posted: Friday, March 01, 2019 - 06:16 AM UTC

Quoted Text

Joel,

If you're wanting to build the white car, you are welcome to my green Vaillant logos, I think the roof or rear wing logo would be the correct length for the rear.

Ray


Ray,
Thank you sir for the offer, it's most appreciated. I'm planning on doing the white car, so it's perfect. I owe you one.

Joel
AussieReg
Staff MemberAssociate Editor
AUTOMODELER
#007
_VISITCOMMUNITY
Victoria, Australia
Joined: June 09, 2009
KitMaker: 8,156 posts
Auto Modeler: 2,953 posts
Posted: Friday, March 01, 2019 - 09:30 AM UTC
Looking at those last two images it seems to me that the decal is following the outer curves of the rear, not just fitting within the "flat" section. Have you cut the decal from the sheet to check if it will fit following the profile?

Cheers, D

Edit. I just did some Googling, and in every "rear end" image I could find, the Vaillant logo is ABOVE the GoodYear logo, on both the green and white cars. Perhaps BeeMax got this bit wrong??? On every kit image I found the Vaillant is below.


Just another rabbit-hole that this hobby leads us down !!
Joel_W
Staff MemberAssociate Editor
AUTOMODELER
_VISITCOMMUNITY
New York, United States
Joined: December 04, 2010
KitMaker: 11,666 posts
Auto Modeler: 2,974 posts
Posted: Friday, March 01, 2019 - 09:52 AM UTC

Quoted Text

Looking at those last two images it seems to me that the decal is following the outer curves of the rear, not just fitting within the "flat" section. Have you cut the decal from the sheet to check if it will fit following the profile?

Cheers, D


D,
I haven't done anything yet with the kit as it's not even on my bench yet. But the space is confined between the two lights and it's flat not curved.

Joel
AussieReg
Staff MemberAssociate Editor
AUTOMODELER
#007
_VISITCOMMUNITY
Victoria, Australia
Joined: June 09, 2009
KitMaker: 8,156 posts
Auto Modeler: 2,953 posts
Posted: Friday, March 01, 2019 - 09:56 AM UTC

Quoted Text

D,
I haven't done anything yet with the kit as it's not even on my bench yet. But the space is confined between the two lights and it's flat not curved.


Hi Joel.
I went on a Google hunt and found some interesting info. I have edited the post above. Might be I have created a monster I can see on the real thing that the area is flat, so if the decal is too wide, it is simply too wide.

Cheers, D
Joel_W
Staff MemberAssociate Editor
AUTOMODELER
_VISITCOMMUNITY
New York, United States
Joined: December 04, 2010
KitMaker: 11,666 posts
Auto Modeler: 2,974 posts
Posted: Friday, March 01, 2019 - 10:46 AM UTC

Quoted Text


Quoted Text

D,
I haven't done anything yet with the kit as it's not even on my bench yet. But the space is confined between the two lights and it's flat not curved.


Hi Joel.
I went on a Google hunt and found some interesting info. I have edited the post above. Might be I have created a monster I can see on the real thing that the area is flat, so if the decal is too wide, it is simply too wide.

Cheers, D


D,
excellent picture, but even if the surface is concave, the decal width is the issue. Ray's sending me his white car decals so I should be ok. If not I'll buy a full set from IndyCals for $14 as a last resort. What's still driving me nuts is that in the Beemax pictures I posted look perfect.

Joel
Szmann
_VISITCOMMUNITY
Netherlands Antilles
Joined: September 02, 2014
KitMaker: 1,977 posts
Auto Modeler: 1,371 posts
Posted: Friday, March 01, 2019 - 04:22 PM UTC

Quoted Text

Gabriel,

One thing that all of us do (including me) is sand down the middle molding ridge on the tires. That has gotten me thinking that we're actually going about it wrong. Brand new tires have that molding line on them as they're made from a clam shell mold.

So my question to all of is if we're modeling a brand new car, show car, or display car with new tires, why are we completely removing that seam line?

Joel


Joel, good question, which reminds me about the old conversation about the aircraft canopies. Why we struggle so much to make them clear, if in reality they are scratched, and sometimes almost milky - a far cry from crystal clear?

Well, I guess for both questions there is a single answer: the scale effect. In scale, scratched canopies just don't look good. Same for the tires: if, let's say, the seam line is 0.5mm x 0.75mm, you have a real correspondent of 1.2cm x 1.8cm (approx. half inch by 3/4 of an inch) - which is way too big - that will be a molded in stripe, not a seam line.
Of course, you're right: the tires have seam lines, runner "pins" on the sides and very rarely the two halves are perfectly aligned.

UPDATE
Not much for today's session, because there is not much left to do than to watch the primer dry.


Cheers!
Gabriel
Joel_W
Staff MemberAssociate Editor
AUTOMODELER
_VISITCOMMUNITY
New York, United States
Joined: December 04, 2010
KitMaker: 11,666 posts
Auto Modeler: 2,974 posts
Posted: Saturday, March 02, 2019 - 01:43 AM UTC
Gabriel,
Good answer, as the Scale Effect would make those seams almost non-existent as you numbers bare it out.

As for not much to do other then watch the paint dry. It's one of my favorite things to do. After all, even I can't screw that up.

Joel