Joel_W
 Associate Editor
New York, United States
Joined: December 04, 2010
KitMaker: 11,666 posts
Auto Modeler: 2,974 posts
Posted: Monday, July 15, 2019 - 09:31 AM UTC
Quoted Text
Quoted Text
Gabriel,
You're quite welcome.
As far as I know, officially two finished pictures are still generally required in the campaign gallery to qualify for a ribbon. D and I just thought that it makes more sense to post the finished pictures in the main campaign thread so everyone can see them including non-enlistees. After all, how many enlistees ever periodically check the gallery for finished pictures? So we changed the rule for the Ford campaign.
Joel
It makes perfect sense to me! I think it was the proposal that at the end of the campaign, the morerator / curator of the campaign to make a feature. That it will be great indeed!
Gabriel 
Gabriel,
I completely forgot about that. Lets hope that we get nearly all the enlistees to finish so it the feature will really be something special.
Joel
On my Workbench:
Monogram 1/24 scale 427 Shelby Cobra
Just Completed:
Beemax 1/24 scale BMW M3 E30 1992 Evolution II
Ontario, Canada
Joined: February 04, 2008
KitMaker: 2,507 posts
Auto Modeler: 409 posts
Posted: Wednesday, July 17, 2019 - 10:42 AM UTC
Quoted Text
Very neat work on the interior Richard, it will contrast nicely with a rich brown exterior.
Looking forward to more progress reports.
Cheers, D
Thank's Guys!
I selected my colour choice from a Porsche 911 turbo web page and selected " Leatherette" matched with chocolate Brown body,

" The Die Hards"
43rd MIDDLESEX REGIMENT
MACHINE GUN CORPS
XXX CORP
The most effective way to do it, is to do it.
- Amelia Earhart
Ontario, Canada
Joined: February 04, 2008
KitMaker: 2,507 posts
Auto Modeler: 409 posts
Posted: Thursday, July 18, 2019 - 06:17 AM UTC
Cockpit ready:-

I decanted Krylon Gloss Brown and airbrushed, next up is some wet and dry and another coat.
" The Die Hards"
43rd MIDDLESEX REGIMENT
MACHINE GUN CORPS
XXX CORP
The most effective way to do it, is to do it.
- Amelia Earhart
Joel_W
Associate Editor New York, United States
Joined: December 04, 2010
KitMaker: 11,666 posts
Auto Modeler: 2,974 posts
Posted: Thursday, July 18, 2019 - 08:49 AM UTC
Richard,
impressive for sure. Love the interior as the color combination with the exterior really blends well together.
Looking forward to seeing that body shell shine after the wet sanding/polishing.
Joel
On my Workbench:
Monogram 1/24 scale 427 Shelby Cobra
Just Completed:
Beemax 1/24 scale BMW M3 E30 1992 Evolution II
Ontario, Canada
Joined: February 04, 2008
KitMaker: 2,507 posts
Auto Modeler: 409 posts
Posted: Friday, July 19, 2019 - 11:00 AM UTC
Thanks Joel!
Painted the rims flat black and then silver.
Lettered the tires with white paint pen:-
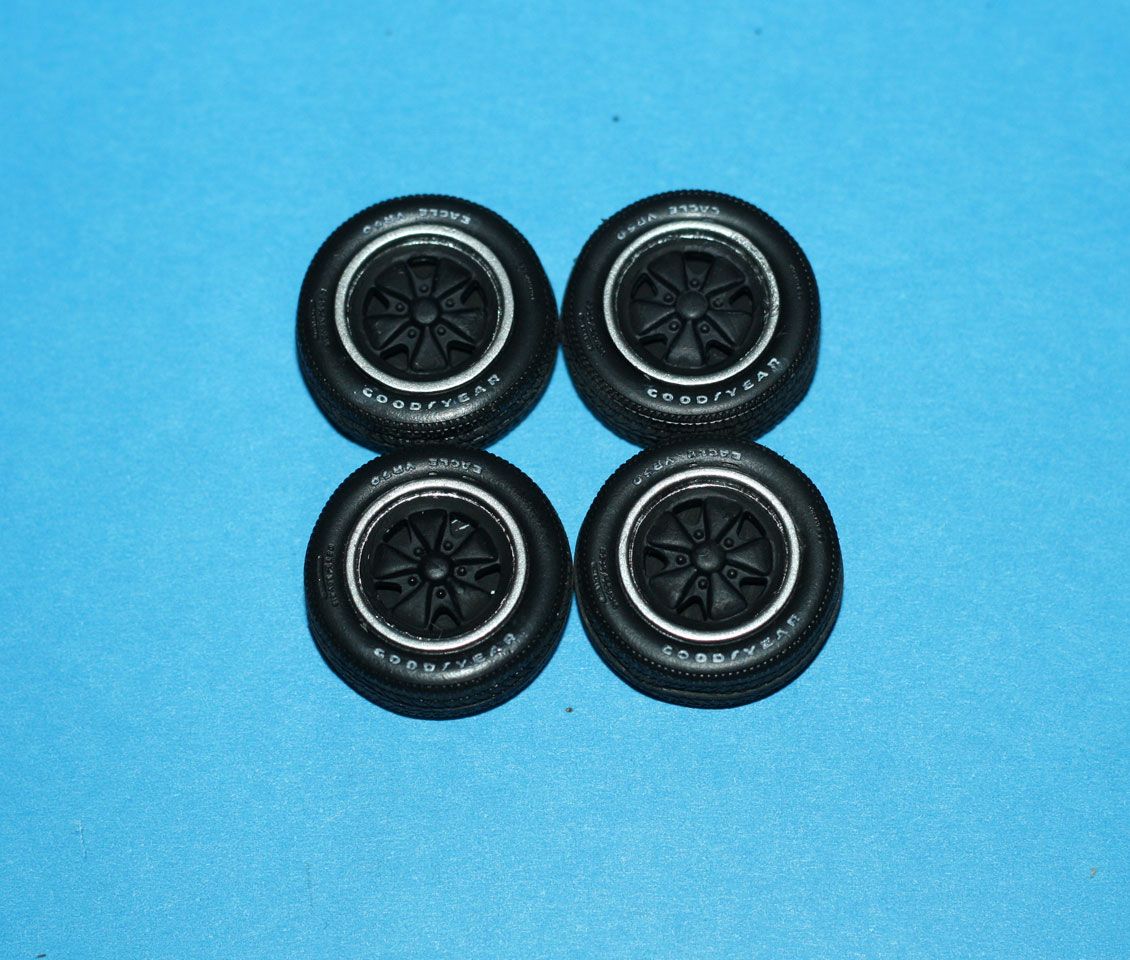
I am still missing head light holders I may have to make them!
" The Die Hards"
43rd MIDDLESEX REGIMENT
MACHINE GUN CORPS
XXX CORP
The most effective way to do it, is to do it.
- Amelia Earhart
Joel_W
Associate Editor New York, United States
Joined: December 04, 2010
KitMaker: 11,666 posts
Auto Modeler: 2,974 posts
Posted: Saturday, July 20, 2019 - 12:05 AM UTC
Quoted Text
Thanks Joel!
Painted the rims flat black and then silver.
Lettered the tires with white paint pen:-
I am still missing head light holders I may have to make them!
Richard,
Excellent job on the wheels and especially the tires. Good luck with making the light holders. Honestly, I'm not exactly sure what parts you're referring to.
Joel
On my Workbench:
Monogram 1/24 scale 427 Shelby Cobra
Just Completed:
Beemax 1/24 scale BMW M3 E30 1992 Evolution II
Ontario, Canada
Joined: February 04, 2008
KitMaker: 2,507 posts
Auto Modeler: 409 posts
Posted: Saturday, July 20, 2019 - 04:51 AM UTC
Joel I should have said the head lights and bezel!
I have the head light lenses.
" The Die Hards"
43rd MIDDLESEX REGIMENT
MACHINE GUN CORPS
XXX CORP
The most effective way to do it, is to do it.
- Amelia Earhart
Joel_W
Associate Editor New York, United States
Joined: December 04, 2010
KitMaker: 11,666 posts
Auto Modeler: 2,974 posts
Posted: Sunday, July 21, 2019 - 01:21 AM UTC
Quoted Text
Joel I should have said the head lights and bezel!
I have the head light lenses.
Richard,
I've carved and shaped clear plastic for lenses with moderate success, but bezels are a real challenge. What's your game plan for them?
Joel
On my Workbench:
Monogram 1/24 scale 427 Shelby Cobra
Just Completed:
Beemax 1/24 scale BMW M3 E30 1992 Evolution II
AussieReg
Associate Editor 
#007
Victoria, Australia
Joined: June 09, 2009
KitMaker: 8,156 posts
Auto Modeler: 2,953 posts
Posted: Friday, July 26, 2019 - 03:05 AM UTC
Just over 1 month to run here folks, time to get those builds moving along the production line and into the showroom!
Cheers, D
ON the bench
Revell 1/24 '53 Corvette (building as '54)
Revell 1/24 BMW 507 Coupe and Cabrio
Italeri 1/48 Me262 B-1a/U1 Nightfighter
Monogram 1/24 '57 Chevy Nomad
Dragon 1/350 USS Frank Knox DD-742
Uusimaa, Finland
Joined: October 01, 2016
KitMaker: 514 posts
Auto Modeler: 44 posts
Posted: Friday, July 26, 2019 - 05:43 PM UTC
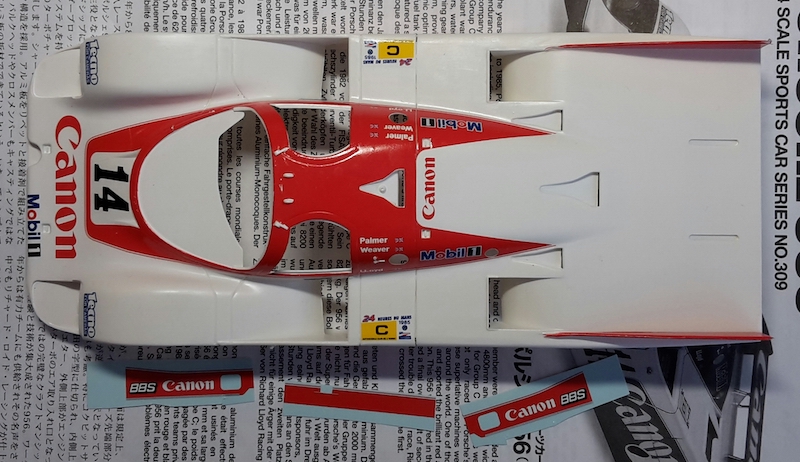
Changed my mind, and will do this instead:

Started the kit this week, and have painted body white and applied two most challening decals. Delayed posting this just to be sure the hard part doesn't fails.
The 962 I planned to build had "interesting" design decision: clear parts were molded directly to car body. This would be fine, if there wouldn't have been injector marks in the visible clear area. There's one visible (small white spot) at bottom of wind screen in my previous start photo. Sanding the marks and polishing clear parts without causing very small cracks to plastic isn't something I want to continue now, so it's older Porsche.
Joel_W
Associate Editor New York, United States
Joined: December 04, 2010
KitMaker: 11,666 posts
Auto Modeler: 2,974 posts
Posted: Saturday, July 27, 2019 - 01:04 AM UTC
Pasi,
Excellent choice for sure. I built the Tamiya 956 earlier in the campaign, but as usual got bogged down with extra details, corrections, etc, and it took over 3 months. Straight OOB, and you should be able to crossed the finish line in time.
The White color coat really looks great. Whose paint did you use?
You've got those decals looking like the Red was painted on, which is absolutely perfect. My concern is the 3 wings.
The horizontal wing's only issue is rolling over the red to cover the leading edge and still wide enough to reach the trailing edge. I'm assuming that the bottom of the wing is white so there's no 2nd decal.
But the two vertical wings just past the rear wheels are Red on both sides. Looking at the decal sheet the 4 decals all look the same size, which means that the seam ends up on the top. This is something that I use to struggle with as more often then not I didn't get both sides to properly align.
BTW, what 962 kit had the clear glass molded to the body?
For sure I'm looking forward to your next up.
Joel
On my Workbench:
Monogram 1/24 scale 427 Shelby Cobra
Just Completed:
Beemax 1/24 scale BMW M3 E30 1992 Evolution II
Uusimaa, Finland
Joined: October 01, 2016
KitMaker: 514 posts
Auto Modeler: 44 posts
Posted: Sunday, July 28, 2019 - 02:07 AM UTC
Thanks Joel.
I did three or four passes with Tamiya white primer from rattle can, and coat of floor polish ("Future") with brush. The decals are quite OK, but there are some small wrinkles that I need to sort out.
Thanks for the heads up about the vertical wing decals.
The 962 kit is Tamiya's Repsol Brun 962C (Le Mans 1990). I think its product number is 24313.
Joel_W
Associate Editor New York, United States
Joined: December 04, 2010
KitMaker: 11,666 posts
Auto Modeler: 2,974 posts
Posted: Sunday, July 28, 2019 - 04:54 AM UTC
Quoted Text
Thanks Joel.
I did three or four passes with Tamiya white primer from rattle can, and coat of floor polish ("Future") with brush. The decals are quite OK, but there are some small wrinkles that I need to sort out.
Thanks for the heads up about the vertical wing decals.
The 962 kit is Tamiya's Repsol Brun 962C (Le Mans 1990). I think its product number is 24313.
Pasi,
Sounds like you have it pretty well under control. How are you planning to deal with those decal wrinkles?
Looking forward to your next update.
Joel
On my Workbench:
Monogram 1/24 scale 427 Shelby Cobra
Just Completed:
Beemax 1/24 scale BMW M3 E30 1992 Evolution II
Uusimaa, Finland
Joined: October 01, 2016
KitMaker: 514 posts
Auto Modeler: 44 posts
Posted: Monday, July 29, 2019 - 06:55 AM UTC
I'll try setting solutions first, and if that doesn't help then I'll cut the overflapping parts with scalpel and fix missing spots with paint. I hope to have the decals done next weekend.
Joel_W
Associate Editor New York, United States
Joined: December 04, 2010
KitMaker: 11,666 posts
Auto Modeler: 2,974 posts
Posted: Monday, July 29, 2019 - 07:35 AM UTC
Quoted Text
I'll try setting solutions first, and if that doesn't help then I'll cut the overflapping parts with scalpel and fix missing spots with paint. I hope to have the decals done next weekend.
Pasi,
Looking forward to it.
Joel
On my Workbench:
Monogram 1/24 scale 427 Shelby Cobra
Just Completed:
Beemax 1/24 scale BMW M3 E30 1992 Evolution II
AussieReg
Associate Editor #007
Victoria, Australia
Joined: June 09, 2009
KitMaker: 8,156 posts
Auto Modeler: 2,953 posts
Posted: Tuesday, July 30, 2019 - 03:17 PM UTC
You are moving along nicely with this build Pasi, the white paint and compound curve decals are a real challenge but you seem to have them under control so far!
Quoted Text
The 962 I planned to build had "interesting" design decision: clear parts were molded directly to car body. This would be fine, if there wouldn't have been injector marks in the visible clear area. There's one visible (small white spot) at bottom of wind screen in my previous start photo. Sanding the marks and polishing clear parts without causing very small cracks to plastic isn't something I want to continue now, so it's older Porsche.
I must say that I have never seen clear and coloured plastic supplied in this way. I can definitely see the white spot that you mentioned in the bottom centre of the front glass (photo posted on May 11 on page 14 of this thread). If that is a flaw in the plastic and runs all the way through there is obviously no way to polish it out. Perhaps a dead bug plastered over it to hide it? I have no doubt that you find a solution when you get back to that kit, in the meantime I'm looking forward to more progress reports on the 956.
Cheers, D
ON the bench
Revell 1/24 '53 Corvette (building as '54)
Revell 1/24 BMW 507 Coupe and Cabrio
Italeri 1/48 Me262 B-1a/U1 Nightfighter
Monogram 1/24 '57 Chevy Nomad
Dragon 1/350 USS Frank Knox DD-742
Joel_W
Associate Editor New York, United States
Joined: December 04, 2010
KitMaker: 11,666 posts
Auto Modeler: 2,974 posts
Posted: Wednesday, July 31, 2019 - 12:15 AM UTC
Pasi,
I've never seen any Tamiya or Hasegawa race car kit body have the clear molded in, so I Googled it. What I found is pictures and a review by Scott Van Aken who has been reviewing kits for nearly a million years on Modeling Madness.com, so I tend to believe what he says about the kit and the molding.
The clear glass for cockpit and front headlights come pre-glued into place that had to be done by Tamiya as their installation isn't on the instructions. And that there was a sheet of masks supplied. In theory this sounds great, but I'm willing to be that they didn't do as good of a job as you would have done, and some work is needed to finish blending them in.
Scott didn't mention if the headlights were already installed, I'm assuming that they were, but were both cavities already pre-painted Flat Black?
Joel
On my Workbench:
Monogram 1/24 scale 427 Shelby Cobra
Just Completed:
Beemax 1/24 scale BMW M3 E30 1992 Evolution II
Ontario, Canada
Joined: February 04, 2008
KitMaker: 2,507 posts
Auto Modeler: 409 posts
Posted: Thursday, August 01, 2019 - 11:05 AM UTC
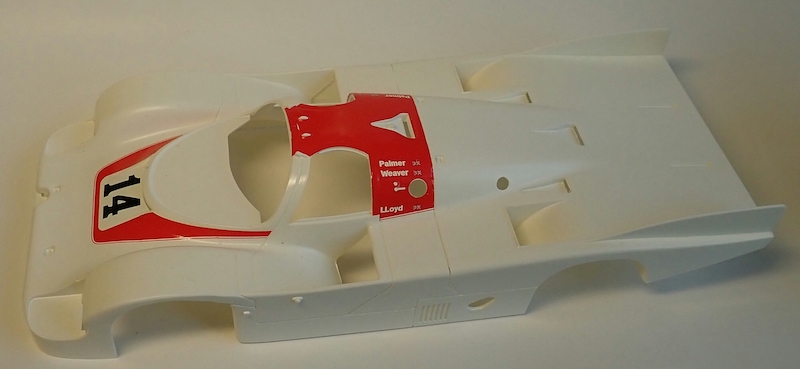
Here is an update on my build:-


Painting complete, next up detail parts and assembly.
Still have to build head light surrounds.
" The Die Hards"
43rd MIDDLESEX REGIMENT
MACHINE GUN CORPS
XXX CORP
The most effective way to do it, is to do it.
- Amelia Earhart
AussieReg
Associate Editor #007
Victoria, Australia
Joined: June 09, 2009
KitMaker: 8,156 posts
Auto Modeler: 2,953 posts
Posted: Thursday, August 01, 2019 - 01:34 PM UTC
Hi Richard.
Neat work on the trims and the main colour looks nice and clean!
Great to see this build coming together now and you are on track for the finish line.
Cheers, D
ON the bench
Revell 1/24 '53 Corvette (building as '54)
Revell 1/24 BMW 507 Coupe and Cabrio
Italeri 1/48 Me262 B-1a/U1 Nightfighter
Monogram 1/24 '57 Chevy Nomad
Dragon 1/350 USS Frank Knox DD-742
Joel_W
Associate Editor New York, United States
Joined: December 04, 2010
KitMaker: 11,666 posts
Auto Modeler: 2,974 posts
Posted: Friday, August 02, 2019 - 12:44 AM UTC
Richard,
I'll 2nd what D said.
The Flat Black trim really stands out from the Chocolate Brown so it has to be tack sharp everywhere, and you sure nailed it. The paint looks very consistent and smooth with a nice gloss to it.
I'm really looking forward to seeing your build power off the assembly line.
Joel
On my Workbench:
Monogram 1/24 scale 427 Shelby Cobra
Just Completed:
Beemax 1/24 scale BMW M3 E30 1992 Evolution II
Ontario, Canada
Joined: February 04, 2008
KitMaker: 2,507 posts
Auto Modeler: 409 posts
Posted: Friday, August 02, 2019 - 09:17 AM UTC
Thank you Damian and Joel for you encouragement!
The trim was masked with .002"Frisket film.
I have punched out polystyrene discs for the head light bezels:-
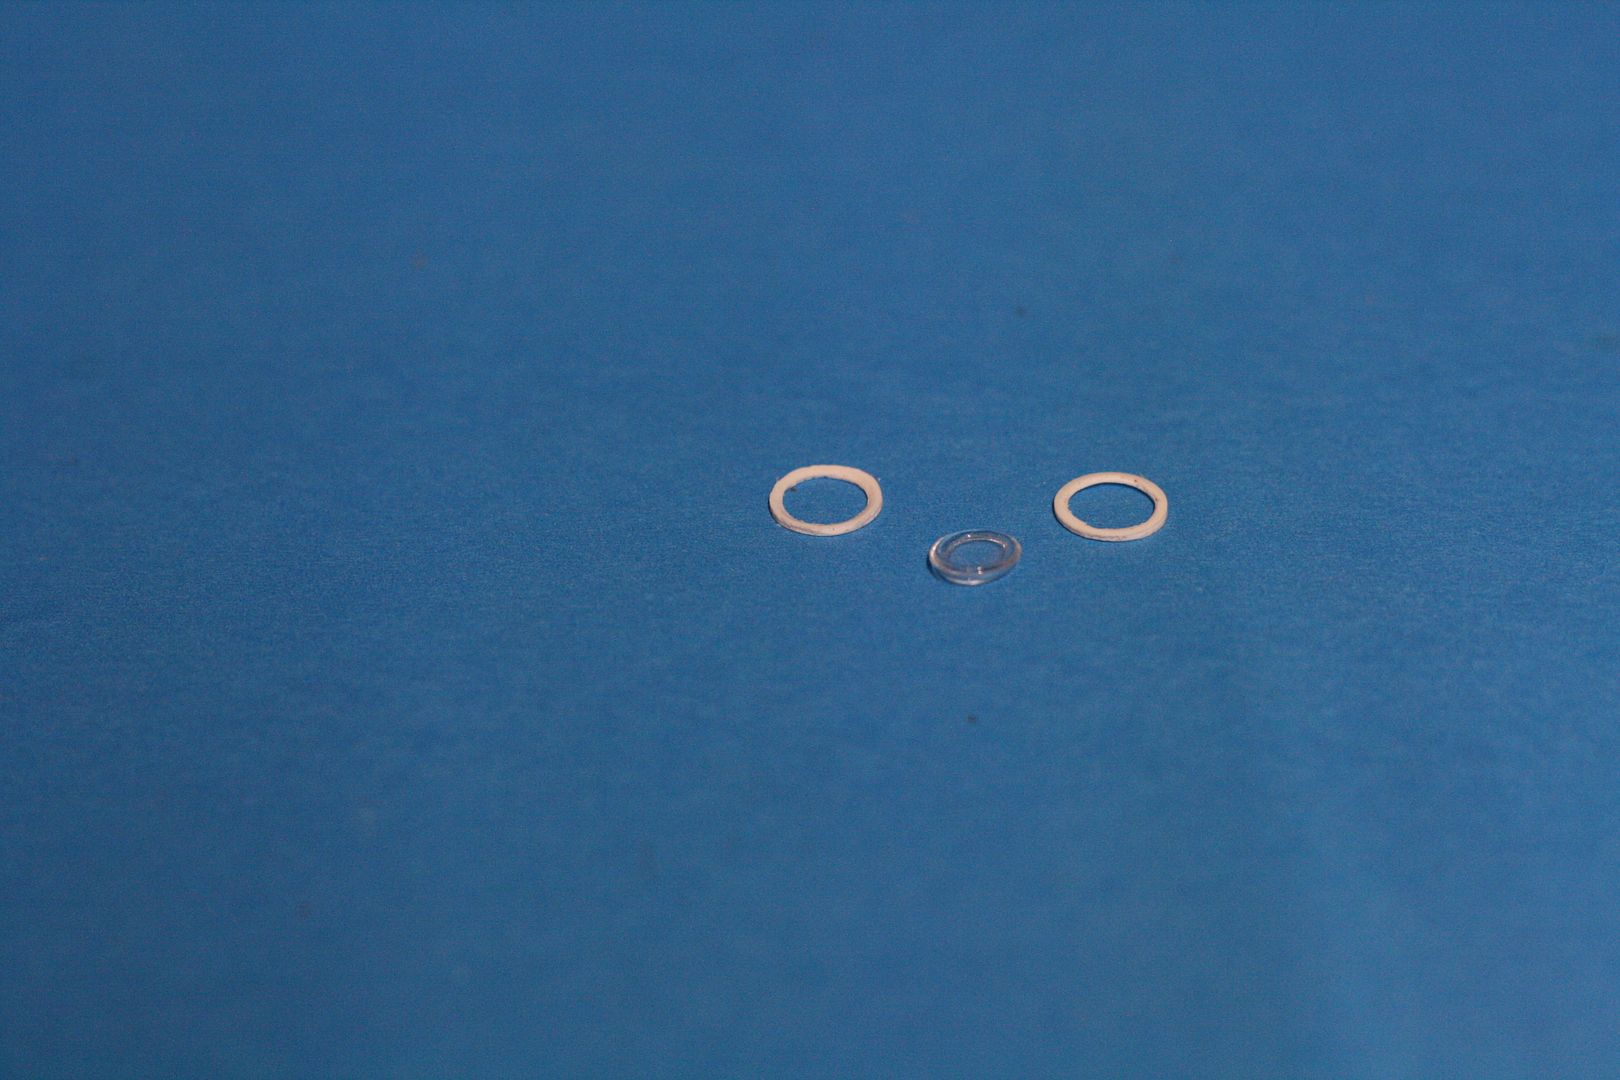

Not sure why the right bezel looks thicker in the photo but they are both the same size!
Some sanding of the bezels and then prime and paint brown.
" The Die Hards"
43rd MIDDLESEX REGIMENT
MACHINE GUN CORPS
XXX CORP
The most effective way to do it, is to do it.
- Amelia Earhart
Joel_W
Associate Editor New York, United States
Joined: December 04, 2010
KitMaker: 11,666 posts
Auto Modeler: 2,974 posts
Posted: Saturday, August 03, 2019 - 01:53 AM UTC
Richard,
I'm really super impressed with your scratch bezels. They look absolutely perfect.
Joel
On my Workbench:
Monogram 1/24 scale 427 Shelby Cobra
Just Completed:
Beemax 1/24 scale BMW M3 E30 1992 Evolution II
Ontario, Canada
Joined: February 04, 2008
KitMaker: 2,507 posts
Auto Modeler: 409 posts
Posted: Saturday, August 03, 2019 - 07:22 AM UTC
I have sanded a wood dowel to fit the bezel and used a battery drill to spin the bezel while sanding:-

In a few months I hope to buy a small Metalworking lathe which will help with scratch building parts
" The Die Hards"
43rd MIDDLESEX REGIMENT
MACHINE GUN CORPS
XXX CORP
The most effective way to do it, is to do it.
- Amelia Earhart
Uusimaa, Finland
Joined: October 01, 2016
KitMaker: 514 posts
Auto Modeler: 44 posts
Posted: Saturday, August 03, 2019 - 06:59 PM UTC
About the 962C and its clear parts: all major clear parts were attached to body. I think windshield spot would mostly be hidden by windshield wipers. Not sure if the headlight spots would be under decals, and if I remember correctly the interior was separate part glued from inside.
Side windows had very noticeable spots at top of the windows. I think it's possible that these were hidden under decals in earlier versions of the kit, but not with this one. Can't really check, because I have trashcan of doom instead of shelf of doom for unfinished kits...
Back to 956.
Most of the decals applied, but not done (and it's easier to place long decals in segments):
I hope Tamiya's LP50 (same as TS49 but in bottle) is close enough match for the decal color.
Joel_W
Associate Editor New York, United States
Joined: December 04, 2010
KitMaker: 11,666 posts
Auto Modeler: 2,974 posts
Posted: Sunday, August 04, 2019 - 04:27 AM UTC
Richard,
Now that's impressive. My Dremel died so I don't even have that option, but I've never thought about a mini lath. Now that's food for thought, and I'm sure that there's a ton of instructional videos on You Tube to get me past the basics.
Joel
On my Workbench:
Monogram 1/24 scale 427 Shelby Cobra
Just Completed:
Beemax 1/24 scale BMW M3 E30 1992 Evolution II


