The Garage
For general automotive modeling or non-modeling topics.
Blue Oval - Ford Motor Co. GB Build Thread
JClapp
#259
_VISITCOMMUNITY
Massachusetts, United States
Joined: October 23, 2011
KitMaker: 2,265 posts
Auto Modeler: 13 posts
Posted: Friday, October 04, 2019 - 11:02 AM UTC

Quoted Text

Thanks for the pic Joel, that tickles a 60 year old memory about my dad's '51 Ford. I remember the air filter housing being about the same size and shape. Should it have had a small film of oil in it? Or was Ole Mable in much worse shape than I knew?


talk of jogging memories - yes, the oil bath air cleaner had a trough with an inch or so of 30 weight oil in it and the filter element wicked it up.
My '64 F250 had that item on a 223 cu in straight 6. Ex B&M railroad, that beast had a 4.8 rear end and 1 ton rear springs.
JClapp
#259
_VISITCOMMUNITY
Massachusetts, United States
Joined: October 23, 2011
KitMaker: 2,265 posts
Auto Modeler: 13 posts
Posted: Friday, October 04, 2019 - 11:15 AM UTC

Quoted Text

Jonathan.
Interesting conversion. Looks very doable. I'm assuming that the interior is exactly the same.

Is the entire kit Bass, or is there plastic parts as well? I'd be lost trying to work just with Brass.

Joel


Alas, there is not a gram of brass in this kit. The word brass should be in quotes. make no mistake, this kit is all plastic. there is a sprue of brass colored plastic which will have to be dealt with.


Dixon66
_VISITCOMMUNITY
New Hampshire, United States
Joined: December 12, 2002
KitMaker: 1,500 posts
Auto Modeler: 645 posts
Posted: Friday, October 04, 2019 - 11:28 AM UTC
Looking good so far all of you.

Nick, I've got that exact kit on the shelf. I may tackle it one day.

Nothing accomplished today on the Raptor except for drilling out the tow hooks on the front of the chassis, they were represented by simple tabs on the kit. Also drilled out the tow ball hole on the rear step bumper.

About the GB Bronco though, a '32 Ford 5 Window Coupe kit was delivered today. It will be a donor for the EFI intake and headers. Also found that the brake cylinder and booster included in it is exactly the one I need for the Bronco, will need to scratch build an angled mount and mechanism for it though. The 1:1 scale one angles to the left to clear the engine.
Szmann
_VISITCOMMUNITY
Netherlands Antilles
Joined: September 02, 2014
KitMaker: 1,977 posts
Auto Modeler: 1,371 posts
Posted: Friday, October 04, 2019 - 02:07 PM UTC

Quoted Text


Coming along very nicely there Gabriel.


Thanks, David! Truth be said, the kit lets too little room for error.


Quoted Text


Excellent progress Gabriel, you are working fast on this one!

Thanks, D.! I have to make up for my delay on Mustang


Quoted Text


Well Henry is not too happy with my tailoring skills (sprue-goo), and definitely angry that the other two turned up back at work legless after a long lunch, but he is happy with the progress on the panel work. The two halves of the main body are together now, and as Gabriel said, a bit more sanding and filling will pull it into shape nicely.


You really make me curious to try that sprue goo for once. After the multiple failures with "dedicated products", I'll try everything, including goo (I didn't forget Joel's advice to use epoxy and I have it ready at hand).


Quoted Text


Gabriel,
Your solution for the exhaust is perfect. Way better then drilling it out. The Qtips that I buy are a rolled paper product, so they're solid. I"m thinking that you're using the more expensive ones from the cosmetics dept. or even the Tamiya ones.


Well, I would have preferred the drilling solution if won't have been for the ejector mark on the side of the pipe, on a potential visible area. I bought by mistake the paper rolled q-tips as well, and I've learnt to peel my eyes before buying. I buy them from the local neighborhood store, "The Chinese", as the block's slang goes.


Quoted Text


Nicely done on the priming and painting of the chassis. We both use Mr. Hobby's #1500 filler/primer. But where we differ is in the thinning for AB'ing. I've found that my usual 1:1 ends up way to thin, requiring a lot of super lite coats, especially if I'm also trying to cover any putty work. I've found that for me 3 parts primer to 2 parts thinner works perfectly. I did step down from my 5mm needle to a 3.5mm needle to help control the flow.
Joel


When I'm airbrushing with my 0.5mm Evolution, maybe I go less than 50%, but for my 0.15mm setup the half / half seems to be the right ratio. It is true, I have to apply more than a single coat, but with that fine setup the primer dries so fast that literally I just keep spinning the part to be painted until is completely covered. I prefer to use my fine setting A/B when dealing with delicate detail like on the chassis here for fear not to drench it as I am expecting at least 3 coats if not 5 (one or two primer, one or two of base color, one of two of clear).

Mike, I'm glad to see you overcome the bent chassis problem. You have your way open wide now! Good job!

Jonathat what a nice barn find you have in there! Odd ball, but interesting nonetheless.

Rowan, you have discovered one of the auto modelling "perks": it is rather uncommon for engine to fit its mounts, and the same goes for the exhaust manifolds versus exhaust pipes. In that particular day these two pairs fit without effort, you should play the lottery as well! And, if by divine intervention, the radiator fan it is also parallel with the radiator, then Bill Gates will hand out his fortunes to you - no questions asked.

Nick, stunning as usual. You have to teach us how to do those shock absorbers, because almost all manufacturers get 'em wrong in plastic. That will be very helpful indeed. As for the scratch build lightened McPerson supports , I not even dare to dream of!

UPDATE - day of too little to late
I needed to run circles in town today and I lost very much productive time in bumper to bumper traffic, so I reach home too late. The time left was too little:

I sprayed the exhaust pipe with Vallejo Air RLM01 Silber. I'm not sure yet if I'm going to let it that way or I'm going to spray another metallic on the muffler:


The sway bar's links are coming as separate pieces and I have used the chassis as a jig to make sure they dry in the right position (the wheels aren't steerable anyway). I took the opportunity to test the fitting of steering assembly as well and it does fit without an issue (See that, AMT?):


And these are the pieces yet to be added to the chassis' frame before the engine / tranny: wheels, brake covers, shock absorbers and the spare wheel support


Since I'm going to do the brake lines this time, I added to the brake covers the connectors (or nipples what-ya-callit I don't know), one for each front wheel and two for the rear ones. Later have trimmed them down to the "specs".


All these are primed by now, but I have to go back over them and clean more seam lines, molding lines and such. As I said, too little

Gabriel
md72
#439
_VISITCOMMUNITY
Washington, United States
Joined: November 05, 2005
KitMaker: 4,950 posts
Auto Modeler: 555 posts
Posted: Friday, October 04, 2019 - 05:13 PM UTC
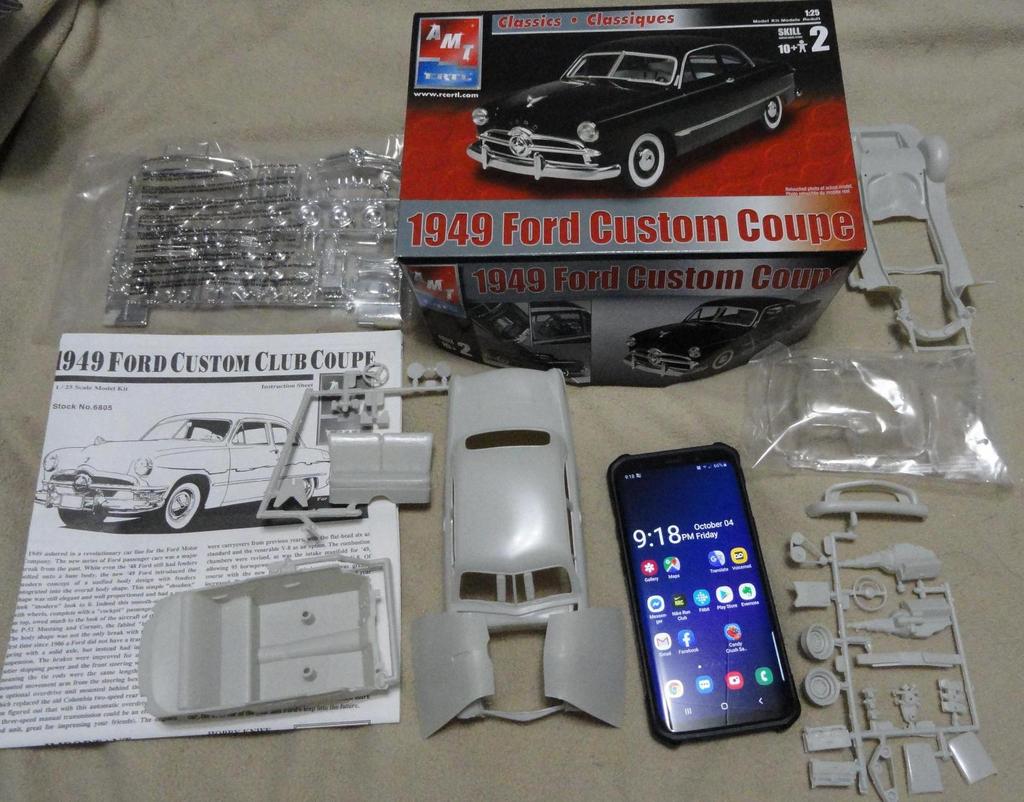
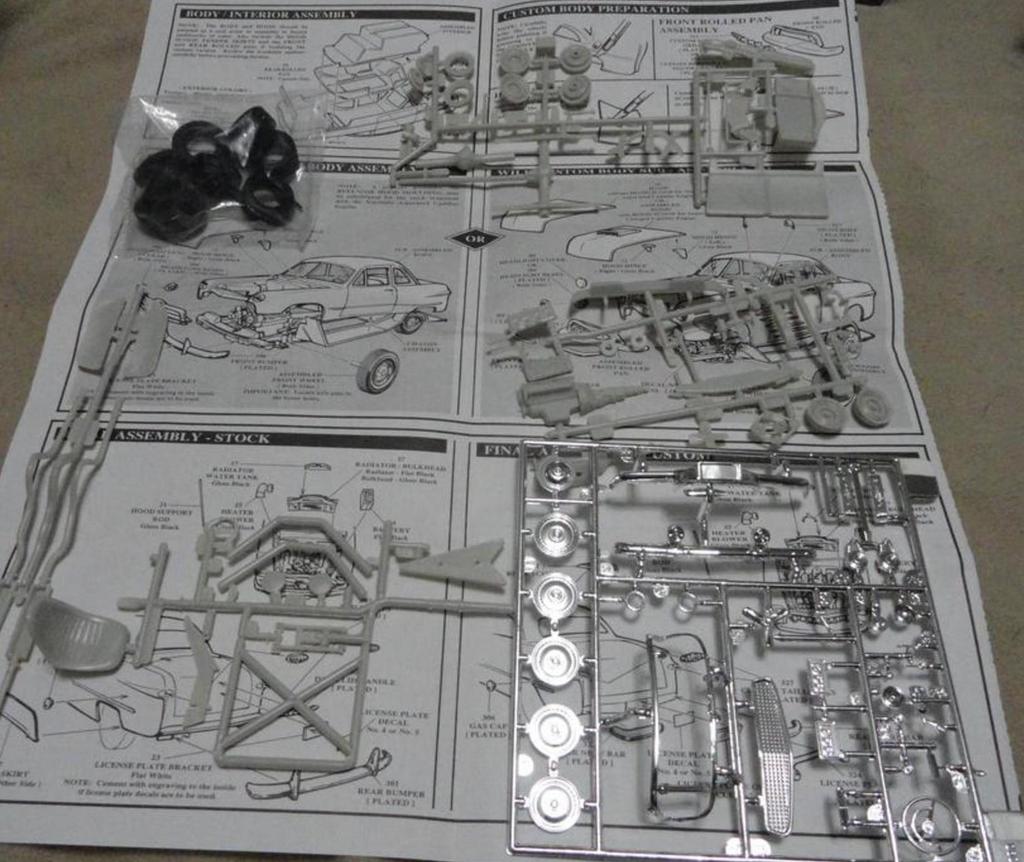
Here's my soon to be 1951 Ford Standard Coupe.


The good news is that the customizing portion of the kit includes a hood (OK Rowan, a bonnet) with a straight bottom edge so I don't have to fill and trim that big bullet nose. The bad news is there is no really good grill option without the bullet nose. The custom kit includes an insert that fits into the empty space and a set of horizontal bars that might fill the void and not look too obnoxious. All I really remember about the grill is the bullet points, and not what's behind them. The second photo includes the donor chrome bumper from a '57 T-Bird for the bullets.

Now to track down Some midnight blue paint and a set of Massachusetts license plates.
Dixon66
_VISITCOMMUNITY
New Hampshire, United States
Joined: December 12, 2002
KitMaker: 1,500 posts
Auto Modeler: 645 posts
Posted: Saturday, October 05, 2019 - 12:20 AM UTC

Quoted Text


Now to track down Some midnight blue paint and a set of Massachusetts license plates.


Print them yourself.

http://acme.com/licensemaker/
Joel_W
Staff MemberAssociate Editor
AUTOMODELER
_VISITCOMMUNITY
New York, United States
Joined: December 04, 2010
KitMaker: 11,666 posts
Auto Modeler: 2,974 posts
Posted: Saturday, October 05, 2019 - 12:53 AM UTC
Jonathan,
Thanks for the clarification. I wonder why they used Brass in the name? Makes little to no sense to me. I'm sure that it would have turned away a good many modelers who didn't want to try and build with Brass. Yet, as you've pointed out, there's just some plastic Brass plated parts. Maybe the idea was that it would actually sell more kits if builders new that the that real brass parts were duplicated with plating, so no need to try and paint them.

Joel
Joel_W
Staff MemberAssociate Editor
AUTOMODELER
_VISITCOMMUNITY
New York, United States
Joined: December 04, 2010
KitMaker: 11,666 posts
Auto Modeler: 2,974 posts
Posted: Saturday, October 05, 2019 - 01:03 AM UTC
Nick,
I just love your builds for a few reasons. 1st is your decision to upgrade, scratch, or use AM parts of various media to detail where you feel the build needs it. 2nd, your scratch building skills that make those upgrades look so much better, and how easy you make the whole process look. 3rd is the push your giving me to stop taking the easy way out all the time, even though my goal is more of the best display model I can create.

I'm just loving how you dealt with the shocks and shock towers. Believe me, I couldn't do that in the remaining years I have left.

Needless to say, you can tell just how much I'm already enjoying your build.

Joel
Joel_W
Staff MemberAssociate Editor
AUTOMODELER
_VISITCOMMUNITY
New York, United States
Joined: December 04, 2010
KitMaker: 11,666 posts
Auto Modeler: 2,974 posts
Posted: Saturday, October 05, 2019 - 01:08 AM UTC

Quoted Text

Moving along with the service truck,i encountered a warp in the frame but after some blow dryer action i was able to straighten things out.
Now its on to the engine assembly


Mike,
Nice job on straightening out the chassis. I enlarged the picture by clicking on it, and the frame does indeed look straight without a twist that I can see.

Just how did you go about it using a hair dryer? I would have worried that I'd applied to much heat to a much larger area then necessary, and ended up doing more damage then good. Actually, that's a true story from years ago. Since then, I've only tried the twist and pray method that takes a long time, and only works every so often.

Joel
jimb
_VISITCOMMUNITY
New York, United States
Joined: August 25, 2006
KitMaker: 2,539 posts
Auto Modeler: 1,405 posts
Posted: Saturday, October 05, 2019 - 01:12 AM UTC

Quoted Text

Now to track down Some midnight blue paint and a set of Massachusetts license plates.


Here is another good resource for license plates: The License Plate Shack

Jim
AussieReg
Staff MemberAssociate Editor
AUTOMODELER
#007
_VISITCOMMUNITY
Victoria, Australia
Joined: June 09, 2009
KitMaker: 8,156 posts
Auto Modeler: 2,953 posts
Posted: Saturday, October 05, 2019 - 01:36 AM UTC
The start of Day 5 and we are already pushing towards 1000 views and 5 pages of posts. This is great! A real testament to the variety of kits and the quality of work that you guys are putting forward, keep it up!

Cheers, D
Joel_W
Staff MemberAssociate Editor
AUTOMODELER
_VISITCOMMUNITY
New York, United States
Joined: December 04, 2010
KitMaker: 11,666 posts
Auto Modeler: 2,974 posts
Posted: Saturday, October 05, 2019 - 01:37 AM UTC
Gabriel,
The front suspension looks pretty darn good. Looking forward to seeing how you detail the brake system.
Joel
Joel_W
Staff MemberAssociate Editor
AUTOMODELER
_VISITCOMMUNITY
New York, United States
Joined: December 04, 2010
KitMaker: 11,666 posts
Auto Modeler: 2,974 posts
Posted: Saturday, October 05, 2019 - 01:44 AM UTC
Mark,
Looking forward to following your build, as the 1949 body style is truly an Iconic one for Ford in the post WWII era.

Joel
AussieReg
Staff MemberAssociate Editor
AUTOMODELER
#007
_VISITCOMMUNITY
Victoria, Australia
Joined: June 09, 2009
KitMaker: 8,156 posts
Auto Modeler: 2,953 posts
Posted: Saturday, October 05, 2019 - 02:34 AM UTC
First application of sprue goo to the body joins, this will be left for a day or so to cure and then a second and possible third application as required. I prefer to use the sprue goo for this type of fix as it is TET based and will actually bond and strengthen the join as well as filling.


Benefit of close digital photos, I didn't see that little round recess under the join line in the second image until now! I will fill that with the next round of goo.

Another very handy use for the goo is to fill the nasty little ejector pin holes. A small drop off the thin brush into the hole will self-level and fill the hole, then I use the AK Fibre Pen to spot sand and tidy them up.


Cheers, D
Joel_W
Staff MemberAssociate Editor
AUTOMODELER
_VISITCOMMUNITY
New York, United States
Joined: December 04, 2010
KitMaker: 11,666 posts
Auto Modeler: 2,974 posts
Posted: Saturday, October 05, 2019 - 02:44 AM UTC
D,
The repair is really looking quite good. I've never used the Goo method, but it has a lot going for it. I've used CA thick and Med for fill jobs which seems to do about the same thing, except that it doesn't bond with the plastic, so I'm not sure if it can really be a fix that will last the life of the model.

I think it's time that I make some of my own Goo and give it a try.

Joel
AussieReg
Staff MemberAssociate Editor
AUTOMODELER
#007
_VISITCOMMUNITY
Victoria, Australia
Joined: June 09, 2009
KitMaker: 8,156 posts
Auto Modeler: 2,953 posts
Posted: Saturday, October 05, 2019 - 02:53 AM UTC

Quoted Text

D,
The repair is really looking quite good. I've never used the Goo method, but it has a lot going for it. I've used CA thick and Med for fill jobs which seems to do about the same thing, except that it doesn't bond with the plastic, so I'm not sure if it can really be a fix that will last the life of the model.

I think it's time that I make some of my own Goo and give it a try.

Joel


Joel, I really like the stuff and use it on every build. It is so easy to make and to adjust the consistency by adding a drop of TET or a few more sticks of sprue. Most online discussions recommend Tamiya or Hasegawa sprue as the best, but I haven't had any problems so far with the old Monogram plastic and I like the black as it stands out from the kit plastic so I can see it more clearly as I clean it up. I like mine about the consistency of thick honey.

I think that I have been using this jar for about 10 years now.

Just wait until a jar of TET is down to about 1/4 full and throw a pile of sprue in, let it sit and watch the magic happen!

Cheers, D
Joel_W
Staff MemberAssociate Editor
AUTOMODELER
_VISITCOMMUNITY
New York, United States
Joined: December 04, 2010
KitMaker: 11,666 posts
Auto Modeler: 2,974 posts
Posted: Saturday, October 05, 2019 - 02:59 AM UTC
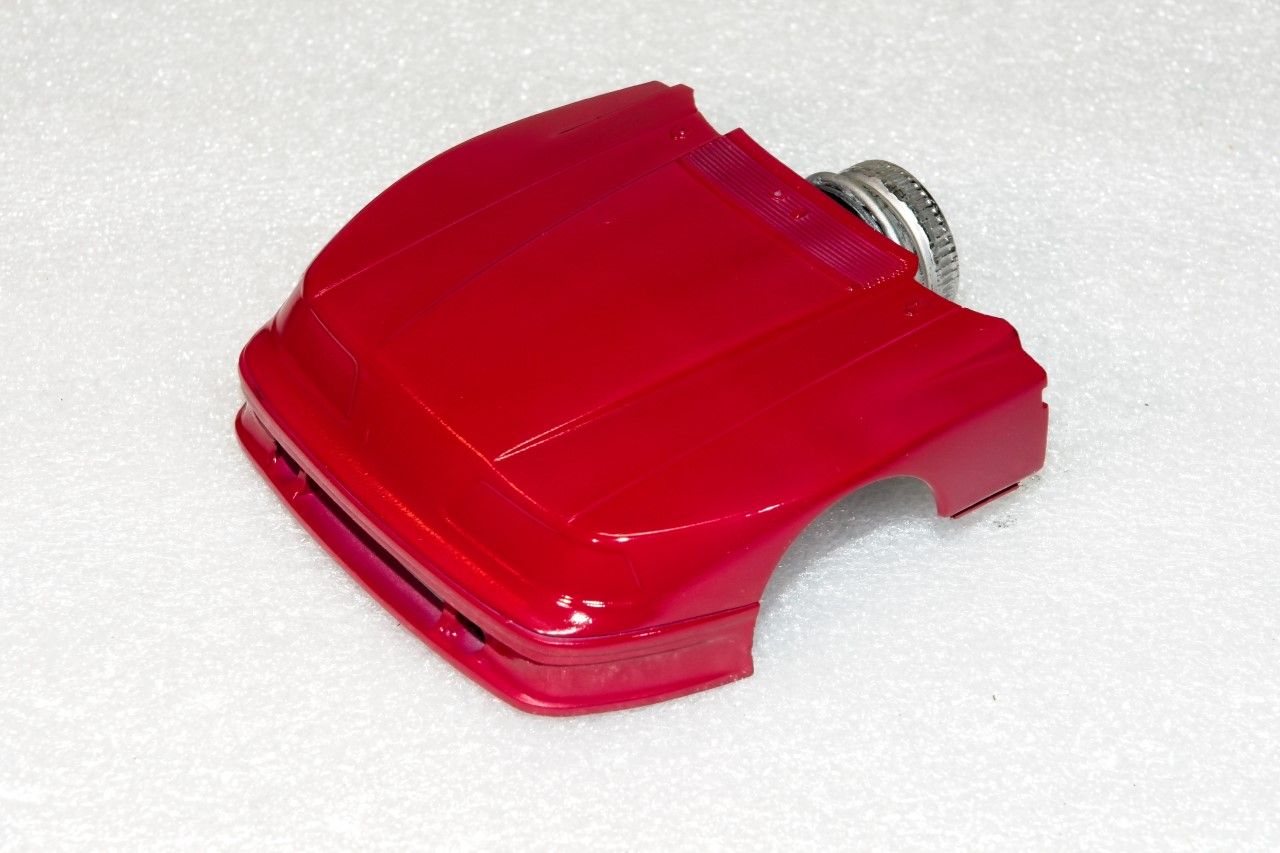
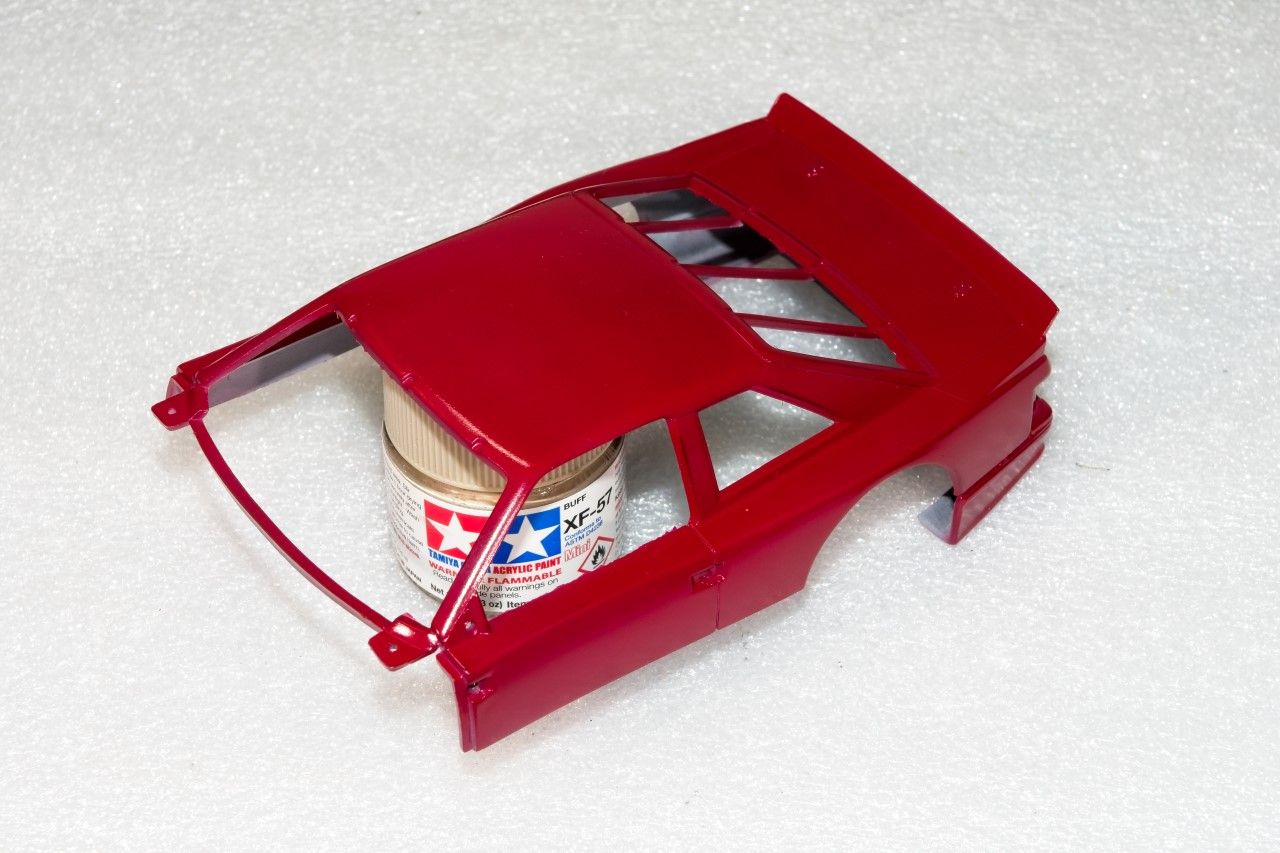
Last post I had primed the two body shell sections after gluing on the front clip. So next up is the color coat.

Since I'm modeling the Folger's Mustang, it's a North American sponsor for a North American series, and neither Gravity nor Zero have the exact color. I'm sure that I could have used Ferrari Rosso Corsa darker Red over Gray primer, and gotten very, very close. Instead I bought the color from MCW paints who specializes in American car colors, both for street and track. Their #2052 Bright Red is their match for the darker Red Folger's color.

The paint is auto lacquer pre-thinned in a 2 oz glass bottle. For the application I used a .5mm needle setup @ a flow rate of 16-18 psi. A few tack coats with a few min in between each. Then I started with Wet coats with 5 min in between each coat. I lost count of how many wet coats I needed to apply for full, even coverage, but the jar is almost empty. Strange, but I don't use anywhere this much paint with either Gravity or Zero paints that are pre-thinned to the same consistency. Maybe it's the color that was the issue.

After the mega session I put both shell halves in my drying container, and every hr. opened the top to vent it. This morning I removed the masking tape, and checked the finish. It, like all my paint jobs will need rubbing out, but looks smoother then usual. I'll give the paint a min of 3 full days to cure before working on the shells.


As usual, the goal is to prepare the shell for decaling at this stage, not to create a super gloss shine. That comes after the decaling is finished. Then there's a lot of detail including screens, and latches that needs to be added, plus detail painting.

Joel
AussieReg
Staff MemberAssociate Editor
AUTOMODELER
#007
_VISITCOMMUNITY
Victoria, Australia
Joined: June 09, 2009
KitMaker: 8,156 posts
Auto Modeler: 2,953 posts
Posted: Saturday, October 05, 2019 - 03:10 AM UTC
Joel, that red tone looks superb and like you said, the finish is really nice before you even get started on the sanding!

Cheers, D
Joel_W
Staff MemberAssociate Editor
AUTOMODELER
_VISITCOMMUNITY
New York, United States
Joined: December 04, 2010
KitMaker: 11,666 posts
Auto Modeler: 2,974 posts
Posted: Saturday, October 05, 2019 - 03:49 AM UTC

Quoted Text

Joel, that red tone looks superb and like you said, the finish is really nice before you even get started on the sanding!

Cheers, D


Thanks D for the huge thumbs up.

Rather then my usual 3,000 sponge rub that I always seem to rub through the color coat in places, I'm going to see if I can start with 6,000 or even 8,000 and then 12,000. Just need to get it smooth enough for decaling. And I don't have enough paint for more then a few touch ups. I sure hate to have to order another bottle, not to mention the 2 week wait as all his colors are custom mixed. So the pressure's already on.

Joel
md72
#439
_VISITCOMMUNITY
Washington, United States
Joined: November 05, 2005
KitMaker: 4,950 posts
Auto Modeler: 555 posts
Posted: Saturday, October 05, 2019 - 04:18 AM UTC
@ David and Jim, thanks for the tips on the license plates. The kit only comes with a pair of '49 Ohio plates, not exactly right for a '51. Since I grew up with this car in New Jersey and Massachusetts, it really needs one of those.

@ Joel, I love you man, but my finish is going to be the exact opposite of yours. One of my most enduring memories of this car is that if you rubbed your fingers along the body, you got a blue-black residue on them. My plan is to paint it with a mixture of a Tamiya gloss Midnight Blue and Flat base to get a heavily weathered look.

If I can't track down the right Tamiya color, does anyone know if Tamiya's Flat base will work with Mr. Color's C series of paints? They have something that they claim is Midnight Blue.

@D thanks for the sprue goo recipe. I wondered why it was such a strange color. I've been using acrylic fillers lately, Perfect Plastic Putty and Artist's modeling paste. Easy clean up but they don't always bond well.
Dixon66
_VISITCOMMUNITY
New Hampshire, United States
Joined: December 12, 2002
KitMaker: 1,500 posts
Auto Modeler: 645 posts
Posted: Saturday, October 05, 2019 - 05:58 AM UTC

Quoted Text

I wonder why they used Brass in the name?


Joel, They are considered "Brass Era" cars, hence the name use. The red came out excellent.


Quoted Text

Here is another good resource for license plates: The License Plate Shack

Jim


Thanks for that link Jim, bookmarked.

Mark, Where in Mass did you grow up?


md72
#439
_VISITCOMMUNITY
Washington, United States
Joined: November 05, 2005
KitMaker: 4,950 posts
Auto Modeler: 555 posts
Posted: Saturday, October 05, 2019 - 06:03 AM UTC
I thought about the brass era stuff too. Isn't there also a part of model railroading that collects / builds locomotives using brass. Wonder if they were trying to reach out to that group as well.

David, the license plate shack might work out OK, they have a '59 plate that could work. The other place only had a '66 (that I could customize) but the '51 was gone by 1962.

--EDIT--
Sorry I missed your question earlier, I grew up in Westfield, in the western part of the state.
Merlin
Staff MemberSenior Editor
AEROSCALE
#017
_VISITCOMMUNITY
United Kingdom
Joined: June 11, 2003
KitMaker: 17,582 posts
Auto Modeler: 388 posts
Posted: Saturday, October 05, 2019 - 08:20 AM UTC
Hi again

Some exciting progress already! Great work all 'round.

@ Joel - Many thanks for the reference shot. It'll certainly make things easier if I go with the kit's filter.

I've got the day off work tomorrow, so I'll hopefully be able to post a progress report soon.

All the best

Rowan
Joel_W
Staff MemberAssociate Editor
AUTOMODELER
_VISITCOMMUNITY
New York, United States
Joined: December 04, 2010
KitMaker: 11,666 posts
Auto Modeler: 2,974 posts
Posted: Saturday, October 05, 2019 - 08:45 AM UTC

Quoted Text

Hi again

Some exciting progress already! Great work all 'round.

@ Joel - Many thanks for the reference shot. It'll certainly make things easier if I go with the kit's filter.

I've got the day off work tomorrow, so I'll hopefully be able to post a progress report soon.

All the best

Rowan


Rowan,
Sure hope that the day off, actually pans out for you.
Joel
Dixon66
_VISITCOMMUNITY
New Hampshire, United States
Joined: December 12, 2002
KitMaker: 1,500 posts
Auto Modeler: 645 posts
Posted: Sunday, October 06, 2019 - 01:06 AM UTC

Quoted Text

Sorry I missed your question earlier, I grew up in Westfield, in the western part of the state.


Grew up in North Andover in the eastern part of the state. My brother graduated from Westfield State College so I am familiar with the area a bit.

Jim was the one that posted up the license plate shack one, my link was the ACME one.