

Great progress report Gabriel! I love the silky-smooth finish you have achieved on the chassis and drive train so far.
Cheers, D


Go to automodeler.com for the current dynamic site!
The Garage
For general automotive modeling or non-modeling topics.
For general automotive modeling or non-modeling topics.
Hosted by Jim Starkweather
Blue Oval - Ford Motor Co. GB Build Thread

AussieReg

#007

Joined: June 09, 2009
KitMaker: 8,156 posts
Auto Modeler: 2,953 posts

Posted: Friday, October 11, 2019 - 01:41 PM UTC


md72

#439

Joined: November 05, 2005
KitMaker: 4,950 posts
Auto Modeler: 555 posts

Posted: Friday, October 11, 2019 - 04:29 PM UTC
Well, this site has failed me.
There is no emojii with eyes as big as saucers to show how amazed I am with this offer. Some guy halfway around the world, has no idea who I am, is willing to help me on a harebrained quest. Thanks Gabriel, PM is on the way.
Quoted Text
Mark, I can do the shield for you - 3D design and print. If you are interested, please PM me.
There is no emojii with eyes as big as saucers to show how amazed I am with this offer.
Some guy halfway around the world, has no idea who I am, is willing to help me on a harebrained quest. Thanks Gabriel, PM is on the way. 

Joel_W
Joined: December 04, 2010
KitMaker: 11,666 posts
Auto Modeler: 2,974 posts

Posted: Saturday, October 12, 2019 - 01:06 AM UTC
Gabriel,
The chassis, wheels/tires look fantastic. I really love how once again you used various shades of Black and flat to Gloss to add interest and depth to your build.
Joel
The chassis, wheels/tires look fantastic. I really love how once again you used various shades of Black and flat to Gloss to add interest and depth to your build.
Joel

Joel_W
Joined: December 04, 2010
KitMaker: 11,666 posts
Auto Modeler: 2,974 posts
Posted: Saturday, October 12, 2019 - 01:07 AM UTC
Mark,
You're in excellent hands with Gabriel on getting those Ford badges made.
Joel
You're in excellent hands with Gabriel on getting those Ford badges made.
Joel
Joel_W
Joined: December 04, 2010
KitMaker: 11,666 posts
Auto Modeler: 2,974 posts
Posted: Saturday, October 12, 2019 - 06:18 AM UTC
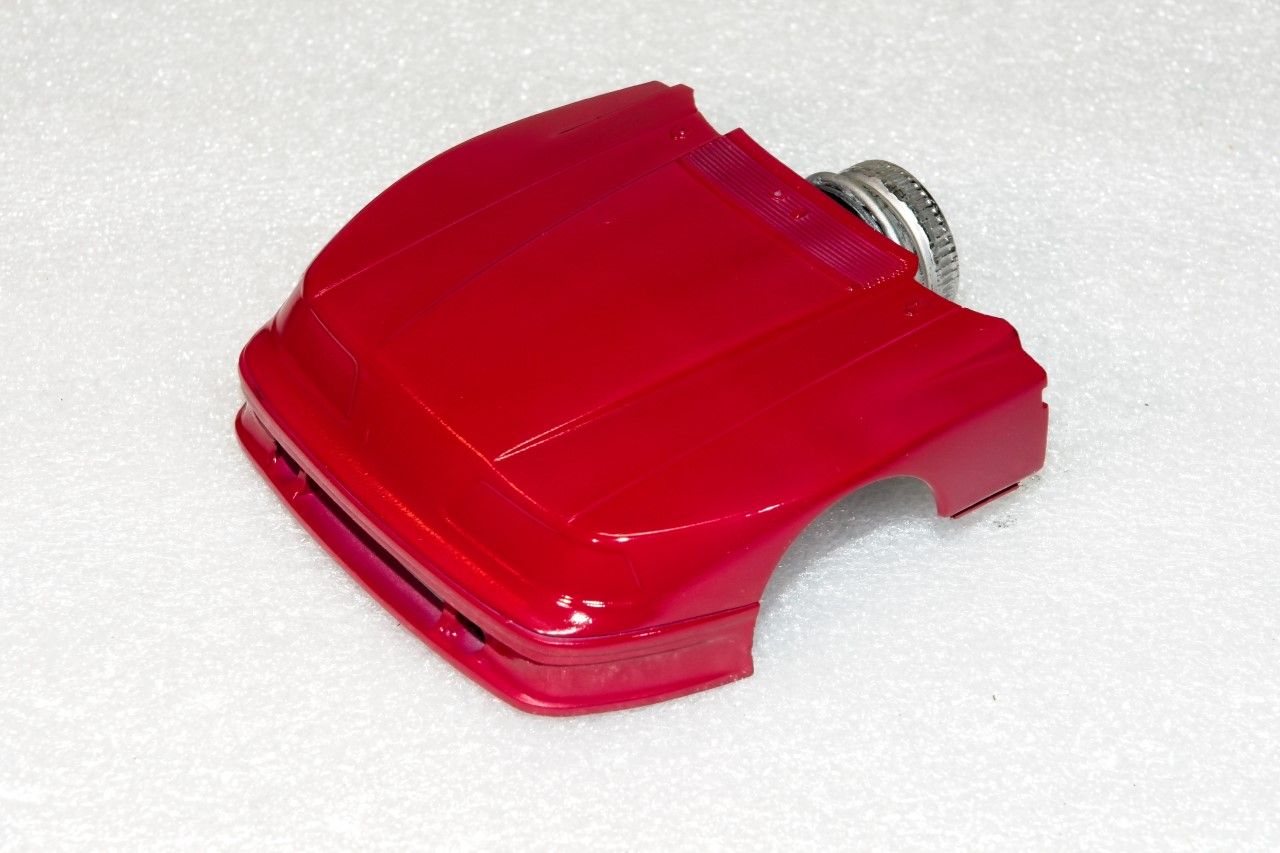
Ok guys, I have to confess that I really screwed up this time but good. My official build for this GB was the Roush Ford Folger's GTO Mustang. The Revell kit that I was able to buy was the Roush JPS Mustang. I just assumed that it was the same body style for the run of Mustangs that Roush Racing fielded. Well, the body isn't the
SAME
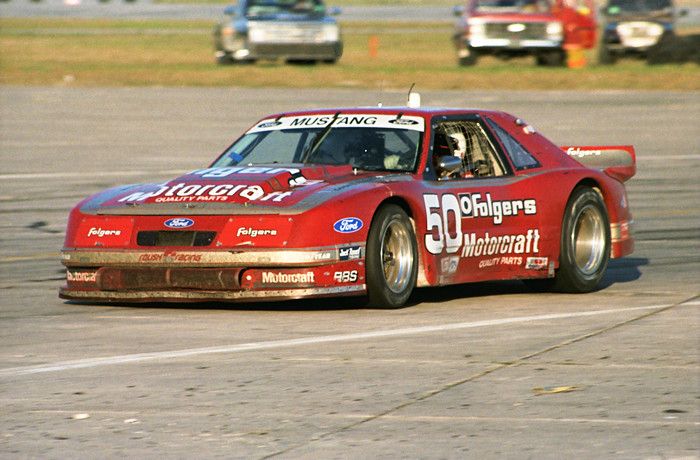
look very closely at the front clip and notice that there is a opening between the two headlights. Now carefully look at the rear wing, it's what they called the Whale Tail as it's a huge scoop.
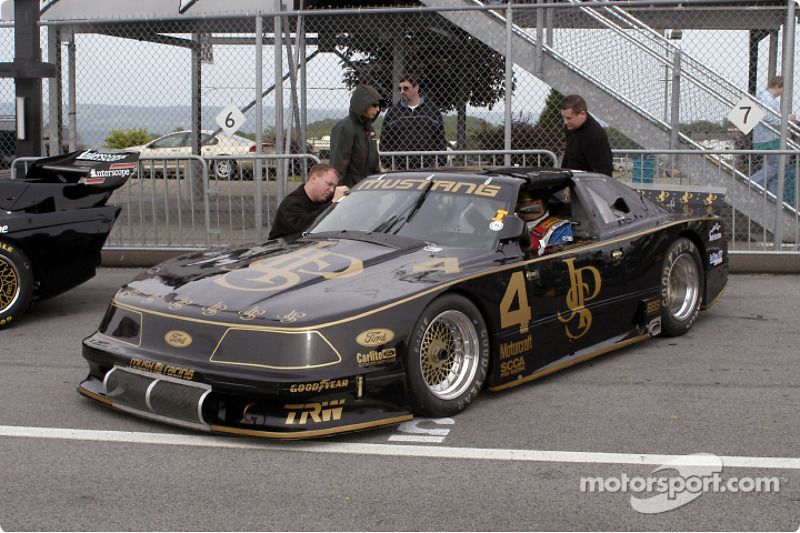
Now here's the JPS Mustang. There's no vent between the headlights, and the tail is just a straight spoiler. There are a few other differences, but enough so that one can't be modeled from the other with just paint and decals. There's also some differences in the pit as well.
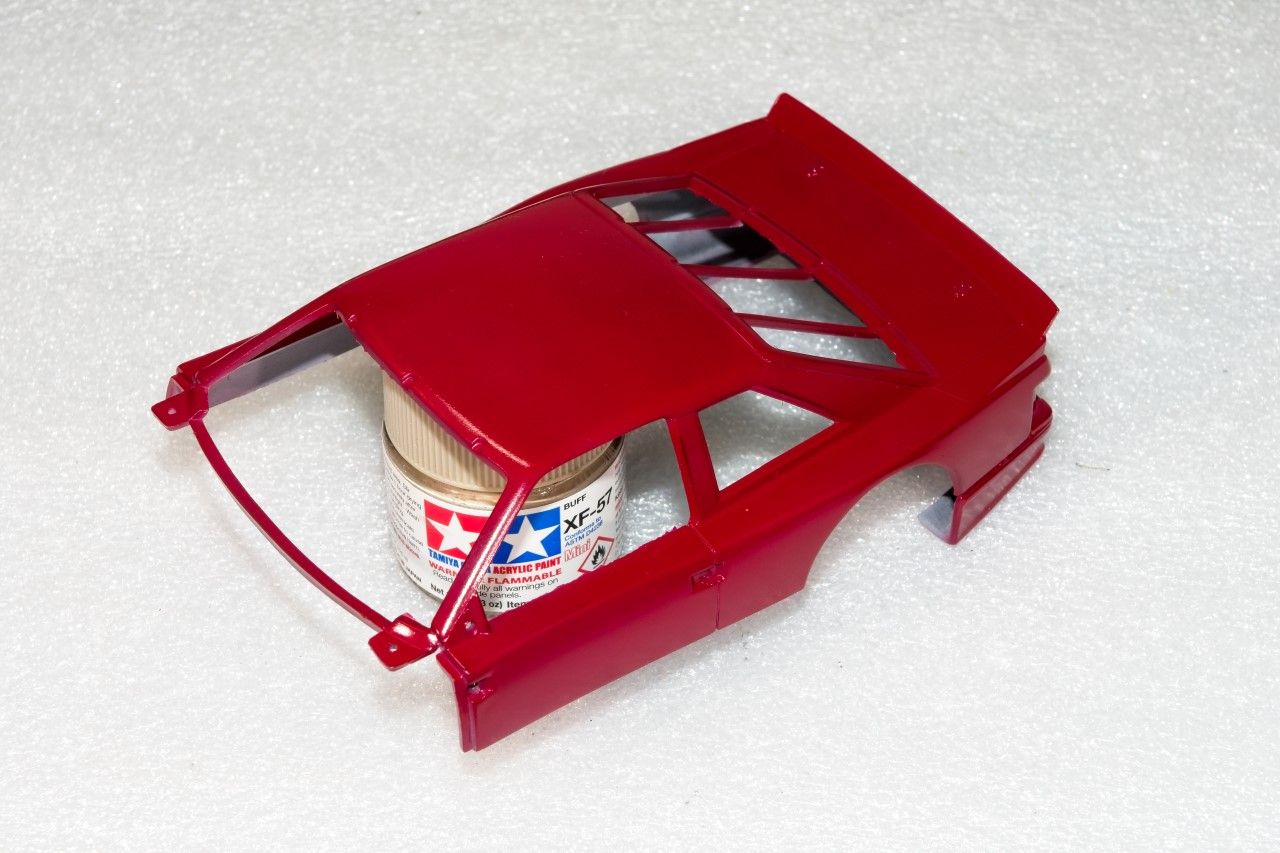
So I spent a full week priming, then painting the two shells, and I actually started to decal them. Then one of my friends whose an expert on these cars pointed out my mistake.
I had a decsion to make. Do I just keep on going with what is now a fantacy build, or suck it up, strip the shells back down, and start over again? I just couldn't go on with what I knew was plain wrong. So today I stripped all the paint off, which was some job with the MCW paints, and will build the JPS Mustang instead for my official GB build. I do have the correct decals from Indy Cal for the car, but I'm going to have to order paint from Gravity of Spain as I don't have enough Black in an opened bottle.
Ok, so I wasted almost two weeks. My tough luck. But now here comes build #2 hopefully. My buddy is sending me the full body for the correct car that was cast by Fox, who I honestly never heard of. I still need the Whale Tail, and that's coming from hiim as well when he gets it, hopefully sooner then later.
So now I'm officially back to the start of the build. Still, I have plenty of time for hopefully both.
As for my build thread in the Car forum, I'm going to basically copy and paste this, but change the subject.
Oh, one other little detail, the fox shell only has the basic chassis. the rest I have to come up with from another Revell kit.
Joel
SAME
look very closely at the front clip and notice that there is a opening between the two headlights. Now carefully look at the rear wing, it's what they called the Whale Tail as it's a huge scoop.
Now here's the JPS Mustang. There's no vent between the headlights, and the tail is just a straight spoiler. There are a few other differences, but enough so that one can't be modeled from the other with just paint and decals. There's also some differences in the pit as well.
So I spent a full week priming, then painting the two shells, and I actually started to decal them. Then one of my friends whose an expert on these cars pointed out my mistake.
I had a decsion to make. Do I just keep on going with what is now a fantacy build, or suck it up, strip the shells back down, and start over again? I just couldn't go on with what I knew was plain wrong. So today I stripped all the paint off, which was some job with the MCW paints, and will build the JPS Mustang instead for my official GB build. I do have the correct decals from Indy Cal for the car, but I'm going to have to order paint from Gravity of Spain as I don't have enough Black in an opened bottle.
Ok, so I wasted almost two weeks. My tough luck. But now here comes build #2 hopefully. My buddy is sending me the full body for the correct car that was cast by Fox, who I honestly never heard of. I still need the Whale Tail, and that's coming from hiim as well when he gets it, hopefully sooner then later.
So now I'm officially back to the start of the build. Still, I have plenty of time for hopefully both.
As for my build thread in the Car forum, I'm going to basically copy and paste this, but change the subject.
Oh, one other little detail, the fox shell only has the basic chassis. the rest I have to come up with from another Revell kit.
Joel

Merlin
#017

Joined: June 11, 2003
KitMaker: 17,582 posts
Auto Modeler: 388 posts

Posted: Saturday, October 12, 2019 - 11:31 PM UTC
Hi Joel
That really sucks! I've replied in more detail in your build thread.
Otherwise - great progress everyone!
I'll post a quick pic of where I've got to before I put the Coupe on hold for a week or two while I concentrate on an aircraft build for a manufacturer:

When I get back to the project I'll probably start a fresh thread with a recap to make it easier to follow.
All the best
Rowan
That really sucks!
I've replied in more detail in your build thread.Otherwise - great progress everyone!
I'll post a quick pic of where I've got to before I put the Coupe on hold for a week or two while I concentrate on an aircraft build for a manufacturer:
When I get back to the project I'll probably start a fresh thread with a recap to make it easier to follow.
All the best
Rowan


TacFireGuru
Joined: December 25, 2004
KitMaker: 3,770 posts
Auto Modeler: 359 posts

Posted: Sunday, October 13, 2019 - 04:49 AM UTC
Ah, PURPLE POWER!!
Or, rather, I use Purple Power to remove chrome. And that was step one for me.
Soak:
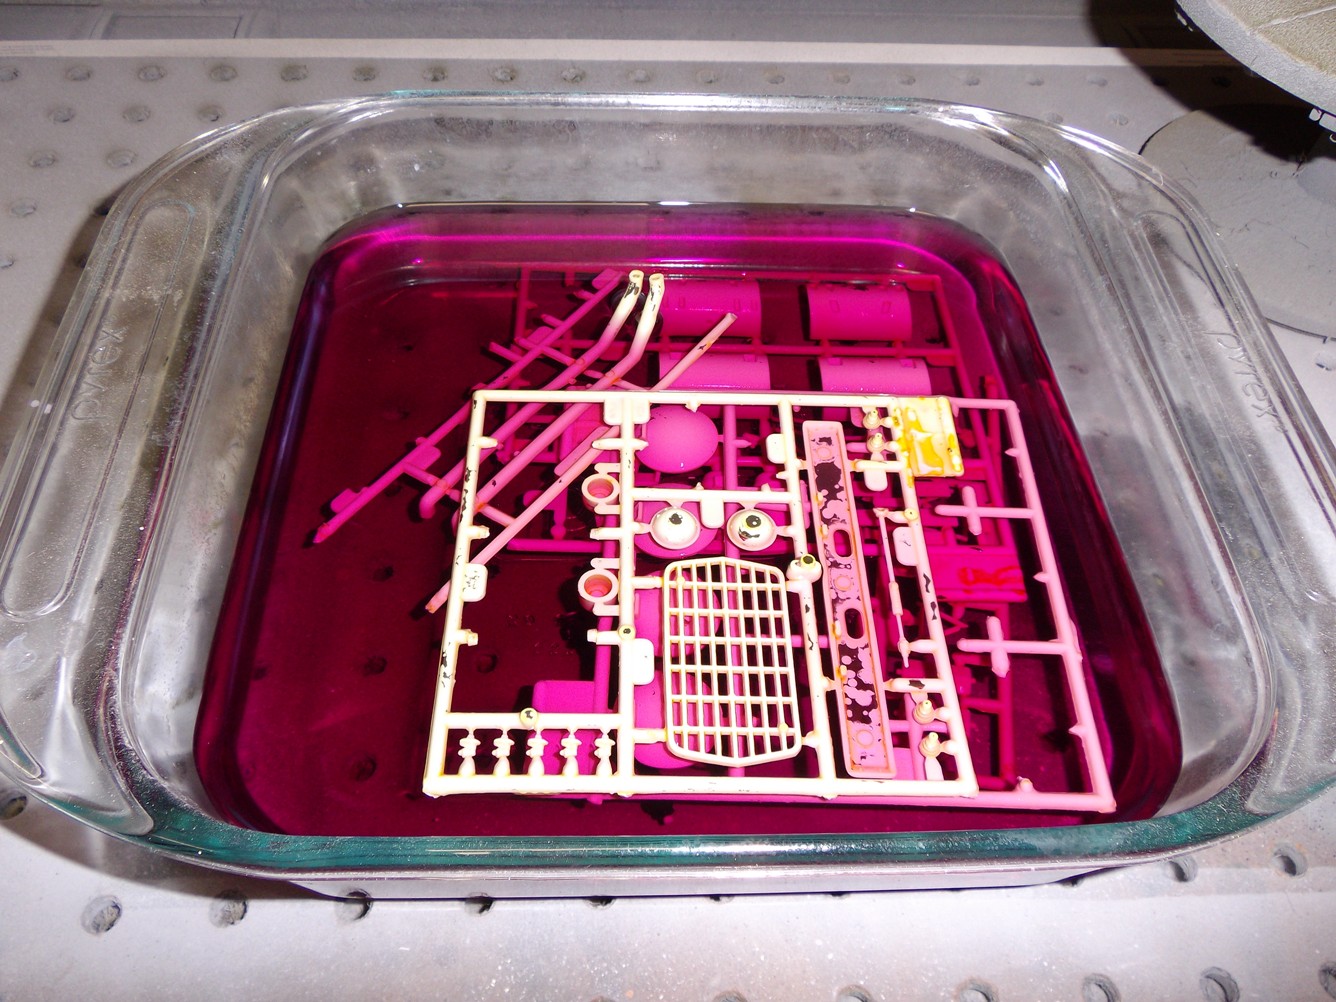
Washed:
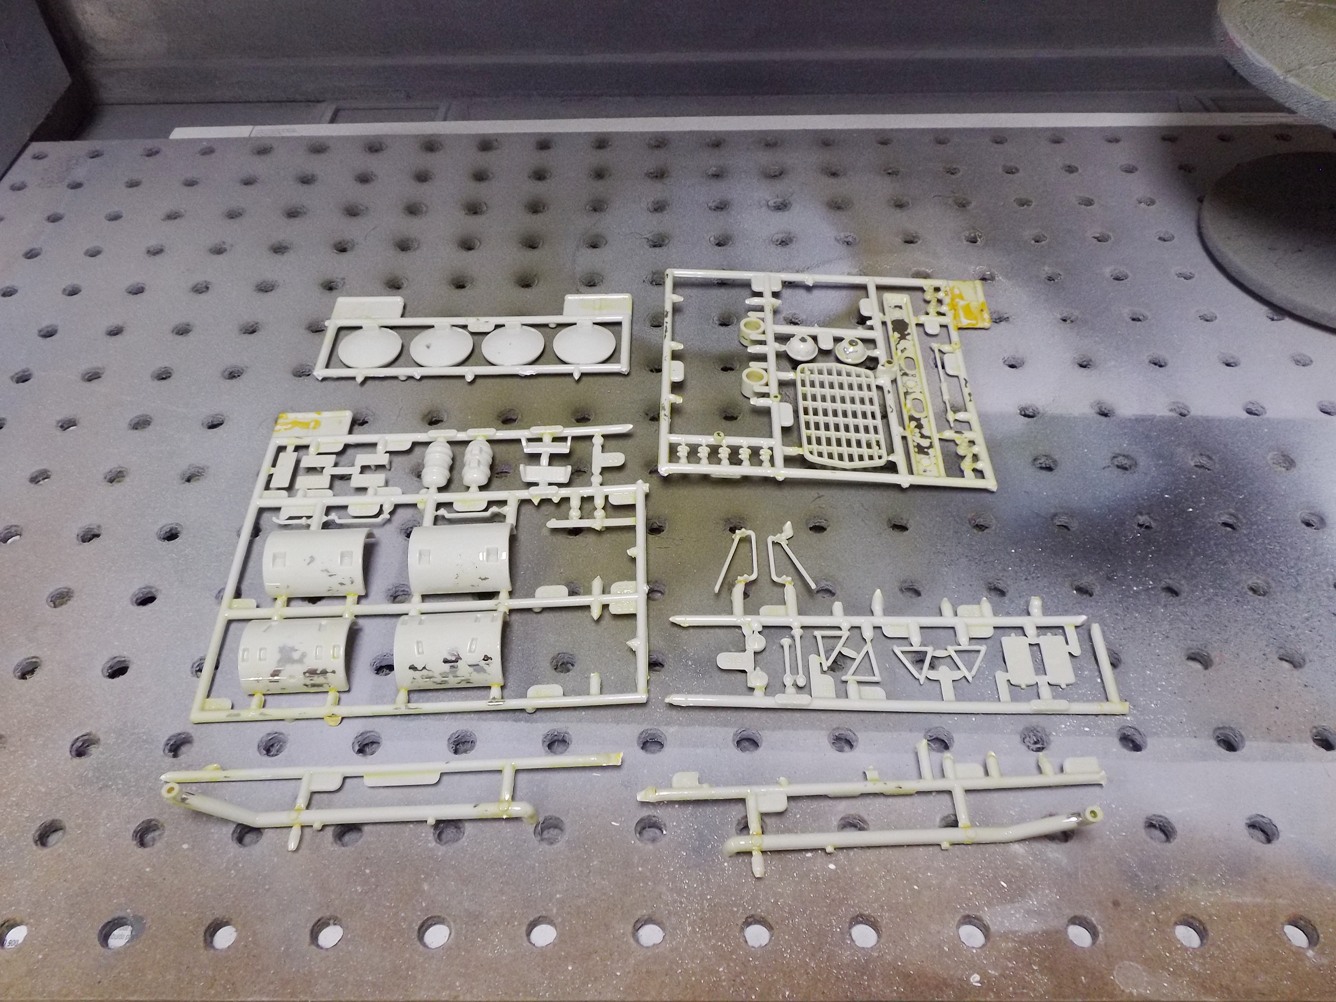
Still some residue and a bit of chrome. Easy enough to clean off with a little light sanding.
I chose not to de-chrome the rims because they've already been started and they're not that bad. I almost switched them (and the tires) for a set of Moebius tires and rims, but...nah.
Mike
Or, rather, I use Purple Power to remove chrome. And that was step one for me.
Soak:
Washed:
Still some residue and a bit of chrome. Easy enough to clean off with a little light sanding.
I chose not to de-chrome the rims because they've already been started and they're not that bad. I almost switched them (and the tires) for a set of Moebius tires and rims, but...nah.
Mike

Joel_W
Joined: December 04, 2010
KitMaker: 11,666 posts
Auto Modeler: 2,974 posts
Posted: Sunday, October 13, 2019 - 08:44 AM UTC
Rowan,
The engine in that dark green just looks fantastic seating in that frame.
Joel
The engine in that dark green just looks fantastic seating in that frame.
Joel
Joel_W
Joined: December 04, 2010
KitMaker: 11,666 posts
Auto Modeler: 2,974 posts
Posted: Sunday, October 13, 2019 - 08:46 AM UTC
Mike,
What is the name of the Purple product? For chrome removal I cover the parts with Oven Cleaner in the garage. 10 min later, all the chrome is gone. Now comes the soapy water wash as that stuff is really caustic.
joel
What is the name of the Purple product? For chrome removal I cover the parts with Oven Cleaner in the garage. 10 min later, all the chrome is gone. Now comes the soapy water wash as that stuff is really caustic.
joel

Szmann

Joined: September 02, 2014
KitMaker: 1,977 posts
Auto Modeler: 1,371 posts

Posted: Sunday, October 13, 2019 - 11:59 AM UTC
Joel, that's a pitty! I'm not entitled to give you any advice on that, but knowing myself, I would go for a (ot two) fictitious rally team(s) (I am already doing it with one of my Dacias).
Rowan, looking good so far; the black on the chassis is nice and smooth - the green on the engine is "strong". I guess some wash will follow on that last one?
Mike, there's a good first step! Lately, I not even bother to de-chrome the wheels - I just sand them lightly and prime them directly. It seems that Mr. Surfacer has enough adhesion power to stay put on chrome
UPDATE
I made sure this time I let myself no door open to escape the brake lines
Before that, I've painted rapidly the shock absorbers with Tamiya cockpit green. I know, there is no poorer choice, but somebody challenged me and I bite the bullet. You are entitled to all cussing and nagging you see fit!

Then I get to the "dreaded" brake lines:

I have installed for now only the e-brake cables, and I try to push the service brake lines as well, but I managed only one (not showing in pictures yet). The "cables" are made of stretched sprue, colored with a brown Sharpie marker and glued with Superglue:

I started preparing the truck's bed and "flares" as well:

Nothing spectacular happened thus well with these parts. Just note the "weak" wood grain on the bed. That's why I'm going to do an "upgrade".

Cheers!
Gabriel
Rowan, looking good so far; the black on the chassis is nice and smooth - the green on the engine is "strong". I guess some wash will follow on that last one?
Mike, there's a good first step! Lately, I not even bother to de-chrome the wheels - I just sand them lightly and prime them directly. It seems that Mr. Surfacer has enough adhesion power to stay put on chrome
UPDATE
I made sure this time I let myself no door open to escape the brake lines
Before that, I've painted rapidly the shock absorbers with Tamiya cockpit green. I know, there is no poorer choice, but somebody challenged me and I bite the bullet. You are entitled to all cussing and nagging you see fit!
Then I get to the "dreaded" brake lines:
I have installed for now only the e-brake cables, and I try to push the service brake lines as well, but I managed only one (not showing in pictures yet). The "cables" are made of stretched sprue, colored with a brown Sharpie marker and glued with Superglue:
I started preparing the truck's bed and "flares" as well:
Nothing spectacular happened thus well with these parts. Just note the "weak" wood grain on the bed. That's why I'm going to do an "upgrade".
Cheers!
Gabriel
AussieReg
#007
Joined: June 09, 2009
KitMaker: 8,156 posts
Auto Modeler: 2,953 posts
Posted: Sunday, October 13, 2019 - 12:38 PM UTC
Looking very nice Gabriel, good progress. I have seen some effective wood finish produced by giving the surface a swipe with some coarse sandpaper to create a 3D grain and then pin washing with various shades of brown to create the colour.
Cheers, D
Cheers, D
Szmann
Joined: September 02, 2014
KitMaker: 1,977 posts
Auto Modeler: 1,371 posts
Posted: Sunday, October 13, 2019 - 12:46 PM UTC
Quoted Text
Looking very nice Gabriel, good progress. I have seen some effective wood finish produced by giving the surface a swipe with some coarse sandpaper to create a 3D grain and then pin washing with various shades of brown to create the colour.
Cheers, D
Thanks for suggestion, D.! I have used myself the technique described by you. In this particular case, I will do a different trick. During my vacation in Romania, I have helped a former high school buddy to work on one of these huge wooden ship models produced by Amati. I brought with me some very fine strips of veneer of which the bridge of the vessel was made. I'll try and use these (if I can find them - I forgot where I stashed them in the un-packing frenzy). If I cannot find them in time, I will apply the method described by you, although the metallic inserts are going to be a pain in the spoiler.
Gabriel
TacFireGuru
Joined: December 25, 2004
KitMaker: 3,770 posts
Auto Modeler: 359 posts
Posted: Sunday, October 13, 2019 - 02:44 PM UTC
Quoted Text
Mike,
What is the name of the Purple product? For chrome removal I cover the parts with Oven Cleaner in the garage. 10 min later, all the chrome is gone. Now comes the soapy water wash as that stuff is really caustic.
joel
It's called Purple Power. I get it from WalMart. Usually let it soak all night. I used to use oven cleaner, but this stuff is easy on the nose and hands.
Mike
md72
#439
Joined: November 05, 2005
KitMaker: 4,950 posts
Auto Modeler: 555 posts
Posted: Sunday, October 13, 2019 - 03:37 PM UTC
Thanks for the hints on the Purple Power. I went looking for it when I did my regular grocery shopping. But since I skipped Wally World, I didn't see any.
For those of us who aren't stretched sprue wizards, could we do the e-brake lines with 0.008" line?
For those of us who aren't stretched sprue wizards, could we do the e-brake lines with 0.008" line?

Hwa-Rang

Joined: June 29, 2004
KitMaker: 6,760 posts
Auto Modeler: 2,182 posts

Posted: Sunday, October 13, 2019 - 05:32 PM UTC
You are on a roll gentlemen, I have barely unboxed my kit 

southpier

Joined: December 11, 2009
KitMaker: 546 posts
Auto Modeler: 33 posts
Posted: Sunday, October 13, 2019 - 06:04 PM UTC
Quoted Text
For those of us who aren't stretched sprue wizards, could we do the e-brake lines with 0.008" line?
I am always in awe of those who can stretch sprue longer than an inch or not have it curl like a pig's tail.
for wire, I would use copper. gauge depends on scale. for 1:25 scale, assuming an emergency brake is 5/16" full scale, I would suggest .0125".
(1" / 25 = .040" [scale inch].
.040" / 16 = .0025" [scale sixteenth inch]
.0025" x 5 = .0125" [scale 5/16"])
#28 AWG copper wire is .0126", so I would use that.
https://www.rapidtables.com/calc/wire/wire-gauge-chart.html#chart
keep in mind this is wire size, Not wire which is covered with insulation.
md72
#439
Joined: November 05, 2005
KitMaker: 4,950 posts
Auto Modeler: 555 posts
Posted: Sunday, October 13, 2019 - 07:11 PM UTC
Well, I talked myself out of using some 0.015" solder that I have laying about. But, at a full size of 0.36 vs. 0.3125 it might work.
AussieReg
#007
Joined: June 09, 2009
KitMaker: 8,156 posts
Auto Modeler: 2,953 posts
Posted: Sunday, October 13, 2019 - 11:25 PM UTC
Gabriel, that is what this community is all about, using the materials and capabilities that you have to help another modeler out. Love your work!
Rowan, very nice start to the assembly and paint work. Is that British Racing Green on the engine? The fit and finish on the chassis looks very nice, and having it as a separate sub assembly will really assist on the detail painting side.
Mike nice work stripping off the kit chrome. The only supplier I can find for Purple Power here in Australia only sells it in 20 litre drums, a little more than I would need for this type of work! I will stick to the Mr Muscle Oven Cleaner & Ziplock Bag strategy for the moment.
Jesper, I really want to see that Nomad finished, but you can follow my lead and just start another (and another, and another)!
Cheers, D
Joel_W
Joined: December 04, 2010
KitMaker: 11,666 posts
Auto Modeler: 2,974 posts
Posted: Monday, October 14, 2019 - 01:33 AM UTC
Gabriel,
I'm really super impressed with the chassis at this point. That spare tire really stands out, yet looks real at the same time.
Your brake lines add another dimension to the chassis. You just need to secure the T fitting to the differential housing so they would bounce.
Nothing wrong with the Green shock colors. Believe me, I've seen a lot worse in real life.
As for the bed being lined with real strip wood. I'm sure hoping that you find them, as there is nothing like using the real deal to emulate the real deal.
Joel
Joel_W
Joined: December 04, 2010
KitMaker: 11,666 posts
Auto Modeler: 2,974 posts
Posted: Monday, October 14, 2019 - 01:34 AM UTC
Quoted Text
Quoted TextMike,
What is the name of the Purple product? For chrome removal I cover the parts with Oven Cleaner in the garage. 10 min later, all the chrome is gone. Now comes the soapy water wash as that stuff is really caustic.
joel
It's called Purple Power. I get it from WalMart. Usually let it soak all night. I used to use oven cleaner, but this stuff is easy on the nose and hands.
Mike
Mike,
Thanks for the name. I'll be hitting my local Wally World this week, and pick some up.
Joel
Joel_W
Joined: December 04, 2010
KitMaker: 11,666 posts
Auto Modeler: 2,974 posts
Posted: Monday, October 14, 2019 - 01:36 AM UTC
Quoted Text
Quoted TextFor those of us who aren't stretched sprue wizards, could we do the e-brake lines with 0.008" line?
I am always in awe of those who can stretch sprue longer than an inch or not have it curl like a pig's tail.
for wire, I would use copper. gauge depends on scale. for 1:25 scale, assuming an emergency brake is 5/16" full scale, I would suggest .0125".
(1" / 25 = .040" [scale inch].
.040" / 16 = .0025" [scale sixteenth inch]
.0025" x 5 = .0125" [scale 5/16"])
#28 AWG copper wire is .0126", so I would use that.
https://www.rapidtables.com/calc/wire/wire-gauge-chart.html#chart
keep in mind this is wire size, Not wire which is covered with insulation.
JSmith,
Thanks for those numbers and the link. I've already been there, and added it to my proper favorite modeling folder.
Joel
Joel_W
Joined: December 04, 2010
KitMaker: 11,666 posts
Auto Modeler: 2,974 posts
Posted: Monday, October 14, 2019 - 01:38 AM UTC
Quoted Text
You are on a roll gentlemen, I have barely unboxed my kit
Jesper,
While you don't work at lightening speed, you do work at a consistent speed, and do cross the finish line. So I have no doubts that you'll be there in plenty of time.
Joel
Joel_W
Joined: December 04, 2010
KitMaker: 11,666 posts
Auto Modeler: 2,974 posts
Posted: Monday, October 14, 2019 - 08:13 AM UTC
Yesterday was the end of feeling sorry for my screw up. Totally my fault as I should I have researched the Revell kits more thoroughly. With that in mind, it was time to take action.
As I said, I would change this build over to the Roush JPS Mustang that Finland's super saloon driver Robert Lappalainen drove to the 1971 SCCA Trans AM championship. So the subject for this blog will be changed to reflect that. Also, the Folgers IMSA GTO car will be built as I now have that kit on the way, and my buddy Bill has sent me the correct Revell body parts, chassis, etc. I originally thought that the body was resin and done by Fox, but I couldn't find a Fox co. anywhere. The answer for a Dum Ass like myself is to step back and remember that Ford called this version of the Mustang for racing The Fox . So now I'll have not 1 but 2 Whale Tail Fox bodied Mustangs to build, or I just might once again turn to the world of Resin castings for the 1997 Mustang campaigned by Tommy Kendall. Only time will tell.
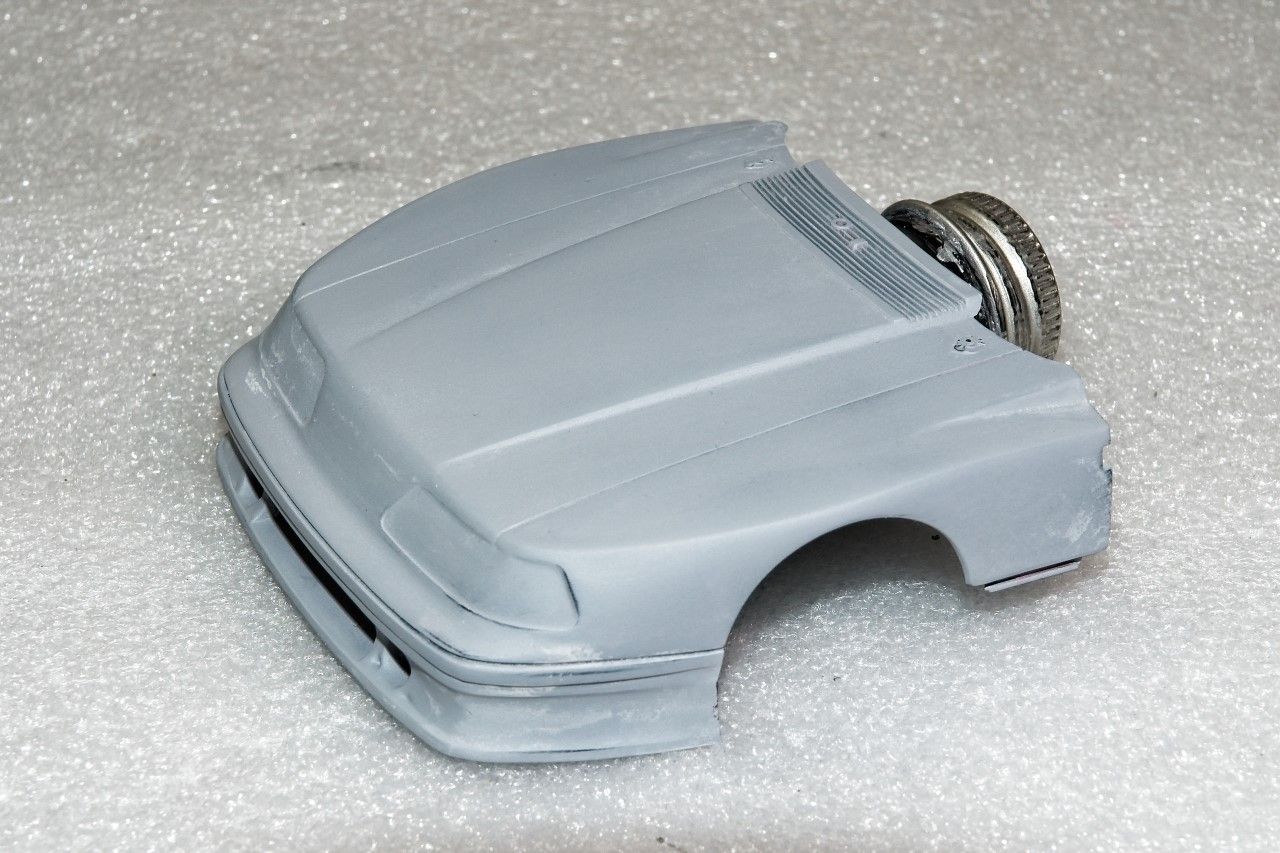
1st step was to strip off the decals and paint. For this I always use Denatured Alcohol. Works great, and it works quite fast with no chance of damaging the body. So from here:
I went to this:
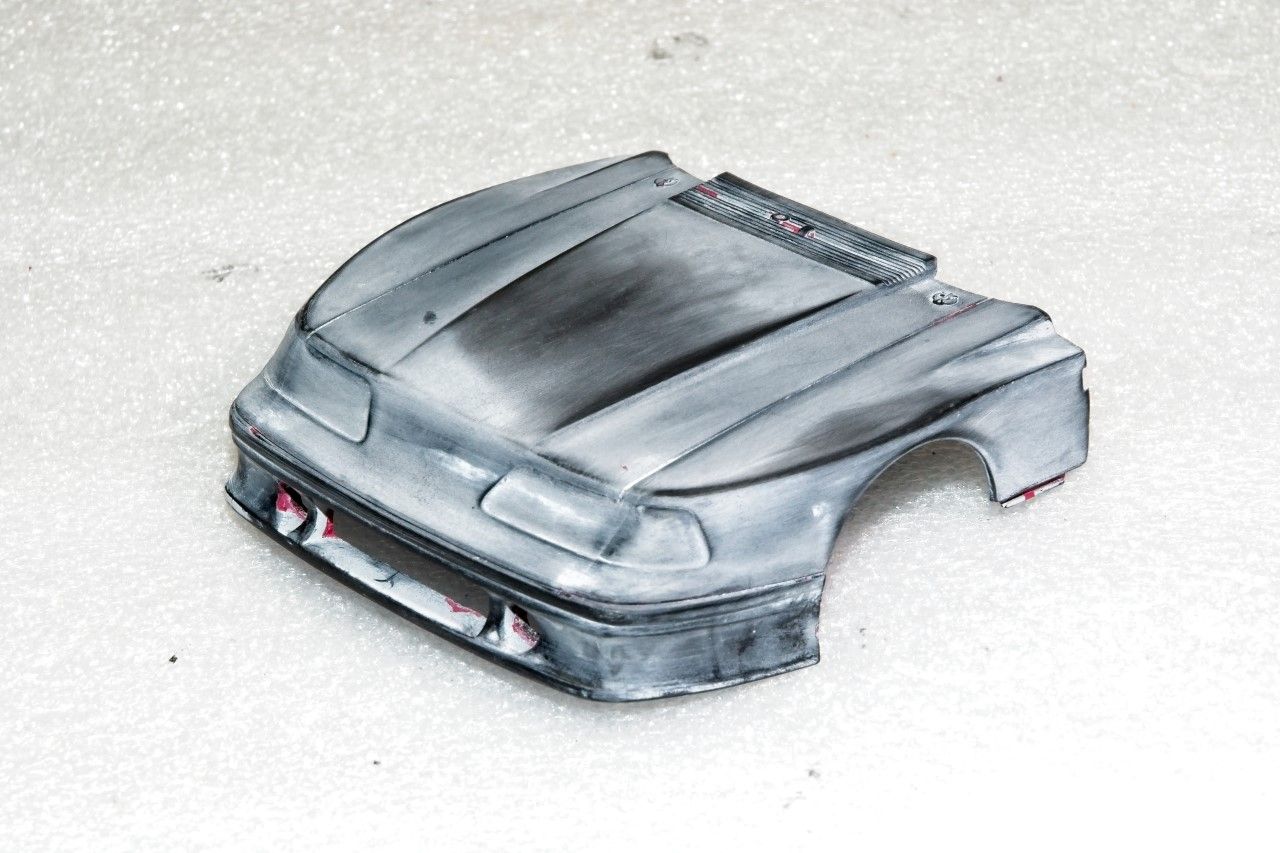
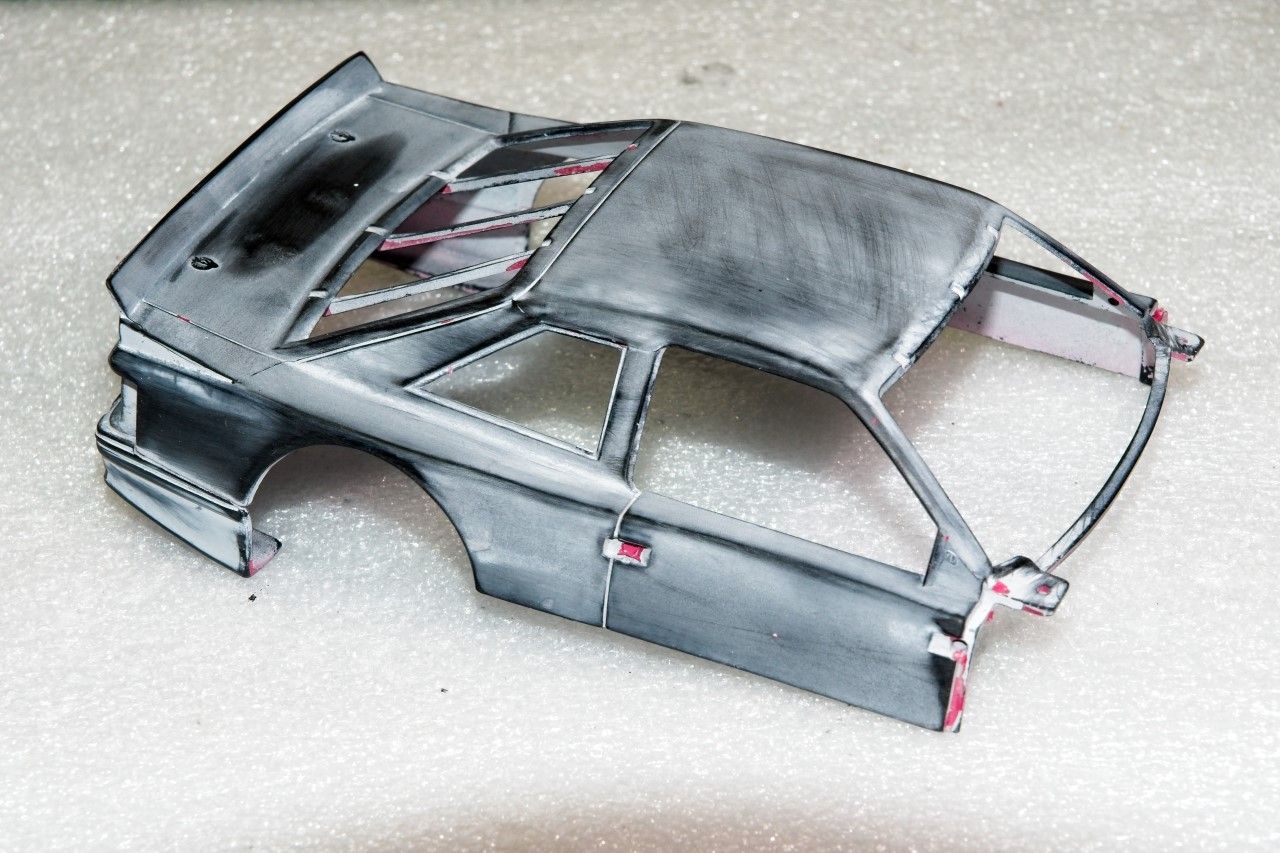
then a complete rub down with Tamiya's 3,000 sponge, and then into the paint booth for primer which is of course Mr. hobby's #1,500 Gray primer thinned with their #400 leveling thinner. The resulting shells now look like this:
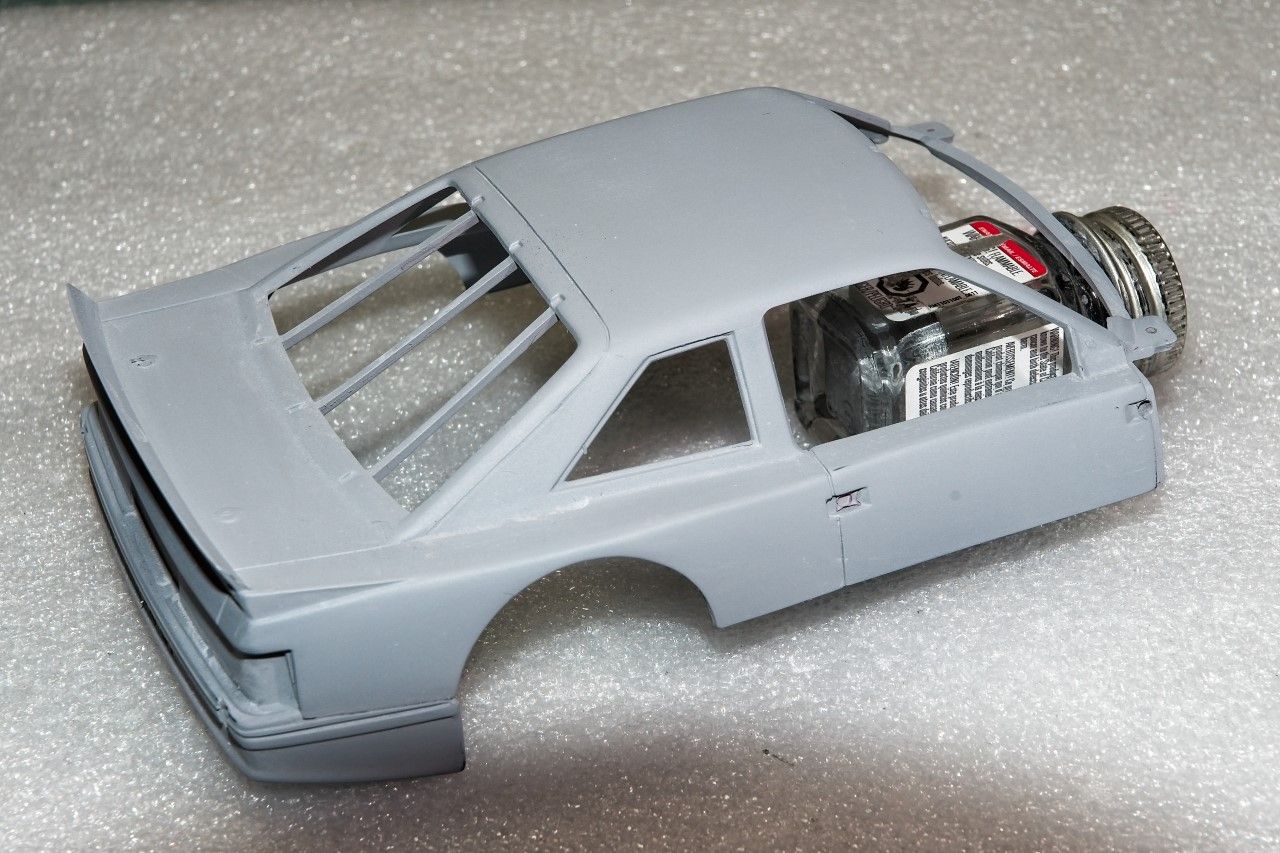
Up next is the Black Color Coat.
Joel
As I said, I would change this build over to the Roush JPS Mustang that Finland's super saloon driver Robert Lappalainen drove to the 1971 SCCA Trans AM championship. So the subject for this blog will be changed to reflect that. Also, the Folgers IMSA GTO car will be built as I now have that kit on the way, and my buddy Bill has sent me the correct Revell body parts, chassis, etc. I originally thought that the body was resin and done by Fox, but I couldn't find a Fox co. anywhere. The answer for a Dum Ass like myself is to step back and remember that Ford called this version of the Mustang for racing The Fox
. So now I'll have not 1 but 2 Whale Tail Fox bodied Mustangs to build, or I just might once again turn to the world of Resin castings for the 1997 Mustang campaigned by Tommy Kendall. Only time will tell.1st step was to strip off the decals and paint. For this I always use Denatured Alcohol. Works great, and it works quite fast with no chance of damaging the body. So from here:
I went to this:
then a complete rub down with Tamiya's 3,000 sponge, and then into the paint booth for primer which is of course Mr. hobby's #1,500 Gray primer thinned with their #400 leveling thinner. The resulting shells now look like this:
Up next is the Black Color Coat.
Joel
TacFireGuru
Joined: December 25, 2004
KitMaker: 3,770 posts
Auto Modeler: 359 posts
Posted: Monday, October 14, 2019 - 10:25 AM UTC
I repainted the frame and axles with flat black.
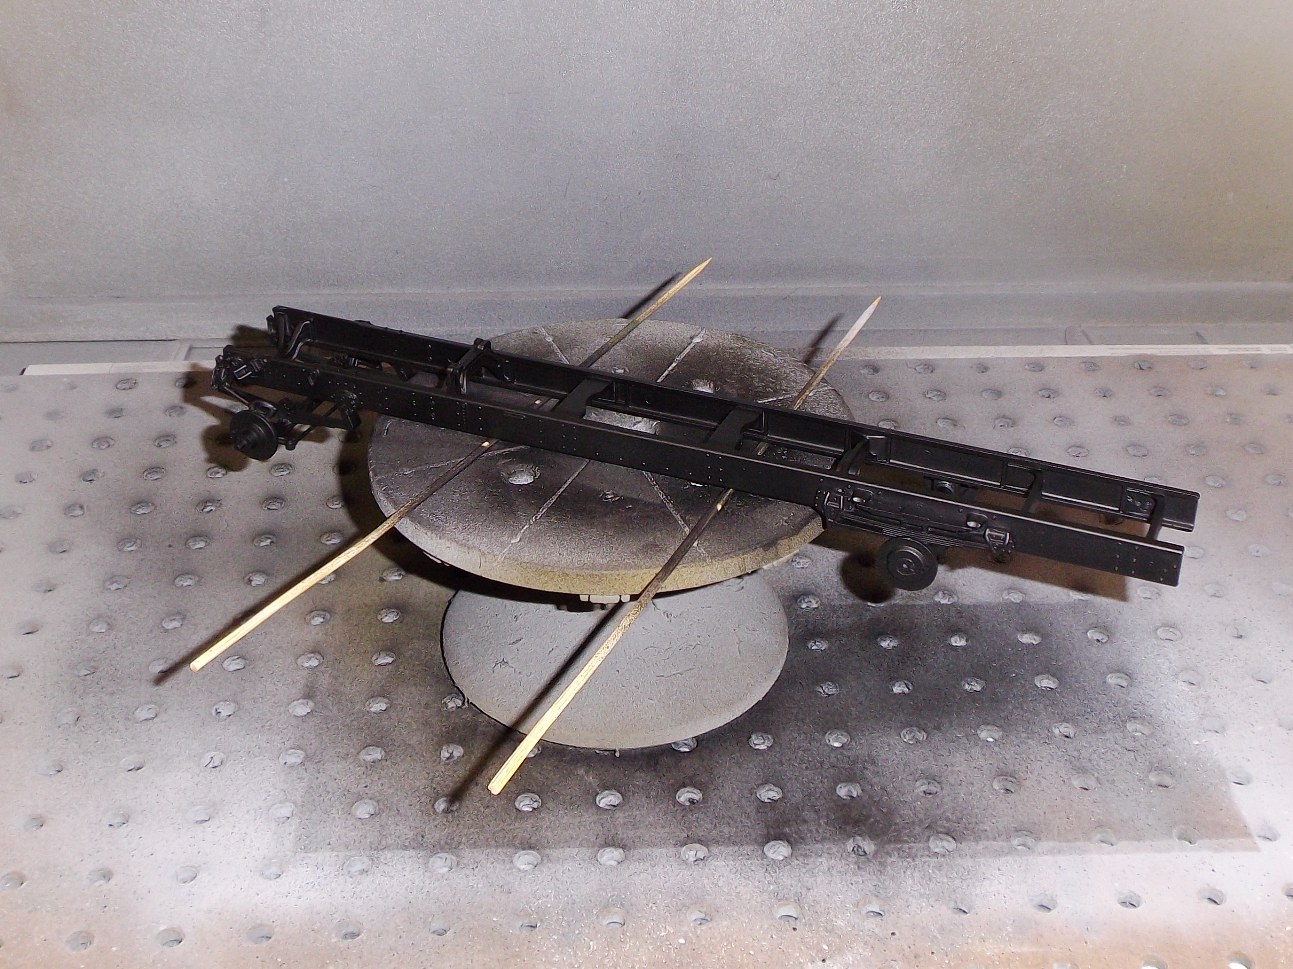
And some additional parts that go to the frame.
I'll paint the box of the truck white, but not yet sure of the cab color.
More to follow.
Mike
And some additional parts that go to the frame.
I'll paint the box of the truck white, but not yet sure of the cab color.
More to follow.
Mike
Joel_W
Joined: December 04, 2010
KitMaker: 11,666 posts
Auto Modeler: 2,974 posts
Posted: Monday, October 14, 2019 - 11:15 AM UTC
Mike,
The frame looks really good.
Looking forward to seeing all those parts added to it.
Joel
The frame looks really good.
Looking forward to seeing all those parts added to it.
Joel
 |

WEB HOSTING BY


Copyright ©2021 Auto Modeler and Kitmaker Network, a subsidiary of Silver Star Enterprises
All Rights Reserved. Please read our Conditions of Use and Privacy Policy.
All Rights Reserved. Please read our Conditions of Use and Privacy Policy.