

D,
The body really looks like you've 99% there with the fix. Most impressive work for sure.
One thought has crossed my mind about all these AMT builds where so much of the drive train and exhaust system is molded as part of the bottom of the frame/pan. With this build, everything seems to look to be separate parts, so that you can really focus on the paint and detailing of each part.
Joel


Go to automodeler.com for the current dynamic site!
The Garage
For general automotive modeling or non-modeling topics.
For general automotive modeling or non-modeling topics.
Hosted by Jim Starkweather
Blue Oval - Ford Motor Co. GB Build Thread

Joel_W

Joined: December 04, 2010
KitMaker: 11,666 posts
Auto Modeler: 2,974 posts

Posted: Wednesday, October 09, 2019 - 12:47 AM UTC

Joel_W
Joined: December 04, 2010
KitMaker: 11,666 posts
Auto Modeler: 2,974 posts
Posted: Wednesday, October 09, 2019 - 12:53 AM UTC
Quoted Text
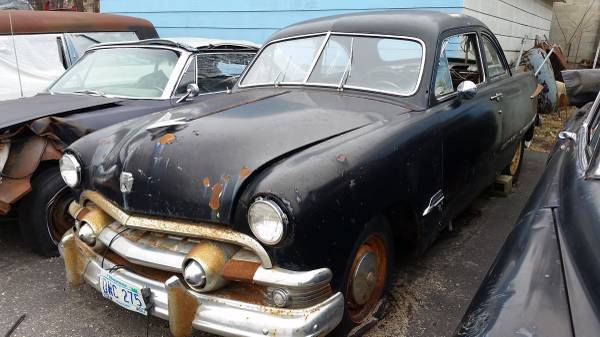
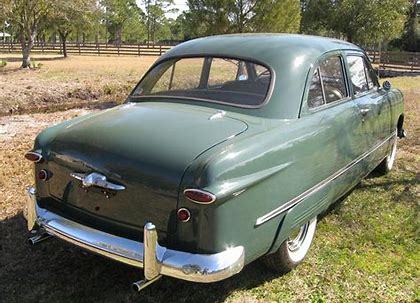
Wow, I was trying to research factory standard interiors for my '51 coupe, ad look what I found.
I'm pretty sure ours still had the headlight rings, the hood closed, the paint wasn't peeling. And Rocket Raccoon hadn't torn out the interior. But that's the chrome rust I remember. Now all I need is a spare $2500 and a way to drag this ghost half-way across the country and I can have a 60 year old memory rusting in my driveway.
Mark,
Nice find for sure. Don't laugh, but I've spent years secretly trying to find a '54 four door Fairlane to restore, as that was the very 1st car my father bought. We called her Old Betsy, and I truly loved that car. I use to pester my Dad into saying he would save her for me, but it wasn't to be, as he traded her in for a 1961 Ford Galaxy that had issues from day one. I really should be focusing on a build of her for old time sake.

Joel

AussieReg

#007

Joined: June 09, 2009
KitMaker: 8,156 posts
Auto Modeler: 2,953 posts

Posted: Wednesday, October 09, 2019 - 01:07 PM UTC
Quoted Text
The body really looks like you've 99% there with the fix. Most impressive work for sure.
Not 99% yet, this is going to take some work to iron out the join while keeping the contour curves intact. I started last night and put almost an hour into it so far.


Quoted Text
One thought has crossed my mind about all these AMT builds where so much of the drive train and exhaust system is molded as part of the bottom of the frame/pan. With this build, everything seems to look to be separate parts, so that you can really focus on the paint and detailing of each part.
The chassis and exhaust are still integral with the floor pan on this kit, so another hour was spent last night chopping up scraps of masking tape to prep the floor pan for some bling!

I also threw some colour on the engine block and started on the clean-up of the bits that make it go bang!

Cheers, D

AussieReg
#007
Joined: June 09, 2009
KitMaker: 8,156 posts
Auto Modeler: 2,953 posts
Posted: Wednesday, October 09, 2019 - 03:01 PM UTC
A couple of coats of SMS Super Silver directly over the primer, 20 minutes to cure, then off with the masking!

Some bleeding along the edges and a couple of tight corners the mask didn't quite get in to, but a quick touch up and some pin wash will take care of that. I will also highlight the exhaust with some burnt metal tones.
A quick test dry-fit of the drive train and suspension to see how it fits together.


I'm happy with how this looks, so I can move along with working from the bottom up while I continue the rectification works up top.
Cheers, D
Some bleeding along the edges and a couple of tight corners the mask didn't quite get in to, but a quick touch up and some pin wash will take care of that. I will also highlight the exhaust with some burnt metal tones.
A quick test dry-fit of the drive train and suspension to see how it fits together.
I'm happy with how this looks, so I can move along with working from the bottom up while I continue the rectification works up top.
Cheers, D
Joel_W
Joined: December 04, 2010
KitMaker: 11,666 posts
Auto Modeler: 2,974 posts
Posted: Wednesday, October 09, 2019 - 11:27 PM UTC
D,
You're still making great progress on those two nasty body joints. Sure seems that back in those days, just about any tolerance was ok as long as the parts kind of touched. I guess that the kids (including me) who built these models back then, really didn't care all that much about tolerances, as getting the finished model done and looking good was the main thing.
Nice job masking the chassis pan from the frame. As you said, some touch up and it's about as perfect as you can get.
Love the 6 carb setup. Must have been a tuners nightmare for sure. My MGB had just two single barrel SU carbs, and they always needed tuning to keep them in sync as the engine vibrations just made the jet needle and springs constantly move one way or the other.
Joel

tinbanger

Joined: February 04, 2008
KitMaker: 2,507 posts
Auto Modeler: 409 posts

Posted: Thursday, October 10, 2019 - 10:38 AM UTC
"Richard, what are you going to use for the chrome parts?"
Hi Damian
I will go with Alclad and Liquid Chrome which I have started using on the seats.
Here is a update on the primed parts:-

Hi Damian
I will go with Alclad and Liquid Chrome which I have started using on the seats.
Here is a update on the primed parts:-

md72

#439
Joined: November 05, 2005
KitMaker: 4,950 posts
Auto Modeler: 555 posts

Posted: Thursday, October 10, 2019 - 01:27 PM UTC
Hey guyz, I spent a lot of time thrashing around the Web last night, and have had zero luck. But I can't find anything to use for a Ford Shield.
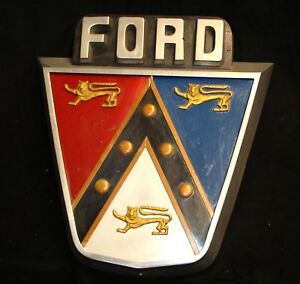
They first started using them in 1951, so the '49 kit doesn't have any.
They first started using them in 1951, so the '49 kit doesn't have any.

AussieReg
#007
Joined: June 09, 2009
KitMaker: 8,156 posts
Auto Modeler: 2,953 posts
Posted: Thursday, October 10, 2019 - 01:39 PM UTC
Overheard in the workshop:

Salesman - "What is this?"
Mechanic - "This is a Pontiac 421 ci with a 6-pack carb set-up. I'm going to put it in that '36, then it will seriously ROCK! I painted it blue and hoped you wouldn't notice."
Henry - "You're fired!"

Salesman - "What is this?"
Mechanic - "This is a Pontiac 421 ci with a 6-pack carb set-up. I'm going to put it in that '36, then it will seriously ROCK! I painted it blue and hoped you wouldn't notice."
Henry - "You're fired!"

Szmann

Joined: September 02, 2014
KitMaker: 1,977 posts
Auto Modeler: 1,371 posts

Posted: Thursday, October 10, 2019 - 02:13 PM UTC
D., I can't quite figure out how you turn this build so fast and so good in the same time... Whatever your dark secret is, it works a threat!
UPDATE
Another puny update - I just don't have enough time yet I managed to do a few little things, and painted black some chassis parts; not worth a picture.
However, I was itching to try a new color scheme and I did (taking the risk):
Using the wheels as lab rats, I tested the clear metallic orange color which is "obsessing" me for some time:

The result is pleasing to me, but the method I devised is rather complicated and comprises 4 steps:
1. Mr. Surfacer primer (this one let to dry and correct the eventual imperfections);
2. Black base for metallic: (I have used in this case TCP 010 Black, but any gloss black enamel or lacquer will do);
3. Metallic (I used Tamiya X-32 Titanium Gold but, again, any solvent based metallic will do - depending on the effect you're after);
4. Clear orange (Tamiya X-26, applied wet, as I would normally apply a clear coat)
Last three steps were done in quick succession, with just pause to clean and re-load the gun.

I'm not sure for the main body, but for the wheels I think the X-26 clear works well enough as a clear gloss as well (I am guessing it is nothing more than X-22 + orange, anyhow!)
Cheers!
Gabriel
UPDATE
Another puny update - I just don't have enough time
yet I managed to do a few little things, and painted black some chassis parts; not worth a picture.However, I was itching to try a new color scheme and I did (taking the risk):
Using the wheels as lab rats, I tested the clear metallic orange color which is "obsessing" me for some time:
The result is pleasing to me, but the method I devised is rather complicated and comprises 4 steps:
1. Mr. Surfacer primer (this one let to dry and correct the eventual imperfections);
2. Black base for metallic: (I have used in this case TCP 010 Black, but any gloss black enamel or lacquer will do);
3. Metallic (I used Tamiya X-32 Titanium Gold but, again, any solvent based metallic will do - depending on the effect you're after);
4. Clear orange (Tamiya X-26, applied wet, as I would normally apply a clear coat)
Last three steps were done in quick succession, with just pause to clean and re-load the gun.
I'm not sure for the main body, but for the wheels I think the X-26 clear works well enough as a clear gloss as well (I am guessing it is nothing more than X-22 + orange, anyhow!)
Cheers!
Gabriel
md72
#439
Joined: November 05, 2005
KitMaker: 4,950 posts
Auto Modeler: 555 posts
Posted: Thursday, October 10, 2019 - 05:12 PM UTC
OK, senior moment here. I thought that Joel had suggested spinning off our build logs to enhance and expand the experience. I see that Patrick started a photo album. Did I miss something or just dream while awake?
Meanwhile, I've borrowed someone's technique of highlighting the weldlines with a sharpie, then sand them off to get the body smoothed out. Might be a good idea, but it looks like that's there's actually a panel line down the top of the rear fender and all the way down the rear panel.
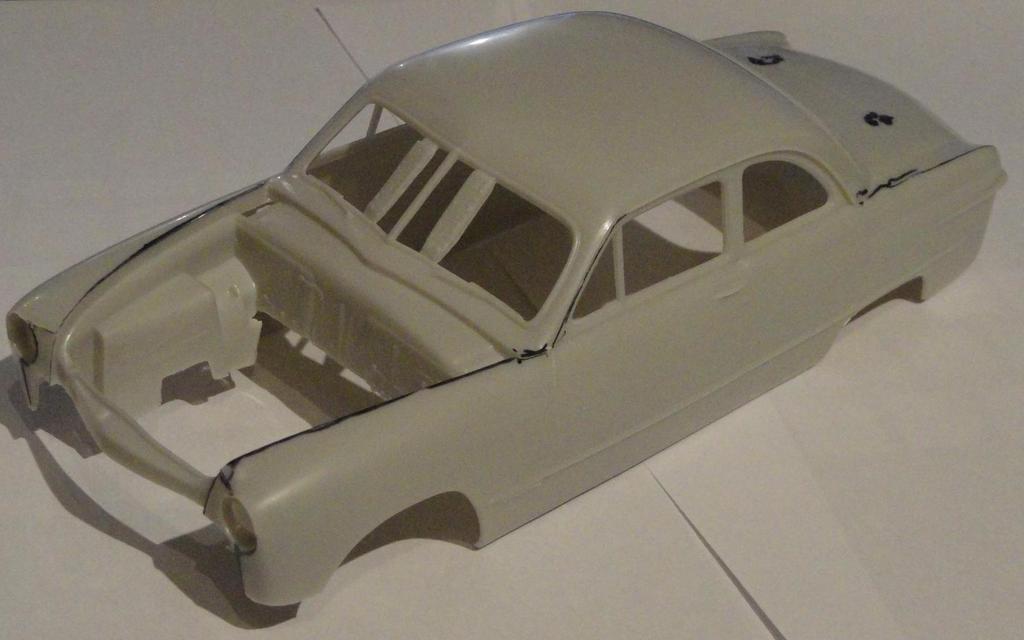
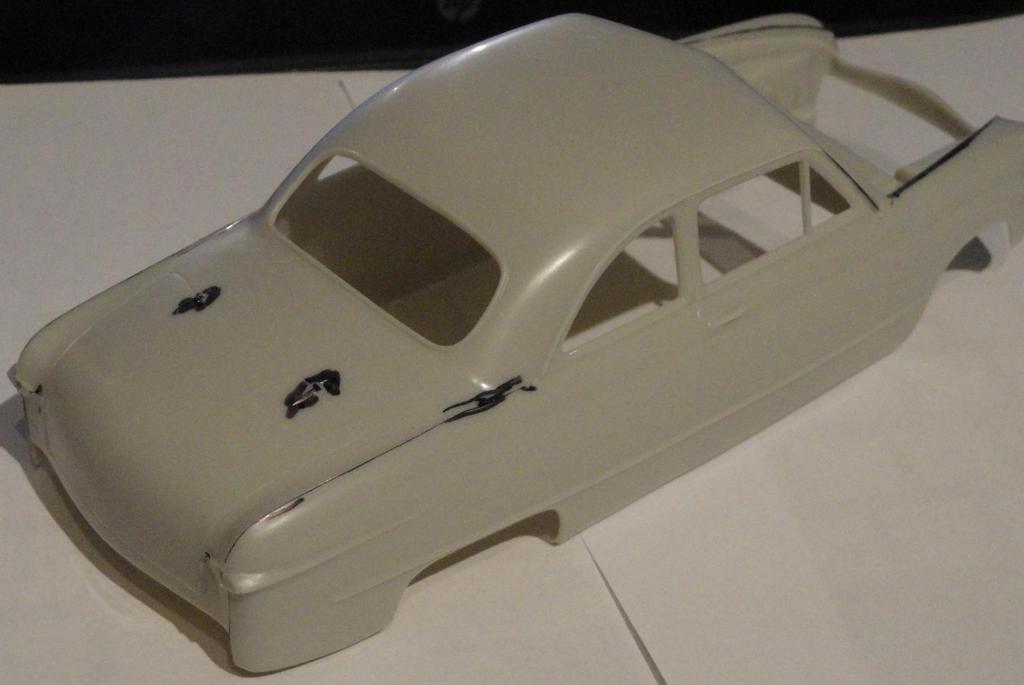
Meanwhile, I've borrowed someone's technique of highlighting the weldlines with a sharpie, then sand them off to get the body smoothed out. Might be a good idea, but it looks like that's there's actually a panel line down the top of the rear fender and all the way down the rear panel.
AussieReg
#007
Joined: June 09, 2009
KitMaker: 8,156 posts
Auto Modeler: 2,953 posts
Posted: Thursday, October 10, 2019 - 06:12 PM UTC
Good to see you starting on the build Mark, I hope it works out as planned! Joel has started a dedicated build log thread for his build, and I already had a thread running for the larger project, so it is up to you if you want to post all of your work here or start a dedicated thread and just drop updates in here.
Cheers, D
Cheers, D

Spruslayer
Joined: May 26, 2017
KitMaker: 57 posts
Auto Modeler: 16 posts

Posted: Friday, October 11, 2019 - 01:01 AM UTC
Heres the progress on the service truck.Cab is ready for the interior tub to be installed and the chassie has the engine,exhaust,spare tire and drive shaft installed.Barring any issues i should have this wraped up in about a week


Joel_W
Joined: December 04, 2010
KitMaker: 11,666 posts
Auto Modeler: 2,974 posts
Posted: Friday, October 11, 2019 - 01:46 AM UTC
Quoted Text
Good to see you starting on the build Mark, I hope it works out as planned! Joel has started a dedicated build log thread for his build, and I already had a thread running for the larger project, so it is up to you if you want to post all of your work here or start a dedicated thread and just drop updates in here.
Cheers, D
D,
Thanks for shameless plug. My thoughts as I said on running updates here, as well as a full build blog in the Car forum serves two purposes. GB members tend to only try to follow builds in the GB Thread, which can be some what challenging with so many builds going on at one time, but tend not to checkout all the various posts and blogs in the open forums. While those members who aren't involved in the GB tend to only follow and view the posts and threads in the open forums. So as I usually do, I cross post to cover both bases. In the last GB, I didn't do full posts in the GB, but rather just a note that a new post was added to the Blog with a picture or two.
It's certainly something that everyone should consider, especially if their build is a long and intricate one.
Joel
Joel_W
Joined: December 04, 2010
KitMaker: 11,666 posts
Auto Modeler: 2,974 posts
Posted: Friday, October 11, 2019 - 01:49 AM UTC
D,
That 6 pack looks great. Sure hope that you have a really good mechanic to keep them in sync.
Joel
That 6 pack looks great. Sure hope that you have a really good mechanic to keep them in sync.
Joel
Joel_W
Joined: December 04, 2010
KitMaker: 11,666 posts
Auto Modeler: 2,974 posts
Posted: Friday, October 11, 2019 - 01:59 AM UTC
Quoted Text
Hey guyz, I spent a lot of time thrashing around the Web last night, and have had zero luck. But I can't find anything to use for a Ford Shield.
They first started using them in 1951, so the '49 kit doesn't have any.
Mark,
Don't give it another thought. We all know that your building a '49, and now with the realization that Ford didn't place any emblems on it, it isn't an issue.
As for the seam lines on the body, even I have used the black marker over mold seams to help in completely removing them. Just go easy and use the finger check to make sure that you're not flat spotting any one area.
Your concern about the raised seam line between the rear fender and the trunk deck got me curious, so I googled it. And indeed, that seam does exist.
Joel
Joel_W
Joined: December 04, 2010
KitMaker: 11,666 posts
Auto Modeler: 2,974 posts
Posted: Friday, October 11, 2019 - 02:04 AM UTC
Gabriel,
Interesting paint technique. Certainly, the depth of the clear and color coat can be seen, but I have my concerns about what looks like paint pigment in the Kleer Orange coat, how it would look on a full body or body panel.
Joel
Interesting paint technique. Certainly, the depth of the clear and color coat can be seen, but I have my concerns about what looks like paint pigment in the Kleer Orange coat, how it would look on a full body or body panel.
Joel
Joel_W
Joined: December 04, 2010
KitMaker: 11,666 posts
Auto Modeler: 2,974 posts
Posted: Friday, October 11, 2019 - 02:07 AM UTC
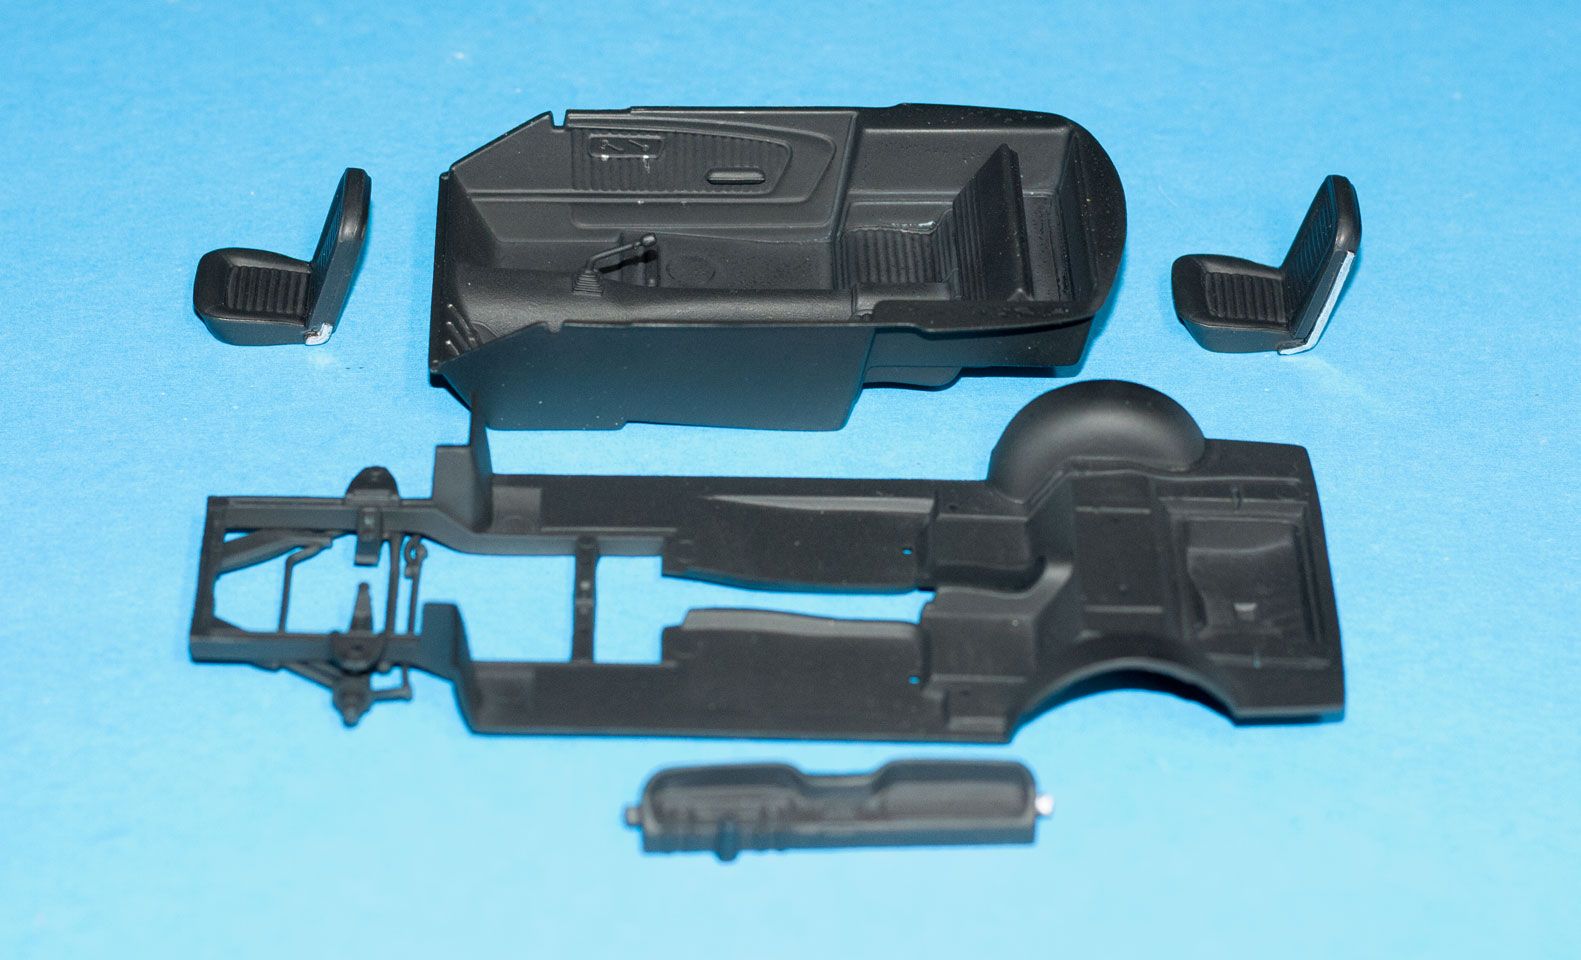
Mike,
Fantastic progress for sure. The full interior, especially the textured floor looks great, as well as the completed frame with engine/tranny, & Suspension.
Your build really came together super fast. sure hope that you'll be building another Ford next.
Joel
Fantastic progress for sure. The full interior, especially the textured floor looks great, as well as the completed frame with engine/tranny, & Suspension.
Your build really came together super fast. sure hope that you'll be building another Ford next.
Joel
Szmann
Joined: September 02, 2014
KitMaker: 1,977 posts
Auto Modeler: 1,371 posts
Posted: Friday, October 11, 2019 - 03:00 AM UTC
Quoted Text
Gabriel,
Interesting paint technique. Certainly, the depth of the clear and color coat can be seen, but I have my concerns about what looks like paint pigment in the Kleer Orange coat, how it would look on a full body or body panel.
Joel
Thanks, Joel!
What it looks as pigment into the clear, it is in fact under it - from Tamiya Gold. The effect appears only under magnification - from a normal viewing distance with naked eye it looks more "clean".
I have this concern as well, that camera can ruin my plans - I am considering now spraying Alclad pale gold instead of Titanium gold.
The main concern, however, is the uniformity of the clear orange. On small surfaces like the wheels, it worked well. On larger surfaces it is still to be seen.
Gabriel
md72
#439
Joined: November 05, 2005
KitMaker: 4,950 posts
Auto Modeler: 555 posts
Posted: Friday, October 11, 2019 - 03:14 AM UTC
Joel,
Thanks, I remembered reading that, I just couldn't find it and started to fear it was just the voices in my head.
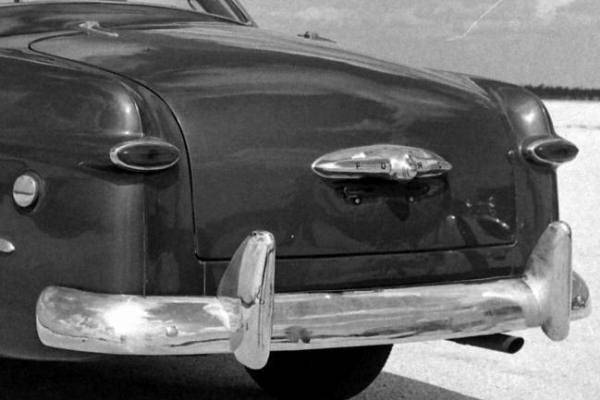
For the record, I'm attempting to convert a '49 into a '51. the sample I was looking at made it look much more like an aircraft panel line. But seeing your picture it looks like there was some sort of body color trim over the seam. The photo of my sample was taken in the last 20 years, so the trim could well have been lost.
There are only 3 major external indicators different between the '49 and '51. The single bullet grill, the trunk (boot) hinges are internal and the addition of the Ford shield in 4 locations. The external hinges are already removed, I'm working on a plan for the single to dual bullets, and I'm lost on handling the shields.
Quoted Text
My thoughts as I said on running updates here, as well as a full build blog in the Car forum serves two purposes. GB members tend to only try to follow builds in the GB Thread, which can be some what challenging with so many builds going on at one time, but tend not to checkout all the various posts and blogs in the open forums. While those members who aren't involved in the GB tend to only follow and view the posts and threads in the open forums. So as I usually do, I cross post to cover both bases. In the last GB, I didn't do full posts in the GB, but rather just a note that a new post was added to the Blog with a picture or two.
Thanks, I remembered reading that, I just couldn't find it and started to fear it was just the voices in my head.
For the record, I'm attempting to convert a '49 into a '51. the sample I was looking at made it look much more like an aircraft panel line. But seeing your picture it looks like there was some sort of body color trim over the seam. The photo of my sample was taken in the last 20 years, so the trim could well have been lost.
There are only 3 major external indicators different between the '49 and '51. The single bullet grill, the trunk (boot) hinges are internal and the addition of the Ford shield in 4 locations. The external hinges are already removed, I'm working on a plan for the single to dual bullets, and I'm lost on handling the shields.

forest1000
Joined: December 14, 2014
KitMaker: 80 posts
Auto Modeler: 44 posts
Posted: Friday, October 11, 2019 - 04:14 AM UTC
What about 3D printing for the shields. Maybe there's someone on the site that can do this or at a public library that has a 3D printer.
AussieReg
#007
Joined: June 09, 2009
KitMaker: 8,156 posts
Auto Modeler: 2,953 posts
Posted: Friday, October 11, 2019 - 10:13 AM UTC
Pretty much there with the body work now. I gave it a light coat of primer to check my work and it I'm happy with it so far. I will give it a light fine sand and another shot of primer, then if nothing else shows up requiring attention, a good final primer coat. After that it is wet sanding to get a glassy finish ready for the top coat colours.


Cheers, D
Cheers, D
Joel_W
Joined: December 04, 2010
KitMaker: 11,666 posts
Auto Modeler: 2,974 posts
Posted: Friday, October 11, 2019 - 10:36 AM UTC
Quoted Text
Quoted TextGabriel,
Interesting paint technique. Certainly, the depth of the clear and color coat can be seen, but I have my concerns about what looks like paint pigment in the Kleer Orange coat, how it would look on a full body or body panel.
Joel
Thanks, Joel!
What it looks as pigment into the clear, it is in fact under it - from Tamiya Gold. The effect appears only under magnification - from a normal viewing distance with naked eye it looks more "clean".
I have this concern as well, that camera can ruin my plans - I am considering now spraying Alclad pale gold instead of Titanium gold.
The main concern, however, is the uniformity of the clear orange. On small surfaces like the wheels, it worked well. On larger surfaces it is still to be seen.
Gabriel
Gabriel,
All the Alcad's I've ever air brushed went down smooth and had a consistent finish, so it should solve your problem. If you're concerned about the Tamiya Clear Orange, I'm pretty sure that Mr. Color has it as well, which is another option for you.
Joel
Joel_W
Joined: December 04, 2010
KitMaker: 11,666 posts
Auto Modeler: 2,974 posts
Posted: Friday, October 11, 2019 - 10:39 AM UTC
Quoted Text
Joel,
Quoted TextMy thoughts as I said on running updates here, as well as a full build blog in the Car forum serves two purposes. GB members tend to only try to follow builds in the GB Thread, which can be some what challenging with so many builds going on at one time, but tend not to checkout all the various posts and blogs in the open forums. While those members who aren't involved in the GB tend to only follow and view the posts and threads in the open forums. So as I usually do, I cross post to cover both bases. In the last GB, I didn't do full posts in the GB, but rather just a note that a new post was added to the Blog with a picture or two.
Thanks, I remembered reading that, I just couldn't find it and started to fear it was just the voices in my head.
For the record, I'm attempting to convert a '49 into a '51. the sample I was looking at made it look much more like an aircraft panel line. But seeing your picture it looks like there was some sort of body color trim over the seam. The photo of my sample was taken in the last 20 years, so the trim could well have been lost.
There are only 3 major external indicators different between the '49 and '51. The single bullet grill, the trunk (boot) hinges are internal and the addition of the Ford shield in 4 locations. The external hinges are already removed, I'm working on a plan for the single to dual bullets, and I'm lost on handling the shields.
Mark,
Thanks for the info on what the conversion will cover. As for that emblem, Maybe some one here has one that you can have or borrow and mold your own, or check with Gabriel about how to go about it. The worst case scenario is having to buy a kit just for the emblem.
Joel
Joel_W
Joined: December 04, 2010
KitMaker: 11,666 posts
Auto Modeler: 2,974 posts
Posted: Friday, October 11, 2019 - 10:41 AM UTC
D,
Double thumbs up for that fix. It looks perfect.
Joel
Double thumbs up for that fix. It looks perfect.
Joel
Szmann
Joined: September 02, 2014
KitMaker: 1,977 posts
Auto Modeler: 1,371 posts
Posted: Friday, October 11, 2019 - 12:16 PM UTC
Mike, very good progress for sure. All sub-assemblies looks good but I specially like the frame. And this is a good example for me, since I'm doing a very similar build.
Damian, the beauty treatment you have forced over that body pays off big time. Yes, she looks ready for the final coat of primer.
I agree on Alclad properties, but the clear will be diluted with MLT as well and I'm a little worried that the solvent may burn thru it. However, I think it's going to be Alclad Pale Gold after all!
Mark, I can do the shield for you - 3D design and print. If you are interested, please PM me.
UPDATE - Wheels!
As usual, I have tested everything first on the spare wheel, which is going to be out of sight anyhow from a normal viewing angle. The tires are nice, although unbranded. They fit very well and they have the "right"feel about them, not too soft, not too hard or sticky. And do they look "blown"!
I have picked the lug nuts and the central circle of the rim with Molotow 1mm chrome pen, but I have noticed an odd behavior: it has a tendency to "stick" and it is nowhere as glossy as expected. Hm... maybe a second application will solve the problem. However, I was pleased with the look of the wheel.

The other wheels have received the same treatment. the picture illustrates very well the achieved effect on multiple paint layers, as the color changes from dark auburn to reddish gold. Unintentionally, I nearly achieved a color-shift scheme!

The front end completed, with the addition of steering bar and sway bar with links:

I couldn't refrain myself from making a two-tone exhaust system. Oh, well, I need a doctor Note: it is the only part that doesn't fit "like a glove" so far, but still the proper alignment is very easy to achieve:

The spare wheel added to the chassis frame. This time the diagonal member does fit like a Champagne cork and adds a lot of rigidity to the frame - well done Moebius!

Finally, I added the trans-axle with the differential, for even more sturdiness. I start wondering if I can actually carry stuff with this truck upon finishing the build

Cheers!
Gabriel
Damian, the beauty treatment you have forced over that body pays off big time. Yes, she looks ready for the final coat of primer.
Quoted Text
Gabriel,
All the Alcad's I've ever air brushed went down smooth and had a consistent finish, so it should solve your problem. If you're concerned about the Tamiya Clear Orange, I'm pretty sure that Mr. Color has it as well, which is another option for you.
Joel
I agree on Alclad properties, but the clear will be diluted with MLT as well and I'm a little worried that the solvent may burn thru it. However, I think it's going to be Alclad Pale Gold after all!
Quoted Text
Mark,
Thanks for the info on what the conversion will cover. As for that emblem, Maybe some one here has one that you can have or borrow and mold your own, or check with Gabriel about how to go about it. The worst case scenario is having to buy a kit just for the emblem.
Mark, I can do the shield for you - 3D design and print. If you are interested, please PM me.
UPDATE - Wheels!
As usual, I have tested everything first on the spare wheel, which is going to be out of sight anyhow from a normal viewing angle. The tires are nice, although unbranded. They fit very well and they have the "right"feel about them, not too soft, not too hard or sticky. And do they look "blown"!
I have picked the lug nuts and the central circle of the rim with Molotow 1mm chrome pen, but I have noticed an odd behavior: it has a tendency to "stick" and it is nowhere as glossy as expected. Hm... maybe a second application will solve the problem. However, I was pleased with the look of the wheel.
The other wheels have received the same treatment. the picture illustrates very well the achieved effect on multiple paint layers, as the color changes from dark auburn to reddish gold. Unintentionally, I nearly achieved a color-shift scheme!
The front end completed, with the addition of steering bar and sway bar with links:
I couldn't refrain myself from making a two-tone exhaust system. Oh, well, I need a doctor
Note: it is the only part that doesn't fit "like a glove" so far, but still the proper alignment is very easy to achieve:The spare wheel added to the chassis frame. This time the diagonal member does fit like a Champagne cork and adds a lot of rigidity to the frame - well done Moebius!
Finally, I added the trans-axle with the differential, for even more sturdiness. I start wondering if I can actually carry stuff with this truck upon finishing the build
Cheers!
Gabriel
 |

WEB HOSTING BY


Copyright ©2021 Auto Modeler and Kitmaker Network, a subsidiary of Silver Star Enterprises
All Rights Reserved. Please read our Conditions of Use and Privacy Policy.
All Rights Reserved. Please read our Conditions of Use and Privacy Policy.