

Yup, Joe, I will! Thanks!


Go to automodeler.com for the current dynamic site!
The Garage
For general automotive modeling or non-modeling topics.
For general automotive modeling or non-modeling topics.
Hosted by Jim Starkweather
Strip, Track & Trail Official Build Thread

pnance26

Joined: January 22, 2016
KitMaker: 766 posts
Auto Modeler: 140 posts

Posted: Wednesday, May 27, 2020 - 05:27 AM UTC

Joel_W
Joined: December 04, 2010
KitMaker: 11,666 posts
Auto Modeler: 2,974 posts

Posted: Wednesday, May 27, 2020 - 05:50 AM UTC
Quoted Text
Quoted TextD,
Those side decals laid down perfectly.
Joel
Thanks Joel, I think I've found the trick here. I have a mug of hot water and dip a Q-tip in it, and use this to roll out the decal once it's down. This seems to stretch out the carrier film and the Mr Mark Softer settles it into the surface contours.
LHS done tonight (with the statutory glass of Shiraz!)
Cheers, D
D,
Warm water works wonders on all decals. I use very warm tap water to soak the decals and as you've found out, it makes a huge difference. I keep on promising myself that I have to buy a coffee cup warmer for my decal tray, but so far I've either haven't gotten around to it, or when at the store, totally forget about it.

Joel

Joel_W
Joined: December 04, 2010
KitMaker: 11,666 posts
Auto Modeler: 2,974 posts
Posted: Wednesday, May 27, 2020 - 05:58 AM UTC
Quoted Text
dave, joel, michael, damian- yes when looking at it in photo it looks good. but after wet sanding i ended up with light patches where the paint was thinner. plus even though it is smooth i can still see the shadows so to speak, of the specks and i am not sure if they would blend in with a coat of clear.
the other issue i am having is tires. the kit tires to me look too narrow and the tires from my spares look too wide.
joe
Joe,
I've been there being way to super critical of a finished build, and just staring at all the little errors that just continue to pop out at me. After a little time, I don't even notice those issues, and I start to see the model as a whole display piece. I guess it's just human nature.
I'm willing to bet that if you didn't mention the black specks and the repaint, not one of us would have picked it up. Still, as far as I'm concerned, it's one great build of a not so great kit.
And I'll even go one further. On my Lotus, I was putting on the last little pieces in the engine bay, and I just plain forgot to wipe the brush on the bottle lid of Extra Thin. Naturally I didn't notice it right away, but I managed to get two drops on the exposed side of the outer chassis
 Talk about dumb luck. So I'm letting it completely dry for a few more hours, then I'll sand, mask, prime, and repaint. That should kill a good few hours tomorrow instead of working on the polishing of the complete shell, and then starting the rear wing.
 Joel
pnance26
Joined: January 22, 2016
KitMaker: 766 posts
Auto Modeler: 140 posts
Posted: Wednesday, May 27, 2020 - 08:14 AM UTC
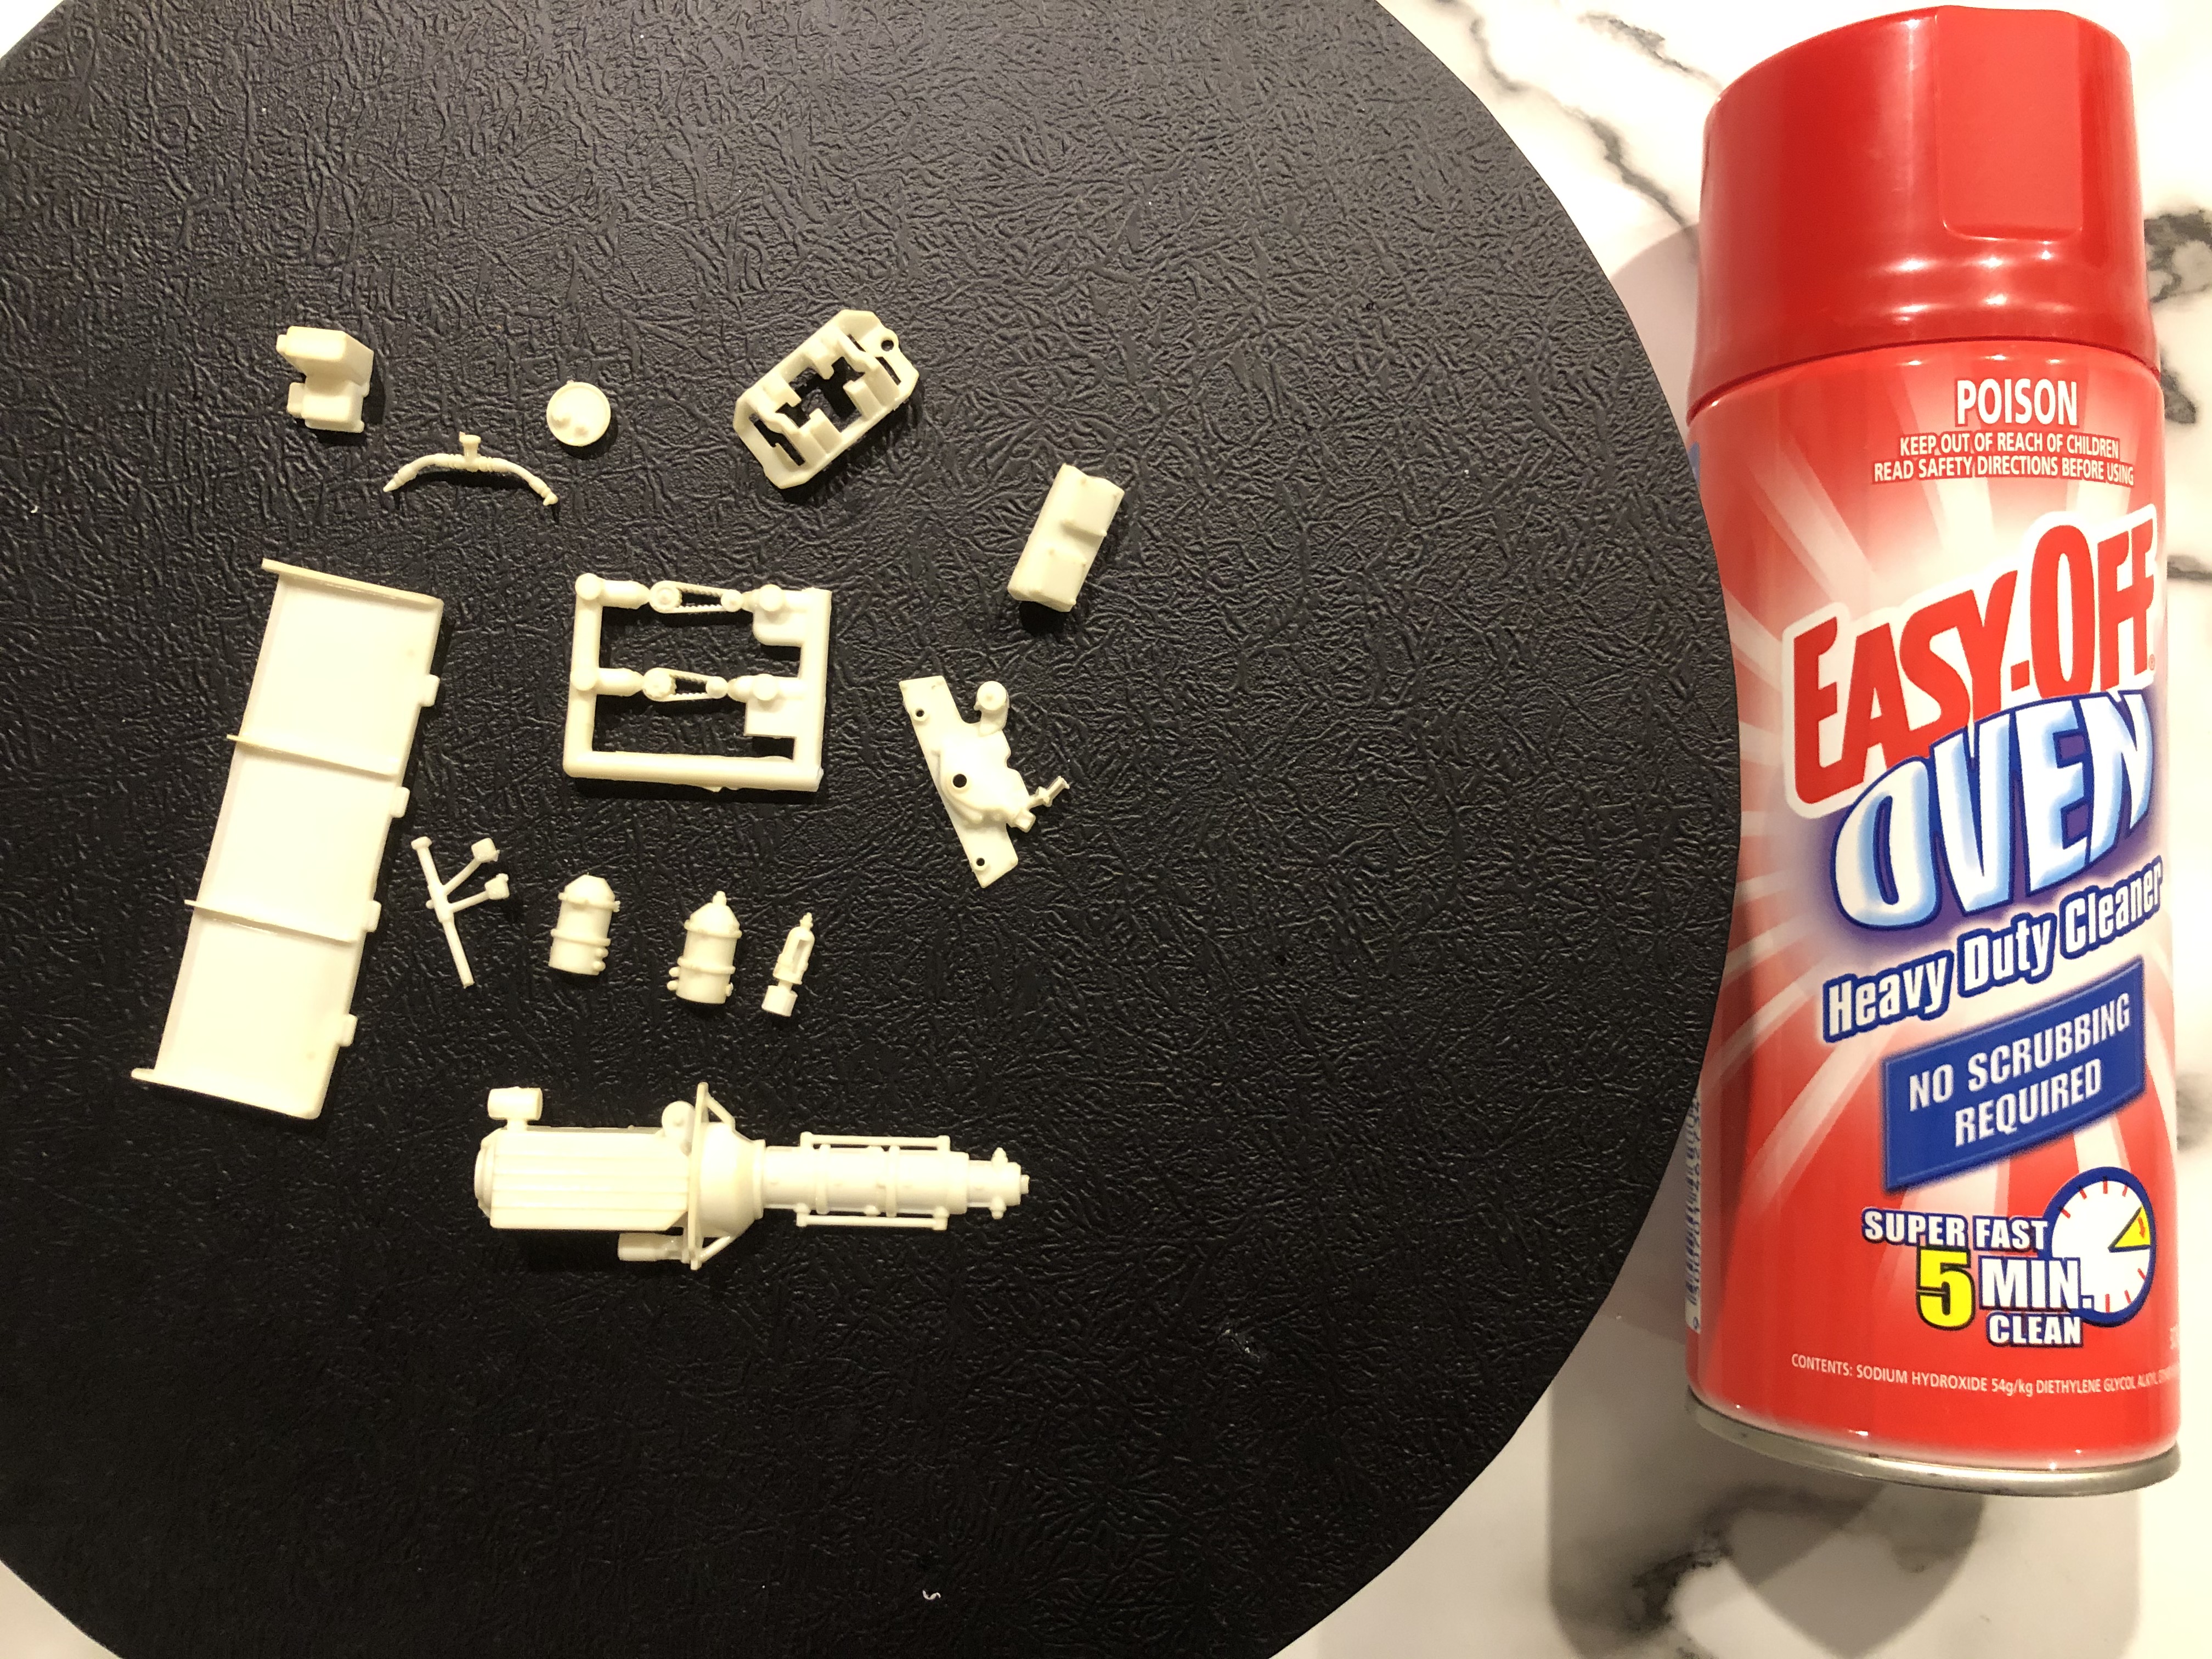
I just received some Testor's Aluminum Plate Buffing Metallizer in rattle cans.
Can anyone please talk me through the steps from the beginning starting with removing the kit chrome from a part?
Please include ALL the steps including buffing and sealing. I don't think I have any Testor's clear, just Tamiya. If that won't work, please let me know. Do I need to warm the cans?
Thanks in advance. I am going to be considering using this on the wings for my Ferrari 312T.

jimb
Joined: August 25, 2006
KitMaker: 2,539 posts
Auto Modeler: 1,405 posts

Posted: Wednesday, May 27, 2020 - 10:10 AM UTC
Patrick,
For the Testors Metalizers, I believe you need Testors Metalizer Sealer. They are both lacquer.
Jim
For the Testors Metalizers, I believe you need Testors Metalizer Sealer. They are both lacquer.
Jim


rv1963
Joined: December 07, 2004
KitMaker: 1,888 posts
Auto Modeler: 806 posts

Posted: Wednesday, May 27, 2020 - 10:45 AM UTC
Patrick-I really never use those paints, but to strip any kind of chrome i use spray on oven cleaner, i put the parts in a plastic resealable tub cover them with the spray and leave them in for as long as it takes, some chrome comes off in a few minutes others take longer.
You could also use Super clean grill cleaner a lot of model builders use it to strip chrome and paint.
You could also use Super clean grill cleaner a lot of model builders use it to strip chrome and paint.

AussieReg

#007

Joined: June 09, 2009
KitMaker: 8,156 posts
Auto Modeler: 2,953 posts

Posted: Wednesday, May 27, 2020 - 11:06 AM UTC
Hi Patrick.
I can't comment on the Testor's product, never used it or seen it in use by my friends here.
As for stripping chrome, Robert is on the money.
About 5 minutes in a ziplock bag then a wash in warm soapy water.
Cheers, D
I can't comment on the Testor's product, never used it or seen it in use by my friends here.
As for stripping chrome, Robert is on the money.
About 5 minutes in a ziplock bag then a wash in warm soapy water.
Cheers, D

Dixon66
Joined: December 12, 2002
KitMaker: 1,500 posts
Auto Modeler: 645 posts

Posted: Wednesday, May 27, 2020 - 12:44 PM UTC
Patrick, I do use the Metalizers.
1. Strip the chrome with Easy-Off in a zip top bag.
2. Wash in warm water and then with warm soapy water.
3. Rinse and let dry overnight.
4. Prime with MSP 1500 Gray.
5. Light mist coats of the Metalizer.
5. Let set up while you clean the airbrush.
6. Seal with either their sealer or very light coats of any other clear lacquer gloss depending on what type of finish you are looking for. If they are the non-buffing ones I don't always seal as long as it is not going to be handled much (engines, exhaust, etc.)
I just sprayed a few different ones between yesterday and today.
Any flaws in the plastic will be magnified, so make sure you get all the seams, EJPs, and sanding scars thoroughly smooth.
pnance26
Joined: January 22, 2016
KitMaker: 766 posts
Auto Modeler: 140 posts
Posted: Wednesday, May 27, 2020 - 01:23 PM UTC
Thanks much for all the hints.
I will try to get photos of the test spoons I did... just ran out of time today.
I see EZ-Off is very popular. I use plain old bleach myself. Chrome plate is gone in minutes!
Happy modeling!
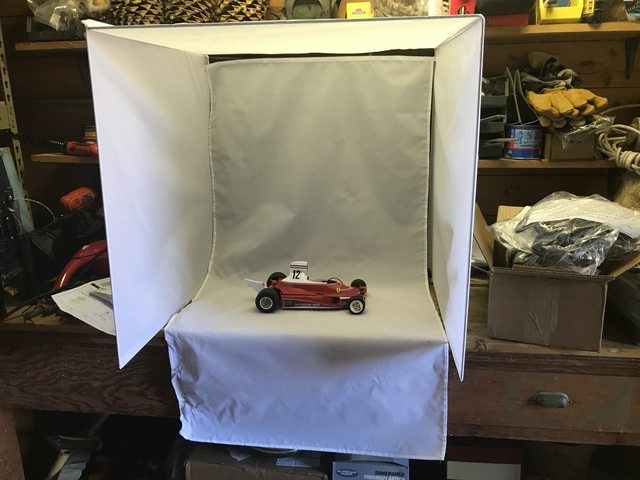
BTW, I got something new today! I didn't have time to get out the LED lights or get out the wrinkles but I am looking forward to this!
And here is where I would be if I hadn't had that colossal screw-up...
I have new parts coming so all is well!
I will try to get photos of the test spoons I did... just ran out of time today.
I see EZ-Off is very popular. I use plain old bleach myself. Chrome plate is gone in minutes!
Happy modeling!
BTW, I got something new today! I didn't have time to get out the LED lights or get out the wrinkles but I am looking forward to this!
And here is where I would be if I hadn't had that colossal screw-up...
I have new parts coming so all is well!
jimb
Joined: August 25, 2006
KitMaker: 2,539 posts
Auto Modeler: 1,405 posts
Posted: Wednesday, May 27, 2020 - 11:44 PM UTC
Nice looking photo booth.
Jim
Jim
Dixon66
Joined: December 12, 2002
KitMaker: 1,500 posts
Auto Modeler: 645 posts
Posted: Thursday, May 28, 2020 - 12:06 AM UTC
I tried bleach as a chrome stripper, but it didn't always remove the lacquer undercoating and left yellow blobs on the parts and in the crevasses especially. Oven cleaner removes that stuff too.
Nice photo setup.
Nice photo setup.
Joel_W
Joined: December 04, 2010
KitMaker: 11,666 posts
Auto Modeler: 2,974 posts
Posted: Thursday, May 28, 2020 - 12:42 AM UTC
Patrick,
Now that's one really nice looking photo booth.
Like everyone else, I use Oven cleaner. Usually the store brand as it's always cheaper. I've tried bleach a few times and some times it worked, and some times it didn't. The process time was super long compared to 10 min or so with the oven cleaner. As I said on the other site, this stuff is really caustic. Even though I cover the plastic container, I always do it in the garage with the door open and I try not to breath the stuff.
After stripping, a running water wash, then a mild detergent bath is needed.
For Metalizer Chromes I use a gloss Black primer. As I've said before, I almost always use Alcad 2 and follow their recommendations on their site.
Joel
pnance26
Joined: January 22, 2016
KitMaker: 766 posts
Auto Modeler: 140 posts
Posted: Thursday, May 28, 2020 - 06:26 AM UTC
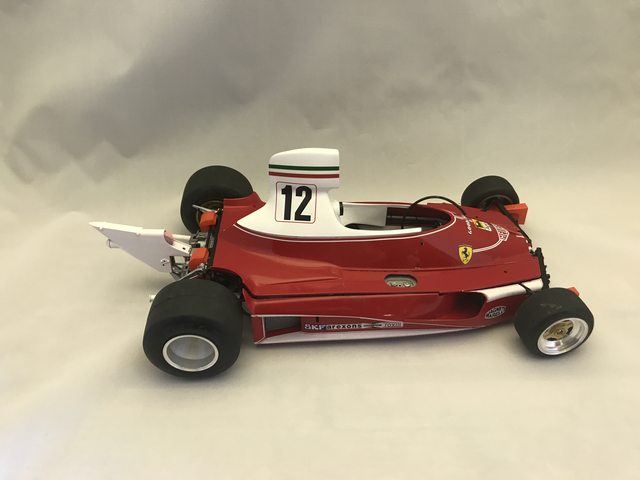
A couple of more from the Tamiya 1/12th Ferrari 312T...
The nose knows...
And the white spoon test for replacing "chrome wings". I have eliminated Bright Gun metal as too dark, and the Gloss Aluminum as too not gloss.
That leaves AS-12 Bare Metal Silver from Tamiya and Testor's Aluminum Plate Buffing Metalizer. Both have a gloss coat of Tamiya TS-13.
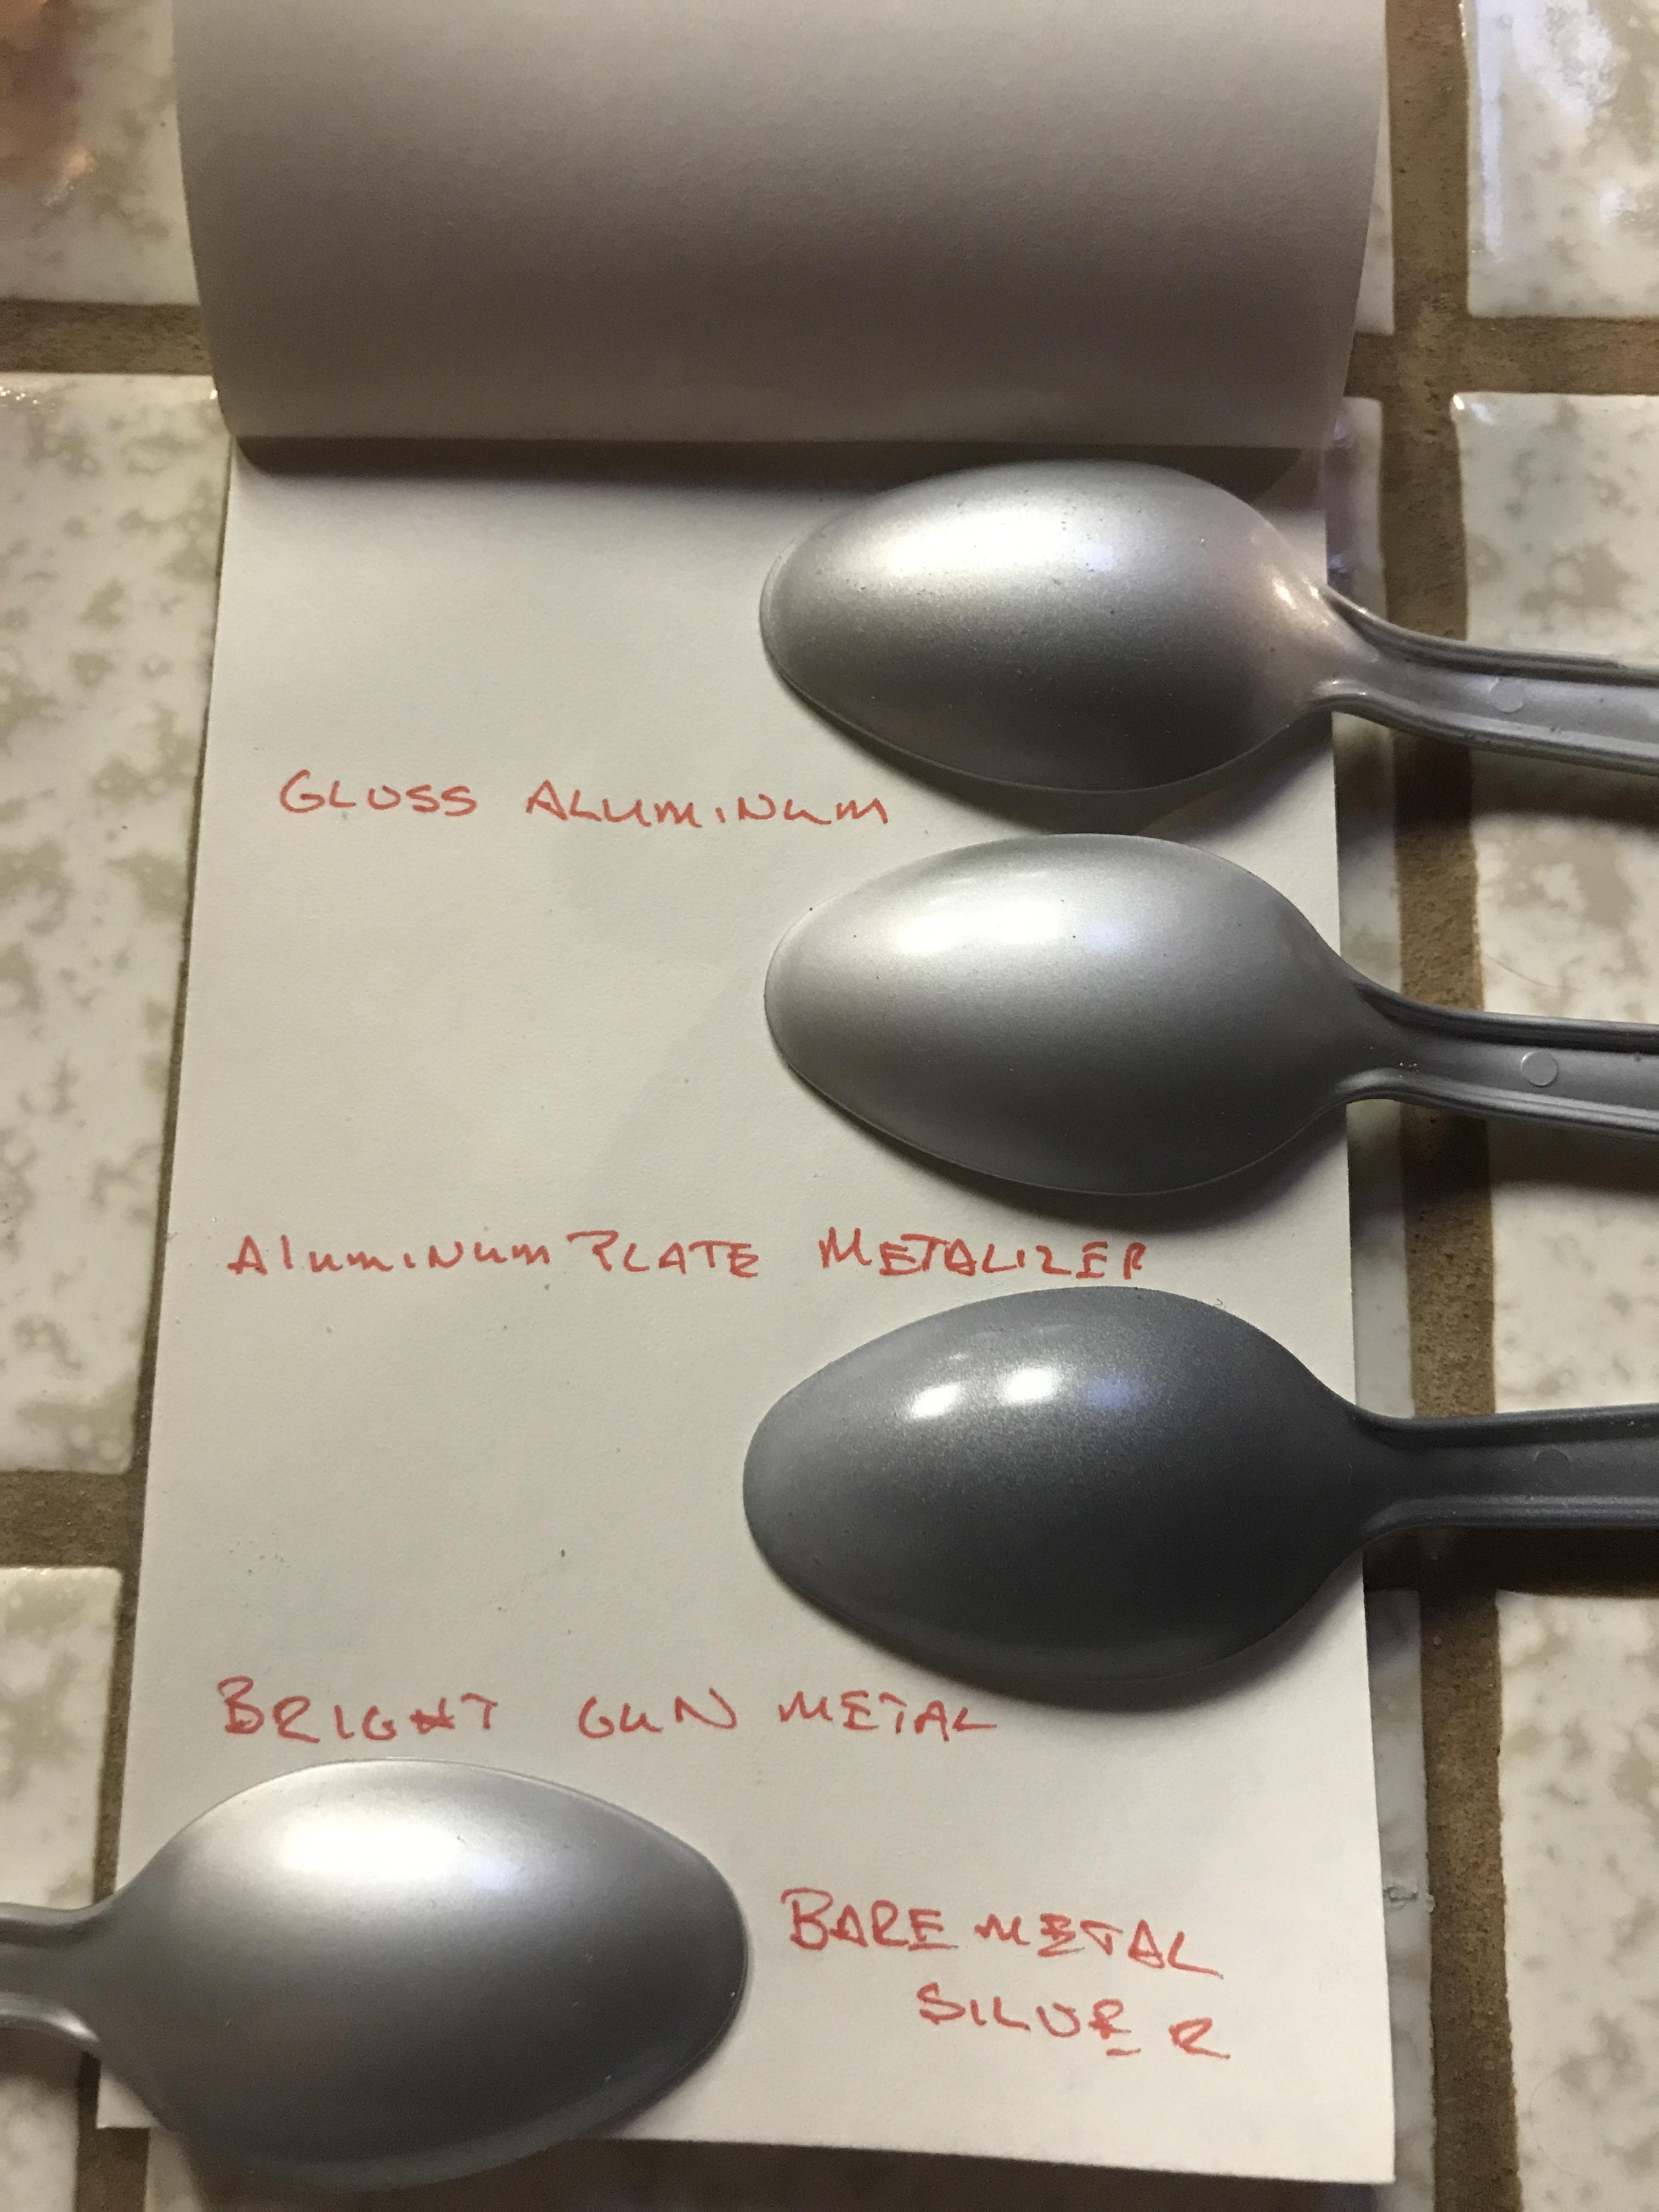
Your comments are always appreciated.
The nose knows...
And the white spoon test for replacing "chrome wings". I have eliminated Bright Gun metal as too dark, and the Gloss Aluminum as too not gloss.
That leaves AS-12 Bare Metal Silver from Tamiya and Testor's Aluminum Plate Buffing Metalizer. Both have a gloss coat of Tamiya TS-13.
Your comments are always appreciated.
pnance26
Joined: January 22, 2016
KitMaker: 766 posts
Auto Modeler: 140 posts
Posted: Thursday, May 28, 2020 - 08:30 AM UTC
Jim, David, and Joel,
Know what the upshot is? That photo booth was less than $50 and folds up flat, comes with four different background colors (white, red, blue, and black) and the lights are included! I haven't put them up yet, but they are LED so there shouldn't be any color corrections needed.
Pretty affordable to me! I also spent another $45 on a better table top tripod than the one provided so I can really focus on the photography (see what I did there... LOL!)
If you are serious about photos of your models, this is a very good investment. Less than $100!
I have also just ordered new decals. Getting the paint down will take a week or so with concentrated effort. After that, I do have a template to go by with decals.
And in the meantime, as paint is curing, I can finish up the wings. They need painted and then decals and then mounted. So I figure there is a good 8 to 10 hours left on this build!
AussieReg
#007
Joined: June 09, 2009
KitMaker: 8,156 posts
Auto Modeler: 2,953 posts
Posted: Thursday, May 28, 2020 - 10:50 AM UTC
Patrick. I'm leaning towards the Metalizer for what you want to achieve here. I would also like to see how it loos with a satin clear instead of a gloss. I think the gloss makes it look more like a painted finish than bare metal, if that makes sense?
Cheers, D
Cheers, D
rv1963
Joined: December 07, 2004
KitMaker: 1,888 posts
Auto Modeler: 806 posts
Posted: Thursday, May 28, 2020 - 10:59 AM UTC
Patrick-I am with Damian on this one the metalizer looks the best to me to.
pnance26
Joined: January 22, 2016
KitMaker: 766 posts
Auto Modeler: 140 posts
Posted: Thursday, May 28, 2020 - 11:02 AM UTC
Robert, Damian
The metalizer is where I am going as well. I have a matte finish clear that I can test if that is where we are going with this! Will take a few days to sort out...
The metalizer is where I am going as well. I have a matte finish clear that I can test if that is where we are going with this! Will take a few days to sort out...
AussieReg
#007
Joined: June 09, 2009
KitMaker: 8,156 posts
Auto Modeler: 2,953 posts
Posted: Thursday, May 28, 2020 - 11:03 AM UTC
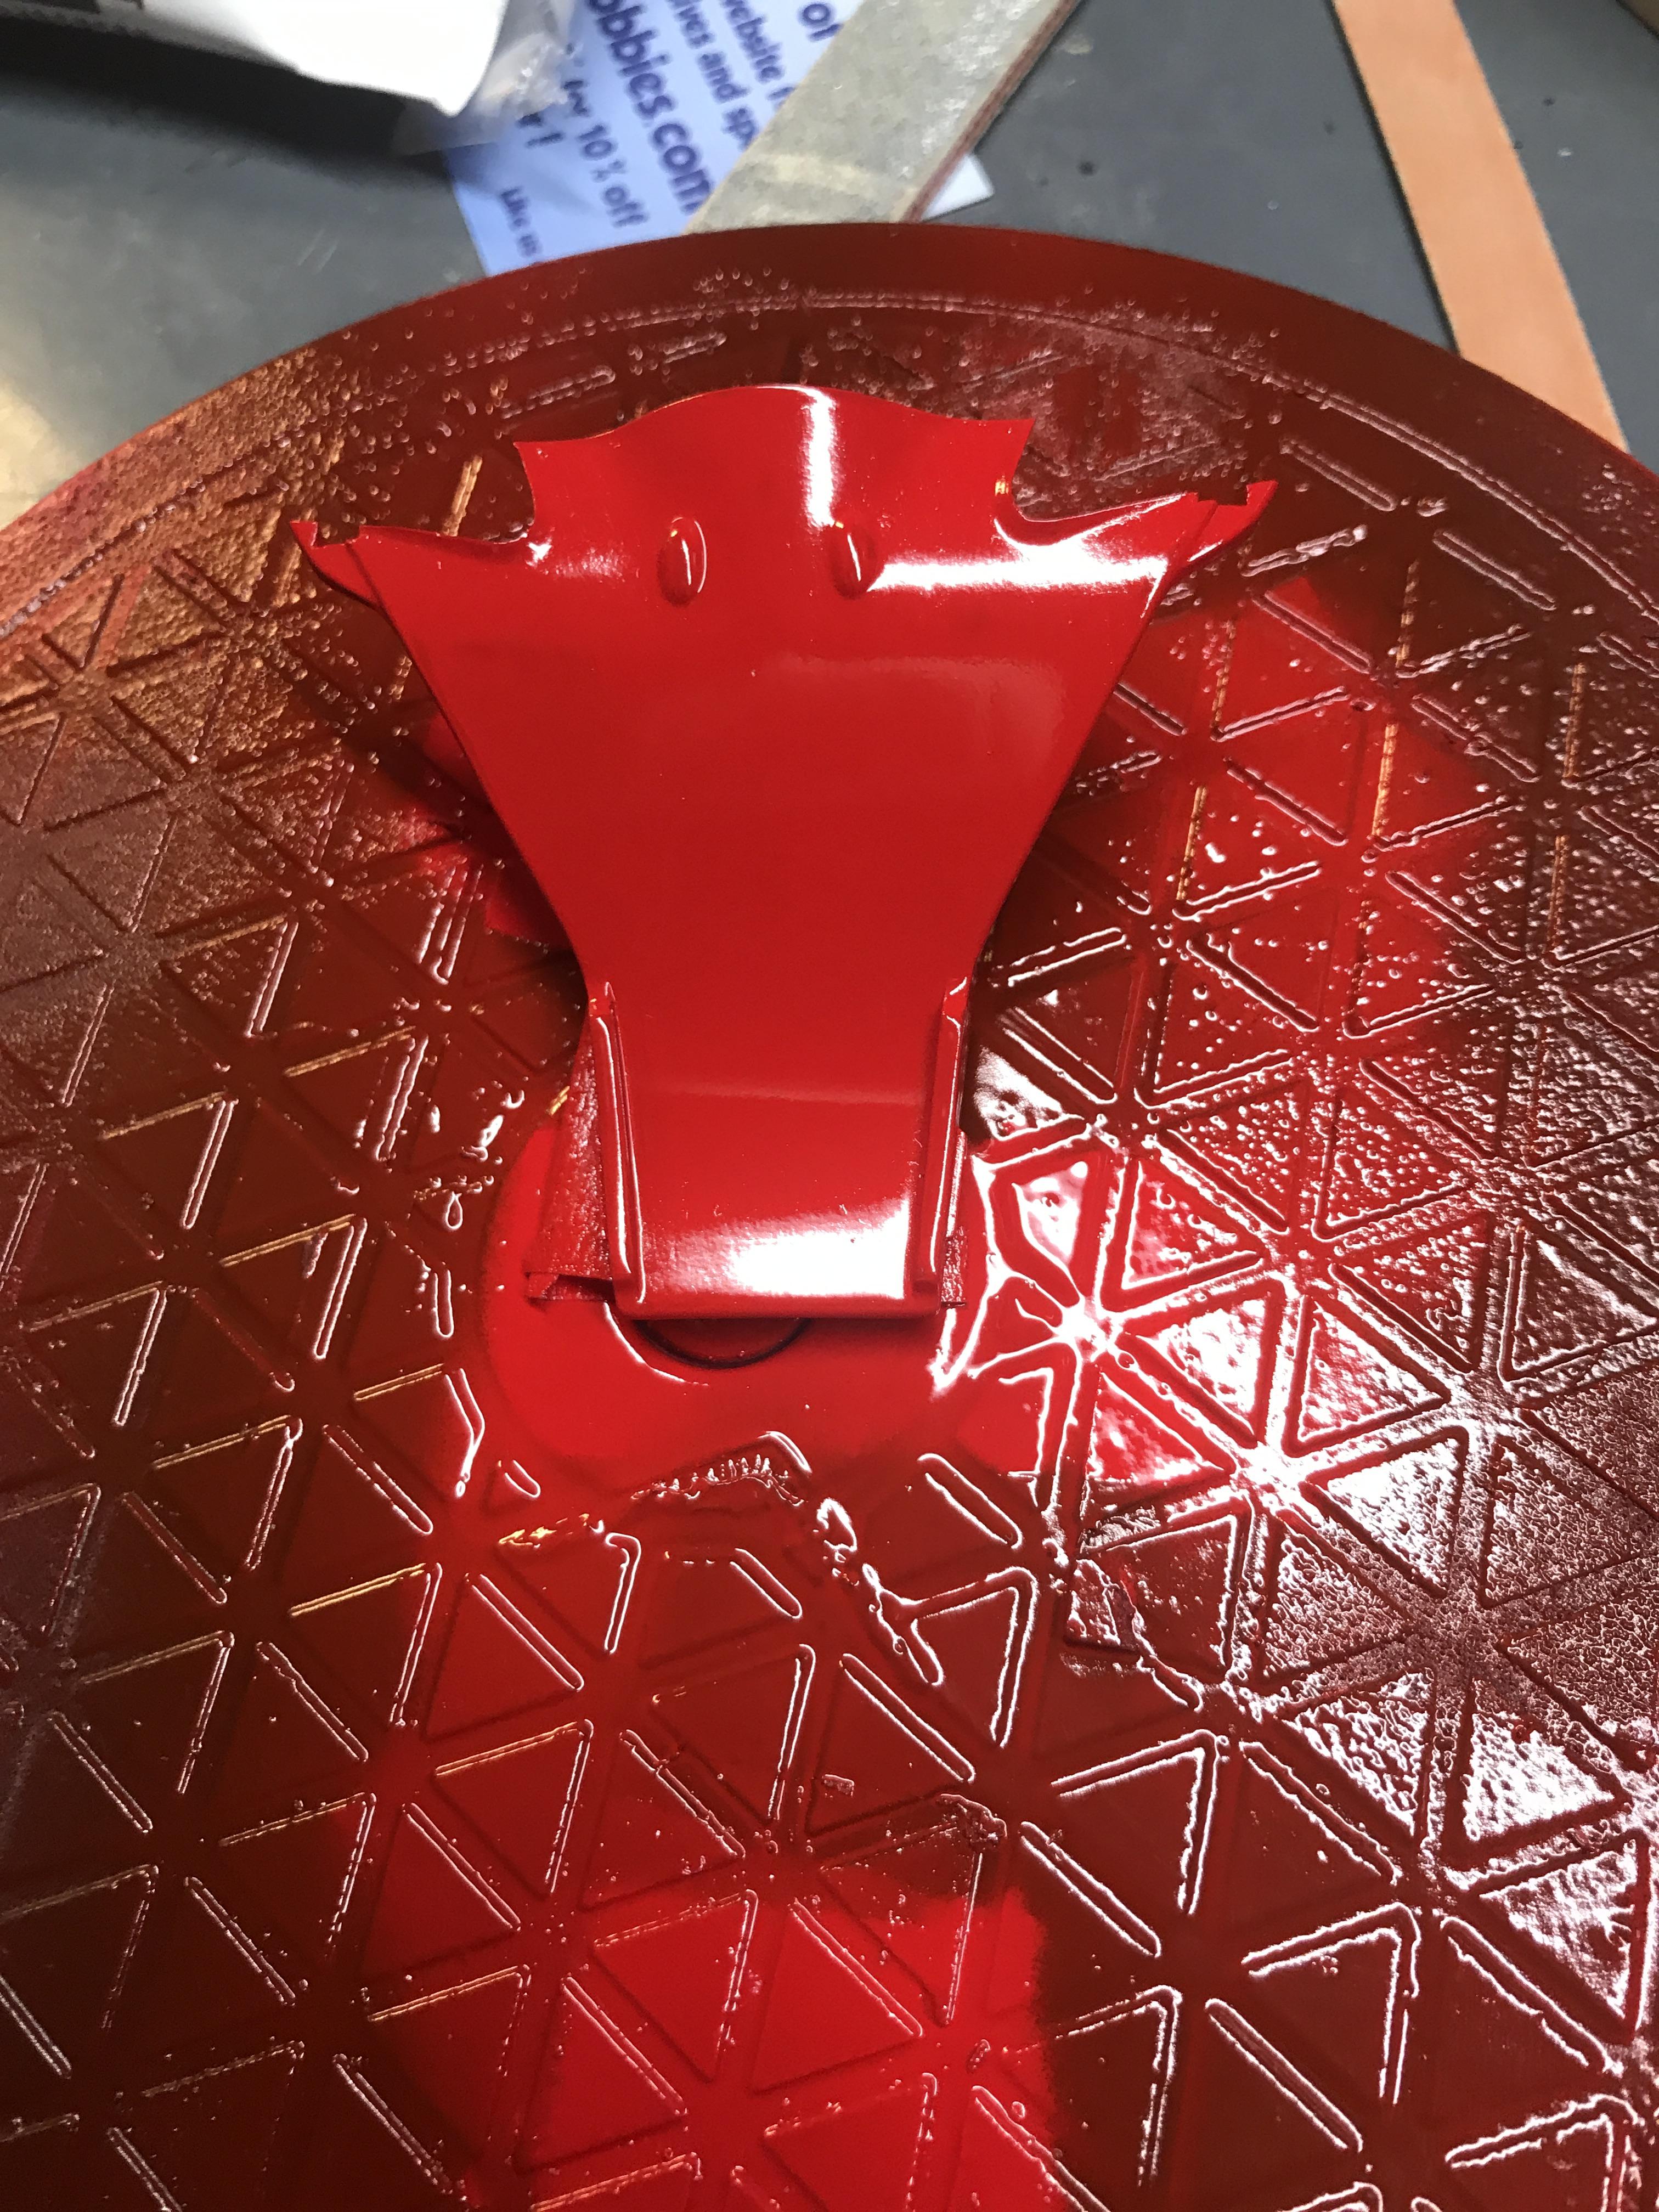
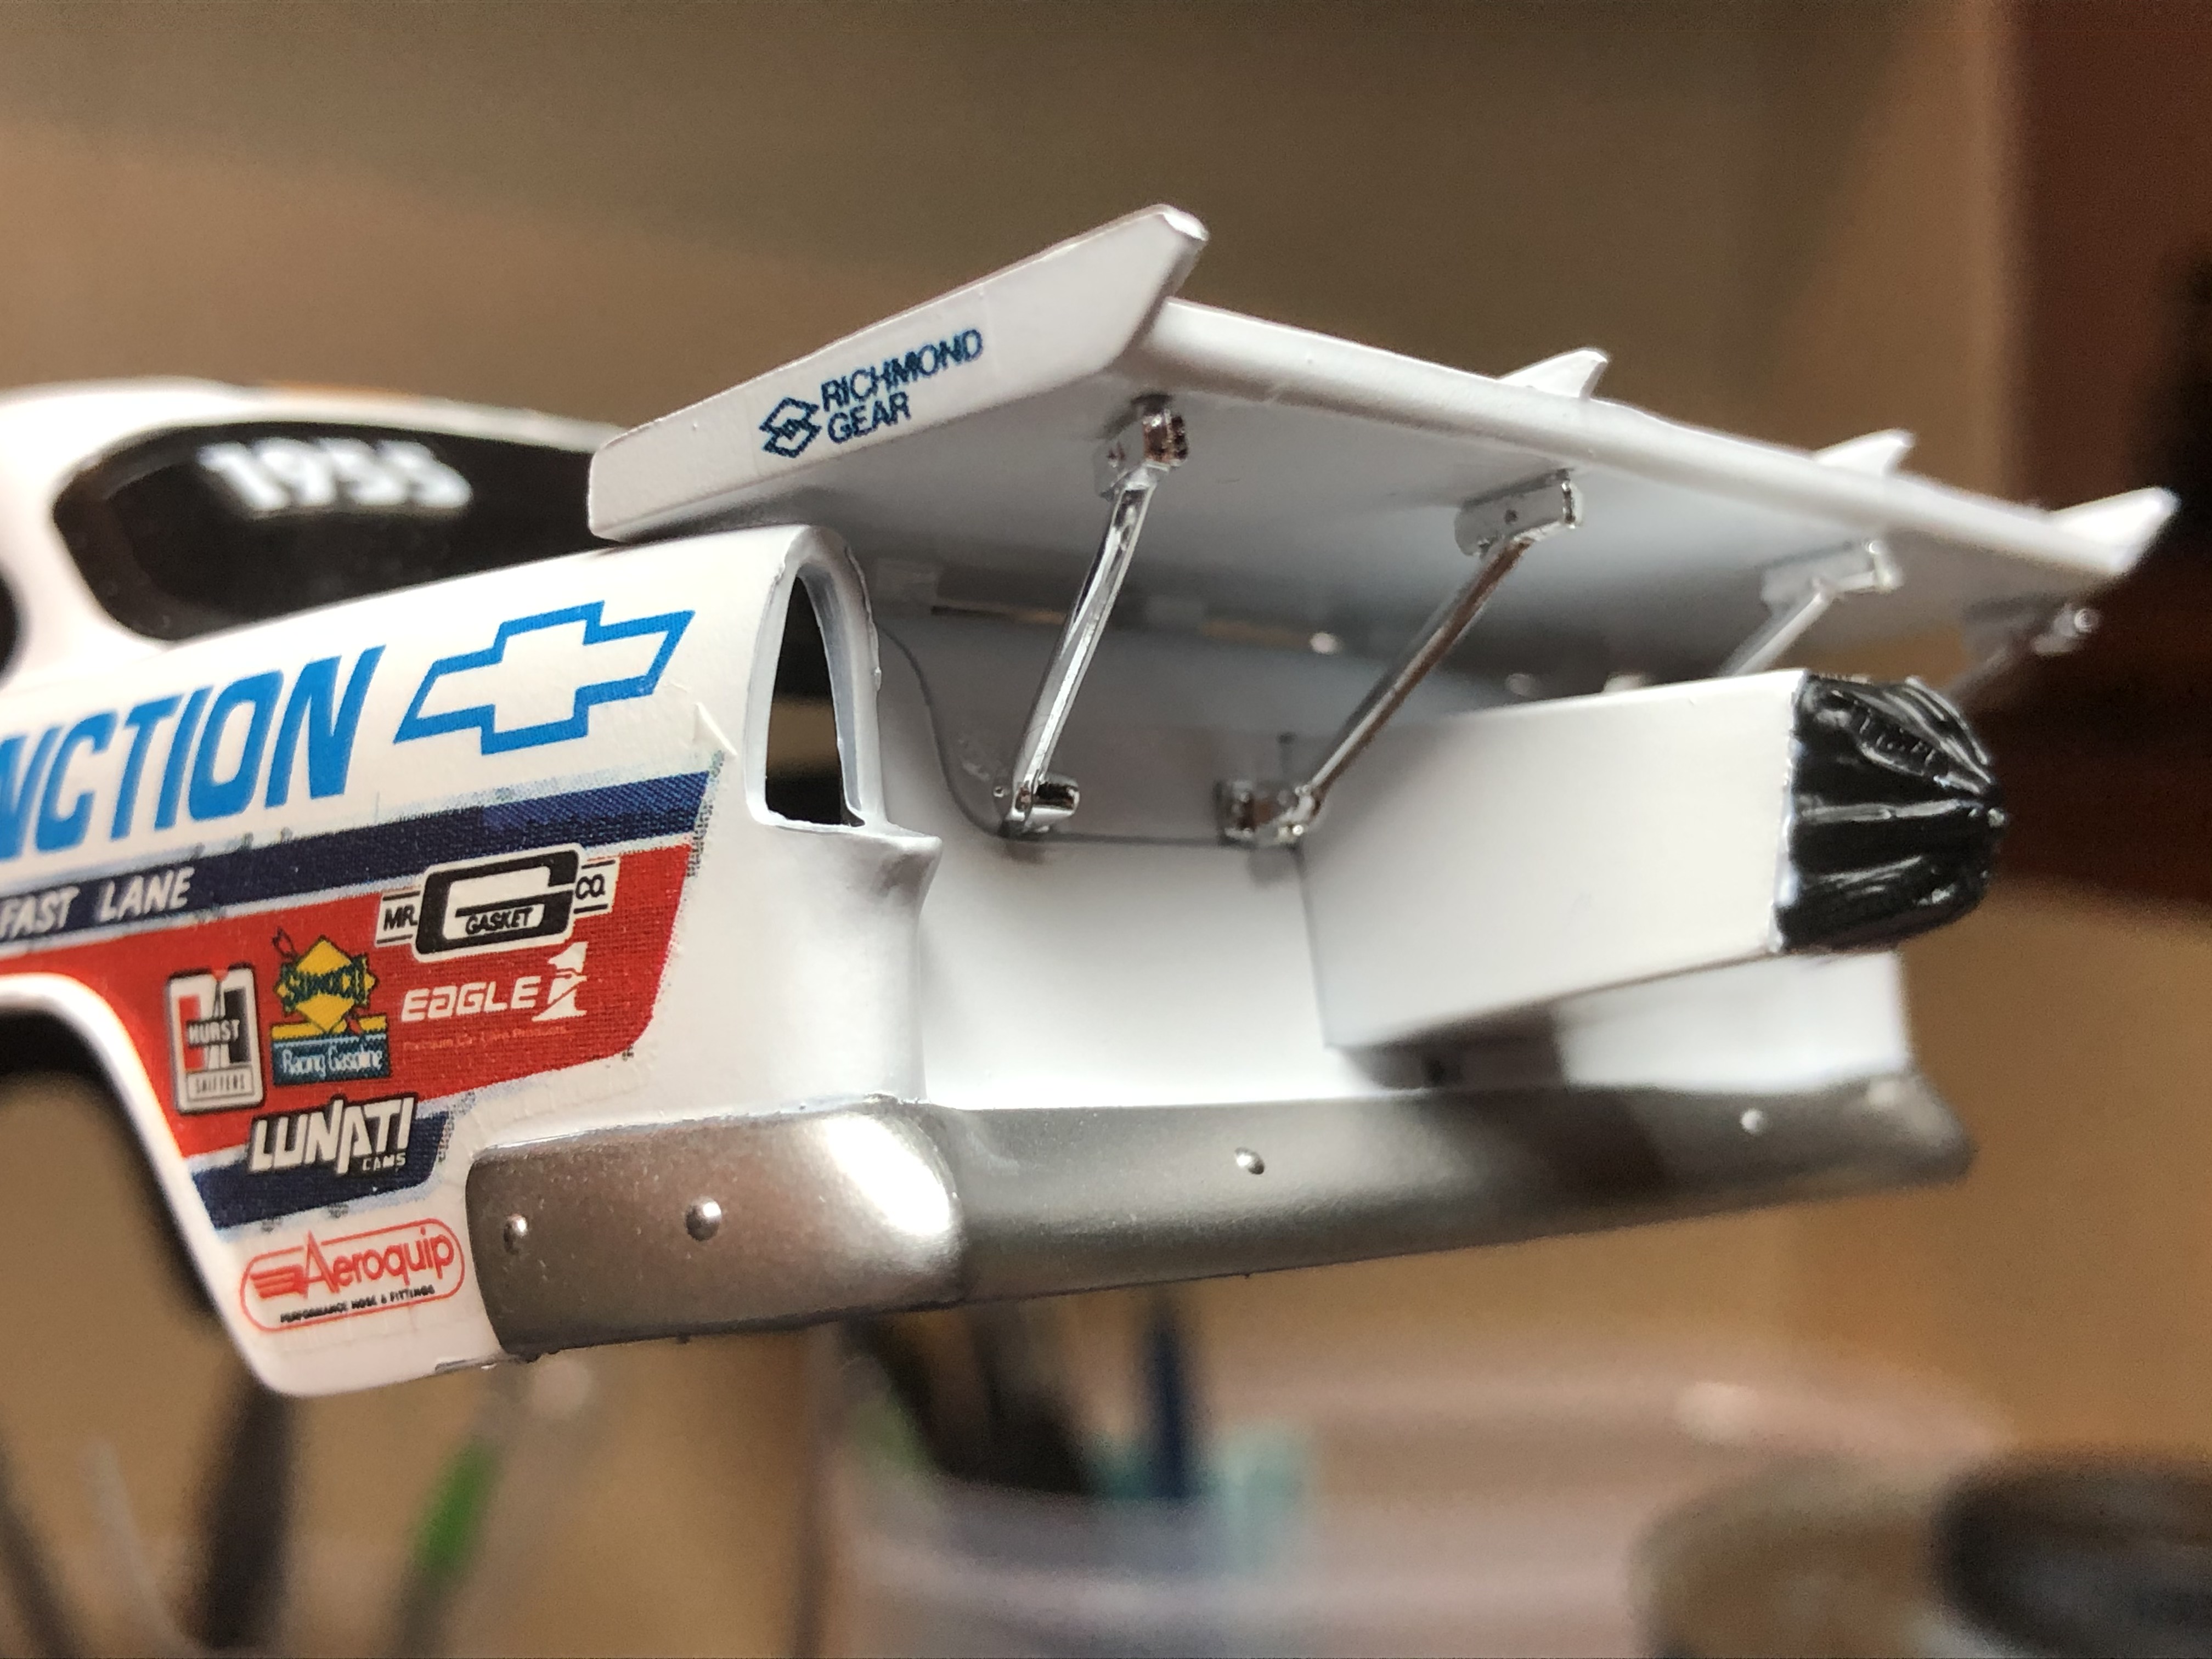
I gave the decals a rest last night and moved forward with some more assembly tasks.
First up I fitted off the drag chute pack and rear spoiler support struts.
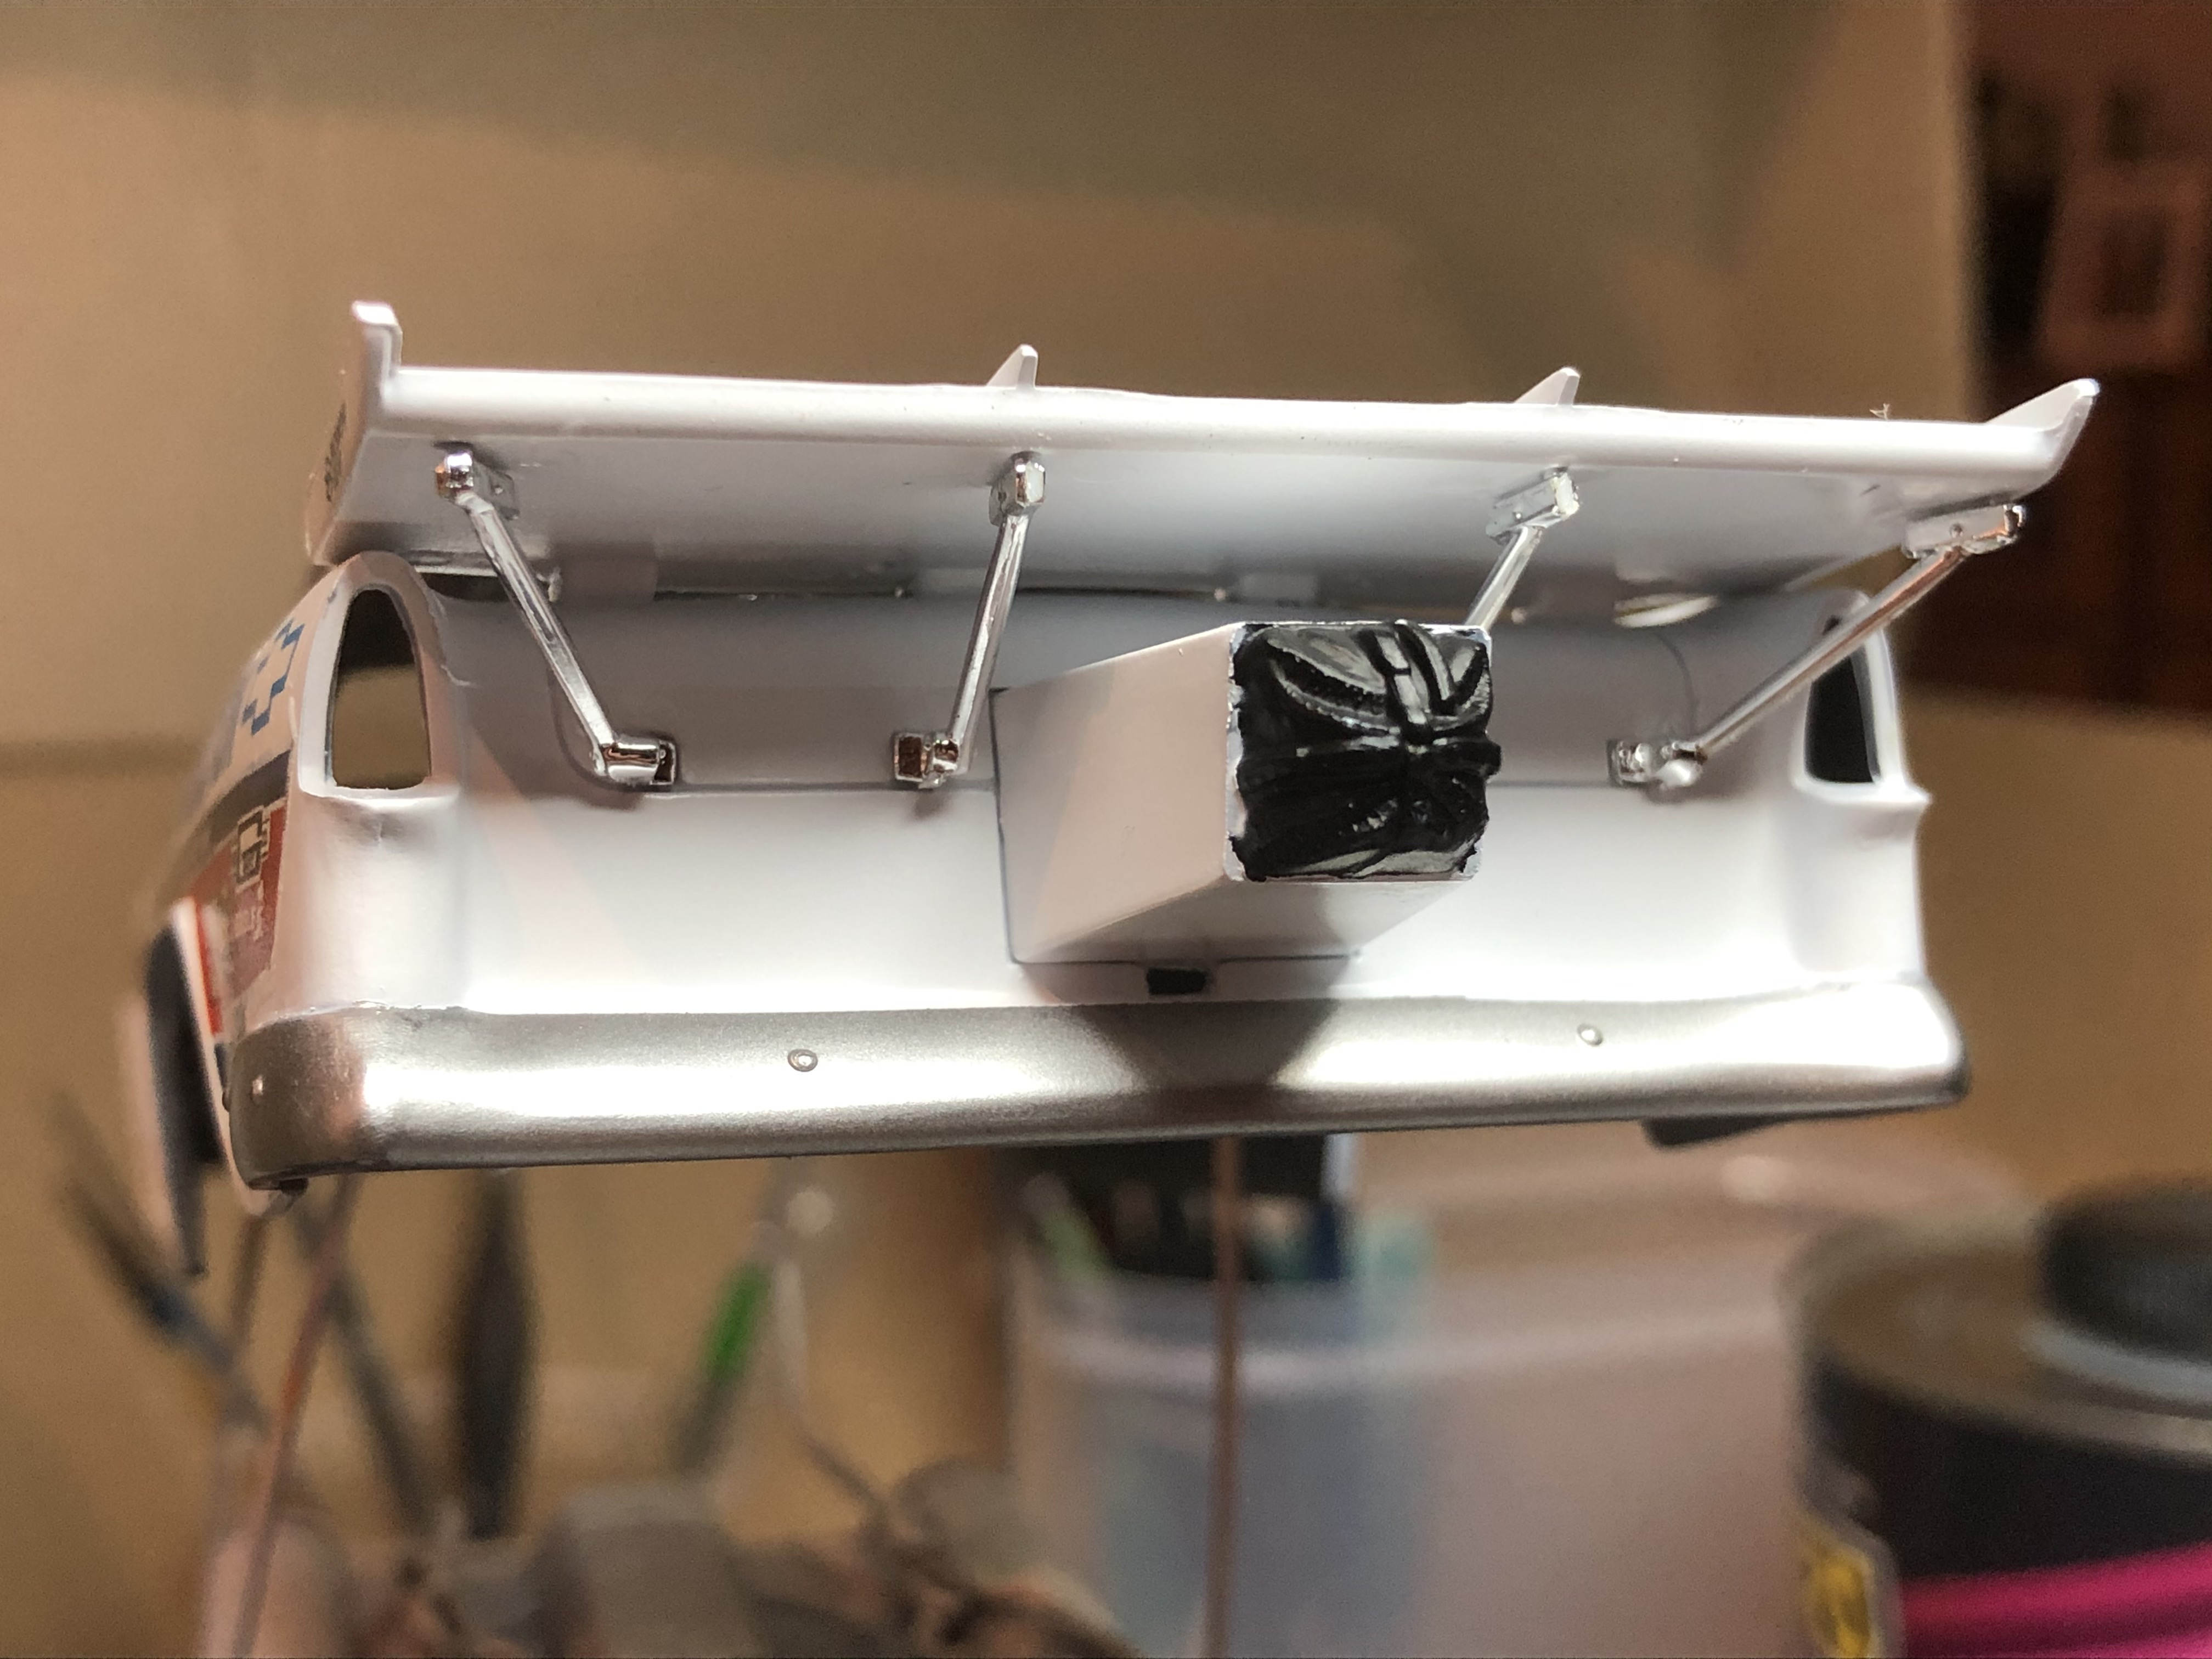
I have pre-drilled a small hole directly beneath the pack for the chute cables to fit through, and they attach to the bottom of the chutes themselves.
The beauty and curse of digital photos, I can now see a small fold in the carrier film of the decal right beside the LHS tail light that I need to address.
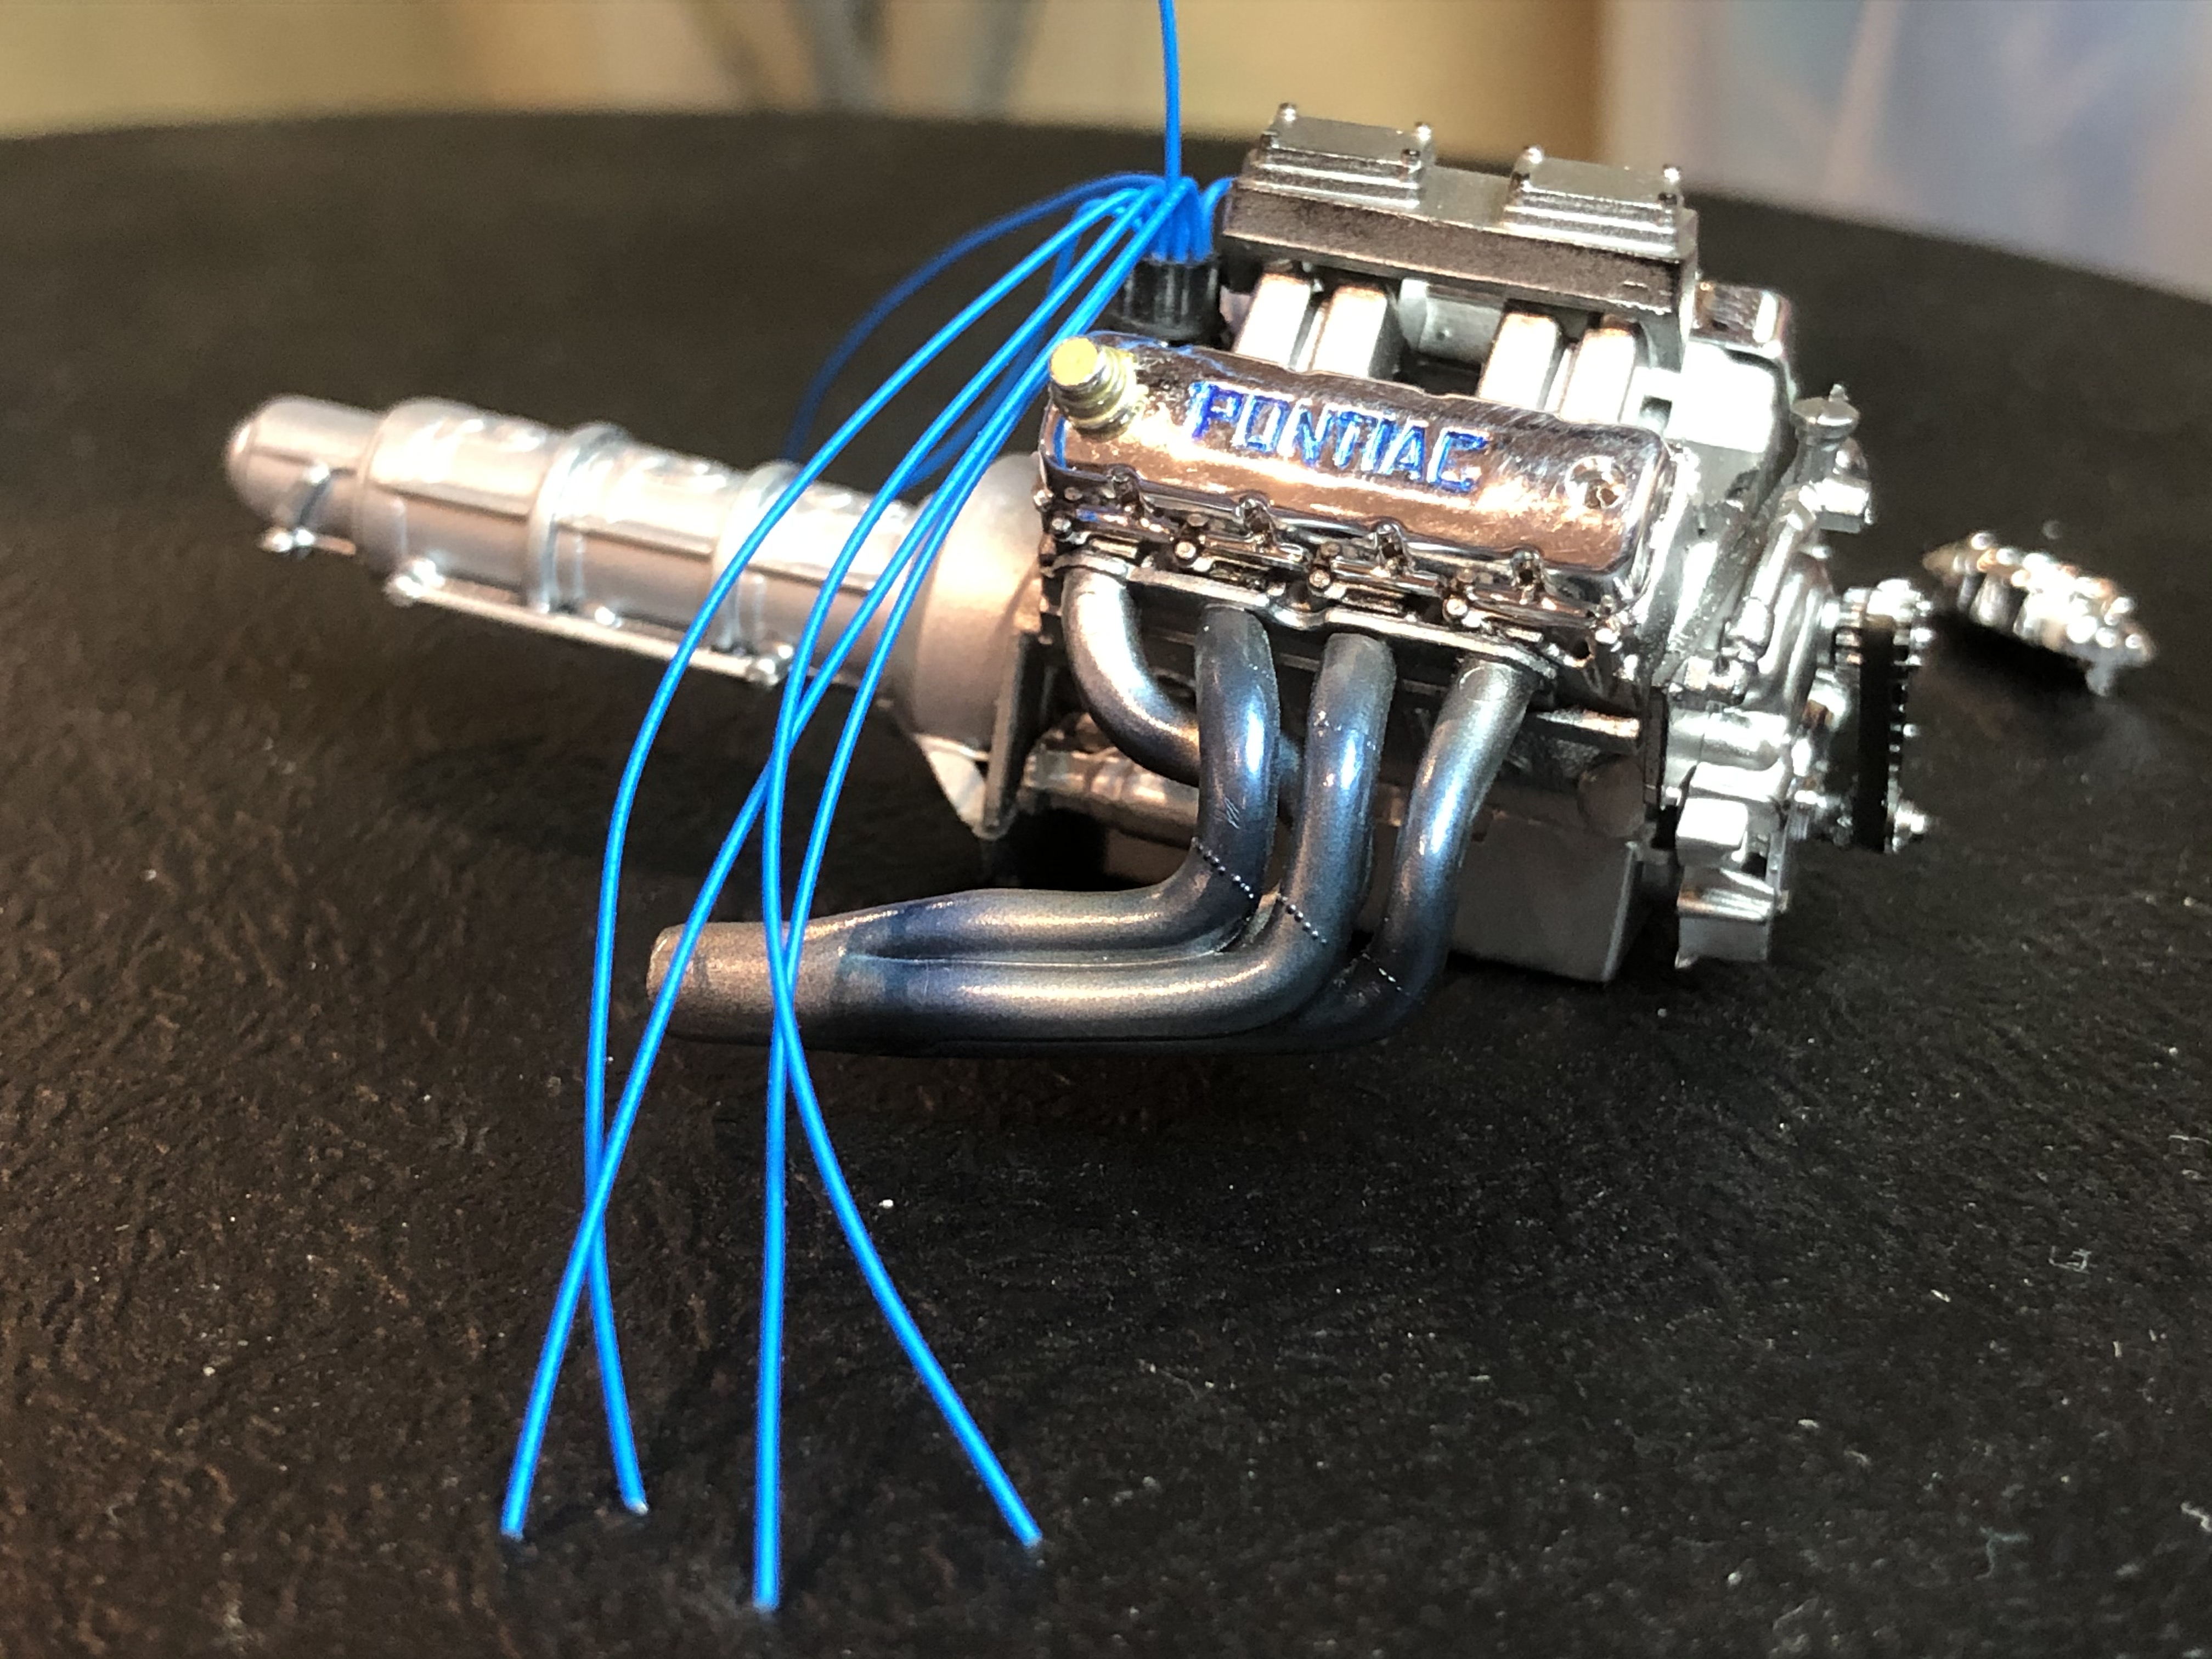
Next up I spent some time on the noisy end. I added the Oil Filter, Flywheel, Pulleys and Belts, Breathers and Headers, and then the after market Distributor. The Carbs might just get a hit of gold paint and the ports drilled out before I fit them off, then I will work on the ignition wiring.

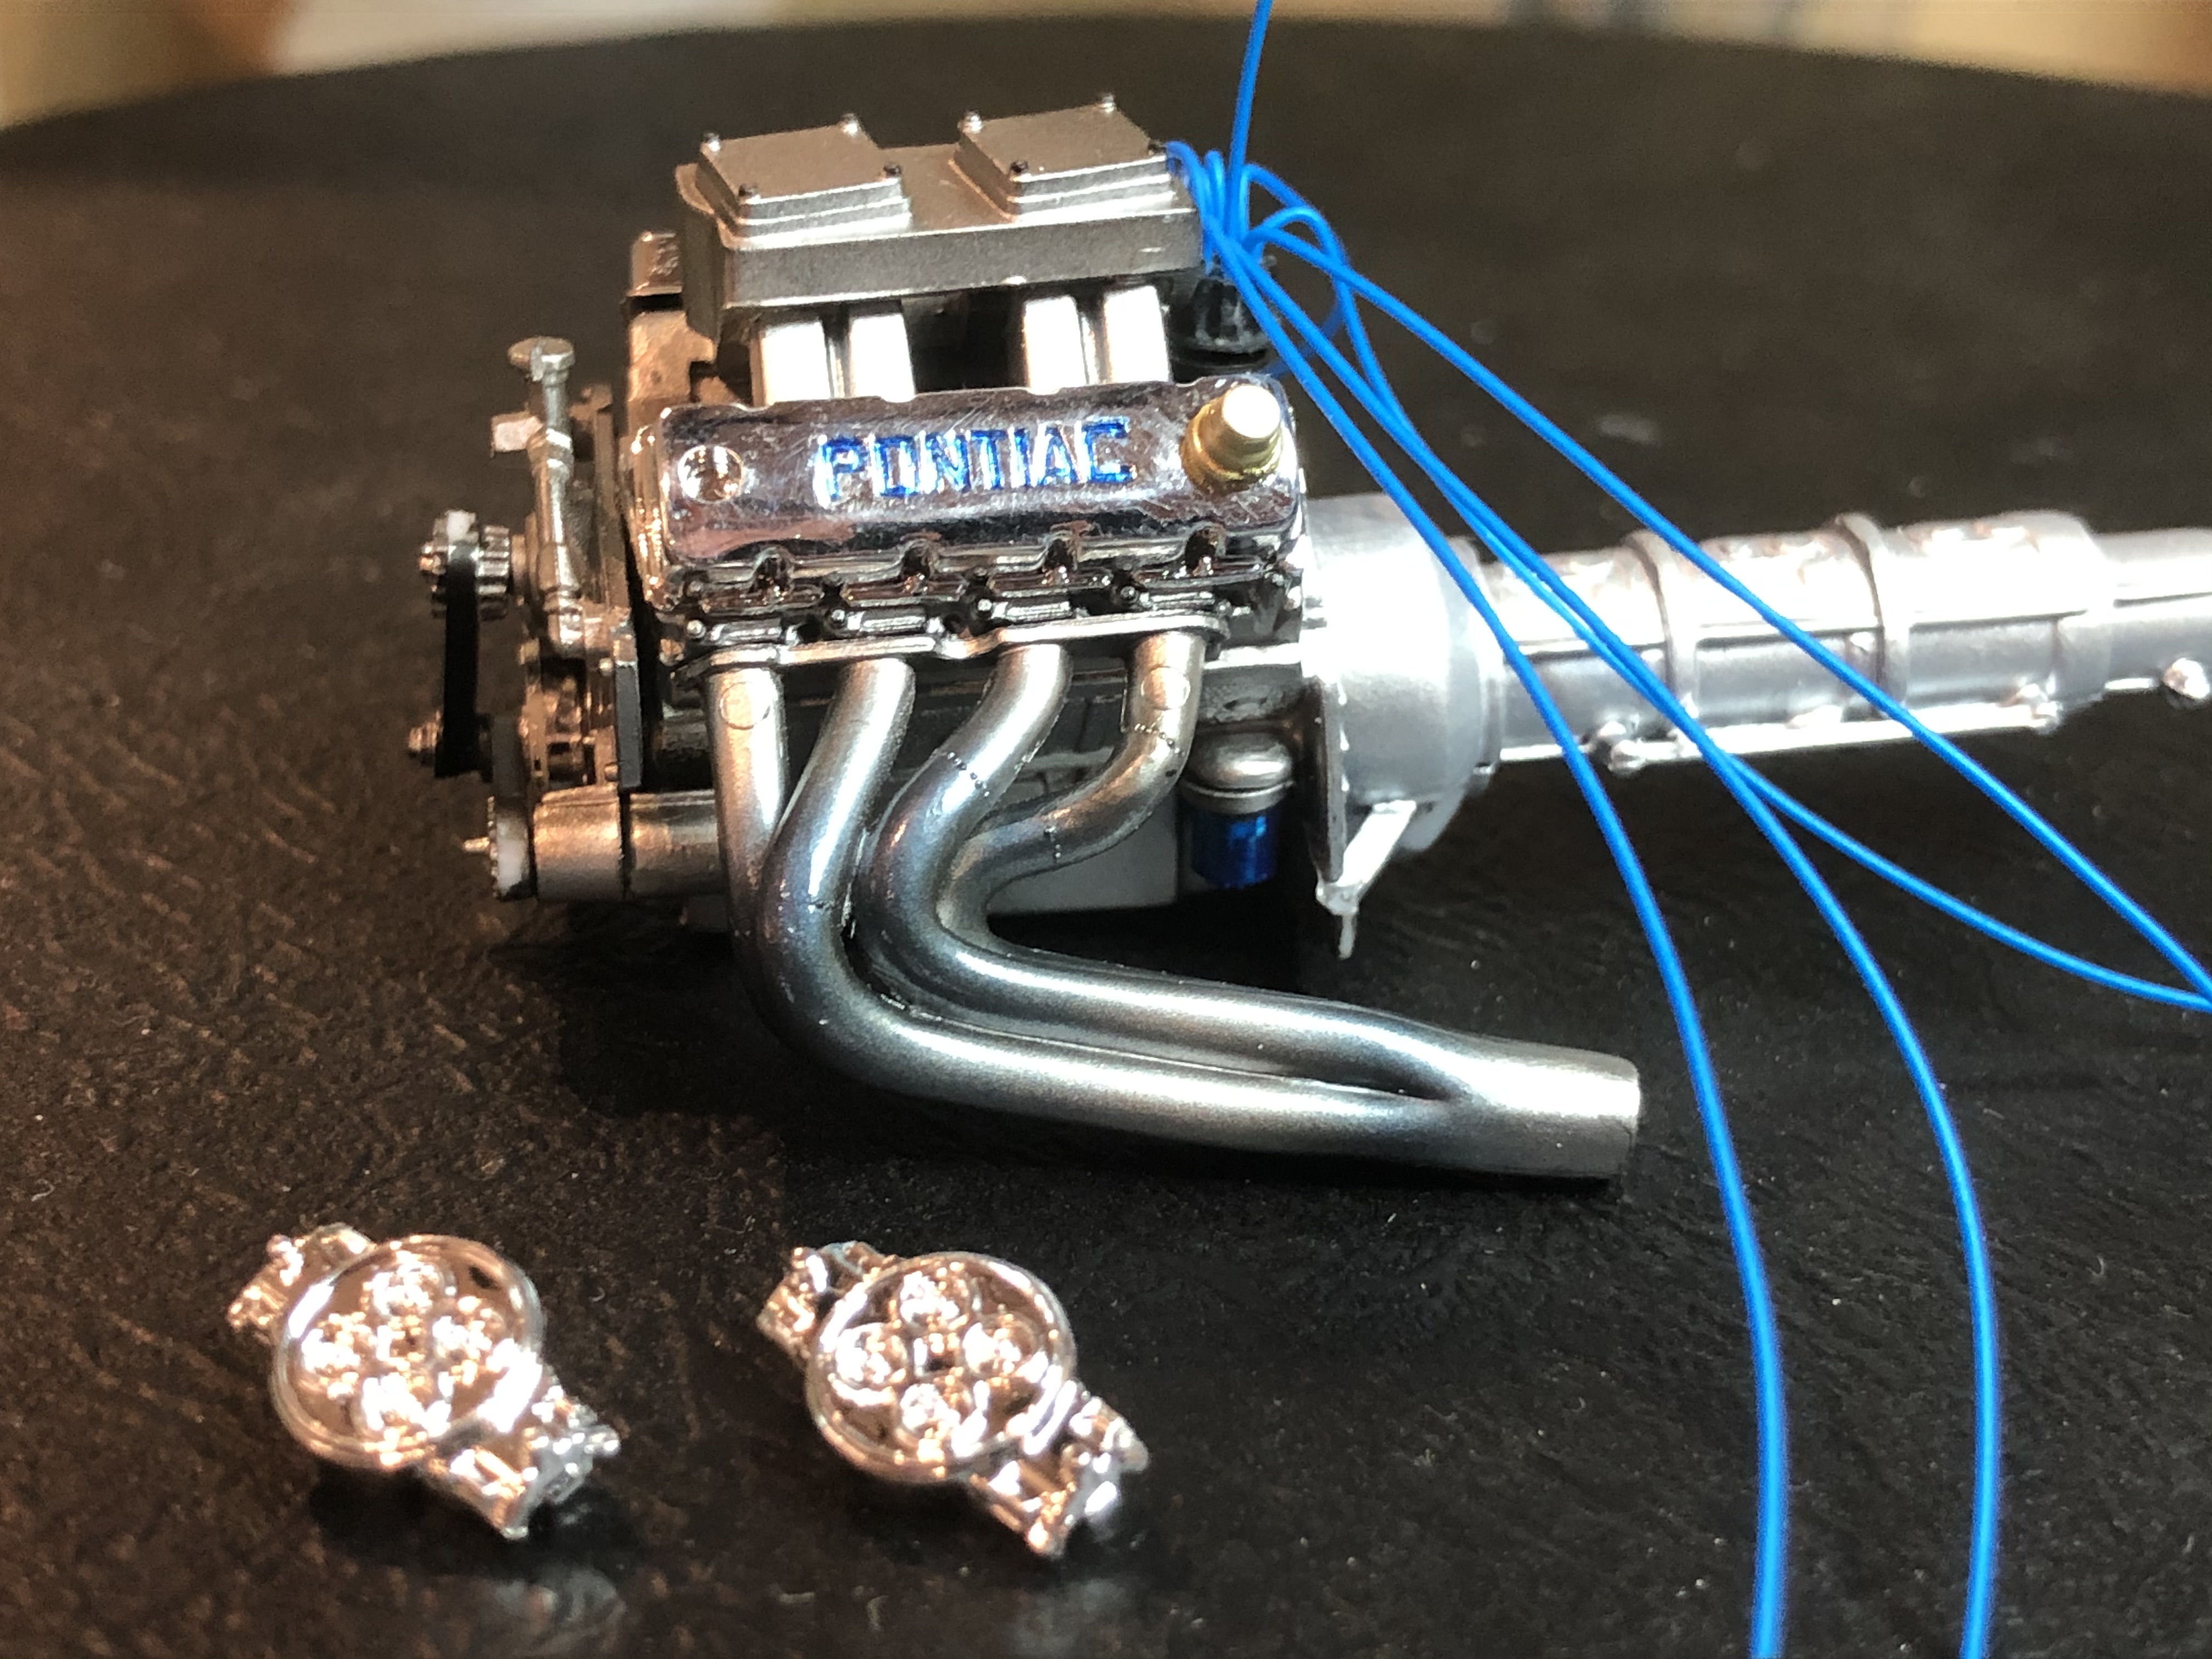
I'm also playing around with some strip styrene to make up some cable frames for the wiring.
Cheers, D
First up I fitted off the drag chute pack and rear spoiler support struts.
I have pre-drilled a small hole directly beneath the pack for the chute cables to fit through, and they attach to the bottom of the chutes themselves.
The beauty and curse of digital photos, I can now see a small fold in the carrier film of the decal right beside the LHS tail light that I need to address.
Next up I spent some time on the noisy end. I added the Oil Filter, Flywheel, Pulleys and Belts, Breathers and Headers, and then the after market Distributor. The Carbs might just get a hit of gold paint and the ports drilled out before I fit them off, then I will work on the ignition wiring.
I'm also playing around with some strip styrene to make up some cable frames for the wiring.
Cheers, D
Joel_W
Joined: December 04, 2010
KitMaker: 11,666 posts
Auto Modeler: 2,974 posts
Posted: Thursday, May 28, 2020 - 11:19 AM UTC
Patrick,
Just way to many choices for an old guy like me. if it were my decision, I'd be up all night trying to decide. So I'll just go along with the Metalizer as it's a sound choice for sure.
D,
The rear wing supports look fantastic. as does the parachute with case, and the engine wiring. As for the decal film fold, I totally missed it until you mentioned it. Yep, digital images can be your best friend, or a real snitch without ever saying a word to you about it when you have the chance to fix it.
Joel

Szmann

Joined: September 02, 2014
KitMaker: 1,977 posts
Auto Modeler: 1,371 posts
Posted: Thursday, May 28, 2020 - 12:27 PM UTC
Damian, nice progress. The wing supports looks good, and so does the engine. The choice of blue for wiring I find it very inspired.
Yes, I found build / finishing errors on my models many times just after I took and analyzed my pictures. It's a good method after all. Oddly enough, I meet online people that are photoshoping their WIP (yes, WIP!) pictures to hide errors and I found it disgusting.
Gabriel
Yes, I found build / finishing errors on my models many times just after I took and analyzed my pictures. It's a good method after all. Oddly enough, I meet online people that are photoshoping their WIP (yes, WIP!) pictures to hide errors and I found it disgusting.
Gabriel
AussieReg
#007
Joined: June 09, 2009
KitMaker: 8,156 posts
Auto Modeler: 2,953 posts
Posted: Thursday, May 28, 2020 - 01:54 PM UTC
Quoted Text
Damian, nice progress. The wing supports looks good, and so does the engine. The choice of blue for wiring I find it very inspired.
Thanks Joel and Gabriel! I thought that matching the wiring and the Pontiac writing on the rocker covers, as well as the oil filter hiding under the RHS header, would make a nice touch!
Quoted Text
Yes, I found build / finishing errors on my models many times just after I took and analyzed my pictures. It's a good method after all. Oddly enough, I meet online people that are photoshoping their WIP (yes, WIP!) pictures to hide errors and I found it disgusting.
Why on earth would you bother to Photoshop WIP images? That really is scraping the barrel looking for compliments!
Cheers, D
Szmann
Joined: September 02, 2014
KitMaker: 1,977 posts
Auto Modeler: 1,371 posts
Posted: Thursday, May 28, 2020 - 02:02 PM UTC
Quoted Text
Why on earth would you bother to Photoshop WIP images? That really is scraping the barrel looking for compliments!
Cheers, D
Infatuation, perhaps. Looking to pose in infaillible "modelling gods". But a short look at their modelling career will prove that they can only imitate some other gods (more entitled this time). Unfortunately I'm not joking

Gabriel
Dixon66
Joined: December 12, 2002
KitMaker: 1,500 posts
Auto Modeler: 645 posts
Posted: Thursday, May 28, 2020 - 02:19 PM UTC
Wow! And I feel ashamed to run a white balance auto correct on them.
rv1963
Joined: December 07, 2004
KitMaker: 1,888 posts
Auto Modeler: 806 posts
Posted: Thursday, May 28, 2020 - 02:42 PM UTC
Damian Proof that we are hardest on our selves about our own models, i didn't even notice the decal problem until you said it. Nice work on the spoiler and engine.
Joel_W
Joined: December 04, 2010
KitMaker: 11,666 posts
Auto Modeler: 2,974 posts
Posted: Friday, May 29, 2020 - 01:21 AM UTC
While I don't have Photoshop, I do have some serious hard core photo editing programs from my time being involved with photography as a hobby. What I do alter for most of my pictures is the White Balance, Contrast, Exposure, and Sharpness (contrast configured). None of that changes what my model actually looks like, just makes up for my rather poor lighting setup, and the fact that I really have a super hard time manually focusing as my eyesight becomes worse and worse.
I also confess to removing all sorts of stains on the wall behind the model for in work grab shots. I really do have to paint my model room much sooner then later.
joel
I also confess to removing all sorts of stains on the wall behind the model for in work grab shots. I really do have to paint my model room much sooner then later.
joel
 |

WEB HOSTING BY


Copyright ©2021 Auto Modeler and Kitmaker Network, a subsidiary of Silver Star Enterprises
All Rights Reserved. Please read our Conditions of Use and Privacy Policy.
All Rights Reserved. Please read our Conditions of Use and Privacy Policy.