The Garage
For general automotive modeling or non-modeling topics.
Strip, Track & Trail Official Build Thread
AussieReg
Staff MemberAssociate Editor
AUTOMODELER
#007
_VISITCOMMUNITY
Victoria, Australia
Joined: June 09, 2009
KitMaker: 8,156 posts
Auto Modeler: 2,953 posts
Posted: Sunday, May 31, 2020 - 02:03 AM UTC

Quoted Text

I'm leaning toward the AMT 1966 Ford Mustang.


Damn, another Ford. My plan for Chevy world domination just took another backward step!
jimb
_VISITCOMMUNITY
New York, United States
Joined: August 25, 2006
KitMaker: 2,539 posts
Auto Modeler: 1,405 posts
Posted: Sunday, May 31, 2020 - 02:12 AM UTC

Quoted Text

Damn, another Ford. My plan for Chevy world domination just took another backward step!


Well, the choices are 1969 Oldsmobile 442, 1987 Buick Grand National, 1968 Chevrolet Chevelle SS396, 1969 Dodge Charger R/T, or the 1966 Ford Mustang. Lot's of choices.

Jim
bomber14
_VISITCOMMUNITY
New Jersey, United States
Joined: February 02, 2015
KitMaker: 330 posts
Auto Modeler: 23 posts
Posted: Sunday, May 31, 2020 - 03:14 AM UTC
thanks all. i am really happy with the paint too even though i do have some dust specks in it, especially the hood, probably caused by the fact it takes longer to AB the body compared to spray can. gives more time for dust to contaminate the paint. i also noticed through this whole build the body/parts attracted dust like a magnet more than usual. i don't know if the plastic used conducted more static electricity than others or what.

damian i was just curious about the wire routing since i am not familiar with drag set ups. i know the plugs do have to be mounted between the headers but thought maybe because the short runs didn't produce as much heat.

james the build looks great for a ford 
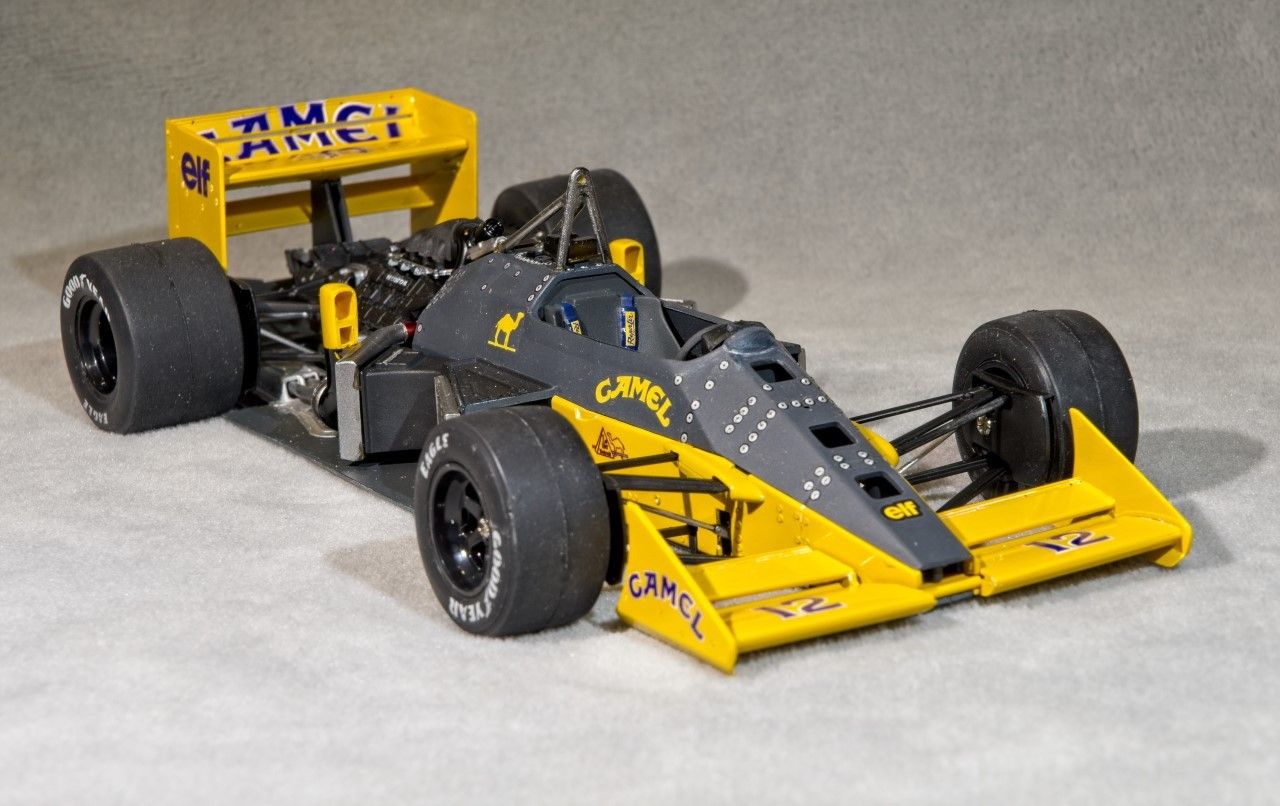
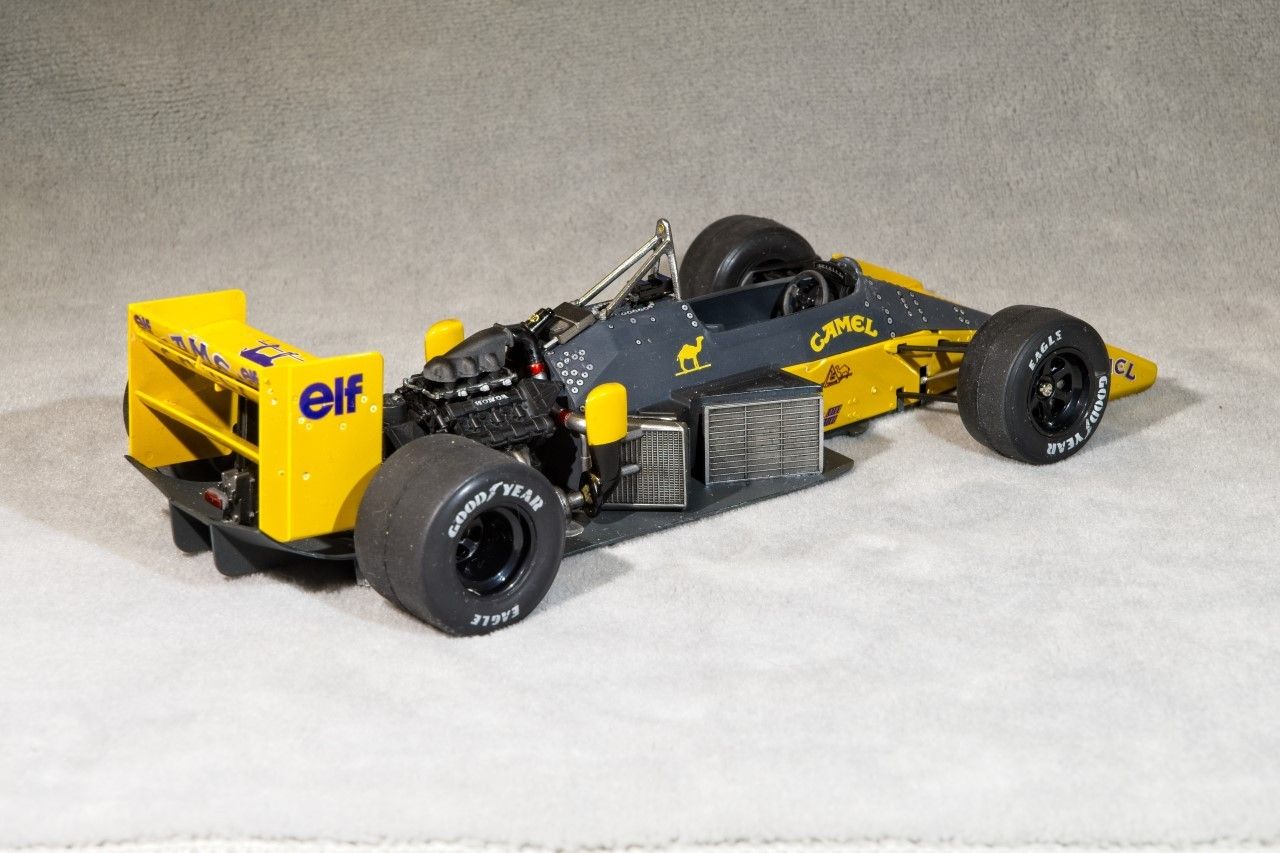
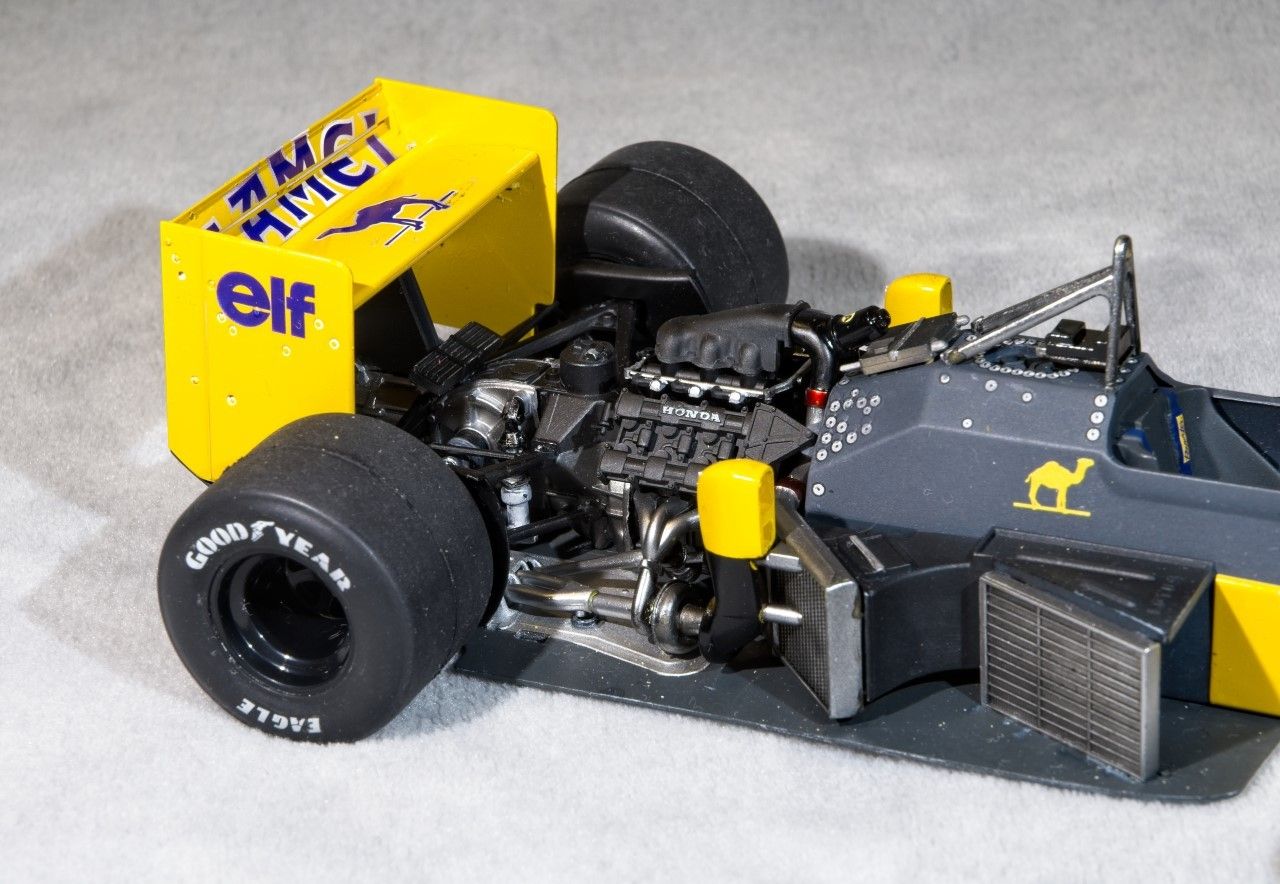
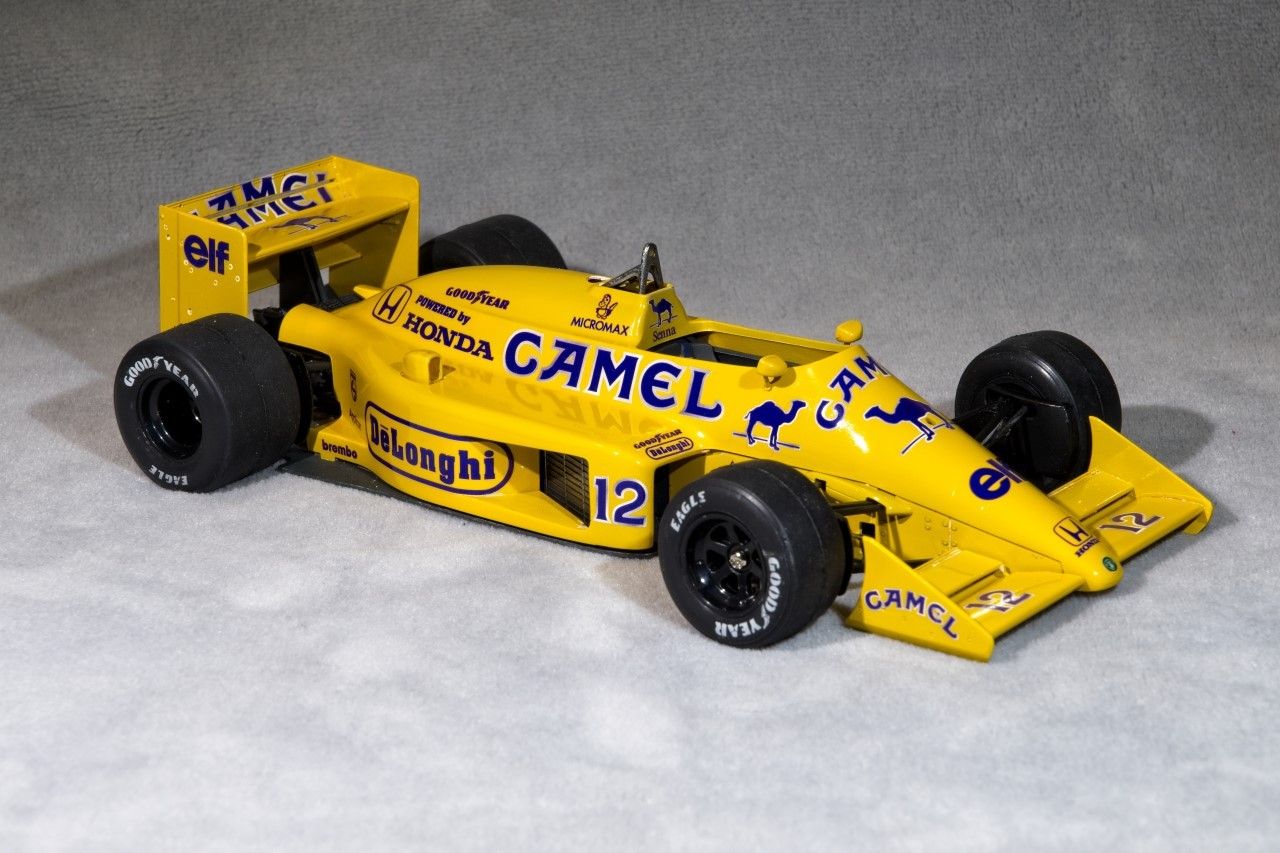
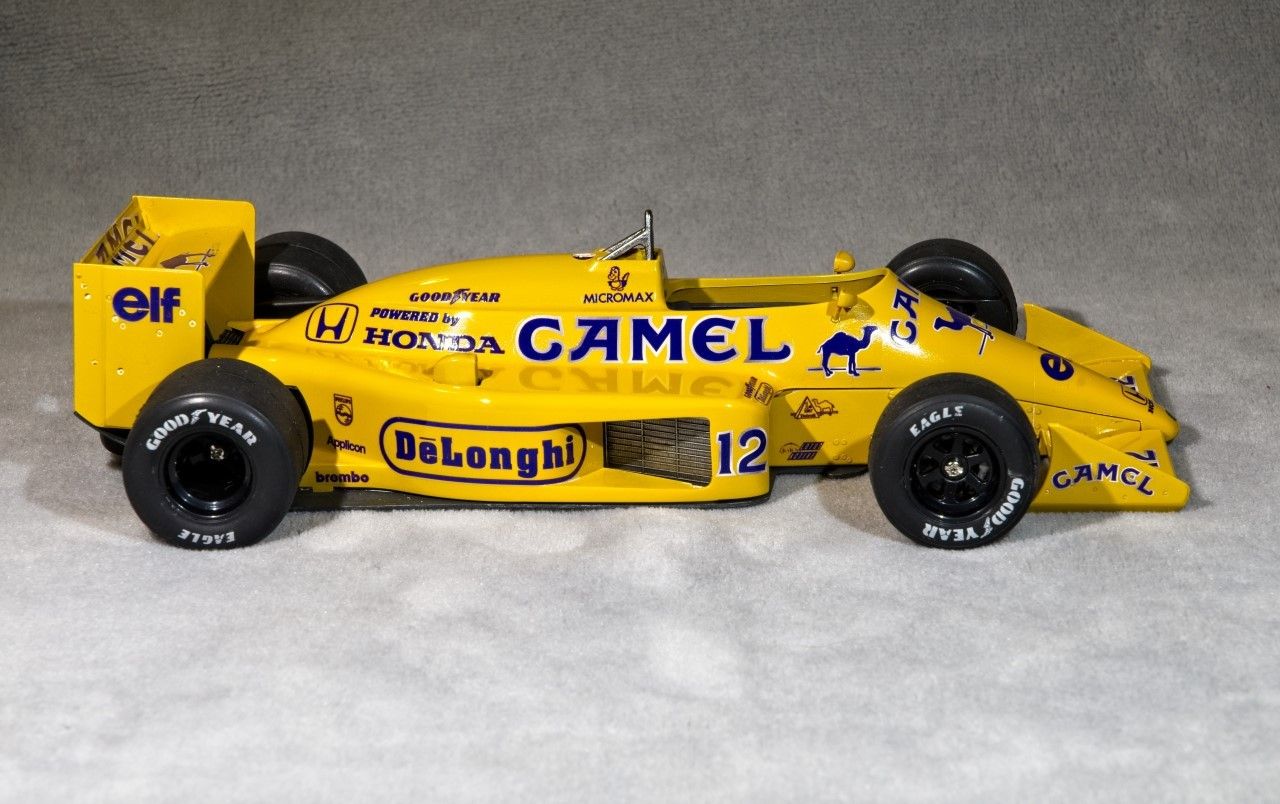
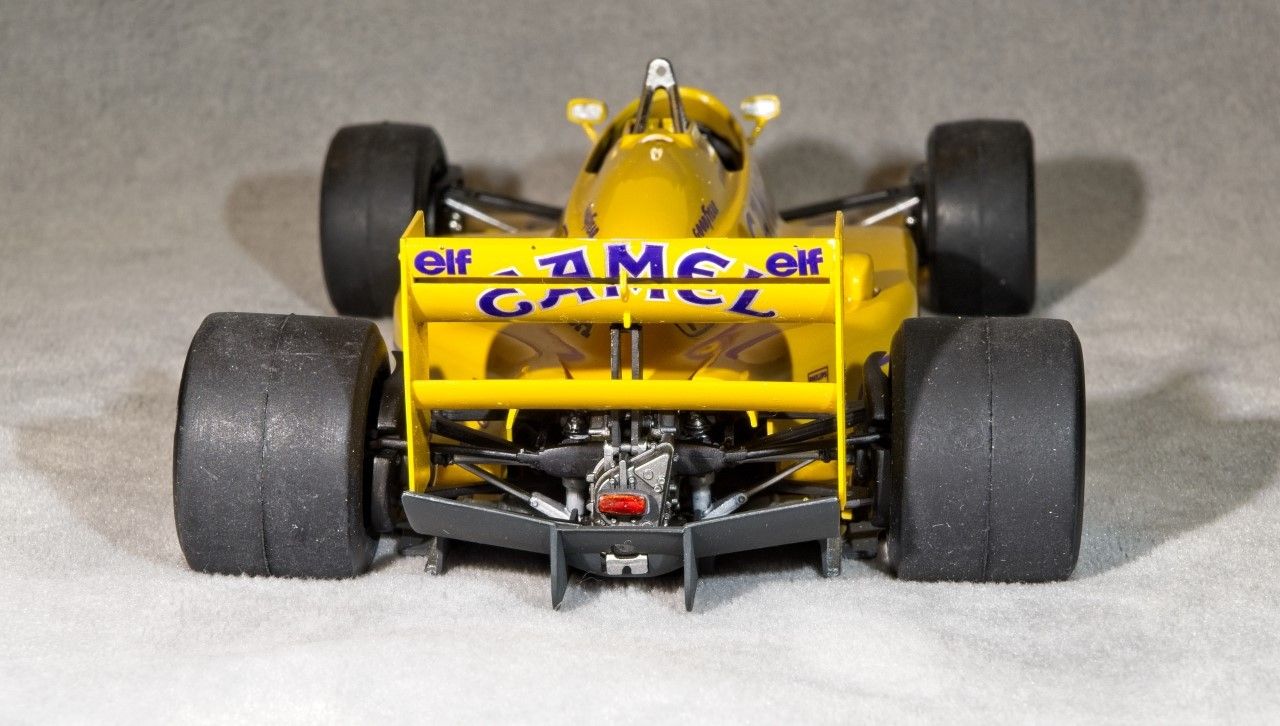
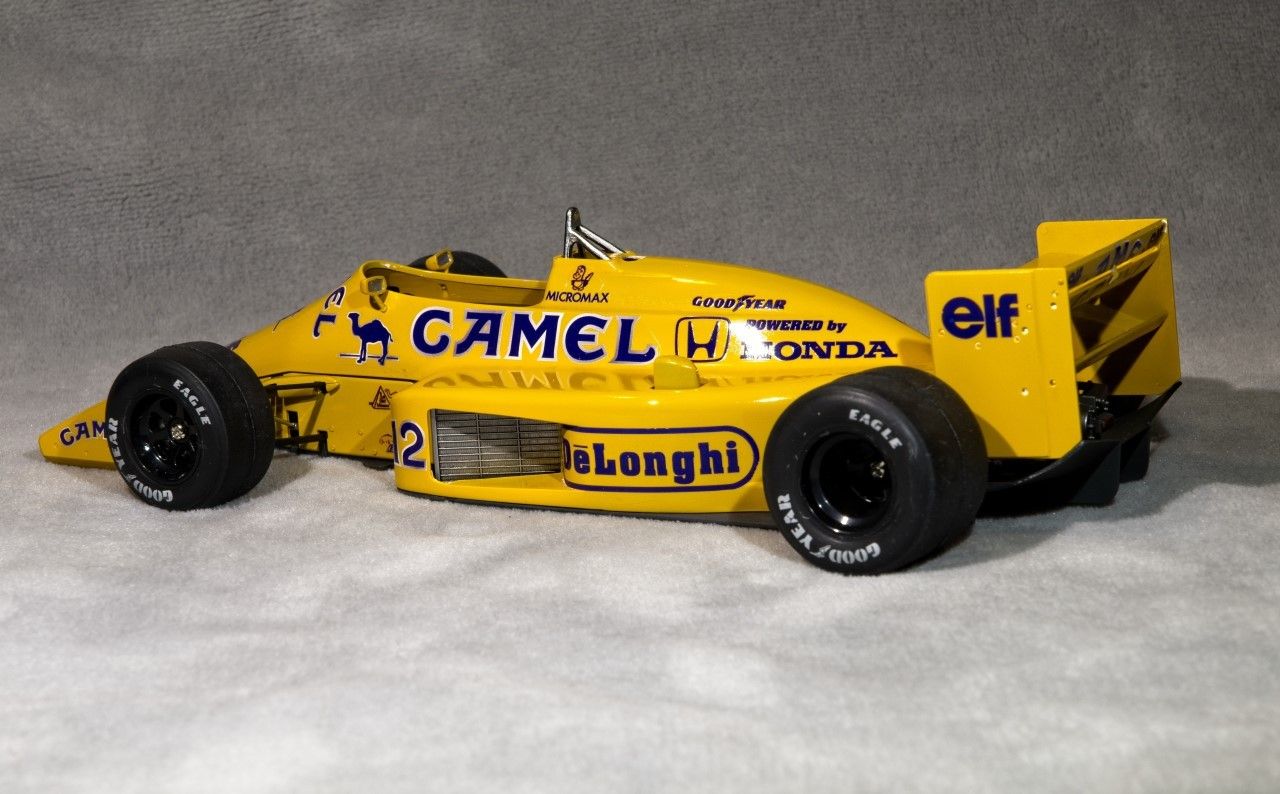
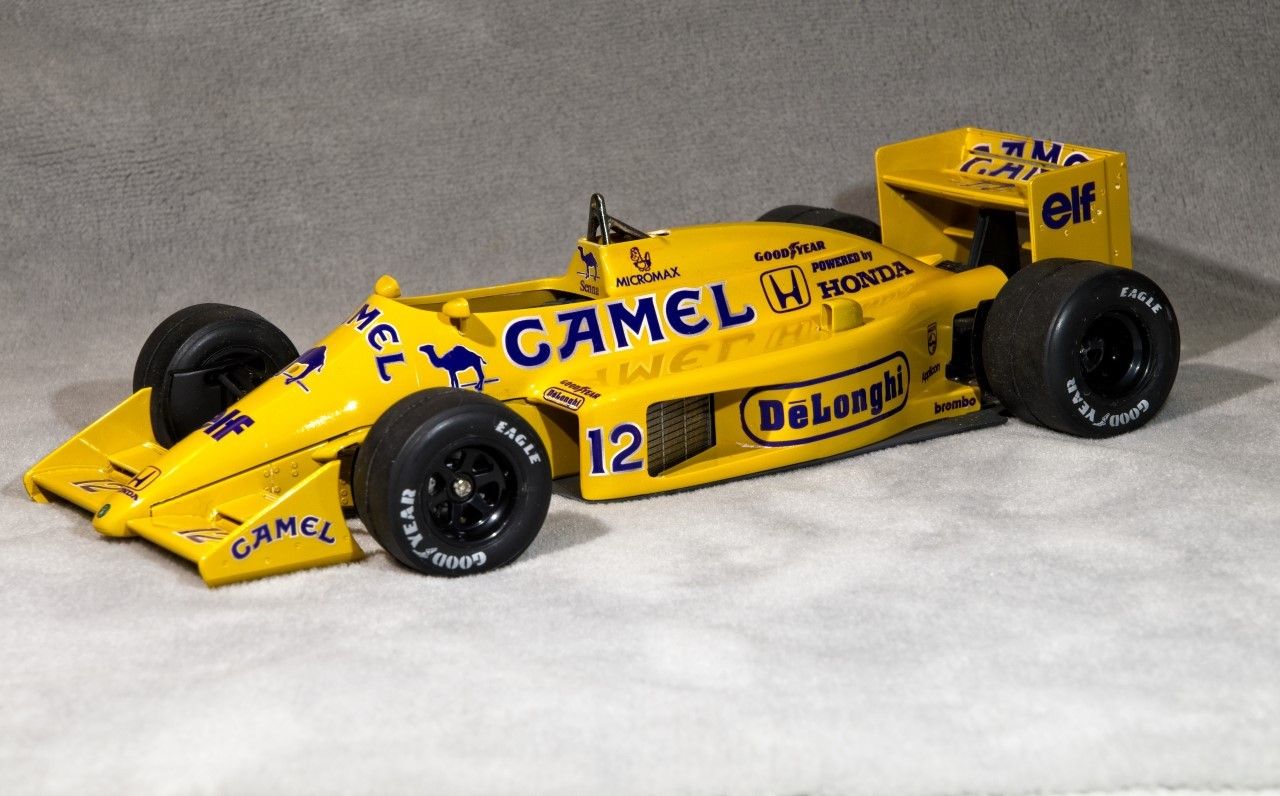
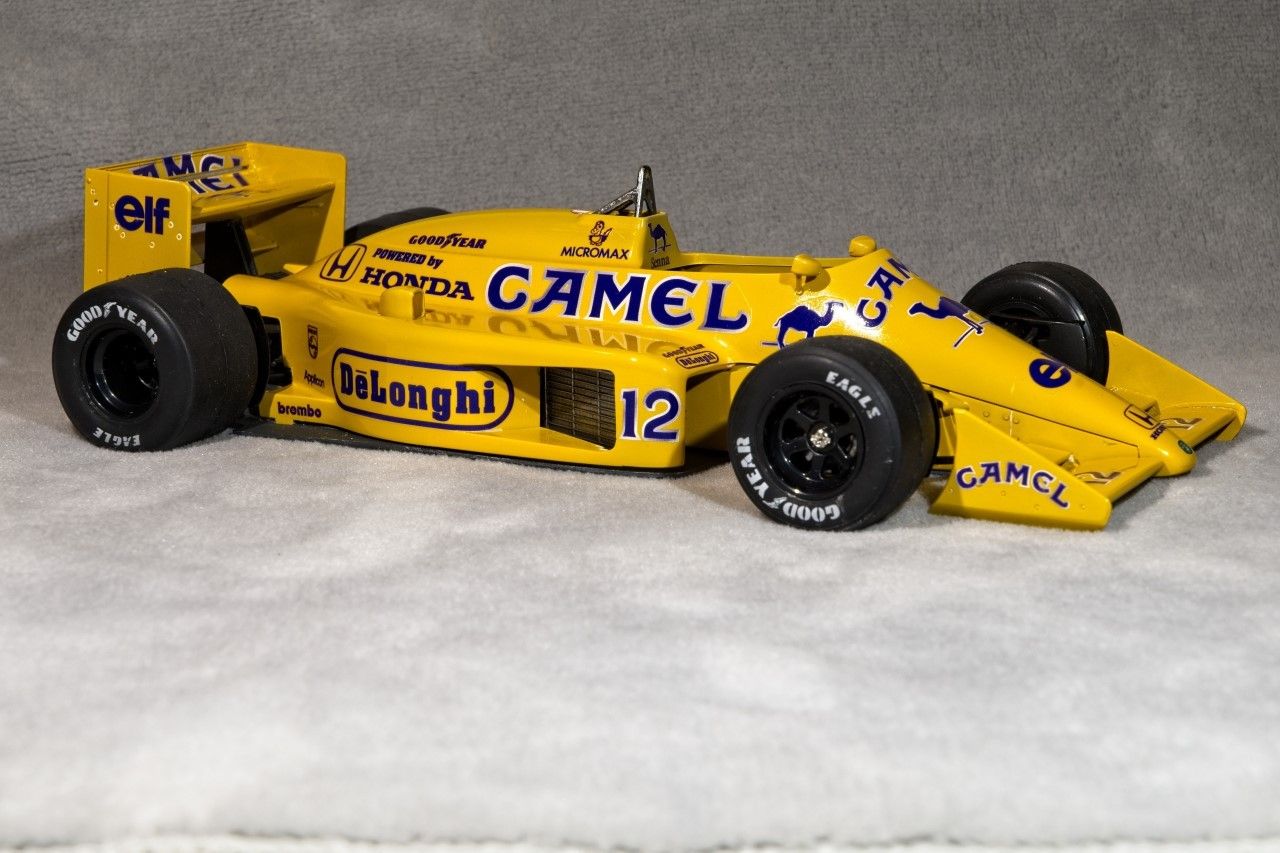
seriously looks great decals,paint,details.
jimb
_VISITCOMMUNITY
New York, United States
Joined: August 25, 2006
KitMaker: 2,539 posts
Auto Modeler: 1,405 posts
Posted: Sunday, May 31, 2020 - 03:23 AM UTC
Thanks, Joe.

Jim
Dixon66
_VISITCOMMUNITY
New Hampshire, United States
Joined: December 12, 2002
KitMaker: 1,500 posts
Auto Modeler: 645 posts
Posted: Sunday, May 31, 2020 - 07:20 AM UTC
As posted in the T2 build thread:
Been doing a lot of small detail painting and such on the suspension and dashboard. Not really much to report. A long way to go still, and slow progress happening. Not to happy with the way my brush painting on the dash and upper door trim came out.

Plan for this week is to mask off the interior and shoot the body color on the underside and engine compartment. If the body shell primer looks good when I pull it out from under the plastic tub I have had over for the past couple weeks I'll shoot it at the same time.
Joel_W
Staff MemberAssociate Editor
AUTOMODELER
_VISITCOMMUNITY
New York, United States
Joined: December 04, 2010
KitMaker: 11,666 posts
Auto Modeler: 2,974 posts
Posted: Sunday, May 31, 2020 - 08:45 AM UTC
David,
I'm sure that your air brushing will turn out just fine.

Joel
heavyjagdpanzer
_VISITCOMMUNITY
Georgia, United States
Joined: February 17, 2013
KitMaker: 173 posts
Auto Modeler: 46 posts
Posted: Sunday, May 31, 2020 - 01:45 PM UTC
Jimb, great Gasser! Great color combo.
heavyjagdpanzer
_VISITCOMMUNITY
Georgia, United States
Joined: February 17, 2013
KitMaker: 173 posts
Auto Modeler: 46 posts
Posted: Sunday, May 31, 2020 - 01:51 PM UTC
The Max is Blue!
AussieReg
Staff MemberAssociate Editor
AUTOMODELER
#007
_VISITCOMMUNITY
Victoria, Australia
Joined: June 09, 2009
KitMaker: 8,156 posts
Auto Modeler: 2,953 posts
Posted: Sunday, May 31, 2020 - 02:39 PM UTC
That looks awesome Bill, great job!

Cheers, D
jimb
_VISITCOMMUNITY
New York, United States
Joined: August 25, 2006
KitMaker: 2,539 posts
Auto Modeler: 1,405 posts
Posted: Monday, June 01, 2020 - 12:06 AM UTC
Thanks, Bill.

Jim
pnance26
_VISITCOMMUNITY
California, United States
Joined: January 22, 2016
KitMaker: 766 posts
Auto Modeler: 140 posts
Posted: Monday, June 01, 2020 - 01:07 AM UTC
So, I went the Testor's Aluminum Plate metalizer way with the wings for my T. How, you may query? Please allow me to retort (tip of the hat to Jules and Quentin)...

First, I stripped the kit chrome in a bleach bath. I then rinsed under warm water using a toothbrush to clean all the nooks and crannies.

Next, I used my sanding files on the bare plastic to get rid of all the little nasties.

Then, using warmed rattle can Testor's, I sprayed WITH NO PRIMER OR BASE COAT, a wet coat. That "flashed" in less than an hour.

Burnishing with cotton swap (no product endorsement here), I was ale to identify some anomalies... here is a look at how an burnished vs. unburnished surface appears. Burnished on right, unburnished on left...


You can see where there was some "schmutz" on the surface. And being as I was already in uncharted waters for me, I thought "I wonder if this will sand out."

So I tried sanding it and there was a great result. Just make sure you go all the way to your finest grit, which for me is around 12000.

I then reshot it with ONE WET coat, waited to burnish after an hour. Then... (drum roll, please)...

I COVERED IT WITH TAMIYA TS-13 CLEAR! And it didn't craze. I only did the large wing before decaling as I want to see what will happen on the smaller wing if I do clear after decals.


Not a bad outcome, eh?

So, we are moving closer to the finish. Got some red paint on the new body panels and will get decals this week hopefully.

Your comments and criticisms are ALWAYS welcome!
Joel_W
Staff MemberAssociate Editor
AUTOMODELER
_VISITCOMMUNITY
New York, United States
Joined: December 04, 2010
KitMaker: 11,666 posts
Auto Modeler: 2,974 posts
Posted: Monday, June 01, 2020 - 01:33 AM UTC
Patrick,
Very nicely done.

From what I've read on the Testors Metallizer's they're a very mild lacquer based paint, so they generally won't craze plastic, but your mileage may vary. Using Tamiya Gloss clear works as it's the same base. Personally, I would have let it cure for a full day just to be on the safe side. Clear coating will dull the finish a tad. But for the look you're after, it's perfect.

Joel
Joel_W
Staff MemberAssociate Editor
AUTOMODELER
_VISITCOMMUNITY
New York, United States
Joined: December 04, 2010
KitMaker: 11,666 posts
Auto Modeler: 2,974 posts
Posted: Monday, June 01, 2020 - 01:35 AM UTC
Bill,
The Max looks darn good in Blue. Well done.

Joel
pnance26
_VISITCOMMUNITY
California, United States
Joined: January 22, 2016
KitMaker: 766 posts
Auto Modeler: 140 posts
Posted: Monday, June 01, 2020 - 01:36 AM UTC

Quoted Text

Patrick,
Very nicely done.

From what I've read on the Testors Metallizer's they're a very mild lacquer based paint, so they generally won't crazy plastic, but your mileage may vary. Using Tamiya Gloss clear works as it's the same base. Personally, I would have let it cure for a full day just to be on the safe side. Clear coating will dull the finish a tad. But for the look you're after, it's perfect.

Joel


Thank you, Joel! It is part of my plan to try to learn something new every build. I will take a photo later this week of three Ferraris all with a different wing surface coating and let the viewers be the judge! I will offer a photo of the actual car for reference!
pnance26
_VISITCOMMUNITY
California, United States
Joined: January 22, 2016
KitMaker: 766 posts
Auto Modeler: 140 posts
Posted: Monday, June 01, 2020 - 01:45 AM UTC

Quoted Text

As posted in the T2 build thread:
Been doing a lot of small detail painting and such on the suspension and dashboard. Not really much to report. A long way to go still, and slow progress happening. Not to happy with the way my brush painting on the dash and upper door trim came out.

Plan for this week is to mask off the interior and shoot the body color on the underside and engine compartment. If the body shell primer looks good when I pull it out from under the plastic tub I have had over for the past couple weeks I'll shoot it at the same time.


Can you give me a link again to your T2 build? That is next for me... in 1/12th using the very old Protar kit...
pnance26
_VISITCOMMUNITY
California, United States
Joined: January 22, 2016
KitMaker: 766 posts
Auto Modeler: 140 posts
Posted: Monday, June 01, 2020 - 01:46 AM UTC
That is a very blue Blue Max! Great color!
Dixon66
_VISITCOMMUNITY
New Hampshire, United States
Joined: December 12, 2002
KitMaker: 1,500 posts
Auto Modeler: 645 posts
Posted: Monday, June 01, 2020 - 03:50 AM UTC

Quoted Text

David,
I'm sure that your air brushing will turn out just fine.

Joel


EEEENNNNHHHHH! Your answer is wrong, thank you for playing.

I royally screwed that up today too. I'm pretty sure I got too impatient and hit it too hard/wet too. All crazed on the sides. I also didn't realize Gravity Kona Blue is a metallic, I'd only ever seen Mustangs that color from a distance and in pictures, thought it was a solid. I'm not a fan of metallics in scale as the flakes always look out of scale to me.

I'm going to try to sand it out in a couple days and hit it again. I hope I can save it, but since it is a race car, maybe there was some damage and quick repairs. Pictures later today.


Patrick, my T2 is a Touring 2 Mustang in SCCA racing, not what you are looking for. The wings look great as do the decals on them.

Nice job on the Blue Max Blue Bill.


Joel_W
Staff MemberAssociate Editor
AUTOMODELER
_VISITCOMMUNITY
New York, United States
Joined: December 04, 2010
KitMaker: 11,666 posts
Auto Modeler: 2,974 posts
Posted: Monday, June 01, 2020 - 04:07 AM UTC
David,
That really does suck big time.

I'm a major player when it comes to use Gravity Paints. But like with all lacquers, I follow my protocols. When you say all four sides are crazed, do you mean the primer or is the plastic actually crazed? If it's the plastic, it's a lot harder to deal with, but it can be done.

Joel
Dixon66
_VISITCOMMUNITY
New Hampshire, United States
Joined: December 12, 2002
KitMaker: 1,500 posts
Auto Modeler: 645 posts
Posted: Monday, June 01, 2020 - 04:33 AM UTC

Quoted Text

David,
That really does suck big time.

I'm a major player when it comes to use Gravity Paints. But like with all lacquers, I follow my protocols. When you say all four sides are crazed, do you mean the primer or is the plastic actually crazed? If it's the plastic, it's a lot harder to deal with, but it can be done.

Joel


Won't know until I start sanding it back. I'm hoping the paint only crazed the primer a little bit. If it goes deeper I'll try stripping, sanding and redoing it.
rv1963
_VISITCOMMUNITY
New York, United States
Joined: December 07, 2004
KitMaker: 1,888 posts
Auto Modeler: 806 posts
Posted: Monday, June 01, 2020 - 05:35 AM UTC
Bill. That paint looks really good, nice an smooth. Patrick. Well done the wings look like aluminium as they should.
pnance26
_VISITCOMMUNITY
California, United States
Joined: January 22, 2016
KitMaker: 766 posts
Auto Modeler: 140 posts
Posted: Monday, June 01, 2020 - 11:35 AM UTC

Quoted Text

Bill. That paint looks really good, nice an smooth. Patrick. Well done the wings look like aluminium as they should.


Thank you! I'm glad it worked and I am glad I have the support of people here!
heavyjagdpanzer
_VISITCOMMUNITY
Georgia, United States
Joined: February 17, 2013
KitMaker: 173 posts
Auto Modeler: 46 posts
Posted: Monday, June 01, 2020 - 12:27 PM UTC
Thanks for the kind words. I have polished the body and gave it the third coat. Hopefully three times is the charm.
AussieReg
Staff MemberAssociate Editor
AUTOMODELER
#007
_VISITCOMMUNITY
Victoria, Australia
Joined: June 09, 2009
KitMaker: 8,156 posts
Auto Modeler: 2,953 posts
Posted: Tuesday, June 02, 2020 - 12:49 AM UTC
Patrick, excellent result there, the finish looks spot on to me! Definitely worth the test shots beforehand to check the options.
Thanks for detailing the procedure as well, all good information to keep stored away!

David, sorry to hear that you have hit some troubles with your Mustang, I'm sure you will be able to sort it out and move forward in no time.

Cheers, D
Joel_W
Staff MemberAssociate Editor
AUTOMODELER
_VISITCOMMUNITY
New York, United States
Joined: December 04, 2010
KitMaker: 11,666 posts
Auto Modeler: 2,974 posts
Posted: Tuesday, June 02, 2020 - 04:19 AM UTC
Well, this is the final update post as my Lotus 99t has finally crossed the finish line. While the build had a few issues, for the most part this early Tamiya release really impressed me as to the fit and details of the parts.

The wheels are held in place with little self tapping screws rather then the Vinyl inserts that nearly every car kit uses today. Tightening them was a little nerve racking as you need to really use more force to get the screws to seat correctly then I really wanted to, and that puts strain on the rear suspenion points that hold on the brake hubs. But all turned out well as I managed for a change not to break anything. Next time that I need to use screws, I'm going to pe-tap the holes.

The rather complex rear wing has the lowest wing actually glued together after you seat it on the transaxle wing supports. Tamiya has both seams on the underside so you really don't see them. I had to paint and decal both halves before assembly. So if this was a contest model, I honestly don't know how you would deal with those 2 bottom seams unless you make your own mounting brackets. But for my purposes, it looks just fine. You then kind of wiggle the rest of the rear wing over that wing, and it actually fits!

At this point I had to deal with the the body shell actually fitting over the full chassis and cockpit. Naturally it didn't. Aligning the twin turbo intakes which attach to the front radiators shouldn't have been an issue, but they're both to far forward. So a lot of finesse filing was needed so that the body literally slips right over both without any pressure from yours truly. The other area that needed attention was both the front wing mounting bracket location, the bracket itself, and the inside vertical edge of the body nose. Again, finesse filing till it was a drop on fit. The wing is removable at this point, but i'm going to just secure it with a little Extra Thin. There are two little locating tabs, one on each side of the body pods that go through holes in the pan to secure the shell to the chassis. It's meant to be removable by slightly pushing the two tabs inwards while lifting the shell up. After the nose alignment those two tabs align perfectly.

The very last item was the antenna that goes through the hole in the upper nose section. After figuring out how to glue it to the tub, naturally I knocked it off as I was setting up for the 1st picture. So that's going to be repair #1.

Finally, here's a dozen pictures of Senna's Lotus 99t.

Joel


rv1963
_VISITCOMMUNITY
New York, United States
Joined: December 07, 2004
KitMaker: 1,888 posts
Auto Modeler: 806 posts
Posted: Tuesday, June 02, 2020 - 05:35 AM UTC
Joel. Great finish your build looks awesome.