

Go to automodeler.com for the current dynamic site!


The Garage
For general automotive modeling or non-modeling topics.
For general automotive modeling or non-modeling topics.
Hosted by Jim Starkweather
Strip, Track & Trail Official Build Thread

heavyjagdpanzer

Joined: February 17, 2013
KitMaker: 173 posts
Auto Modeler: 46 posts

Posted: Tuesday, May 26, 2020 - 05:55 AM UTC
Jimb I love the 57 Ford. My dad had one. Lv1963 cool looking Gasser! I have got the body on the funny car ready to paint.

bomber14
Joined: February 02, 2015
KitMaker: 330 posts
Auto Modeler: 23 posts

Posted: Tuesday, May 26, 2020 - 06:43 AM UTC
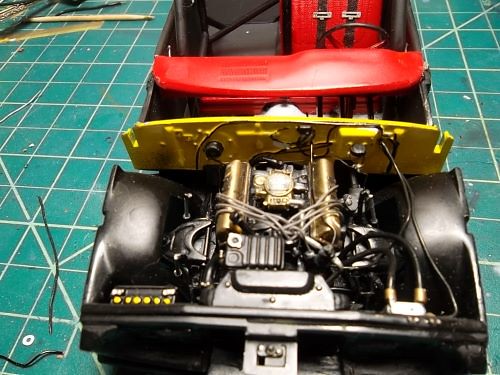
got most of the chassis done and the engine in and plumed. i sprayed the body with the yellow from a rattle can from model car world and got these odd little specks all over the body. i wet sanded the body down smooth as the photo shows. now what to do? i think i will try decanting the paint and shooting it through an airbrush which will give me more control. if the same results happen i guess i will have to go to a different yellow that is not the shade i like.
[ ][/img]

 " BORDER="0">
[
][/img] " BORDER="0"> 
Dixon66
Joined: December 12, 2002
KitMaker: 1,500 posts
Auto Modeler: 645 posts

Posted: Tuesday, May 26, 2020 - 07:08 AM UTC
Patrick, Great work on those pinstripes and the rest. Look nice and straight, keep it up.
Robert, that Gasser look excellent.
Joe, The interior and engine look great. Can't seen any flaws in the paint from my house. LOL Could you just clear it from there or did the wet sanding cut through?
You're all making great progress, I'm languishing a bit but did get a bunch of paint applied between last night and earlier today.

Joel_W
Joined: December 04, 2010
KitMaker: 11,666 posts
Auto Modeler: 2,974 posts

Posted: Tuesday, May 26, 2020 - 09:42 AM UTC
Joe,
Your entire engine compartment looks great. More then enough detailing to really kick it up a few notches.
As David said, I the yellow looks absolutely perfect in the pictures. Is this after your rubbed out the paint? I've never used a rattle can for a color coat, so I couldn't even venture a guess to what the problem is or what caused it.
Out of curiosity, do you have any close up pictures of those specks?
Joel


pnance26
Joined: January 22, 2016
KitMaker: 766 posts
Auto Modeler: 140 posts

Posted: Tuesday, May 26, 2020 - 11:37 AM UTC
Kids... let this be a lesson to follow directions and not try to outthink the designers!
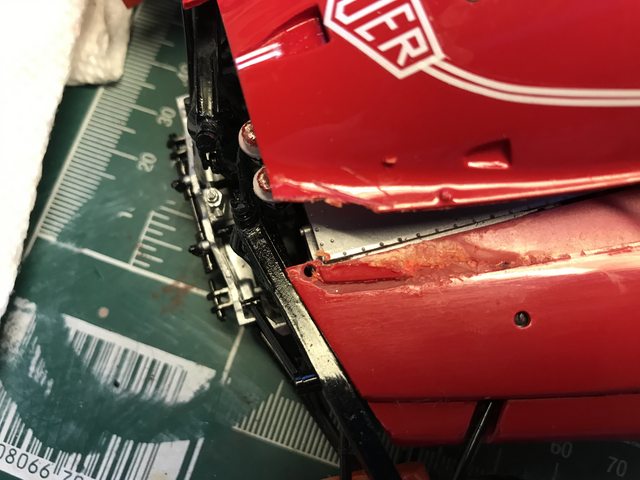
When I was dry fitting the side pod tops and the main cowling, I didn't like all the gaps even though they were there on the 1:1 cars. So I glued the two side pieces to the main cowl. I didn't know that eventually those side pieces are under some major piping.
And so the main cowling didn't fit!
Well, there is nothing done that can't be undone... or destroyed.
I was working very carefully with ungluing the parts and carefully broke them both...
Let us never forget mediocrity is lurking at every corner. But there is a positive... It's only paint, decals, and time. I can redo the top stripes where I want them (correctly), I can straighten up the offending AGIP logo... and I can have a cowling for a diorama set piece!
I feel very mediocre at this moment.
Pride comes before the fall! LOL!

Cosimodo

#335

Joined: September 03, 2013
KitMaker: 1,808 posts
Auto Modeler: 701 posts

Posted: Tuesday, May 26, 2020 - 12:21 PM UTC
Ah Patrick, I was just going to comment on how great the decals looked when I came to this final post. I guess we have all done that that. It just hurts more when you're at that stage of the build. I am sure you've got the recovery in you. Looking forward to it.
cheers
Michael
cheers
Michael
Cosimodo
#335
Joined: September 03, 2013
KitMaker: 1,808 posts
Auto Modeler: 701 posts
Posted: Tuesday, May 26, 2020 - 12:28 PM UTC
I am working backwards on these updates - so many since yesterday!
Joe, great job on the engine and the yellow on the body shell looks amazing.
Rob, the Gas Master is superb. The color combo works well. Can't wait to see this finished.
Jim,
you wouldn't know from the picture that the decals were a problem. The gasser is looking real good.
Damian, the decals sort of suit the vintage and style of the race car. I think it adds to rough and ready nature of the racing.
cheers
Michael

rv1963
Joined: December 07, 2004
KitMaker: 1,888 posts
Auto Modeler: 806 posts

Posted: Tuesday, May 26, 2020 - 01:33 PM UTC
Thanks guys the gasser is finished i will post a bunch of pics tomorrow-Joe that engine compartment looks great, would love to see a few close up pics, i would do a test on a piece of scrap first.
Patrick that is a shame, but with your skill it will get fixed.
Patrick that is a shame, but with your skill it will get fixed.
pnance26
Joined: January 22, 2016
KitMaker: 766 posts
Auto Modeler: 140 posts
Posted: Tuesday, May 26, 2020 - 04:21 PM UTC
Ive already got new body panels in the works and plenty to do otherwise... wings and side pods, so itll be alright!
Thanks everyone for the kind words!
Thanks everyone for the kind words!

AussieReg

#007

Joined: June 09, 2009
KitMaker: 8,156 posts
Auto Modeler: 2,953 posts

Posted: Tuesday, May 26, 2020 - 06:09 PM UTC
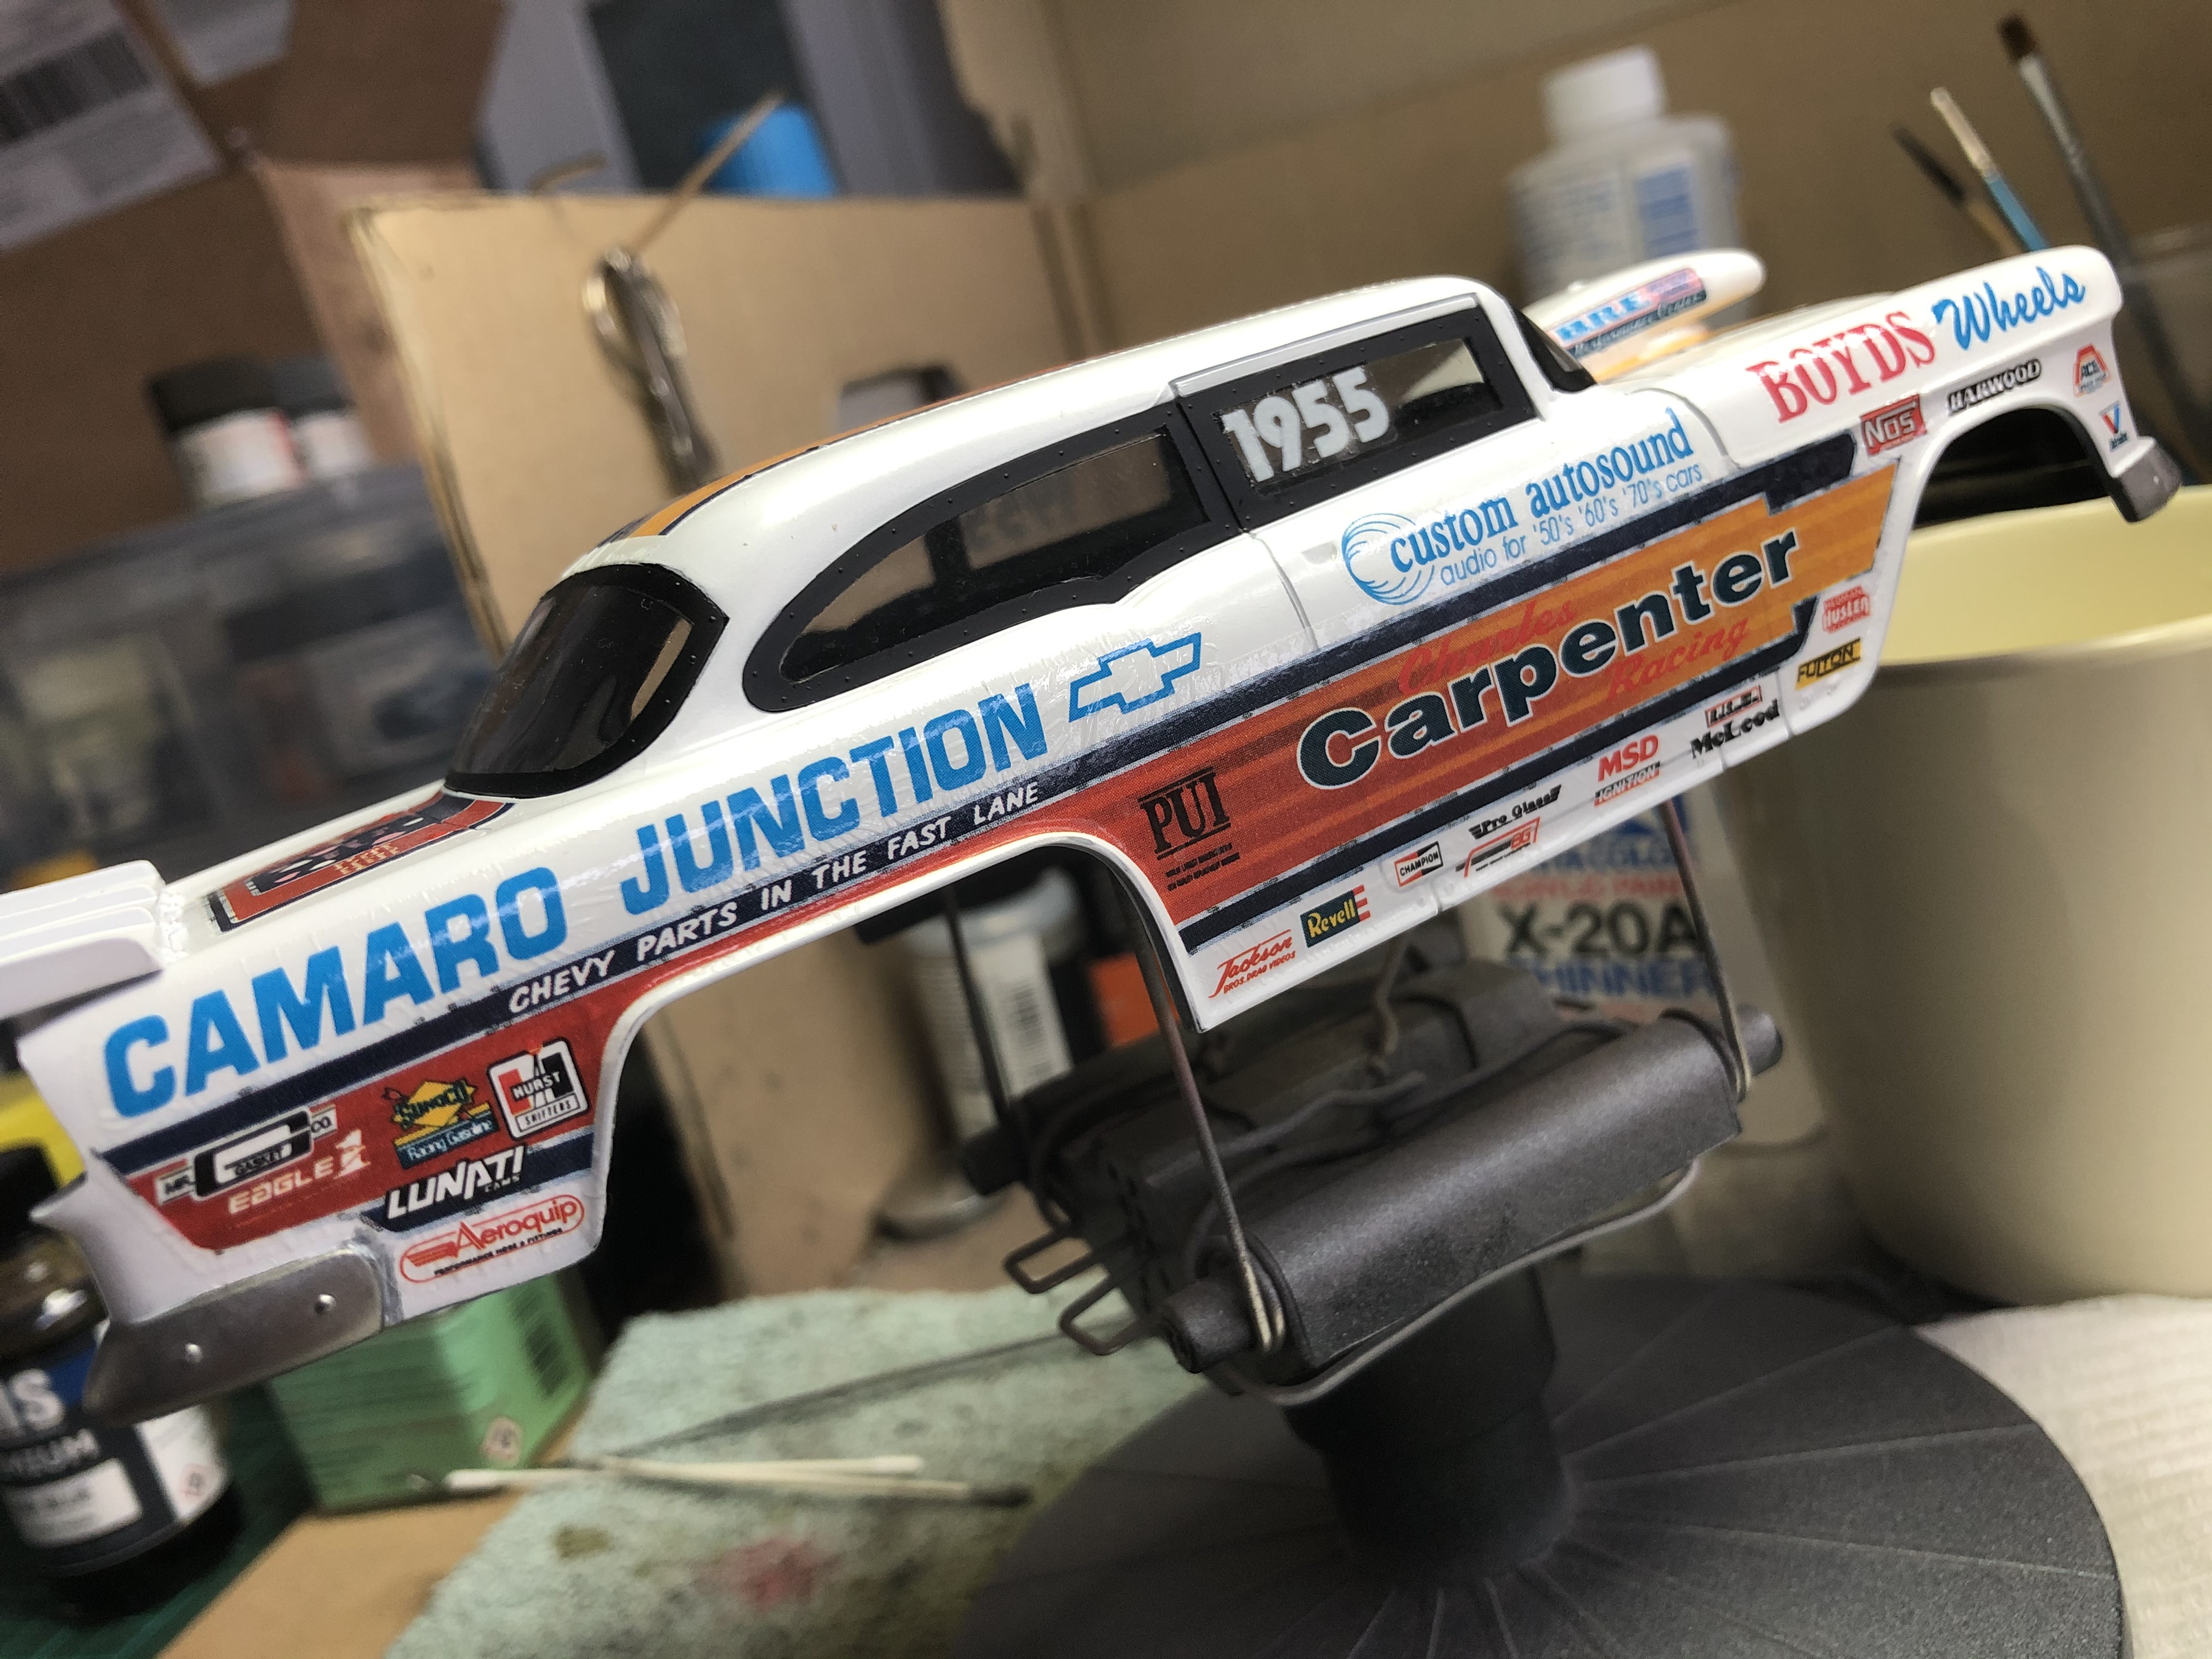
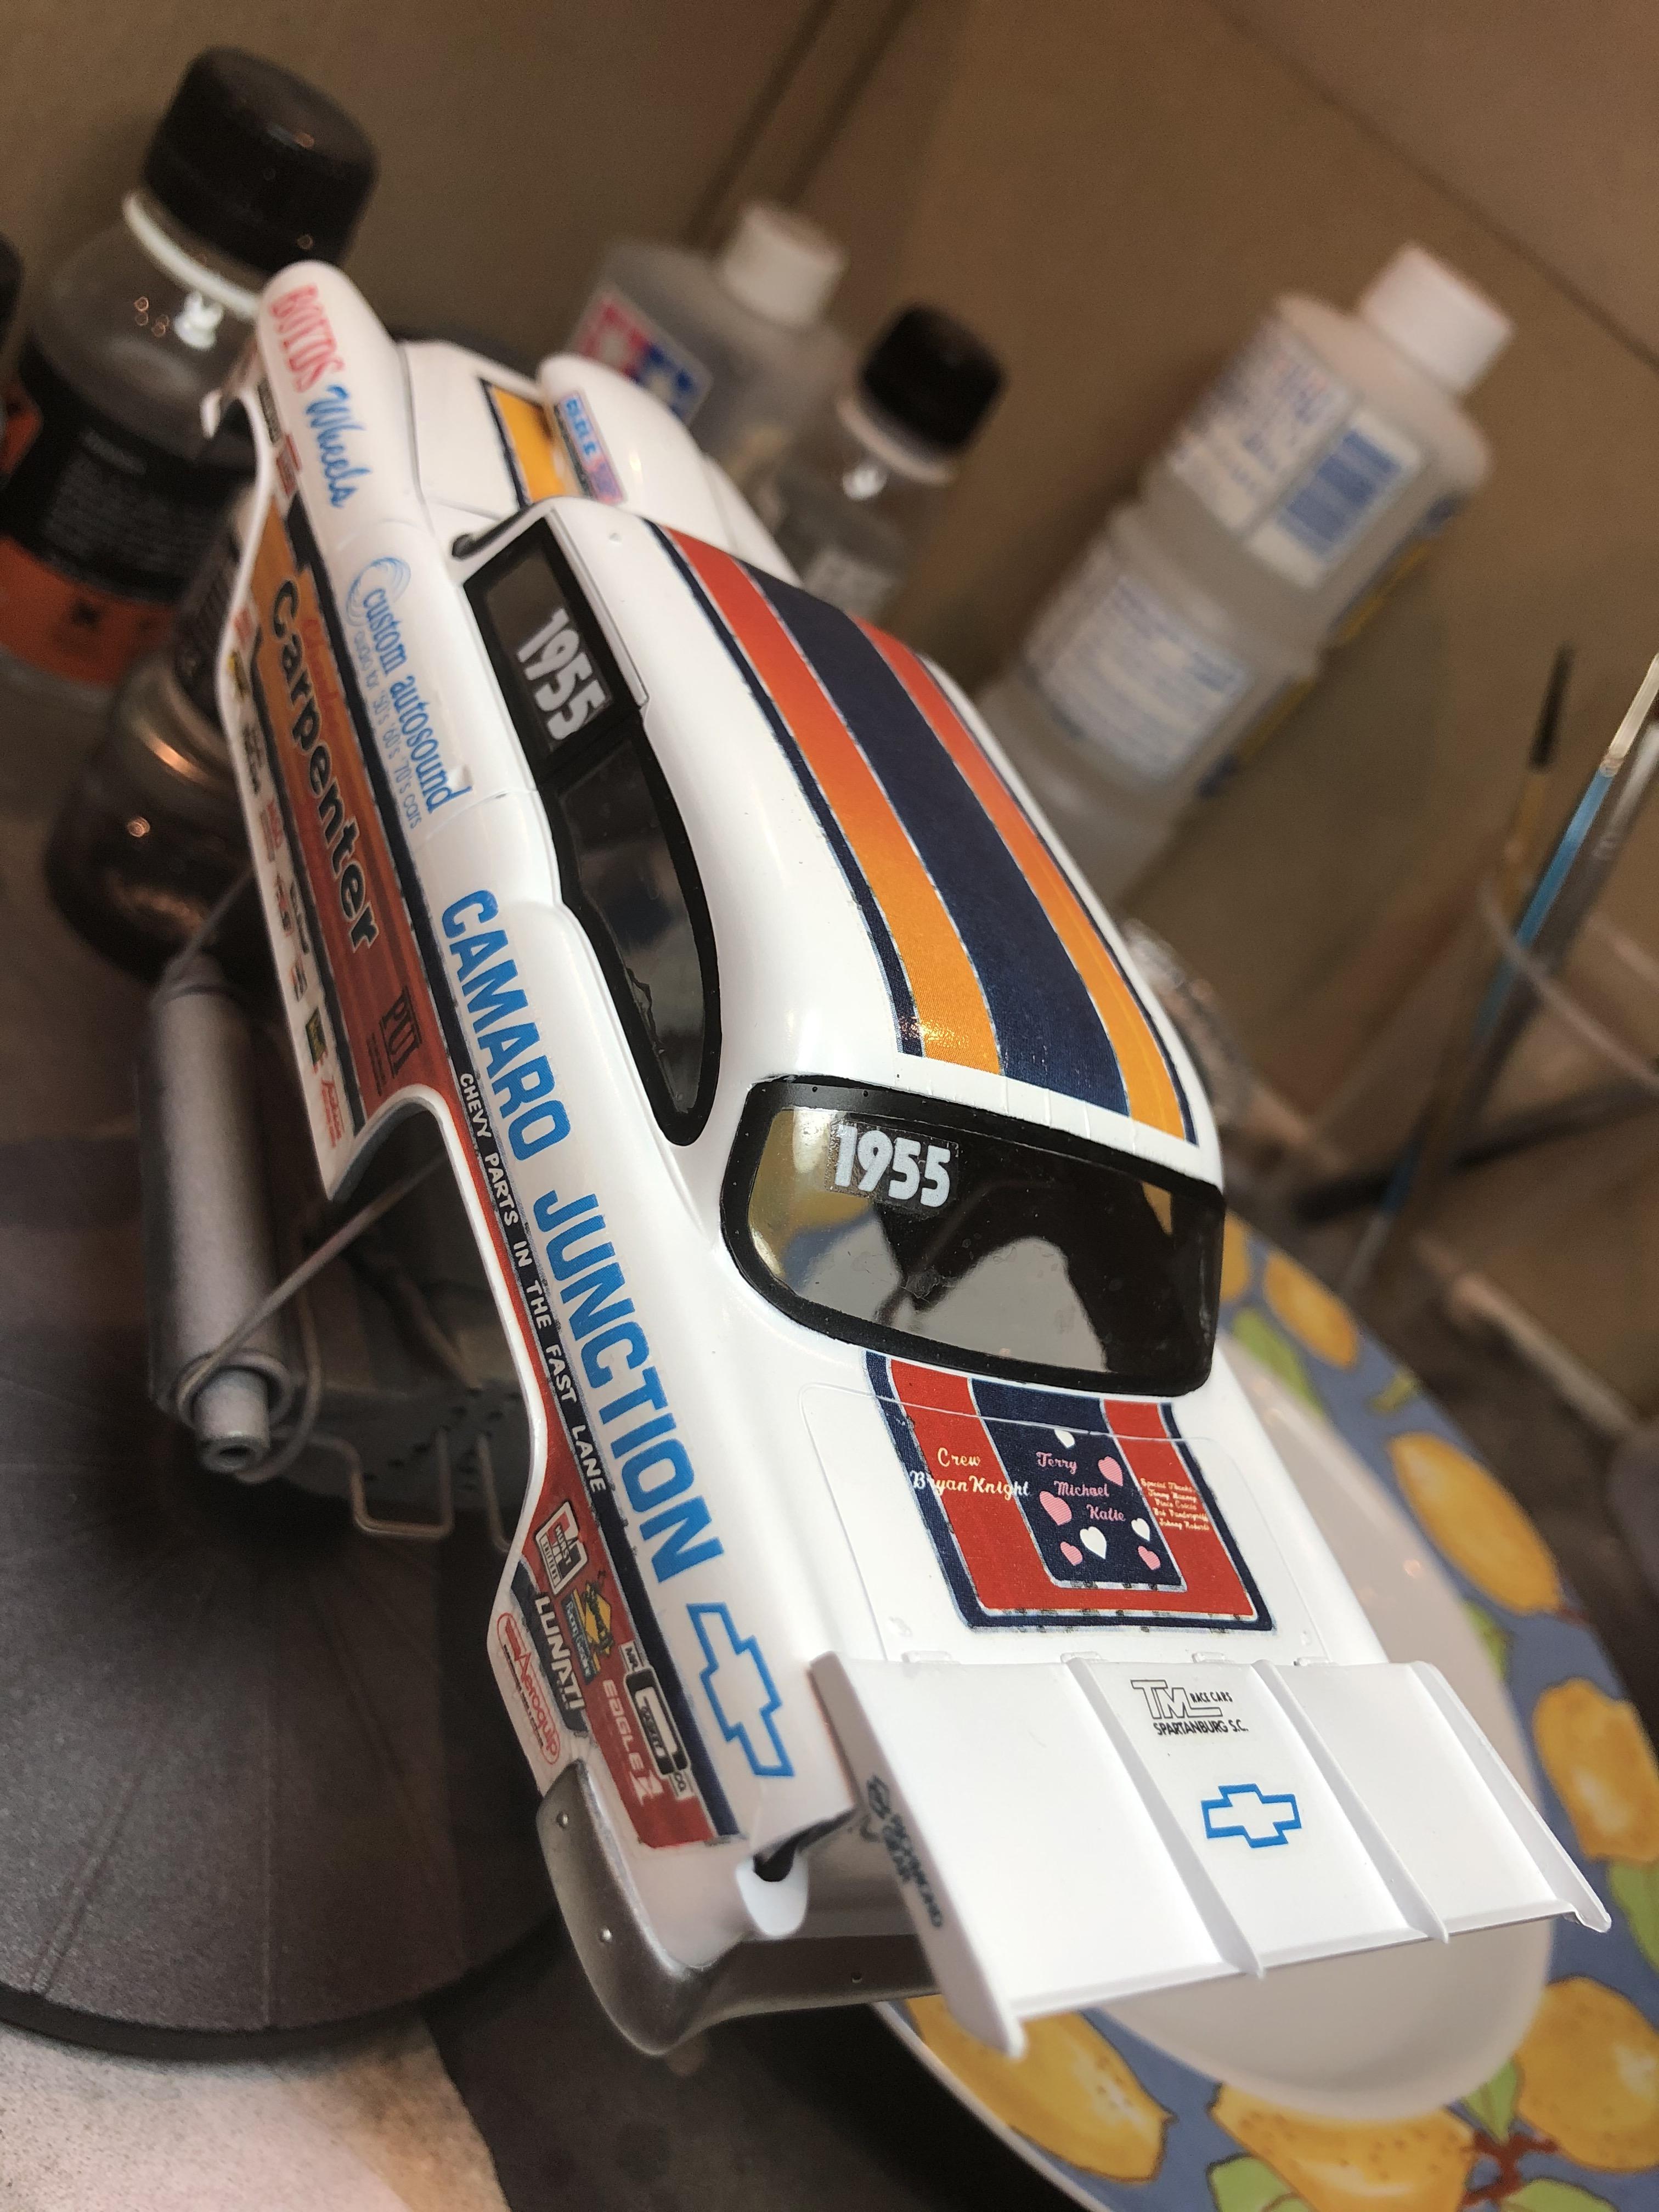
Ok, let's see how the side decal set behaves! This is just applied and still wet with Mr Mark Softer!
Cheers, D
Cheers, D

AussieReg
#007
Joined: June 09, 2009
KitMaker: 8,156 posts
Auto Modeler: 2,953 posts
Posted: Tuesday, May 26, 2020 - 06:26 PM UTC
Wow, I turn my back for a day or so and so much is going on!
26 pages of Racing Gold in this thread and not even 2 months in! You guys are killing it!
Patrick, good advice, look waaaaaaaaay ahead through the instructions to see what could (and probably will) go wrong if you deviate! I'm sure that you will recover from this minor collision, racing mishap, in-field styling modification!
Robert, great to hear that you have completed the '37, looking forward to the grand reveal glamour shots! Very nice work patching up the paint job!
Joe, I can't spot any bugs in the paintwork from your photo! The colour and finish look good. Perhaps a bit more wet sanding and another shot of colour? The rolling chassis and engine came together very well, great detailing.
Bill, looking forward to the Blue Max with some colour on!
Cheers, D
rv1963
Joined: December 07, 2004
KitMaker: 1,888 posts
Auto Modeler: 806 posts
Posted: Wednesday, May 27, 2020 - 12:20 AM UTC
Time for an update-I am done-Boy am i glad to be finished even with all the trouble this one gave me it turned out ok, plenty of pics. All comments welcome.


Dixon66
Joined: December 12, 2002
KitMaker: 1,500 posts
Auto Modeler: 645 posts
Posted: Wednesday, May 27, 2020 - 12:46 AM UTC
Looks fantastic Robert. Cannot see any real differential in the paint from where you resprayed, just the changes in color from the lighting.
AussieReg
#007
Joined: June 09, 2009
KitMaker: 8,156 posts
Auto Modeler: 2,953 posts
Posted: Wednesday, May 27, 2020 - 12:51 AM UTC
Lovely build Robert, congratulations on getting across the line! All of the troubles along the way just make it that much sweeter to make it to the end!
I love the colour combination, and the white walls paired with the white side flash just balances really nicely. Neat detail work, highlights, modifications and scratchbuilding round out the picture.
Cheers, D
I love the colour combination, and the white walls paired with the white side flash just balances really nicely. Neat detail work, highlights, modifications and scratchbuilding round out the picture.
Cheers, D
Joel_W
Joined: December 04, 2010
KitMaker: 11,666 posts
Auto Modeler: 2,974 posts
Posted: Wednesday, May 27, 2020 - 02:04 AM UTC
Robert,
Boy did you nail it. The finished build looks tremendous. One wouldn't have the slightest hint that it fought you every inch of the way.
Joel
Boy did you nail it. The finished build looks tremendous. One wouldn't have the slightest hint that it fought you every inch of the way.
Joel
Joel_W
Joined: December 04, 2010
KitMaker: 11,666 posts
Auto Modeler: 2,974 posts
Posted: Wednesday, May 27, 2020 - 02:05 AM UTC
D,
Those side decals laid down perfectly.
Joel
Those side decals laid down perfectly.
Joel
AussieReg
#007
Joined: June 09, 2009
KitMaker: 8,156 posts
Auto Modeler: 2,953 posts
Posted: Wednesday, May 27, 2020 - 02:35 AM UTC
Quoted Text
D,
Those side decals laid down perfectly.
Joel
Thanks Joel, I think I've found the trick here. I have a mug of hot water and dip a Q-tip in it, and use this to roll out the decal once it's down. This seems to stretch out the carrier film and the Mr Mark Softer settles it into the surface contours.
LHS done tonight (with the statutory glass of Shiraz!)
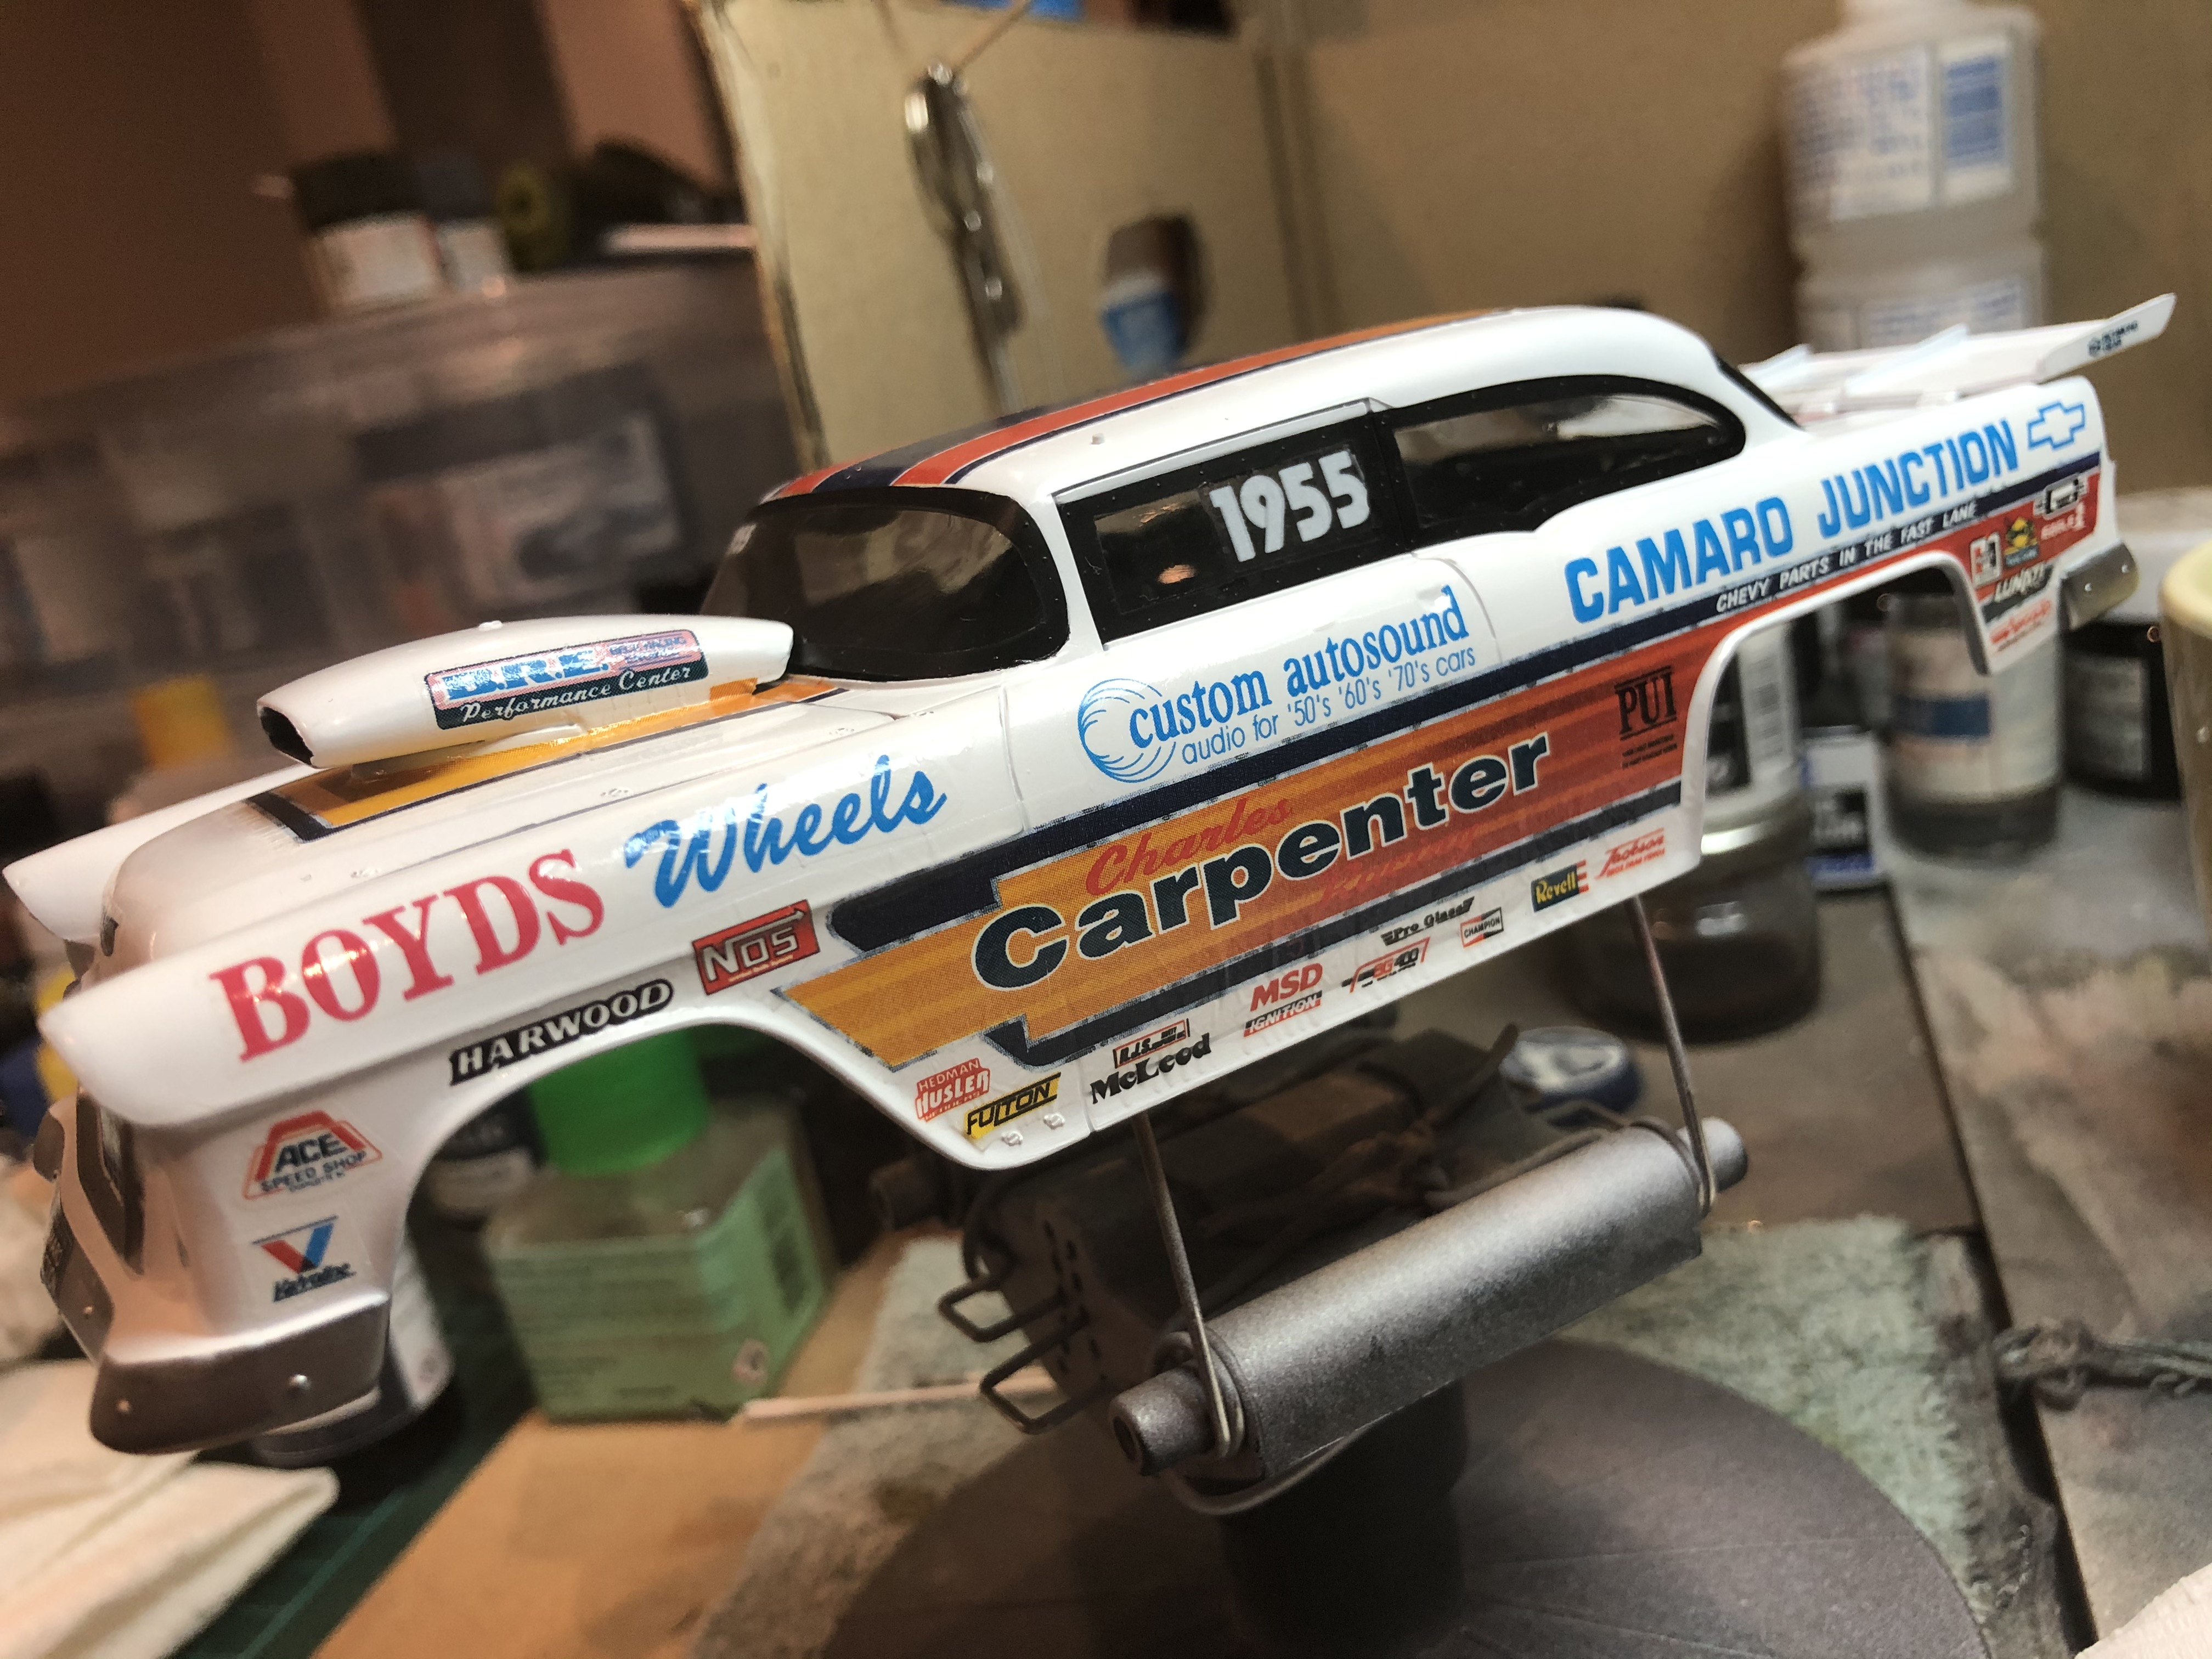
I will be going back over the older decals now to see if I can get them to settle down a bit better.
Cheers, D
rv1963
Joined: December 07, 2004
KitMaker: 1,888 posts
Auto Modeler: 806 posts
Posted: Wednesday, May 27, 2020 - 02:36 AM UTC
Thanks guys, I will give you a mini review on this kit.
I would stay away from this one unless you have an above average amount of experience, almost nothing on this model fits good.
1. The windows don't fit the body good, to get a decent fit i had to cut them apart from each other.
2. My chassis to body fit was off like shifted to one side, never did get that to sit rite.
3. Rear suspension, poor fit i installed and i lifted it a little to get more clearance, put it back in stock location and the tire almost touches the front of the rear
fender.
4. Rear springs way to thin and weak i added a little plastic to stiffen them up.
5. Stock hood doesn't fit if you add any paint it needs a lot of work.
Please keep in mind i could add at least 10 more things to the list of parts that don't fit, these are just the big ones. The kit does have a few good points a huge decal sheet that you could decal 5 gassers from nice front and rear tires and lots of extra parts and options.
Please also keep in mind this is just my opinion and maybe i just got a real stinker of a kit (nope). My next build will be on a recent modern tooled kit so i can get a much better experience. All comments and question welcome.
rv1963
Joined: December 07, 2004
KitMaker: 1,888 posts
Auto Modeler: 806 posts
Posted: Wednesday, May 27, 2020 - 02:42 AM UTC
Damian-Nice work on your decals, i don't like the way they printed those decals, like with the different tones in the silver areas it makes it look sloppy, not your fault theirs.
Just to be clear i understand the reason they printed them that way i just don't like it.
Just to be clear i understand the reason they printed them that way i just don't like it.

jimb
Joined: August 25, 2006
KitMaker: 2,539 posts
Auto Modeler: 1,405 posts

Posted: Wednesday, May 27, 2020 - 02:48 AM UTC
Robert, your gasser looks great. Despite the issues you had, I think it came out fantastic.
D., that's a lot of decals! They look really nice.
Jim
D., that's a lot of decals! They look really nice.
Jim
AussieReg
#007
Joined: June 09, 2009
KitMaker: 8,156 posts
Auto Modeler: 2,953 posts
Posted: Wednesday, May 27, 2020 - 02:54 AM UTC
Quoted Text
Damian-Nice work on your decals, i don't like the way they printed those decals, like with the different tones in the silver areas it makes it look sloppy, not your fault theirs.
Just to be clear i understand the reason they printed them that way i just don't like it.
I know what you mean Robert, but they actually did a great job of replicating the signage from the original cars

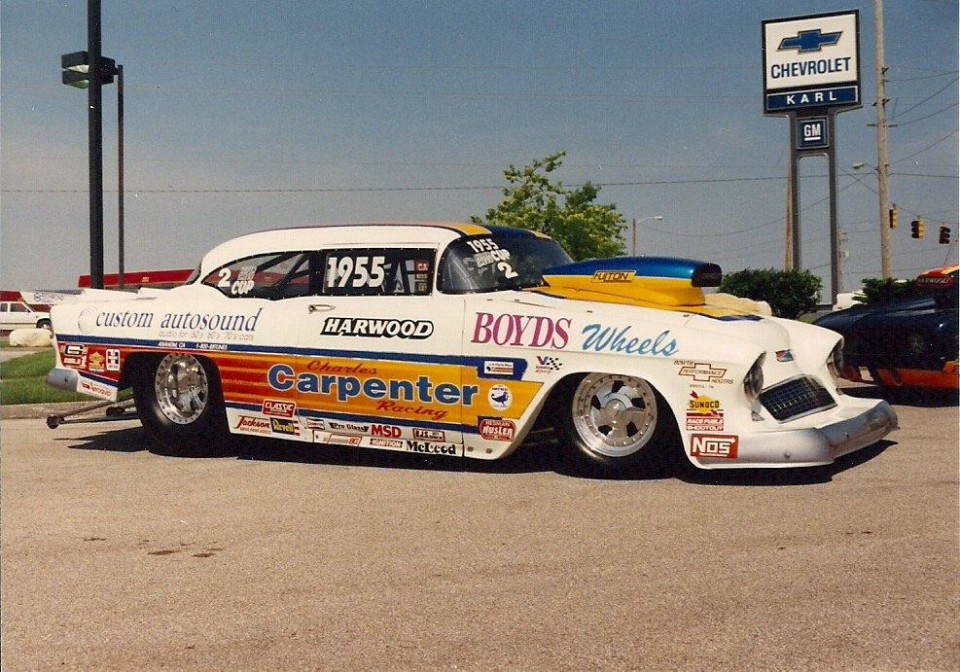
Cheers, D
bomber14
Joined: February 02, 2015
KitMaker: 330 posts
Auto Modeler: 23 posts
Posted: Wednesday, May 27, 2020 - 04:29 AM UTC
WOW!!! looks great robert. the color combo really stands out and a really nice job on the engine too.
patric, that's tough. i had many instances like that. recently on my wrangler monte carlo.(seems i am having bad luck with paint recently) the difference is i shelved it but you will carry on and fix/complete it.
dave, joel, michael, damian- yes when looking at it in photo it looks good. but after wet sanding i ended up with light patches where the paint was thinner. plus even though it is smooth i can still see the shadows so to speak, of the specks and i am not sure if they would blend in with a coat of clear.
the other issue i am having is tires. the kit tires to me look too narrow and the tires from my spares look too wide.
joe
pnance26
Joined: January 22, 2016
KitMaker: 766 posts
Auto Modeler: 140 posts
Posted: Wednesday, May 27, 2020 - 05:24 AM UTC
Thanks, Michael! I will finish them out and leave it for now...
pnance26
Joined: January 22, 2016
KitMaker: 766 posts
Auto Modeler: 140 posts
Posted: Wednesday, May 27, 2020 - 05:24 AM UTC
Quoted Text
Thanks guys the gasser is finished i will post a bunch of pics tomorrow-Joe that engine compartment looks great, would love to see a few close up pics, i would do a test on a piece of scrap first.
Patrick that is a shame, but with your skill it will get fixed.
Thanks Robert! Your gasser looks great!
pnance26
Joined: January 22, 2016
KitMaker: 766 posts
Auto Modeler: 140 posts
Posted: Wednesday, May 27, 2020 - 05:26 AM UTC
Thanks, Damian! I had not a clue but now I do!
I have a pal who is on his third build of this kit so he has spares to sell! They are on the way from not far away!
I appreciate the condolences!
I have a pal who is on his third build of this kit so he has spares to sell! They are on the way from not far away!
I appreciate the condolences!
 |

WEB HOSTING BY


Copyright ©2021 Auto Modeler and Kitmaker Network, a subsidiary of Silver Star Enterprises
All Rights Reserved. Please read our Conditions of Use and Privacy Policy.
All Rights Reserved. Please read our Conditions of Use and Privacy Policy.