

Go to automodeler.com for the current dynamic site!


The Garage
For general automotive modeling or non-modeling topics.
For general automotive modeling or non-modeling topics.
Hosted by Jim Starkweather
Strip, Track & Trail Official Build Thread

Dixon66

Joined: December 12, 2002
KitMaker: 1,500 posts
Auto Modeler: 645 posts

Posted: Friday, May 22, 2020 - 11:26 AM UTC
Love the steering column and the shifter boot Robert, I keep a supply of various size pins on hand for just the same.

Joel_W
Joined: December 04, 2010
KitMaker: 11,666 posts
Auto Modeler: 2,974 posts

Posted: Friday, May 22, 2020 - 11:28 AM UTC
Robert,
Nicely done on the rolling chassis. Aces on the steering shaft, but the shifter and knob really came out great. I personally don't think that the shift knob is oversize, and back in my day, they were pretty large like a pool ball.
Joel
Nicely done on the rolling chassis. Aces on the steering shaft, but the shifter and knob really came out great. I personally don't think that the shift knob is oversize, and back in my day, they were pretty large like a pool ball.
Joel

Joel_W
Joined: December 04, 2010
KitMaker: 11,666 posts
Auto Modeler: 2,974 posts
Posted: Saturday, May 23, 2020 - 04:02 AM UTC
Just a quick update as to my current progress on the Lotus 99t.
I finally finished the front suspension, only to realize that all the detail painting I did on the front shocks will never be seen as they're inside the tub. I just gotta pay more attentiion to these things, as it's really a waste of time at no one including me will ever see it. Of course the shocks came out perfect, but you'll just have to take my word for it.
Took a few hours to sand down the tire surfaces. I got them as best as I could as the molds for the right and left sides of both the front and rear tires didn't align correctly, so there's quite a large step on the North side, and the step on the south side is on the other half. For Tamiya, that's really weird. Also the front suspension is meant to be adjustable so it uses the clip type of connections that takes so much pressure to snap in, that I was really concerned about breaking one, but I managed not to this time. Also the brake discs are held in place with SCREWS, so now I have to hand prime and then paint them flat black.
I'm not thrilled with the any of the brake air intake scoops as they're not scoops but just half of ones. Another issue that Tamiya QC just let slide on by.
The front wing does fitslike a glove.
I finally finished the super simple cockpit. the racing harness is molded on the seat. Without a Dremel or power tool there's just no way to remove it and polish out the seat. So I hand painted it, then added the decals. Looks better then I thought it would. The digital tach is a a decal, then glossed with Pledge. Cockpit done. The tub surround for the dash is in the process of being cleaned up as I didn't much care for it in Aluminum. So it's back to Dark German Gray.
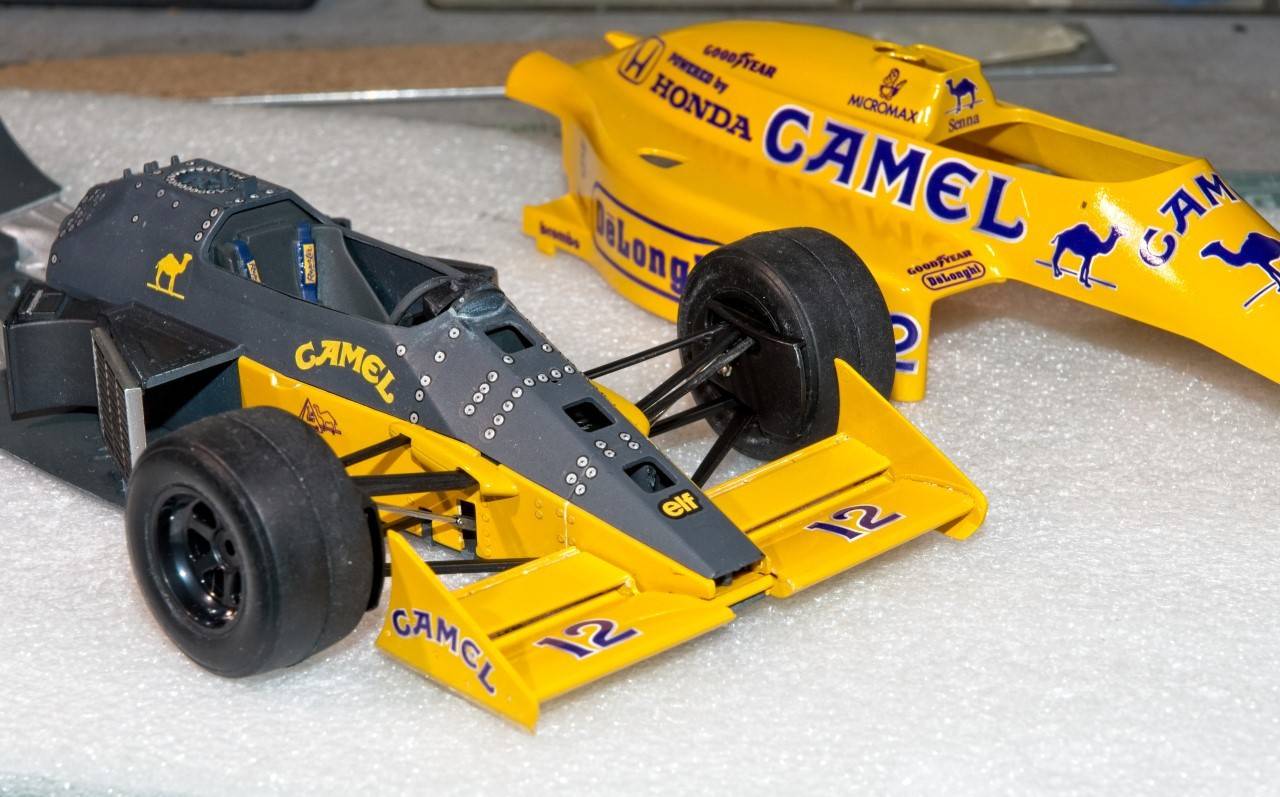

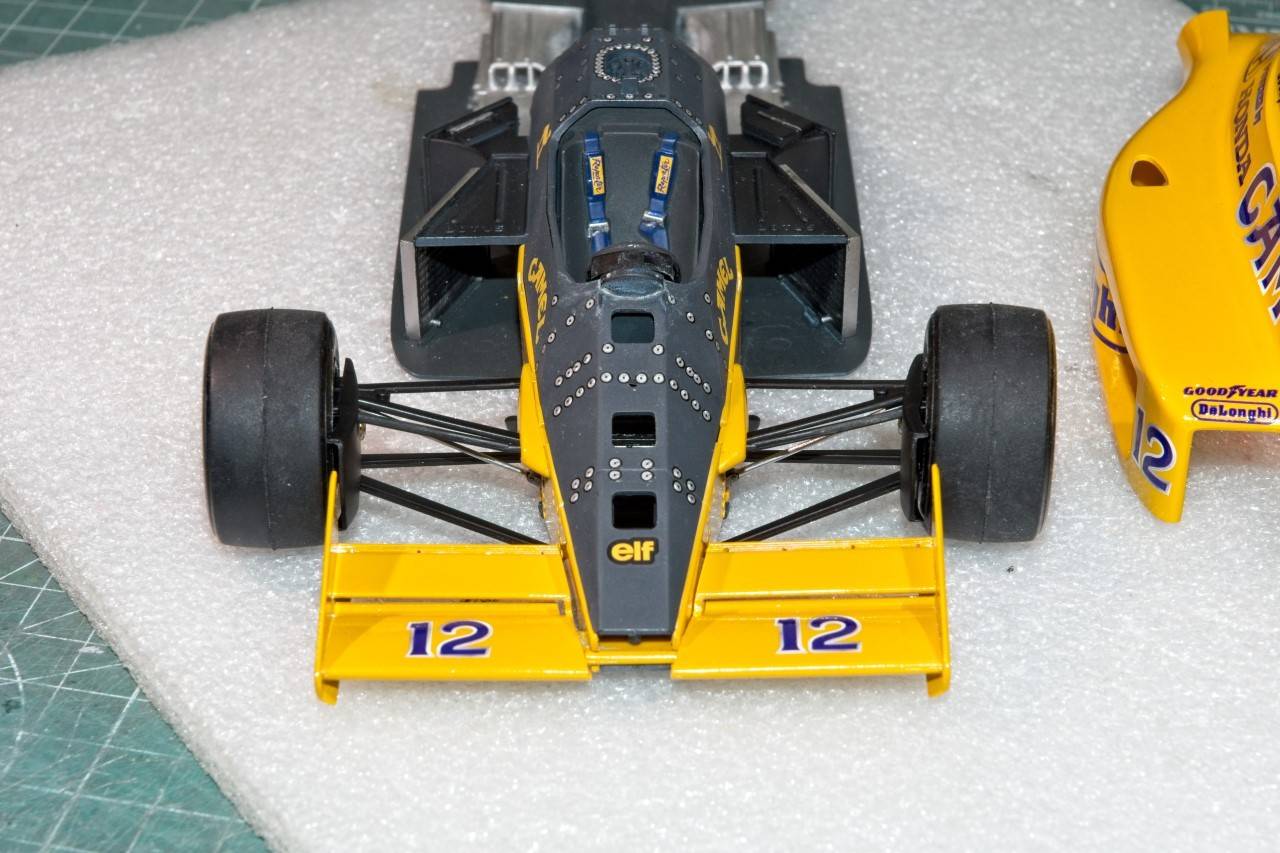
The front wing has been polished and waxed. The shell in the background hasn't been touched since it came out of the paint booth.
Joel
I finally finished the front suspension, only to realize that all the detail painting I did on the front shocks will never be seen as they're inside the tub. I just gotta pay more attentiion to these things, as it's really a waste of time at no one including me will ever see it. Of course the shocks came out perfect, but you'll just have to take my word for it.
Took a few hours to sand down the tire surfaces. I got them as best as I could as the molds for the right and left sides of both the front and rear tires didn't align correctly, so there's quite a large step on the North side, and the step on the south side is on the other half. For Tamiya, that's really weird. Also the front suspension is meant to be adjustable so it uses the clip type of connections that takes so much pressure to snap in, that I was really concerned about breaking one, but I managed not to this time. Also the brake discs are held in place with SCREWS, so now I have to hand prime and then paint them flat black.
I'm not thrilled with the any of the brake air intake scoops as they're not scoops but just half of ones. Another issue that Tamiya QC just let slide on by.
The front wing does fitslike a glove.
I finally finished the super simple cockpit. the racing harness is molded on the seat. Without a Dremel or power tool there's just no way to remove it and polish out the seat. So I hand painted it, then added the decals. Looks better then I thought it would. The digital tach is a a decal, then glossed with Pledge. Cockpit done. The tub surround for the dash is in the process of being cleaned up as I didn't much care for it in Aluminum. So it's back to Dark German Gray.
The front wing has been polished and waxed. The shell in the background hasn't been touched since it came out of the paint booth.
Joel

rv1963
Joined: December 07, 2004
KitMaker: 1,888 posts
Auto Modeler: 806 posts

Posted: Saturday, May 23, 2020 - 04:49 AM UTC
Nice work Joel, those seat belts look pretty good for being molded on, to bad about those tires i am surprised as Tamiya should have better quality even for this old kit.
Joel_W
Joined: December 04, 2010
KitMaker: 11,666 posts
Auto Modeler: 2,974 posts
Posted: Saturday, May 23, 2020 - 05:48 AM UTC
Robert
Thanks for the thumbs up. As for the tires, I feel exactly the same.
Joel
Dixon66
Joined: December 12, 2002
KitMaker: 1,500 posts
Auto Modeler: 645 posts
Posted: Saturday, May 23, 2020 - 07:56 AM UTC
Coming along very nicely Joel. At least you will always know the shocks were done correctly. 
As to the tires, that is a shocker.
As to the tires, that is a shocker.
Joel_W
Joined: December 04, 2010
KitMaker: 11,666 posts
Auto Modeler: 2,974 posts
Posted: Saturday, May 23, 2020 - 09:40 AM UTC
Robert,
Thanks for stopping by and checking out my progress to date. the racing harness was a pleasant surprise which was off set by the tire issue. I still have to gloss the tires and then decal them.
At this point of the build, I'm starting to look forward to my next build.
joel
Thanks for stopping by and checking out my progress to date. the racing harness was a pleasant surprise which was off set by the tire issue. I still have to gloss the tires and then decal them.
At this point of the build, I'm starting to look forward to my next build.
joel
Joel_W
Joined: December 04, 2010
KitMaker: 11,666 posts
Auto Modeler: 2,974 posts
Posted: Saturday, May 23, 2020 - 09:41 AM UTC
David,
How very true. But with my advancing age, I sure hope that I actually remember about those shocks as time marches on.
Joel
How very true. But with my advancing age, I sure hope that I actually remember about those shocks as time marches on.
Joel
rv1963
Joined: December 07, 2004
KitMaker: 1,888 posts
Auto Modeler: 806 posts
Posted: Saturday, May 23, 2020 - 11:57 AM UTC
Joel I know how you feel i to am looking to just finish mine as it has fought me every step of the way, i have already added the decals and 2 coats of clear, the first coat of clear went on great but the second didn't it left a some what rough texture on 4 or 5 places and one of the worst spots is on top of the decals so i can't wet sand over that if i do i may cut through the clear and damage the decal than the entire model goes in the garbage, i guess i am just going to have to live with it.

AussieReg

#007

Joined: June 09, 2009
KitMaker: 8,156 posts
Auto Modeler: 2,953 posts

Posted: Saturday, May 23, 2020 - 12:45 PM UTC
Quoted Text
Joel I know how you feel i to am looking to just finish mine as it has fought me every step of the way, i have already added the decals and 2 coats of clear, the first coat of clear went on great but the second didn't it left a some what rough texture on 4 or 5 places and one of the worst spots is on top of the decals so i can't wet sand over that if i do i may cut through the clear and damage the decal than the entire model goes in the garbage, i guess i am just going to have to live with it.
Joe, what clear coat did you use? It can be worth mist coating some neat MLT onto the clear, almost to the wet coat point, to reactivate the surface and get it to settle down further. This might greatly reduce the amount of sanding needed.
Cheers, D

AussieReg
#007
Joined: June 09, 2009
KitMaker: 8,156 posts
Auto Modeler: 2,953 posts
Posted: Saturday, May 23, 2020 - 12:51 PM UTC
Joel, your build is really looking great! Did you manage to get any pictures of the hidden work before you buried it?
A shame about the tyres, the dilemma between spending more hours to get it right in your eyes, and moving on to more rewarding tasks. The good thing is that the hours you have already spent have it pretty good, and without having it pointed out.
The fit of the front wing is spot on, and the waxed finish is glowing!
Cheers, D
rv1963
Joined: December 07, 2004
KitMaker: 1,888 posts
Auto Modeler: 806 posts
Posted: Saturday, May 23, 2020 - 01:35 PM UTC
Damian I used Testors one coat lacquer, i am pretty shore i have used this before on another model and applied more than one coat and didn't have a problem. I applied the second coat about 15 minutes after the first maybe i should have waited a full 24 hours don't know what happened.
I have already wet sanded a few spots and broke through the copper orange rite to the white under coat, the spots are very small though, now i will have to decant some of the orange and try it in my airbrush to retouch the paint work. I really hope this works if it comes up with a nice gloss i will leave it alone, my guess since i am retouching just a small area that it won't have a high gloss so than i will have to add clear to.
Wish me luck all i am really going to need it.

Cosimodo

#335

Joined: September 03, 2013
KitMaker: 1,808 posts
Auto Modeler: 701 posts

Posted: Saturday, May 23, 2020 - 04:50 PM UTC
This campaign is just at full speed. Blink and another page is full.
Great work on the Ferrari, Patrick. The red finish is amazing and the decals are looking very good so far.
Damian, the exhausts look a treat and the nitrous bottles are very shiny. Nice work on all that masking.
Robert, the rolling chassis and white wheels are very sharp. How I envy your 8 wire distributor
Joel, the body shell is looking gorgeous. I know how you feel about those Tamiya tyres. It has always been one of their low points for F1 kits. I am surprised no one does a resin replacement for these. I am suree there would be decent demand for them.
And thanks for the great comments about the 917 engine. I have thought about weathering it. I may wait until it is in place and look at the engine bay as a whole.
cheers
Michael
Joel_W
Joined: December 04, 2010
KitMaker: 11,666 posts
Auto Modeler: 2,974 posts
Posted: Sunday, May 24, 2020 - 12:56 AM UTC
Robert,
sorry to read about your clear coating issues. I've used Testors Gloss Coat for years, and I still use their Dull coat to this day without any issues. However, I've always used them via my Air Brush thinned 1:1 with either Tamiya Yellow cap or Mr. Color's #400 lacquer based thinners. I always let the painted surface dry then cure for a min of 3 days if it's acrylic Lacquer or Acrylics. in the old days of enamel paints, I had to let it cure for a full week or more. As for application, one or two tack coats, followed by a few wet coats, and that's one right after another. that prevents the following layers of clear coat from not laying down and self leveling into the 1st coat.
D's suggestion of a wet coat of mostly thinner should solve your problem by leveling out those bumps.
Joel
Joel_W
Joined: December 04, 2010
KitMaker: 11,666 posts
Auto Modeler: 2,974 posts
Posted: Sunday, May 24, 2020 - 01:05 AM UTC
D,
Of course I totally forgot to take some pictures of the shocks, that would have been to easy . The front wing polishing was a lot easier then I thought it was going to be, but I'm sure that the massive rear wing assembly will hold lots of surprises for me.
I decided on this build that the only wiring will be the ignition leads to the plugs, and perhaps the fuel injection lines. the fit under the skin is so tight that from what I've seen and read running lines is a real challenge on this kit, and honestly, the engine compartment is busy enough as is.
Another tire issue raised it's head this morning, that's 100% my fault. The Goodyear Eagle decals in 1/20 scale are from Indy Cals, and while I have the proper size Goodyear's, I don't have the right size Eagle logos. So I'm going to have to put together a small order to get them. I'll decal the tires without them for now, then Matt Coat them. When the decals arrive I'll just polish out the Dull coat and add the decals, then another layer of Dull coat. the wheels are held in place with screws, so removing them won't be an issue.
Joel
Of course I totally forgot to take some pictures of the shocks, that would have been to easy
. The front wing polishing was a lot easier then I thought it was going to be, but I'm sure that the massive rear wing assembly will hold lots of surprises for me. I decided on this build that the only wiring will be the ignition leads to the plugs, and perhaps the fuel injection lines. the fit under the skin is so tight that from what I've seen and read running lines is a real challenge on this kit, and honestly, the engine compartment is busy enough as is.
Another tire issue raised it's head this morning, that's 100% my fault. The Goodyear Eagle decals in 1/20 scale are from Indy Cals, and while I have the proper size Goodyear's, I don't have the right size Eagle logos. So I'm going to have to put together a small order to get them. I'll decal the tires without them for now, then Matt Coat them. When the decals arrive I'll just polish out the Dull coat and add the decals, then another layer of Dull coat. the wheels are held in place with screws, so removing them won't be an issue.
Joel
rv1963
Joined: December 07, 2004
KitMaker: 1,888 posts
Auto Modeler: 806 posts
Posted: Sunday, May 24, 2020 - 02:55 AM UTC
Joel I am surprised that i had this issue with the clear, i checked the label for directions and it says to wait 20 minutes between coats, i waited about 15 to 20 minutes so i am rite there and the paint was dry to the touch before i added the second coat and there was no rain that day and it was 72 and sunny. I think and i could be wrong that i sprayed my second coat way to heavy and it ate into the first coat, just a guess.
These newer spray paints in my opinion are way better than the stuff of 10 or more years ago. I to have been using Testors paint for many years most of it out of the can and i have had a few problems with there old formulas, i have had there flat coats from one can go on great and another can take a week to dry.
I really should just be using my airbrush for most of these paint jobs as i will have way better control over what happens.
I will post a pic of the before and after the touch up.
AussieReg
#007
Joined: June 09, 2009
KitMaker: 8,156 posts
Auto Modeler: 2,953 posts
Posted: Sunday, May 24, 2020 - 02:57 AM UTC
Well the decals are fighting me on this one! They are quite thick and I haven't had any tearing at all, but the carrier film outside of the colour areas is quite wide and wrinkling up, even after a couple of shots of softener. I have performed some delicate surgery with a scalpel blade and cut some of the larger ridges, then reapplied some softener, now I will wait until tomorrow night when I get home from work to see if that makes a difference.
Cheers, D
Cheers, D
AussieReg
#007
Joined: June 09, 2009
KitMaker: 8,156 posts
Auto Modeler: 2,953 posts
Posted: Sunday, May 24, 2020 - 03:04 AM UTC
Running update on builds
7 weeks in, almost 12,500 views and 600 posts
22 enlisted (plus 1, Jesper sign in please mate!)
15 builds in progress
3 completed builds
Szmann (Gabriel) - NASCAR - Chev Monte Carlo (Tony Stewart) - 1/25 AMT/ERTL kit - COMPLETED
Stickframe (Nick) - ENDURANCE - McLaren F1 GTR Longtail - 1/24 Aoshima kit - COMPLETED
Szmann (Gabriel) - NASCAR - Pontiac Grand Prix (Kyle Petty) - 1/24 Revell/Monogram kit - COMPLETED
Aussiereg (Damian) - STRAIGHTLINE - '55 Chev Pro Sportsman (Charles Carpenter) - 1/25 Revell kit - Engine detailing, body decalling
Joel_W (Joel) - FORMULA 1 - Lotus 99T Honda (Ayrton Senna 1987) - 1/20 Tamiya kit - Major assembly stage
Joel_W (Joel) - INDY - enlisted - Lola T-8800 Newman Haas (Mario Andretti 1988) - 1/25 AMT kit
Dixon66 (David) - ENDURANCE GROUP 5 - Zakspeed Capri - 1/24 Tamiya kit - Decals on order, body in primer, underside and interior complete
Dixon66 (David) - TOURING GROUP 2 - 2006 Mustang GT- 1/25 Revell kit - Interior modifications, drivetrain assembly
tinbanger (Richard) - GRAND PRIX - 1914 Mercedes Racer - 1/16 Lindberg kit - Engine and chassis started, major panel works under way, custom milled wheels/tyres and sheetmetal panels started
md72 (Mark) - INDY - enlisted - Target Reynard (Jimmy Vasser) - 1/25 Revell kit
Szmann (Gabriel) - FORMULA 1 - Tyrrell P34 (Monaco 1977 #4) - 1/20 Tamiya kit kit - Engine assembly and detailing, chassis plate and outer shell paint/decals
Hwa-Rang (Jesper) - NASCAR - (TBA)
PasiAhopelto (Pasi) - NASCAR - enlisted - Olds 442 (Donnie Allison) - 1/25 Salvinos JR kit
forest1000 (David) - FORMULA 1 - enlisted - Williams Renault (Jaques Villeneuve) - 1/24 Revell/Monogram kit
jimb (Jim) - STRAIGHTLINE - '57 Ford Sedan Gasser - Rolling chassis assembled, interior complete
Cosimodo (Michael) - ENDURANCE - 1971 Porsche 917/20 - 1/12 MFH kit - Step 1 of 26 completed - Engine Assembly
bluebell914 (Patrick) - ENDURANCE - enlisted - Ferrari P4 or 512S
2002hummer (Darrell) - GRAND PRIX - Lotus Super Seven (Tamiya) - Engine assembled and painted
TacFireGuru (Mike) - NASCAR - enlisted - Chev Monte Carlo (Home Depot)
Lakota (Don) - ENDURANCE - Corvette C7.R - 1/25 Revell kit - Engine assembled, floor pan/chassis under way
RedwingNev (Neil) - GRAND PRIX - enlisted - Lotus 79 (1978 Mario Andretti?) - 1/20 Tamiya kit
rv1963 (Robert) - STRAIGHTLINE - '37 Chevy Gasser - 1/25 AMT kit- Engine complete with 3D printed & custom milled parts, body painted, rolling chassis and interior detailing
heavyjagdpanzer (Bill) - STRAIGHTLINE - Blue Max Funny Car - 1/25 Revell kit - Rolling chassis completed, body work commenced
bmwh548 (Radu) - RALLY - '99 WRC Subaru Impreza - 1/24 Tamiya kit - Wheels and tyres
pnance26 (Patrick) - FORMULA 1 - Ferrari 312T - 1/12 Tamiya kit - Rolling chassis/engine/drivetrain complete, body painted and decals under way
bomber14 (Joe) - STOCK CAR - '60 Ford Starliner - AMT/ERTL kit - Body and chassis modifications, interior paint/detailing and assembly
Torpon (Carlos) - TBA - enlisted - TBA
If anybody has changed or firmed up their proposed builds, or spotted anything wrong in the list, please let me know.
Cheers, D
Joel_W
Joined: December 04, 2010
KitMaker: 11,666 posts
Auto Modeler: 2,974 posts
Posted: Sunday, May 24, 2020 - 03:36 AM UTC
Egads!!
Today sure seems like it's jinxed for all of us.
Robert: Wet sanding Lacquer clearcoat after just one day is not an easy thing to do, I know that all to well. It's very easy as you found out to cut right through to the super thin layers of paint. My golden rule has always been 3 days/72 hours before sanding, rubbing out, and polishing. For Clearcoats, as I said, I just do 2 tack coats, followed by two wet coats and into the drying bin for 72 hrs.
As far as touch up air brushing, you should be fine going that route. I've done it many times without issues. Well, the only issue is not covering the rest of the model as rouge over spray has always been an issue for me.
Joel
Joel_W
Joined: December 04, 2010
KitMaker: 11,666 posts
Auto Modeler: 2,974 posts
Posted: Sunday, May 24, 2020 - 03:40 AM UTC
D,
Sorry to hear about your decaling issues. That's one of the reason why I try never to use kit decals as I've also had horrendous luck with them, and they're usual super thick.
if you have Solvaset, it's pretty strong and will help to get rid of all those wrinkles as it dries. I also use for the thick Asian Decals Mr, Mark Setter & Softener, as they're even stronger then Solvaset.
Joel
Joel_W
Joined: December 04, 2010
KitMaker: 11,666 posts
Auto Modeler: 2,974 posts
Posted: Sunday, May 24, 2020 - 03:41 AM UTC
Well, the Jinx traveled all the way to New York, Long Island, and found me quite busy working on the turbo charges and exhausts. Lets just say that I eventually decided to take up the good fight again another day. 
Joel
Joel

md72
#439
Joined: November 05, 2005
KitMaker: 4,950 posts
Auto Modeler: 555 posts

Posted: Sunday, May 24, 2020 - 04:43 AM UTC
OK, thanks for the warning. I had a stubborn decal yesterday. Micro Sol wasn't having any effect. Whipped out my OLD bottle of Solvaset, it tried to eat up the decal, ate through the Future and tried to eat up the Tamiya Lemon Yellow below the Future. Guess I'll pass on the Mr. Color products for a while. Anybody got something in between Micro Sol and Solvaset? 

rv1963
Joined: December 07, 2004
KitMaker: 1,888 posts
Auto Modeler: 806 posts
Posted: Sunday, May 24, 2020 - 04:57 AM UTC
Damian Sorry to hear about your decal problems, bin there before to.
Well fist pic below show the 2 spots i cut through wet sanding, top rim of the head light and to the right below and a little to the left of the large decal on the door, second pic shows the respray, not to bad it is a bit lighter in shade i assume because there is no clear on it. I will wait this time at least 2 to 3 days than i will only polish the line out between the old and new paint, there will be no sanding. All comments welcome.


Well fist pic below show the 2 spots i cut through wet sanding, top rim of the head light and to the right below and a little to the left of the large decal on the door, second pic shows the respray, not to bad it is a bit lighter in shade i assume because there is no clear on it. I will wait this time at least 2 to 3 days than i will only polish the line out between the old and new paint, there will be no sanding. All comments welcome.

Szmann

Joined: September 02, 2014
KitMaker: 1,977 posts
Auto Modeler: 1,371 posts
Posted: Sunday, May 24, 2020 - 05:10 AM UTC
Quoted Text
Well the decals are fighting me on this one! They are quite thick and I haven't had any tearing at all, but the carrier film outside of the colour areas is quite wide and wrinkling up, even after a couple of shots of softener. I have performed some delicate surgery with a scalpel blade and cut some of the larger ridges, then reapplied some softener, now I will wait until tomorrow night when I get home from work to see if that makes a difference.
Cheers, D
Probably you need a "solid" coat of clear and sanding over. I has pretty much the same on my Hot Wheels NASCAR and the clear + sanding helped a lot with the unruly edges.
Gabriel
Szmann
Joined: September 02, 2014
KitMaker: 1,977 posts
Auto Modeler: 1,371 posts
Posted: Sunday, May 24, 2020 - 05:14 AM UTC
Robert, looking good. The metallics are always finicky to patch, because have the bad habit to arrange the flakes in different patterns. Yes, the tonal difference it is most probably given by the lack of clear over the patchwork.
Gabriel
Gabriel
 |

WEB HOSTING BY


Copyright ©2021 Auto Modeler and Kitmaker Network, a subsidiary of Silver Star Enterprises
All Rights Reserved. Please read our Conditions of Use and Privacy Policy.
All Rights Reserved. Please read our Conditions of Use and Privacy Policy.