

Hi Patrick,
Yes, take a look in the Cars forums - the heading is F1 Fun, the build callsign is Stickframe. It's a series of F1 builds - there's a Zakspeed Yamaha, Ferrari 126 C2 and Tyrrell P34. They all use the same paints to a greater or lesser degree. I haven't decided on the next car yet - I want to do an MP4/13 but am missing/waiting for some parts. I could do a really detailed Lotus 79 1978 - BUT it's got almost the same engine as the P34! I could use some variety!
Cheers
Nick


Go to automodeler.com for the current dynamic site!
The Garage
For general automotive modeling or non-modeling topics.
For general automotive modeling or non-modeling topics.
Hosted by Jim Starkweather
Strip, Track & Trail Official Build Thread

Stickframe

#362

Joined: December 01, 2013
KitMaker: 1,661 posts
Auto Modeler: 431 posts

Posted: Monday, May 18, 2020 - 12:34 PM UTC

Joel_W
Joined: December 04, 2010
KitMaker: 11,666 posts
Auto Modeler: 2,974 posts

Posted: Tuesday, May 19, 2020 - 01:16 AM UTC
Nick,
I really not only enjoy your super detail builds, but even at my age I do learn things from each of your builds. What I really like is that we can both build the same model with two completely different focuses for our builds. You're focused more on the detailing while I'm focused more on a display piece.
As for your reason for not wanting to do the 1978 Lotus 79 because the engine is once again the Ford Cosworth V8 no matter what version it may be. But seeing as it was the most successful F1 engine of it's generation, the vast majority of teams did run a version of it. There's more then enough variation in each Lotus version to test your skills for sure.
I'd say go for it.
Joel

Joel_W
Joined: December 04, 2010
KitMaker: 11,666 posts
Auto Modeler: 2,974 posts
Posted: Tuesday, May 19, 2020 - 01:32 AM UTC
Patrick,
Tamiya TS-12 and Mr. Color rattle cans of chrome will work, but I'm not sure of how one goes about applying Metallics from a Rattle can without flooding it on.
As far as AB needle/cone sizes, the standard for a hobby AB is 3-3.5mm. 2.0 and 5.0 aren't offered in ABs but for different applications. I have two Grex Abs: 3.5 & 5.0. The only hobby type AB that is different is the Paasche H series. It's an external mix AB. It comes with their #3 setup. They do offer a #1 & #5 as well. The trouble is that the #3 is more like a #5.
if you're not sure, just post the make and model and I'll check it out for you.
Joel
Stickframe
#362
Joined: December 01, 2013
KitMaker: 1,661 posts
Auto Modeler: 431 posts
Posted: Tuesday, May 19, 2020 - 04:38 AM UTC
Hi Joel
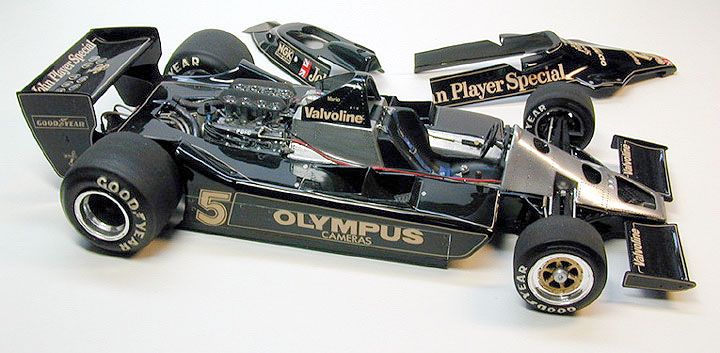
Yes, the Cosworth is quite an engine. I found several detail kits for the Lotus 79 (each meeting my exacting standard of being on sale!) everything from the engine and suspension to the wings, each being a combination of white metal and etch - perfect! I will eventually build it, but the engine layout is strikingly similar to what's on the P34 I just finished, and interestingly, the P68! who would have guessed?
I think it's a bit like the LT-1, another great engine, but I find it more interesting to mix things up a bit. I don't think I'd build several of those in a row either.
I have a Tamiya MP4/13 and ordered a Top Studio detail kit for it too - but, I'm experiencing the joy you had a few weeks ago, which is waiting for it to arrive from Australia. So, in the mean time, I don't want to jump into the Lotus by default, and do a mediocre job on what could be a really good build.
Honestly, I'd like to build a car that's a bit newer, like post 2010. The F1 cars of the 70's seem to feature a common wedge body design (it never occurred to me that the design may have influenced the TR7?), and I'd prefer some variety - maybe that's why the kits I found were each on sale - who knows?
Annoyingly, I did recently find some newer cars, at very good prices at Lucky Model - but, too late - I'll build what I've got, I don't need more kits! a bit like the various M1A1 and T-55 kits that I "had" to have somewhere along the line, and are now collecting dust!
Happy model building gents, stay well
Nick
Joel_W
Joined: December 04, 2010
KitMaker: 11,666 posts
Auto Modeler: 2,974 posts
Posted: Tuesday, May 19, 2020 - 06:13 AM UTC
Nick,
You do bring up a lot of valid points for sure. And with your focus on super detailing and correcting each build should be unique from the last build.
The Tamiya MP4/13 kit, I'm assuming you're referring to the Ebbro kit as their Tamiya's race car div these days.
Funny how even in F1 where teams have to build their own car from the ground up with the exception of engine/trans, just how similar one design is to the other. they just have to share some data for that to occur every season. One major advance to the nose and every team has made changes to the nose clip.
This is one of the reasons why I so rarely build an F1 car even though I was collecting them for a while, and much prefer Tin Tops from the multitude of series that race them.
Like you, my stint into armor quickly narrowed to USA to just Sherman's. I must have 7 build and stored away as all my display shelves are for cars.
I'm certainly looking forward to whatever you decide on next.
Joel
pnance26
Joined: January 22, 2016
KitMaker: 766 posts
Auto Modeler: 140 posts

Posted: Tuesday, May 19, 2020 - 09:17 AM UTC
Joel.
I called Badger this morning. I bought an Omni 6000 about 18 months ago during their birthday sale.
It is fine tip needle with a .5 tip which is standard. I am thinking of buying a .35 or .33.
Badger and one other source say the .5 will do fine for what I am doing with the Molotow. They also confirmed that I can clean the brush with airbrush cleaner or lacquer thinner as long as i just run it through the brush and 'back gargle' it... don't immerse it as it will screw with the O-ring.
Chris says run it at about 20-25 psi. And it doesn't require a black base. I will be doing the spoon test whilst I am cleaning up the parts.
Thanks everyone for all the help. I will let you all know.
Joel_W
Joined: December 04, 2010
KitMaker: 11,666 posts
Auto Modeler: 2,974 posts
Posted: Tuesday, May 19, 2020 - 11:59 AM UTC
Patrick,
Badger is plain wrong. No way do you want to shoot Alcad 2 with a .5mm needle and cone. You're just misting it on in lite layers. With out a black gloss base the depth of the shine will be about zero and the shine will never be what you're looking for.
And yes you can clean your AB with LC or air brush cleaner after the session, and back flush, which I always do. But I do semi tear down my AB and clean it so that next session I don't have issues from paint that dried in the AB. LC that gets to the rubber o rings just dries them out.
Go on You tube and watch a few vids on air brushing basics and cleaning. Paul from International modeler has a few excellent vids on it, as does Paul Budzik.
Joel
pnance26
Joined: January 22, 2016
KitMaker: 766 posts
Auto Modeler: 140 posts
Posted: Tuesday, May 19, 2020 - 12:34 PM UTC
Quoted Text
Patrick,
Badger is plain wrong. No way do you want to shoot Alcad 2 with a .5mm needle and cone. You're just misting it on in lite layers. With out a black gloss base the depth of the shine will be about zero and the shine will never be what you're looking for.
And yes you can clean your AB with LC or air brush cleaner after the session, and back flush, which I always do. But I do semi tear down my AB and clean it so that next session I don't have issues from paint that dried in the AB. LC that gets to the rubber o rings just dries them out.
Go on You tube and watch a few vids on air brushing basics and cleaning. Paul from International modeler has a few excellent vids on it, as does Paul Budzik.
Joel
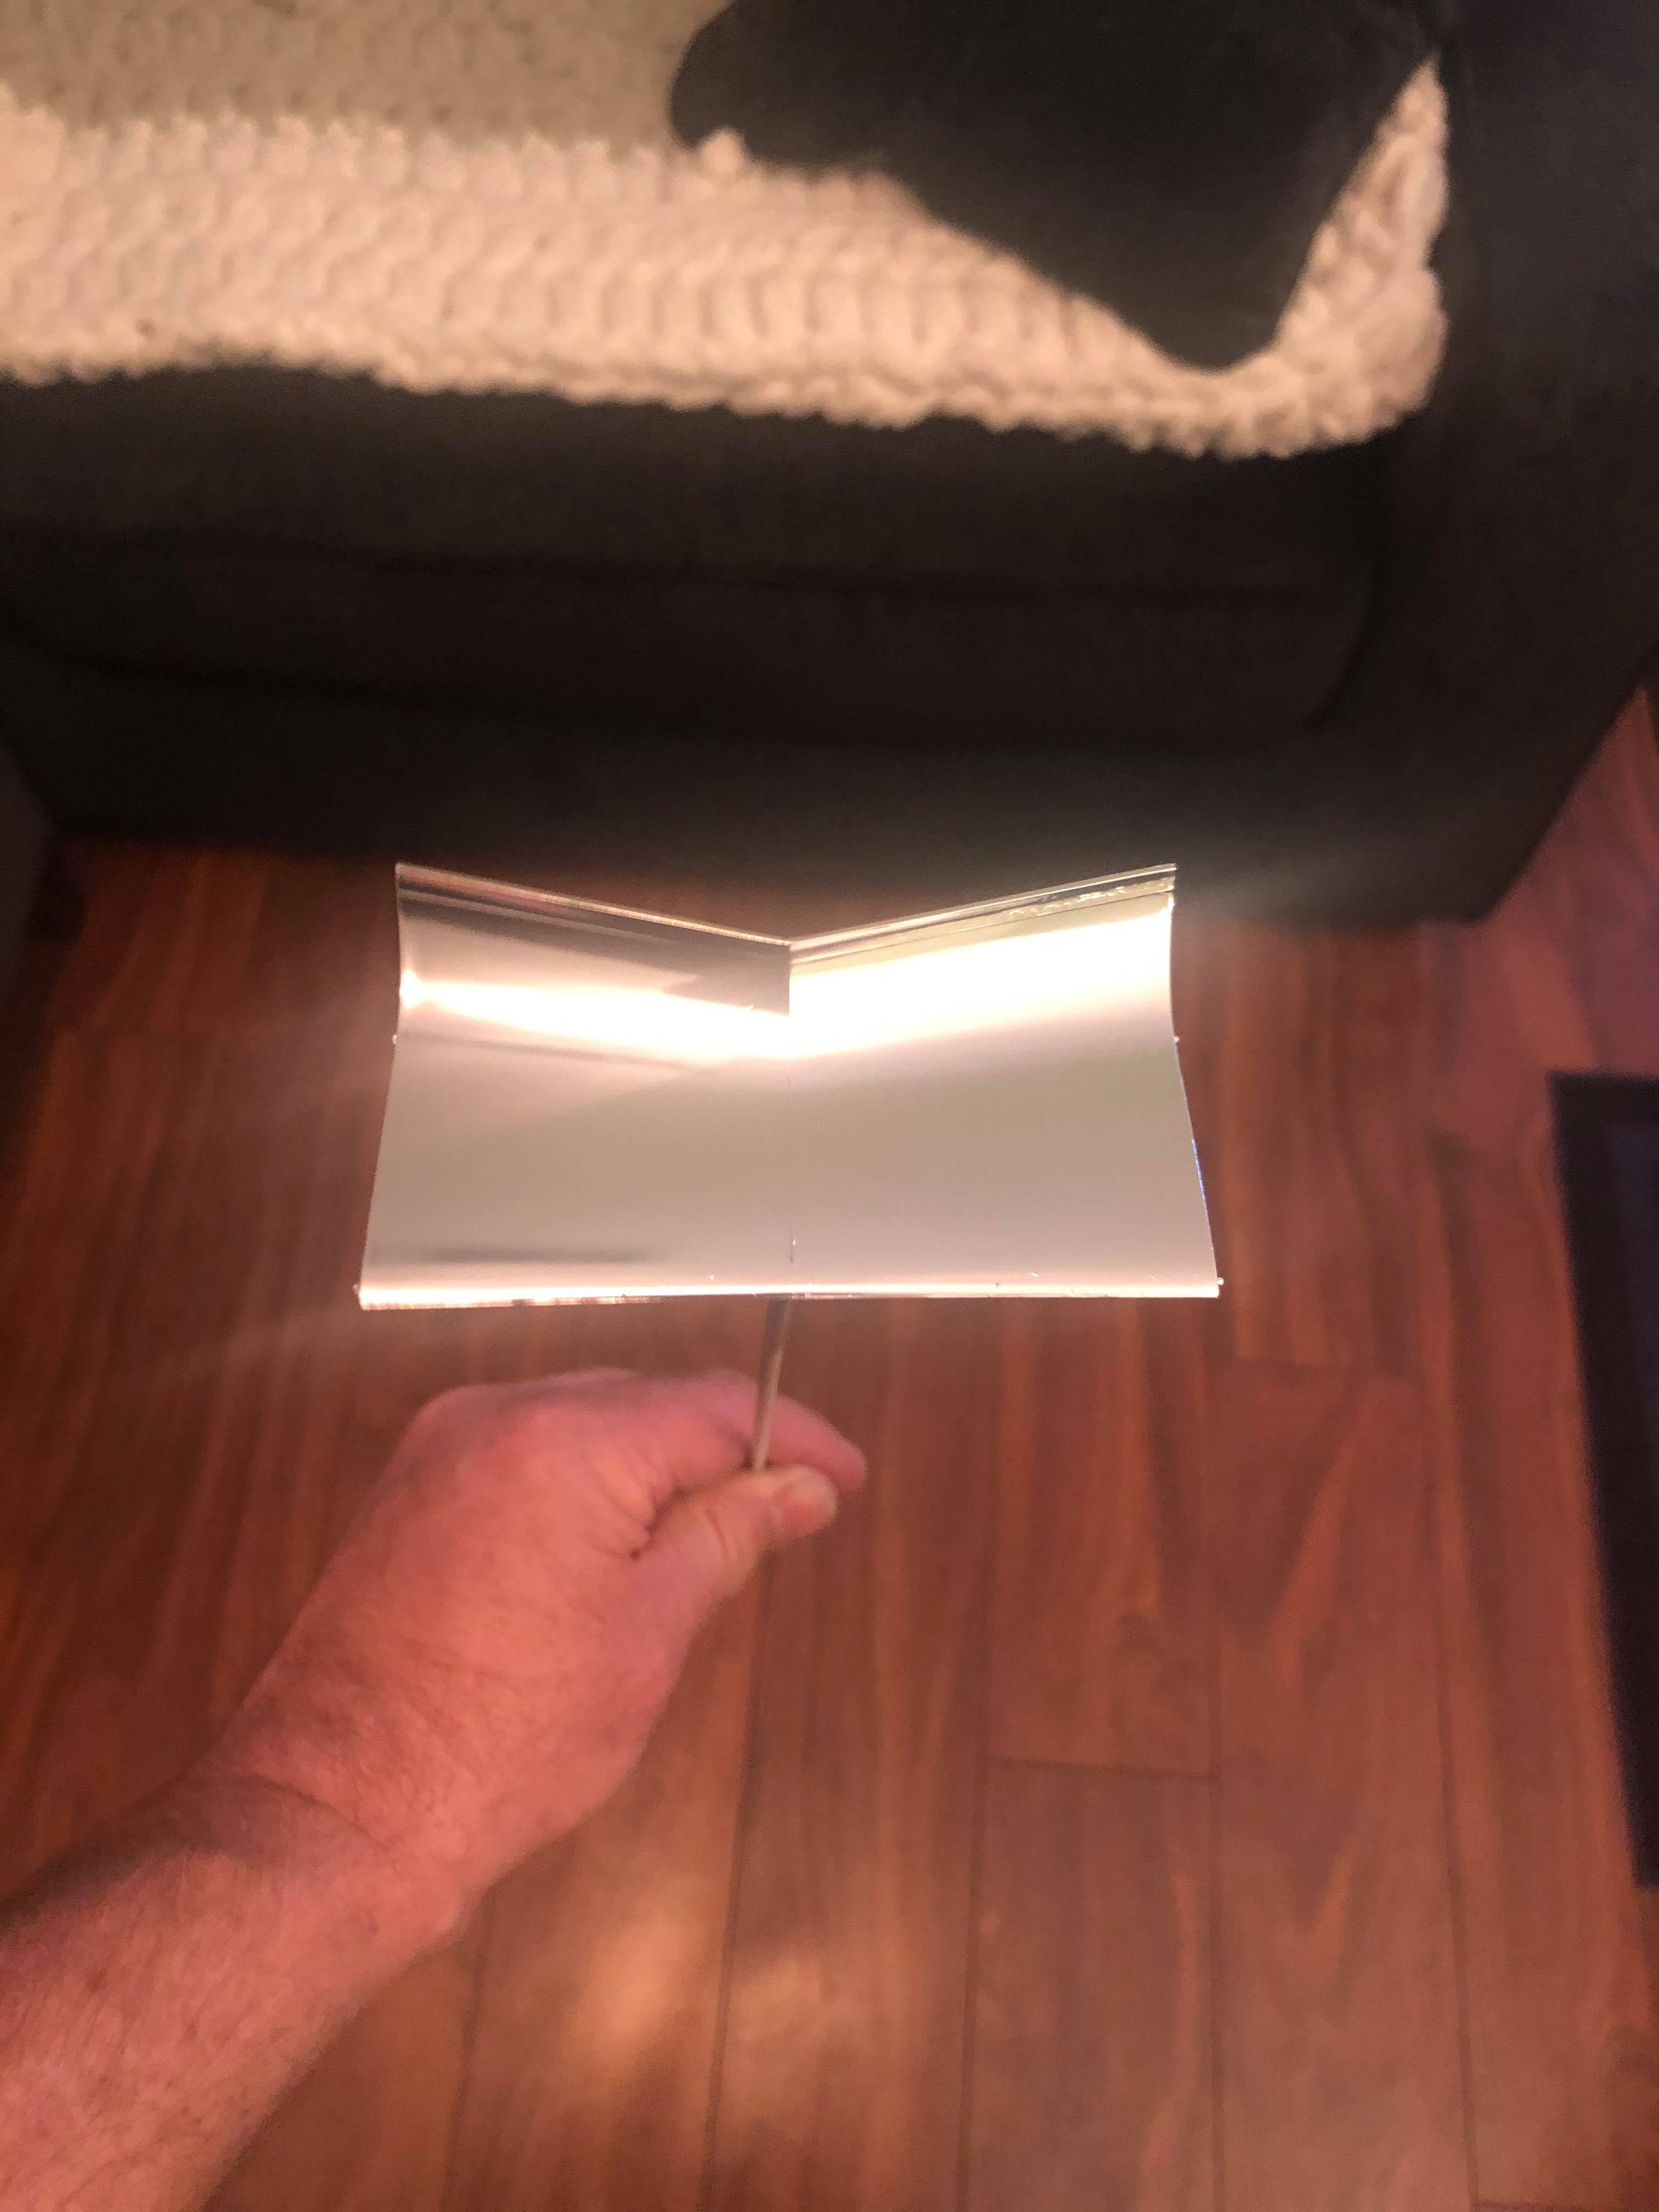
The info on the painting came from Chris Smith, Joel. I wouldn't jump on Badger. Chris has been working with the Molotow which is NOT Alclad. We were not talking about Alclad. We were talking about Motolow. He sent me this photo and said that using Molotow, you don't do mist coats. You do it all at once. Flash on the paint is 5 minutes. I planned on trying it on spoons just to test it out. Nor do you need a gloss black base with Molotow.
Here is what he got with Molotow...

bomber14
Joined: February 02, 2015
KitMaker: 330 posts
Auto Modeler: 23 posts

Posted: Tuesday, May 19, 2020 - 01:33 PM UTC
Joel i think patrick pulled a bait and switch on you.
i have only tried their pen and it worked great without a black base cote at first. when i tried it six months or more later it looked like just shiny silver paint. evidently it has a shelf life.
i have only tried their pen and it worked great without a black base cote at first. when i tried it six months or more later it looked like just shiny silver paint. evidently it has a shelf life.
bomber14
Joined: February 02, 2015
KitMaker: 330 posts
Auto Modeler: 23 posts
Posted: Tuesday, May 19, 2020 - 01:47 PM UTC
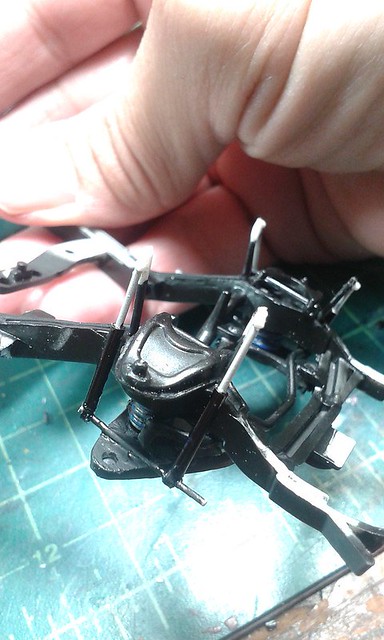
have not had any updates lately on the starliner.
got the front shock towers and shocks done. plumed the rear end and added the duel shocks (one fell off as you can see) and installed the brake line. the bench seat is in and the roll cage is pieced together with some parts box parts and rod. the wire you see in there is tied to a trap door on the back side of the right front wheel well. during the race the driver could pull the rope to lift the door and check the condition of the tire. shocks are scratch made
 " BORDER="0">
 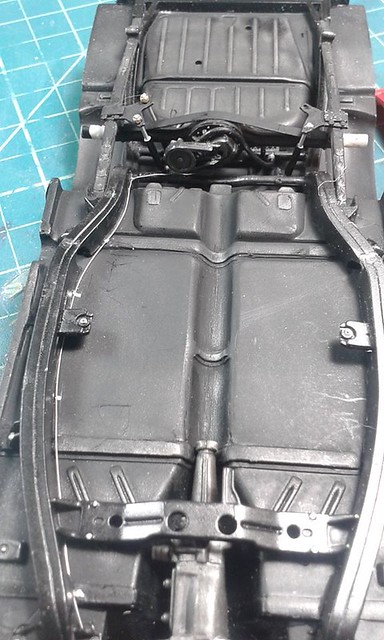 " BORDER="0">
 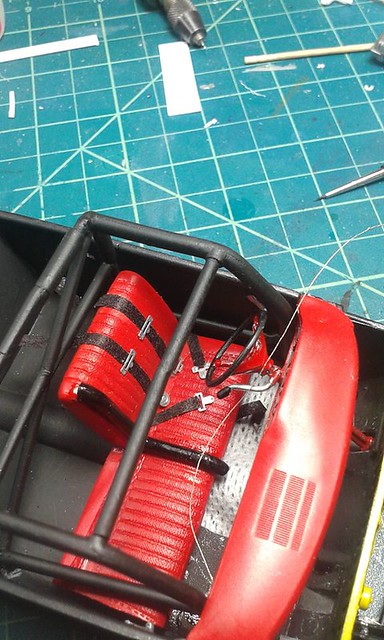 " BORDER="0">
 Joel_W
Joined: December 04, 2010
KitMaker: 11,666 posts
Auto Modeler: 2,974 posts
Posted: Tuesday, May 19, 2020 - 08:21 PM UTC
Patrick,
You were asking about Metallic modeling paints, which are generally Lacquer based. I was specifically referring to the Alcad2 line of Metallics that I've used for years. Not the Molotow Liquid Chrome which is listed on their site as an acrylic, but no other information.
If their Liquid acrylic Chrome is thinned for Air Brush, which I'm assuming is thinned for their pen line, then a higher flow psi will be needed to air brush it, and a larger needle/cone would be the right way to go.
I was referring to the pre-thinned Lacquer based line of Alcad Metallics. The 12-15 psi is their starting recommendation, as is the small air brush tip. As to what base is needed, that depends on which Metallic your air brushing and the effect that you want. Gray Primer to Gloss Black and a few in between, all of which are listed on their web site.
As a general rule, acrylics don't require a primer coat, and don't attack plastic, while lacquers do.
As for cleaning your air brush after using it, is different then cleaning it enough to switch colors or types of paint. I've always used plain Jane Lacquer Thinner from a big box hardware store, but would never use it to thin lacquer model paints. Just about every brand of model paint has a air brush cleaner that they recommend. Generally speaking they're rather expensive but don't do any better job of cleaning than LC does. The trick is to semi disassemble your AB so that you can clean the needle and tip. Dried on paint is the number one reason for a air brush to have issues the next time it's used.
Back flowing is when you block the tip so that you're forcing the LC back into the bowl to clean out any paint on the needle and nozzle.
Joel
Joel_W
Joined: December 04, 2010
KitMaker: 11,666 posts
Auto Modeler: 2,974 posts
Posted: Wednesday, May 20, 2020 - 02:12 AM UTC
Joe,
You're doing an amazing build on the Starliner. The front and rear suspension look simply outstanding. As for the front seat trapped door and cord. It's a great touch for sure.
Joel
You're doing an amazing build on the Starliner. The front and rear suspension look simply outstanding. As for the front seat trapped door and cord. It's a great touch for sure.
Joel

AussieReg

#007

Joined: June 09, 2009
KitMaker: 8,156 posts
Auto Modeler: 2,953 posts

Posted: Wednesday, May 20, 2020 - 03:23 AM UTC
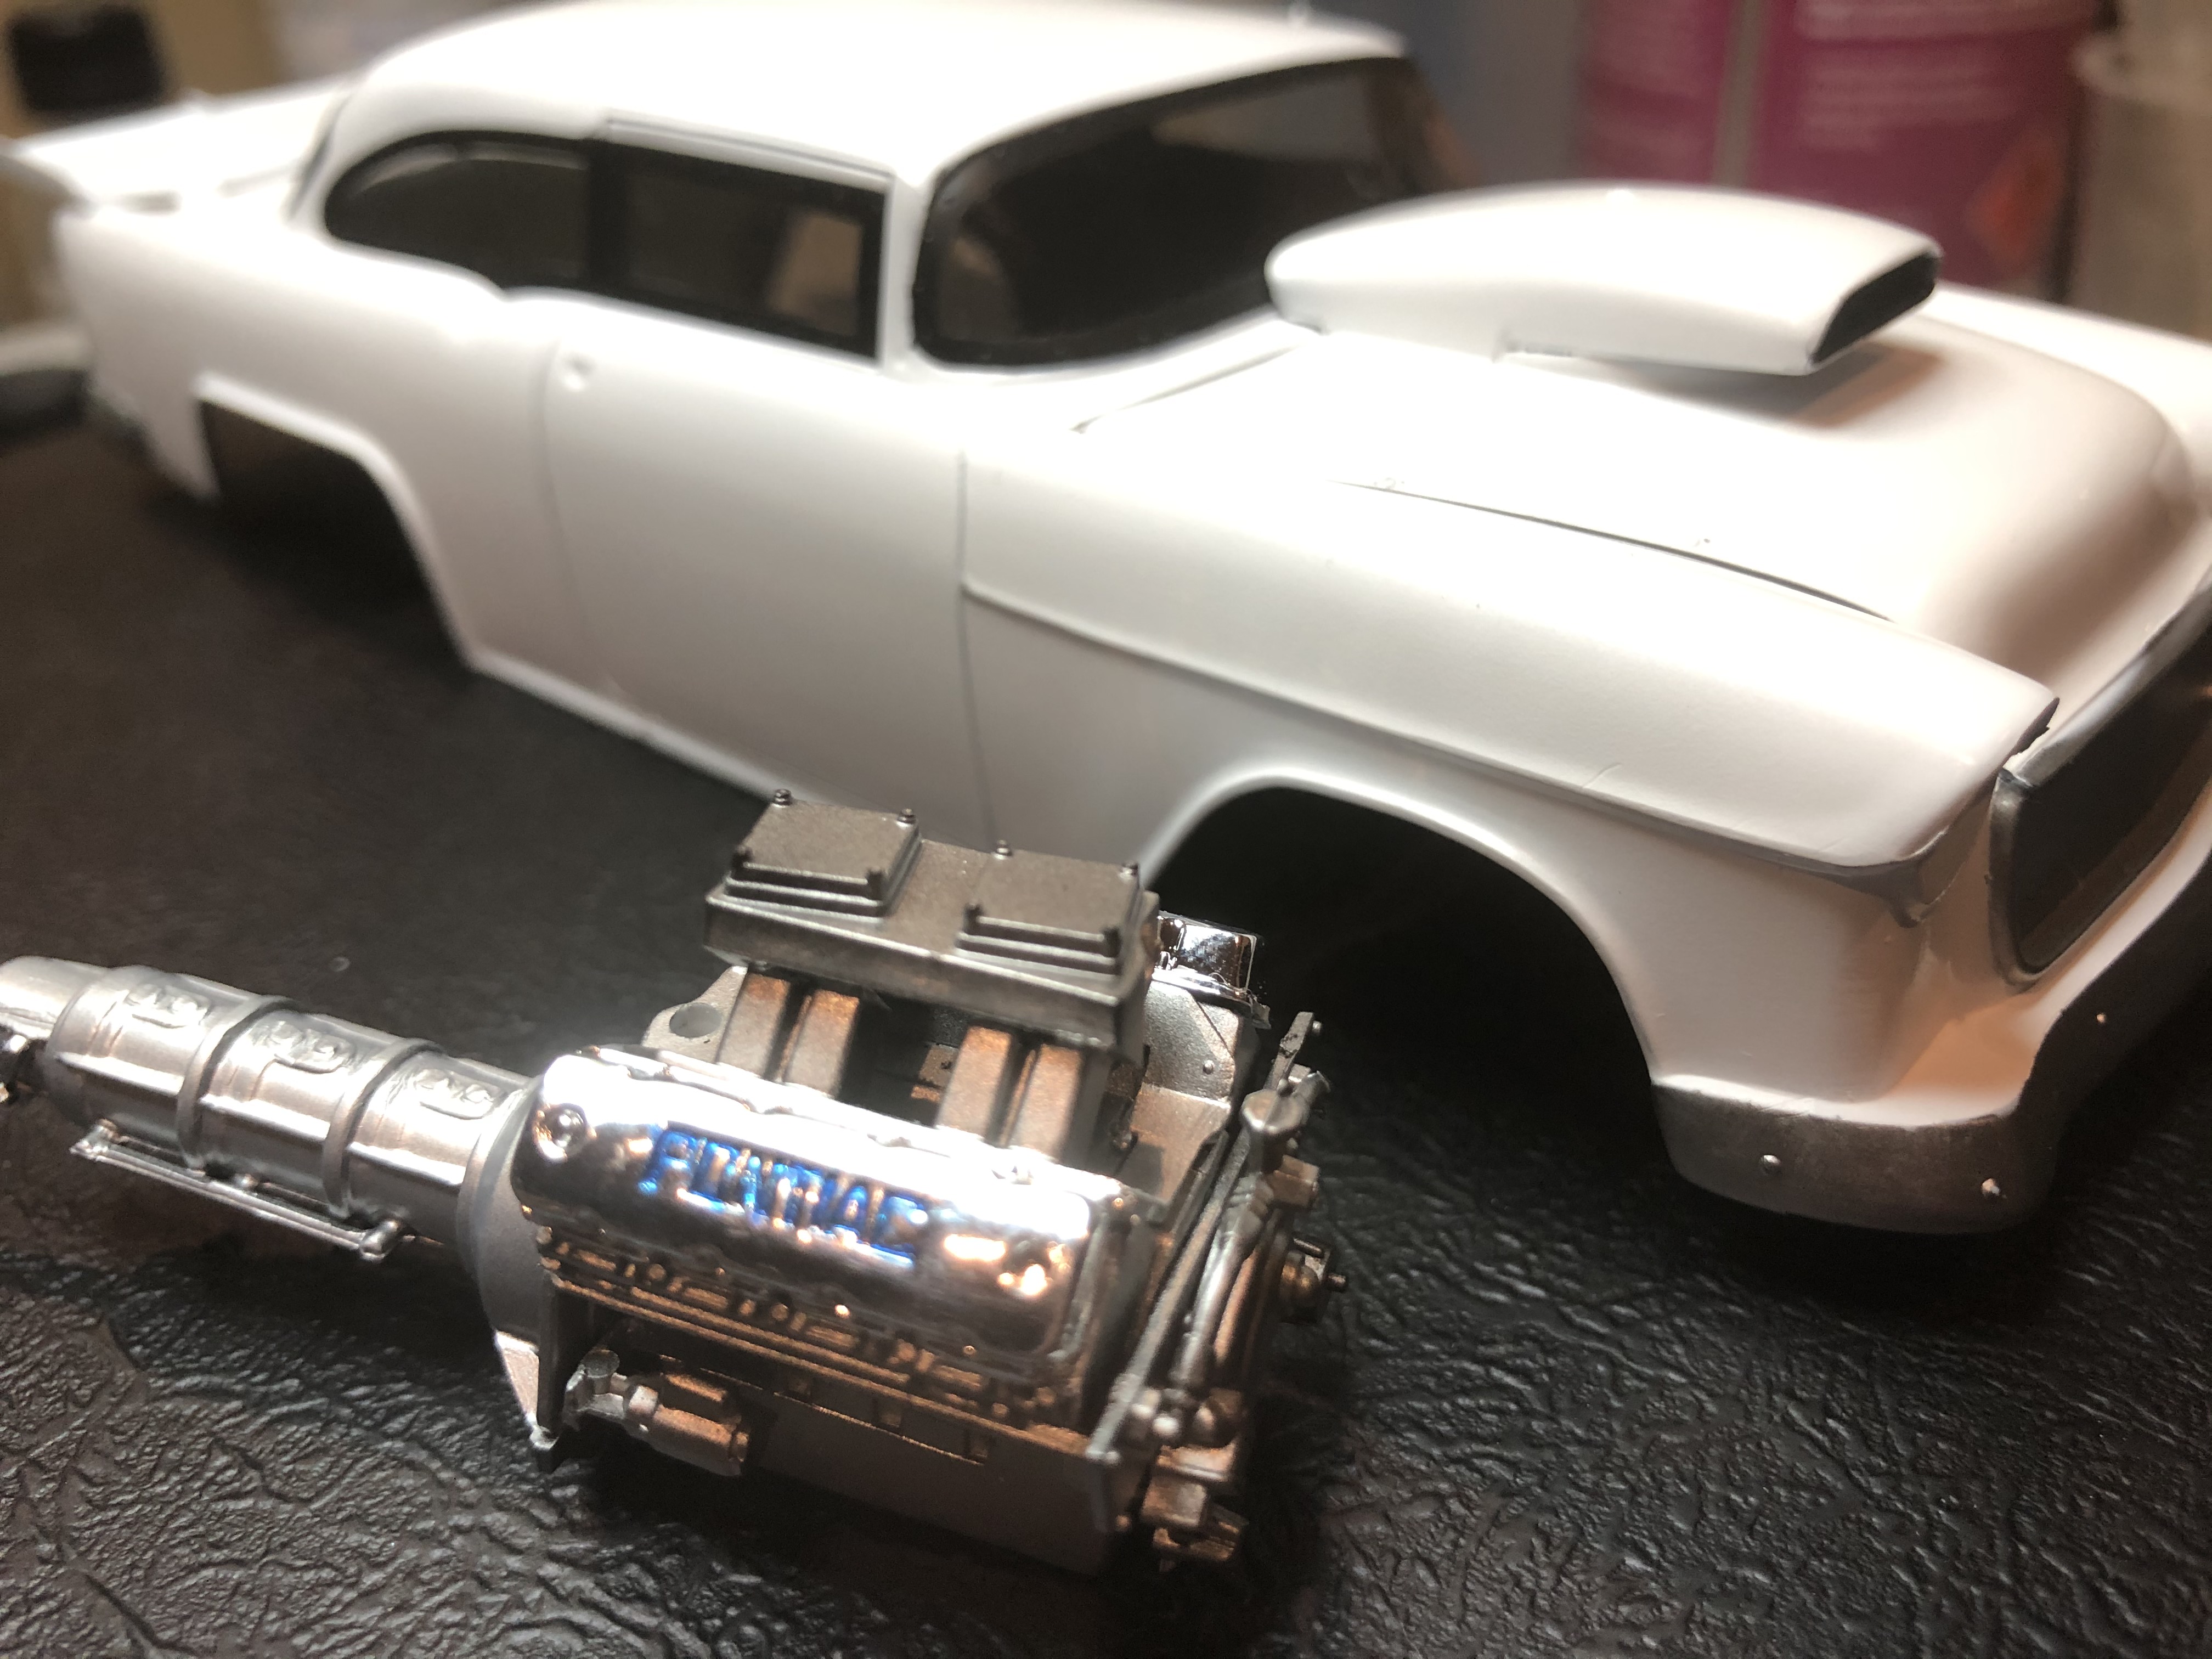
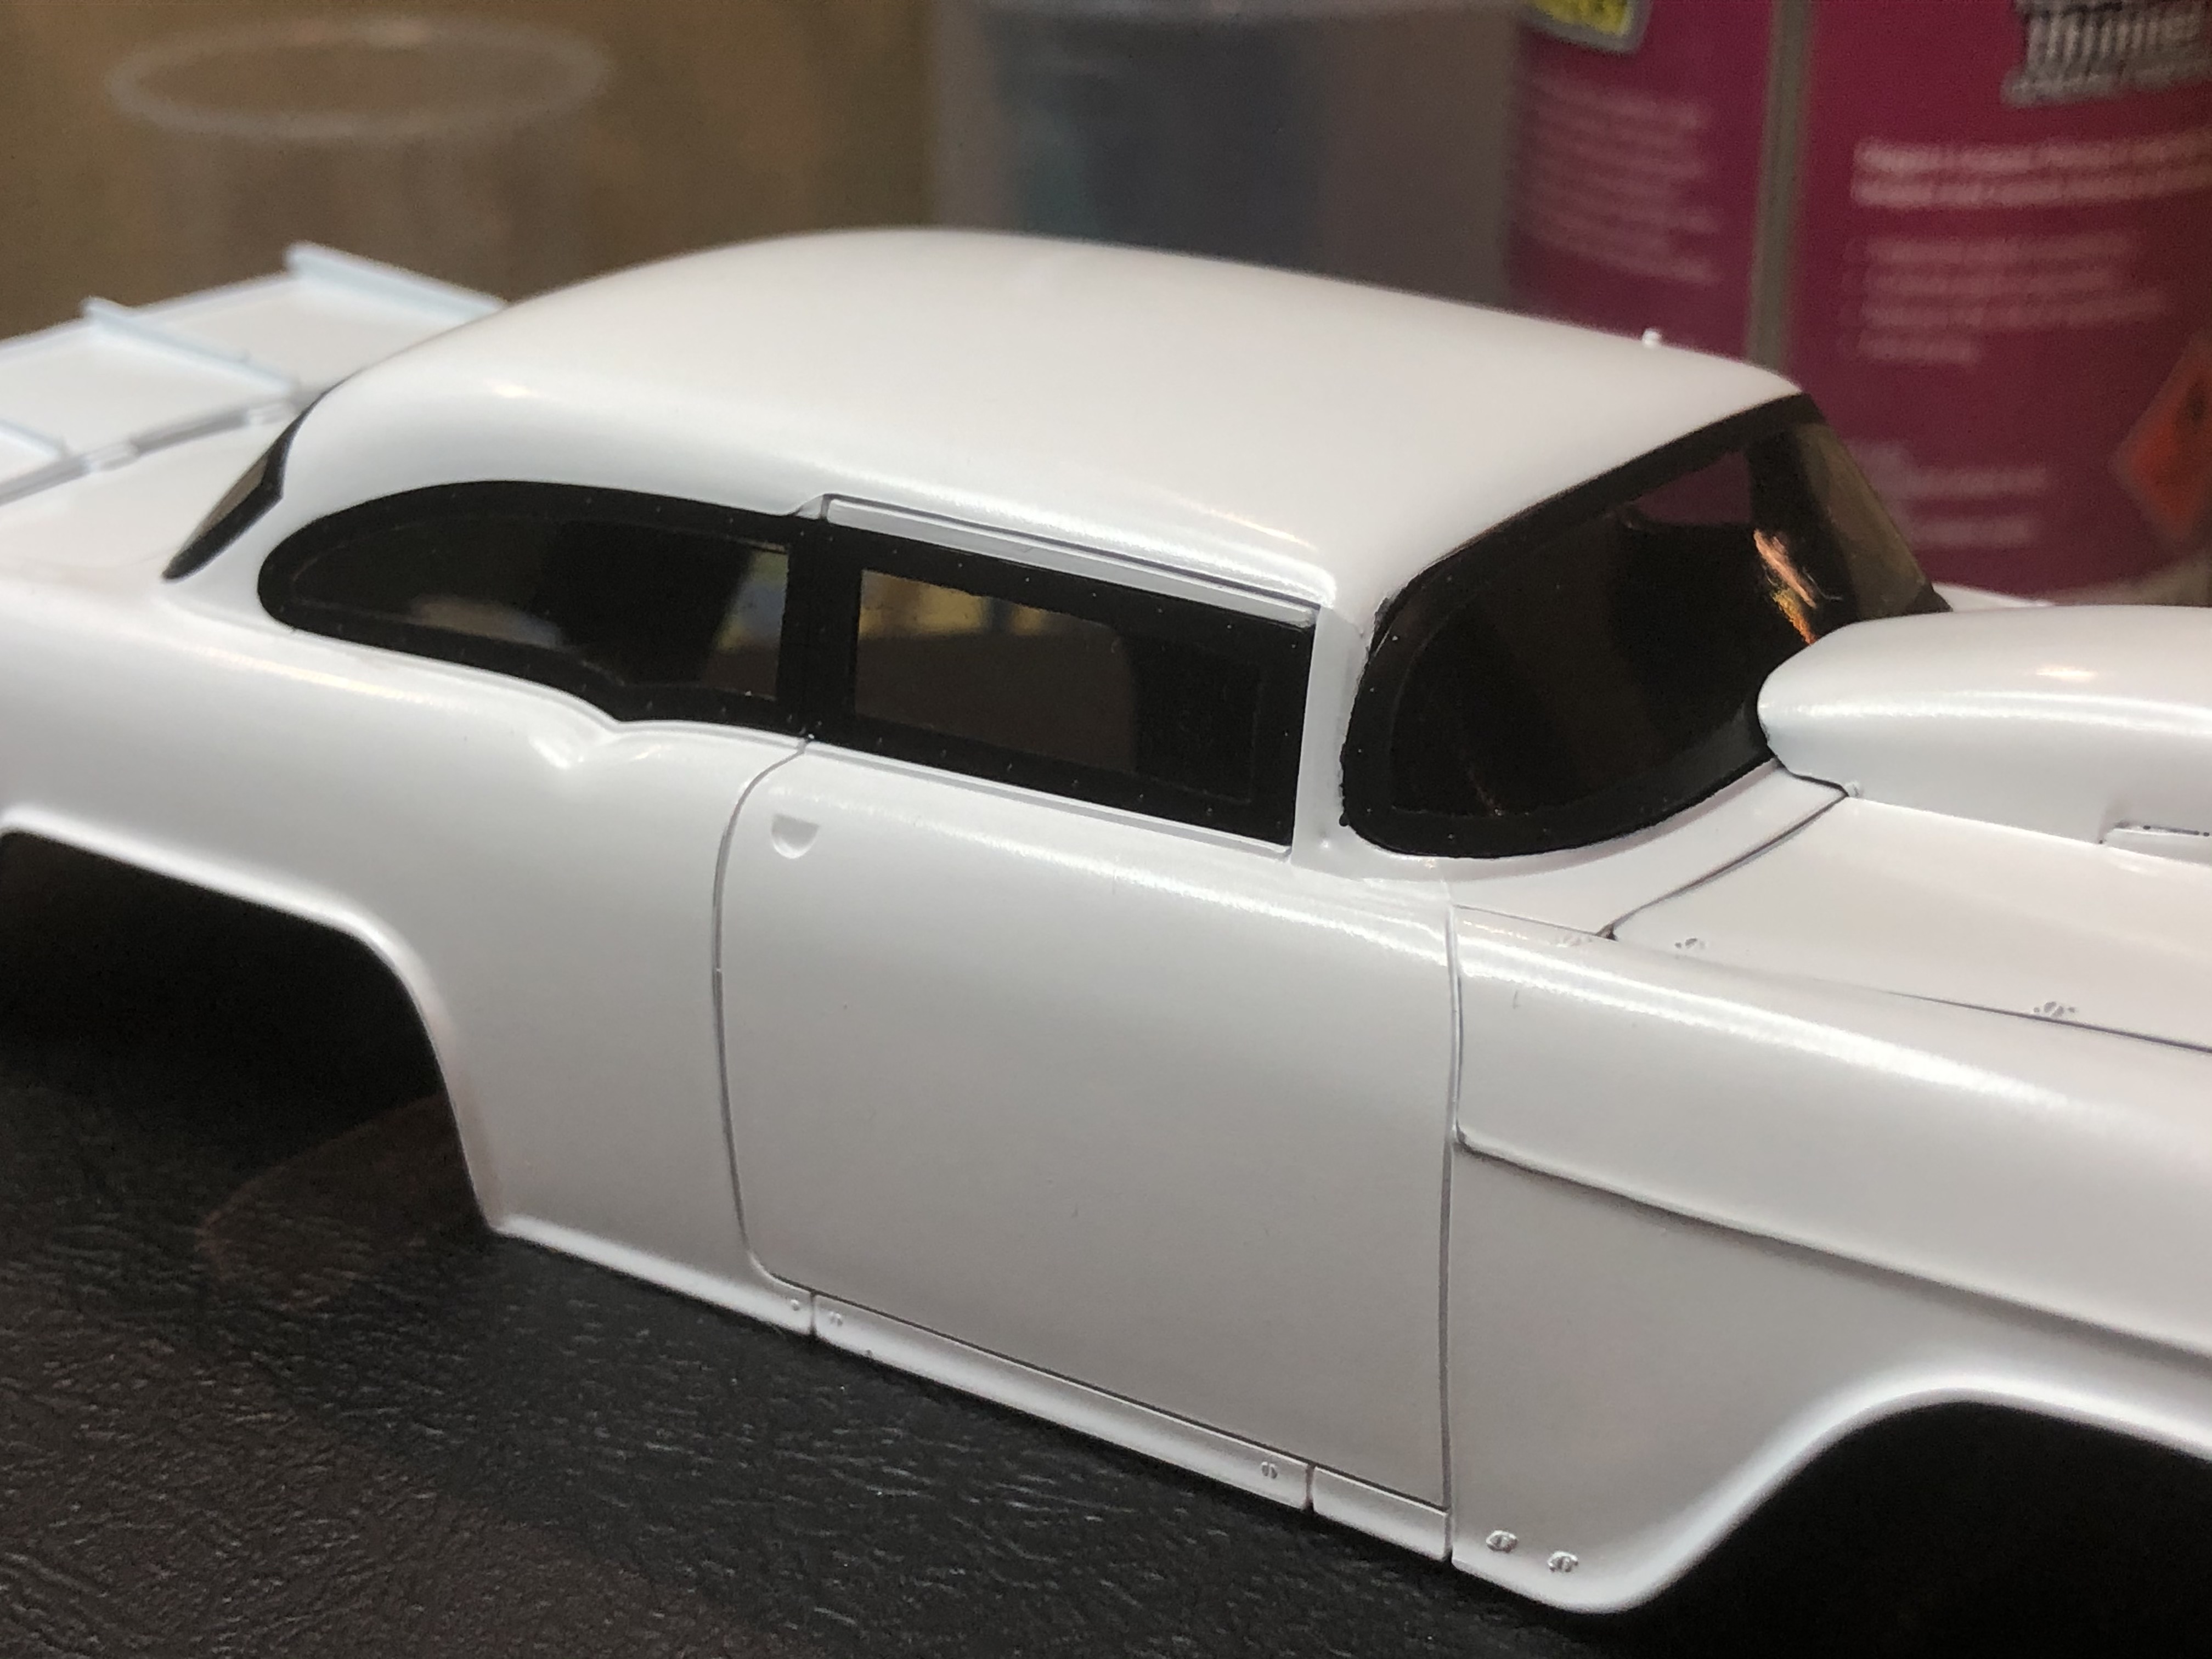
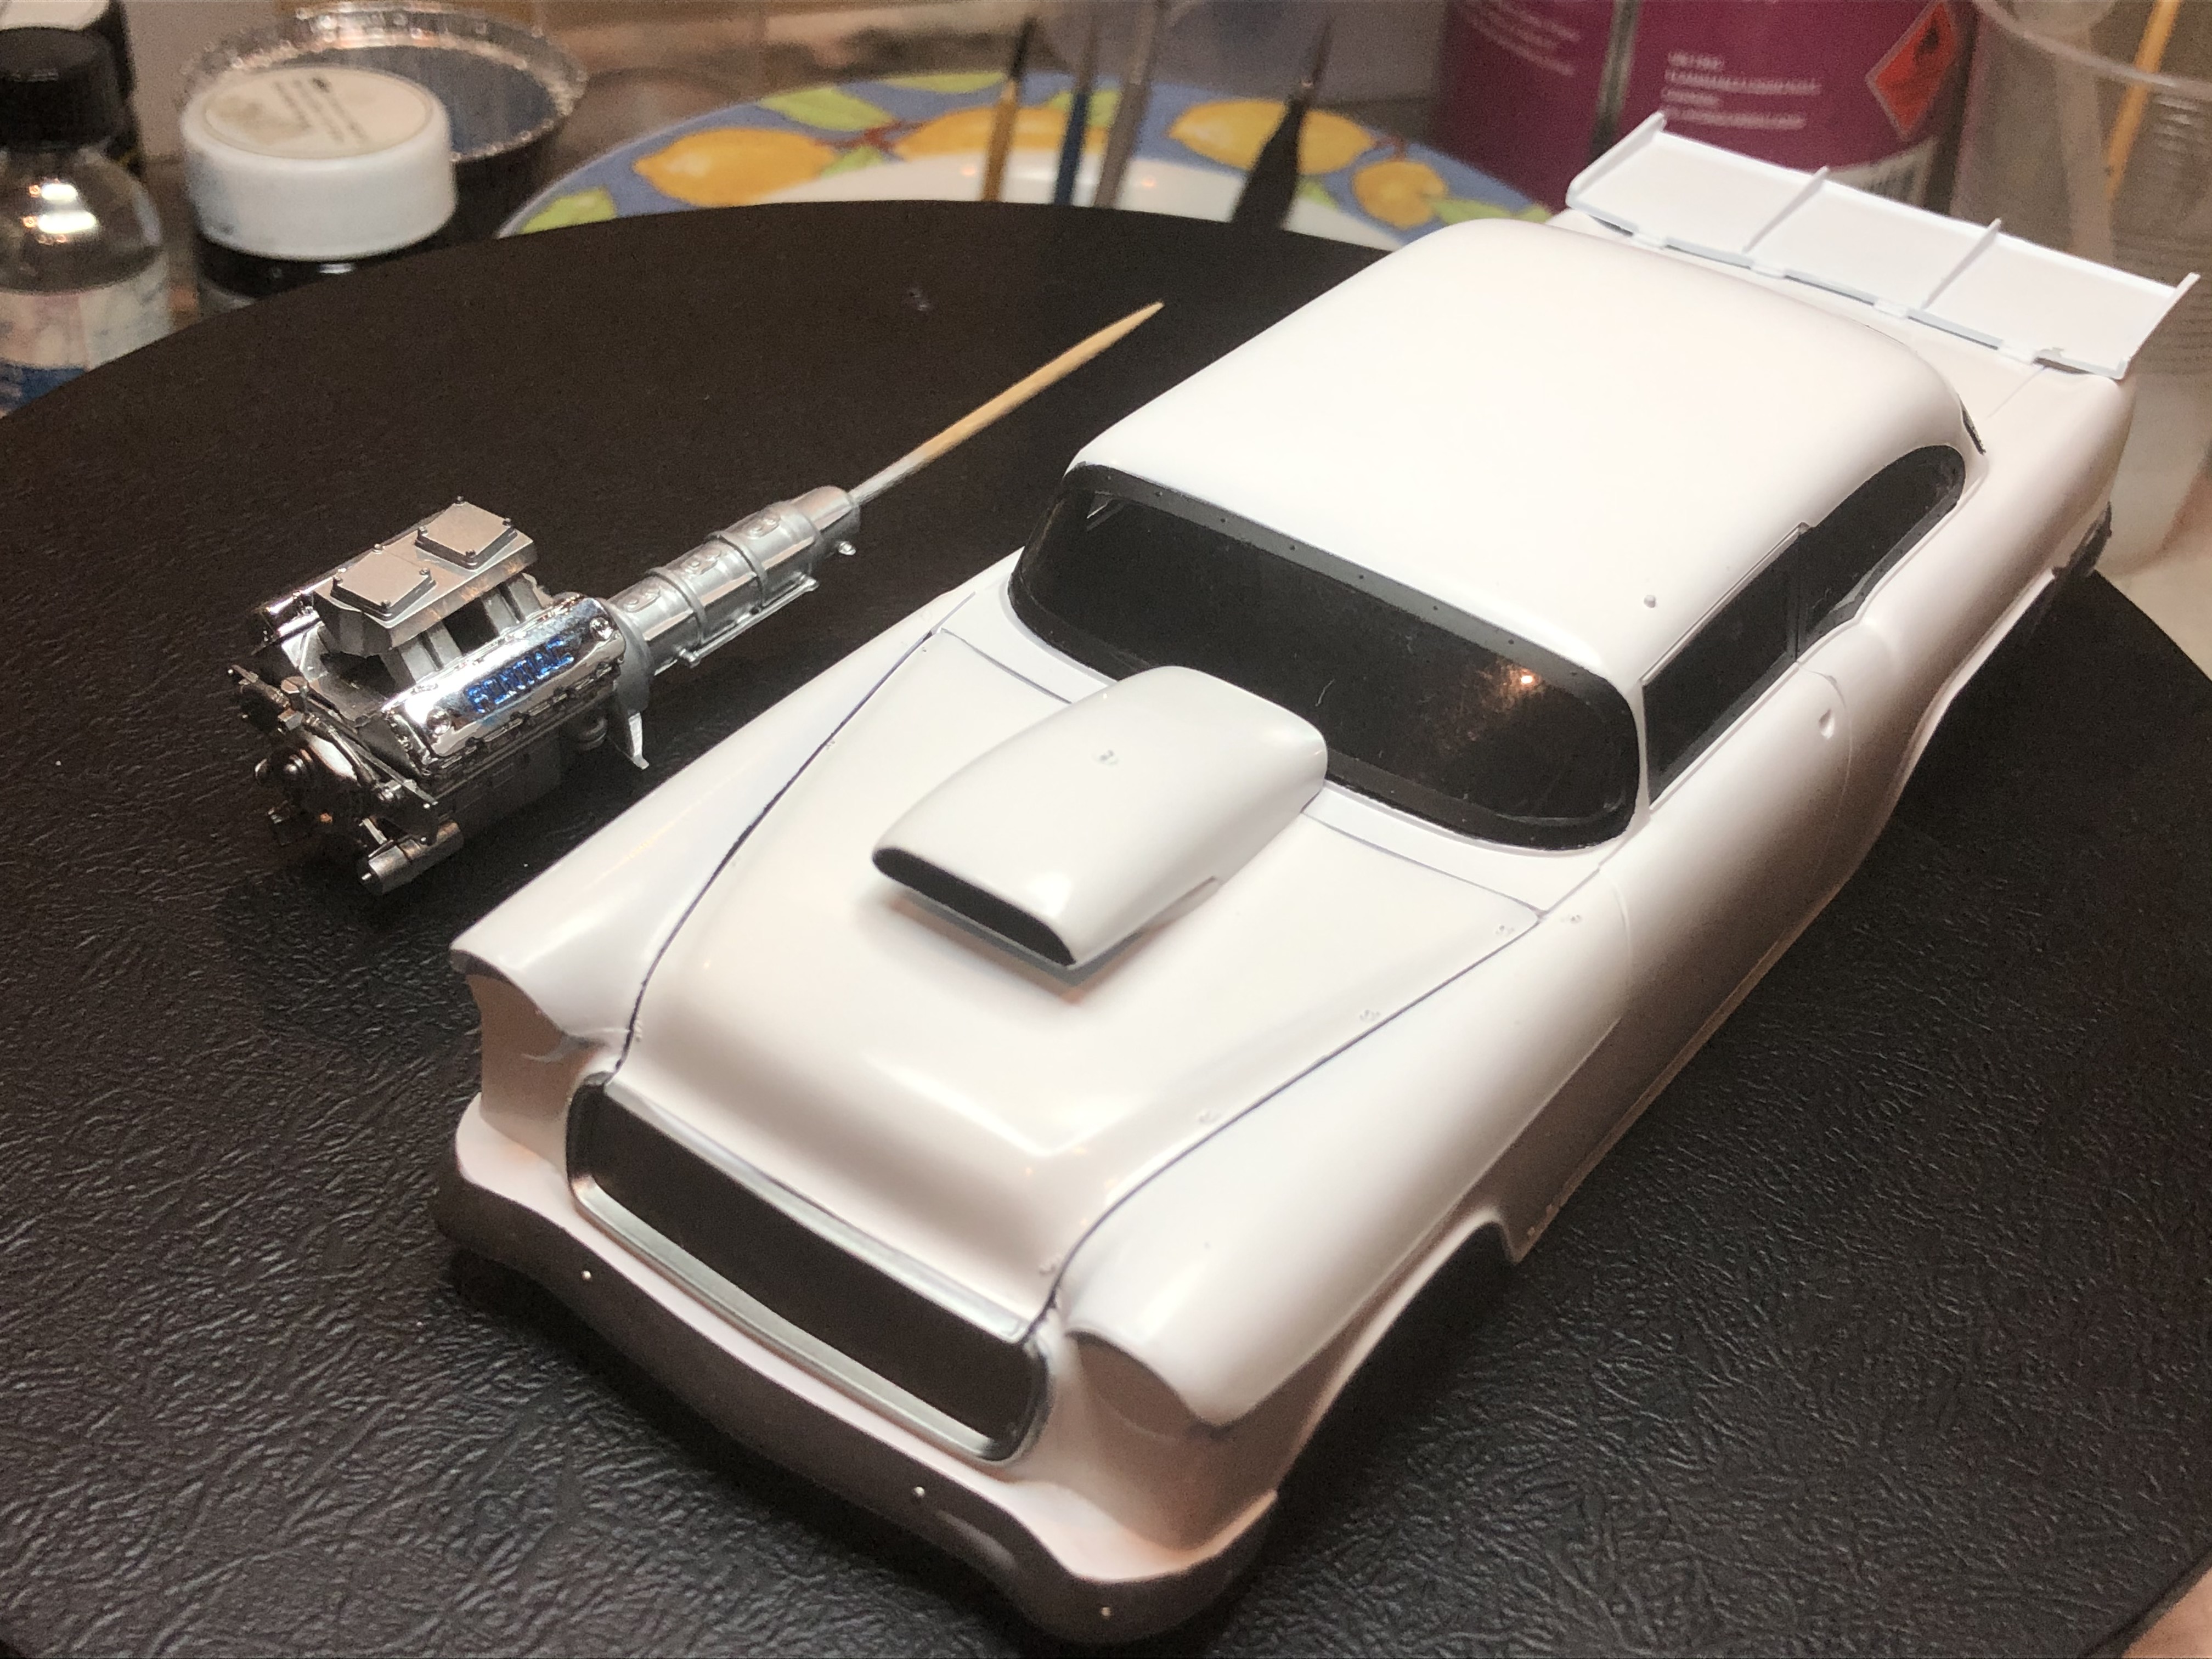
Slow progress on the '55, but no issues to report which makes a pleasant change!
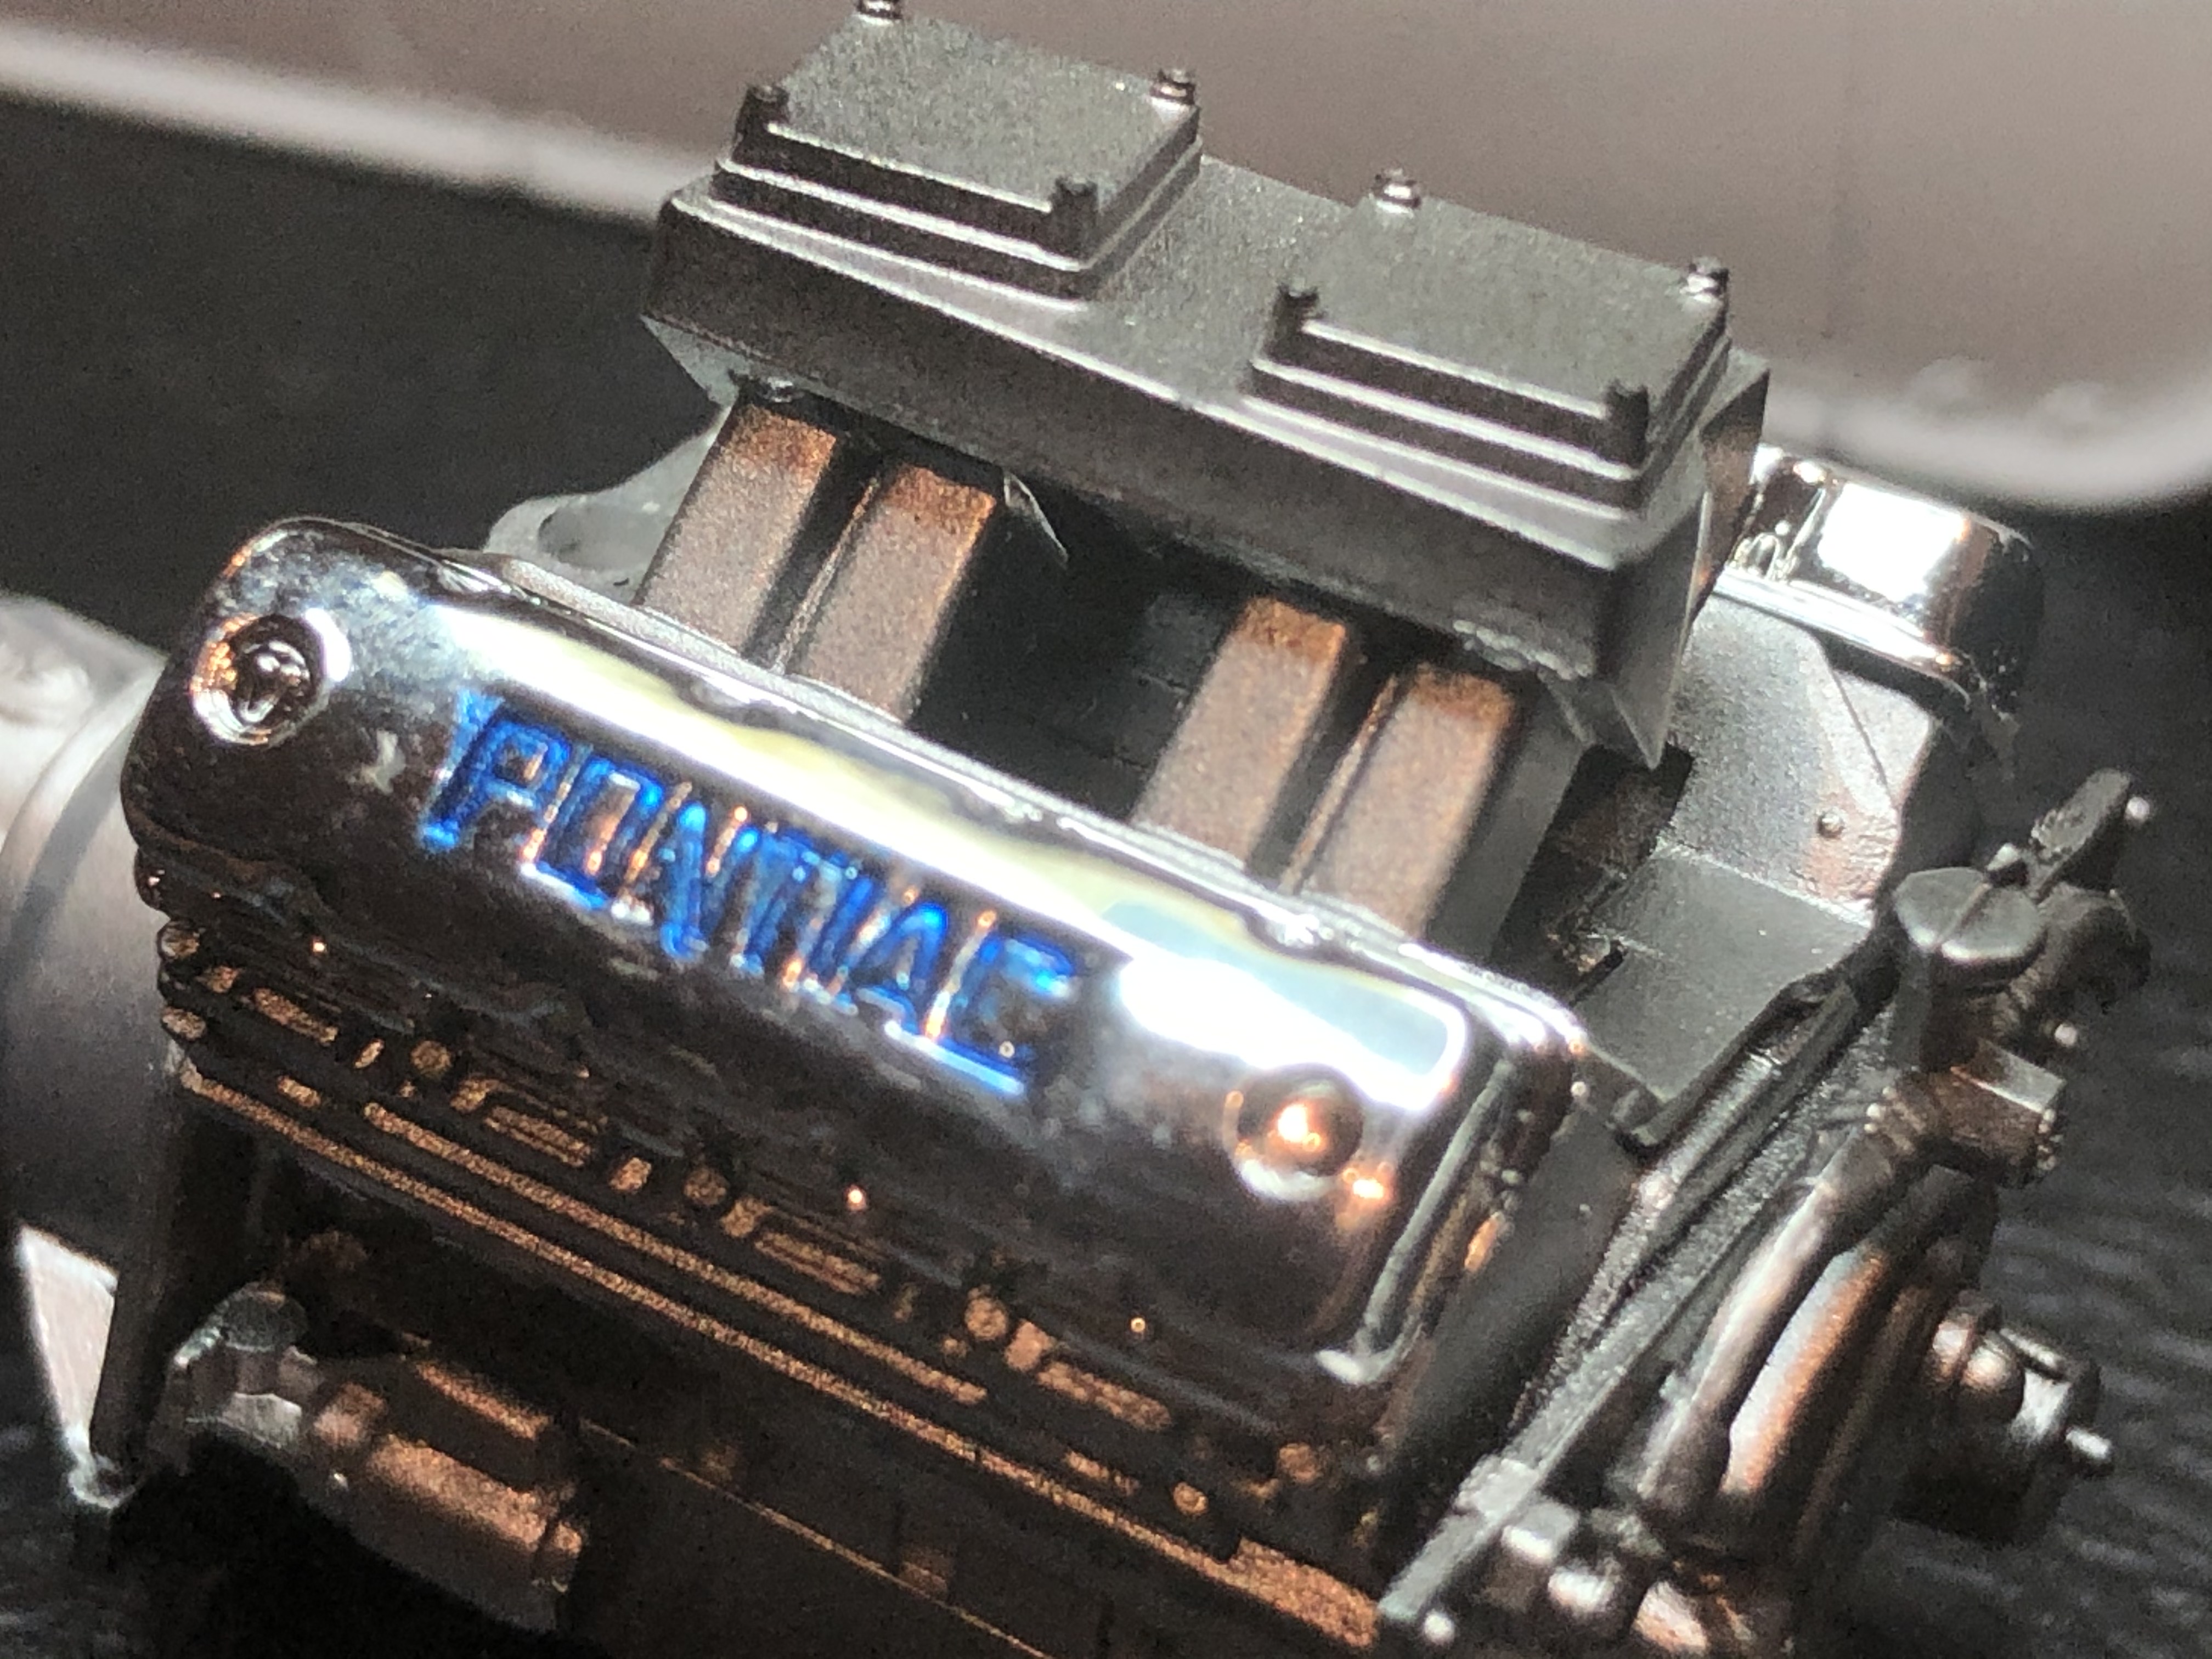
I have fine wet sanded the white body paint and I'm happy that it's ready for decals now. I have masked and painted the black frames on the tinted clear parts and installed them, and detail painted the chrome rocker covers and fitted them as well.
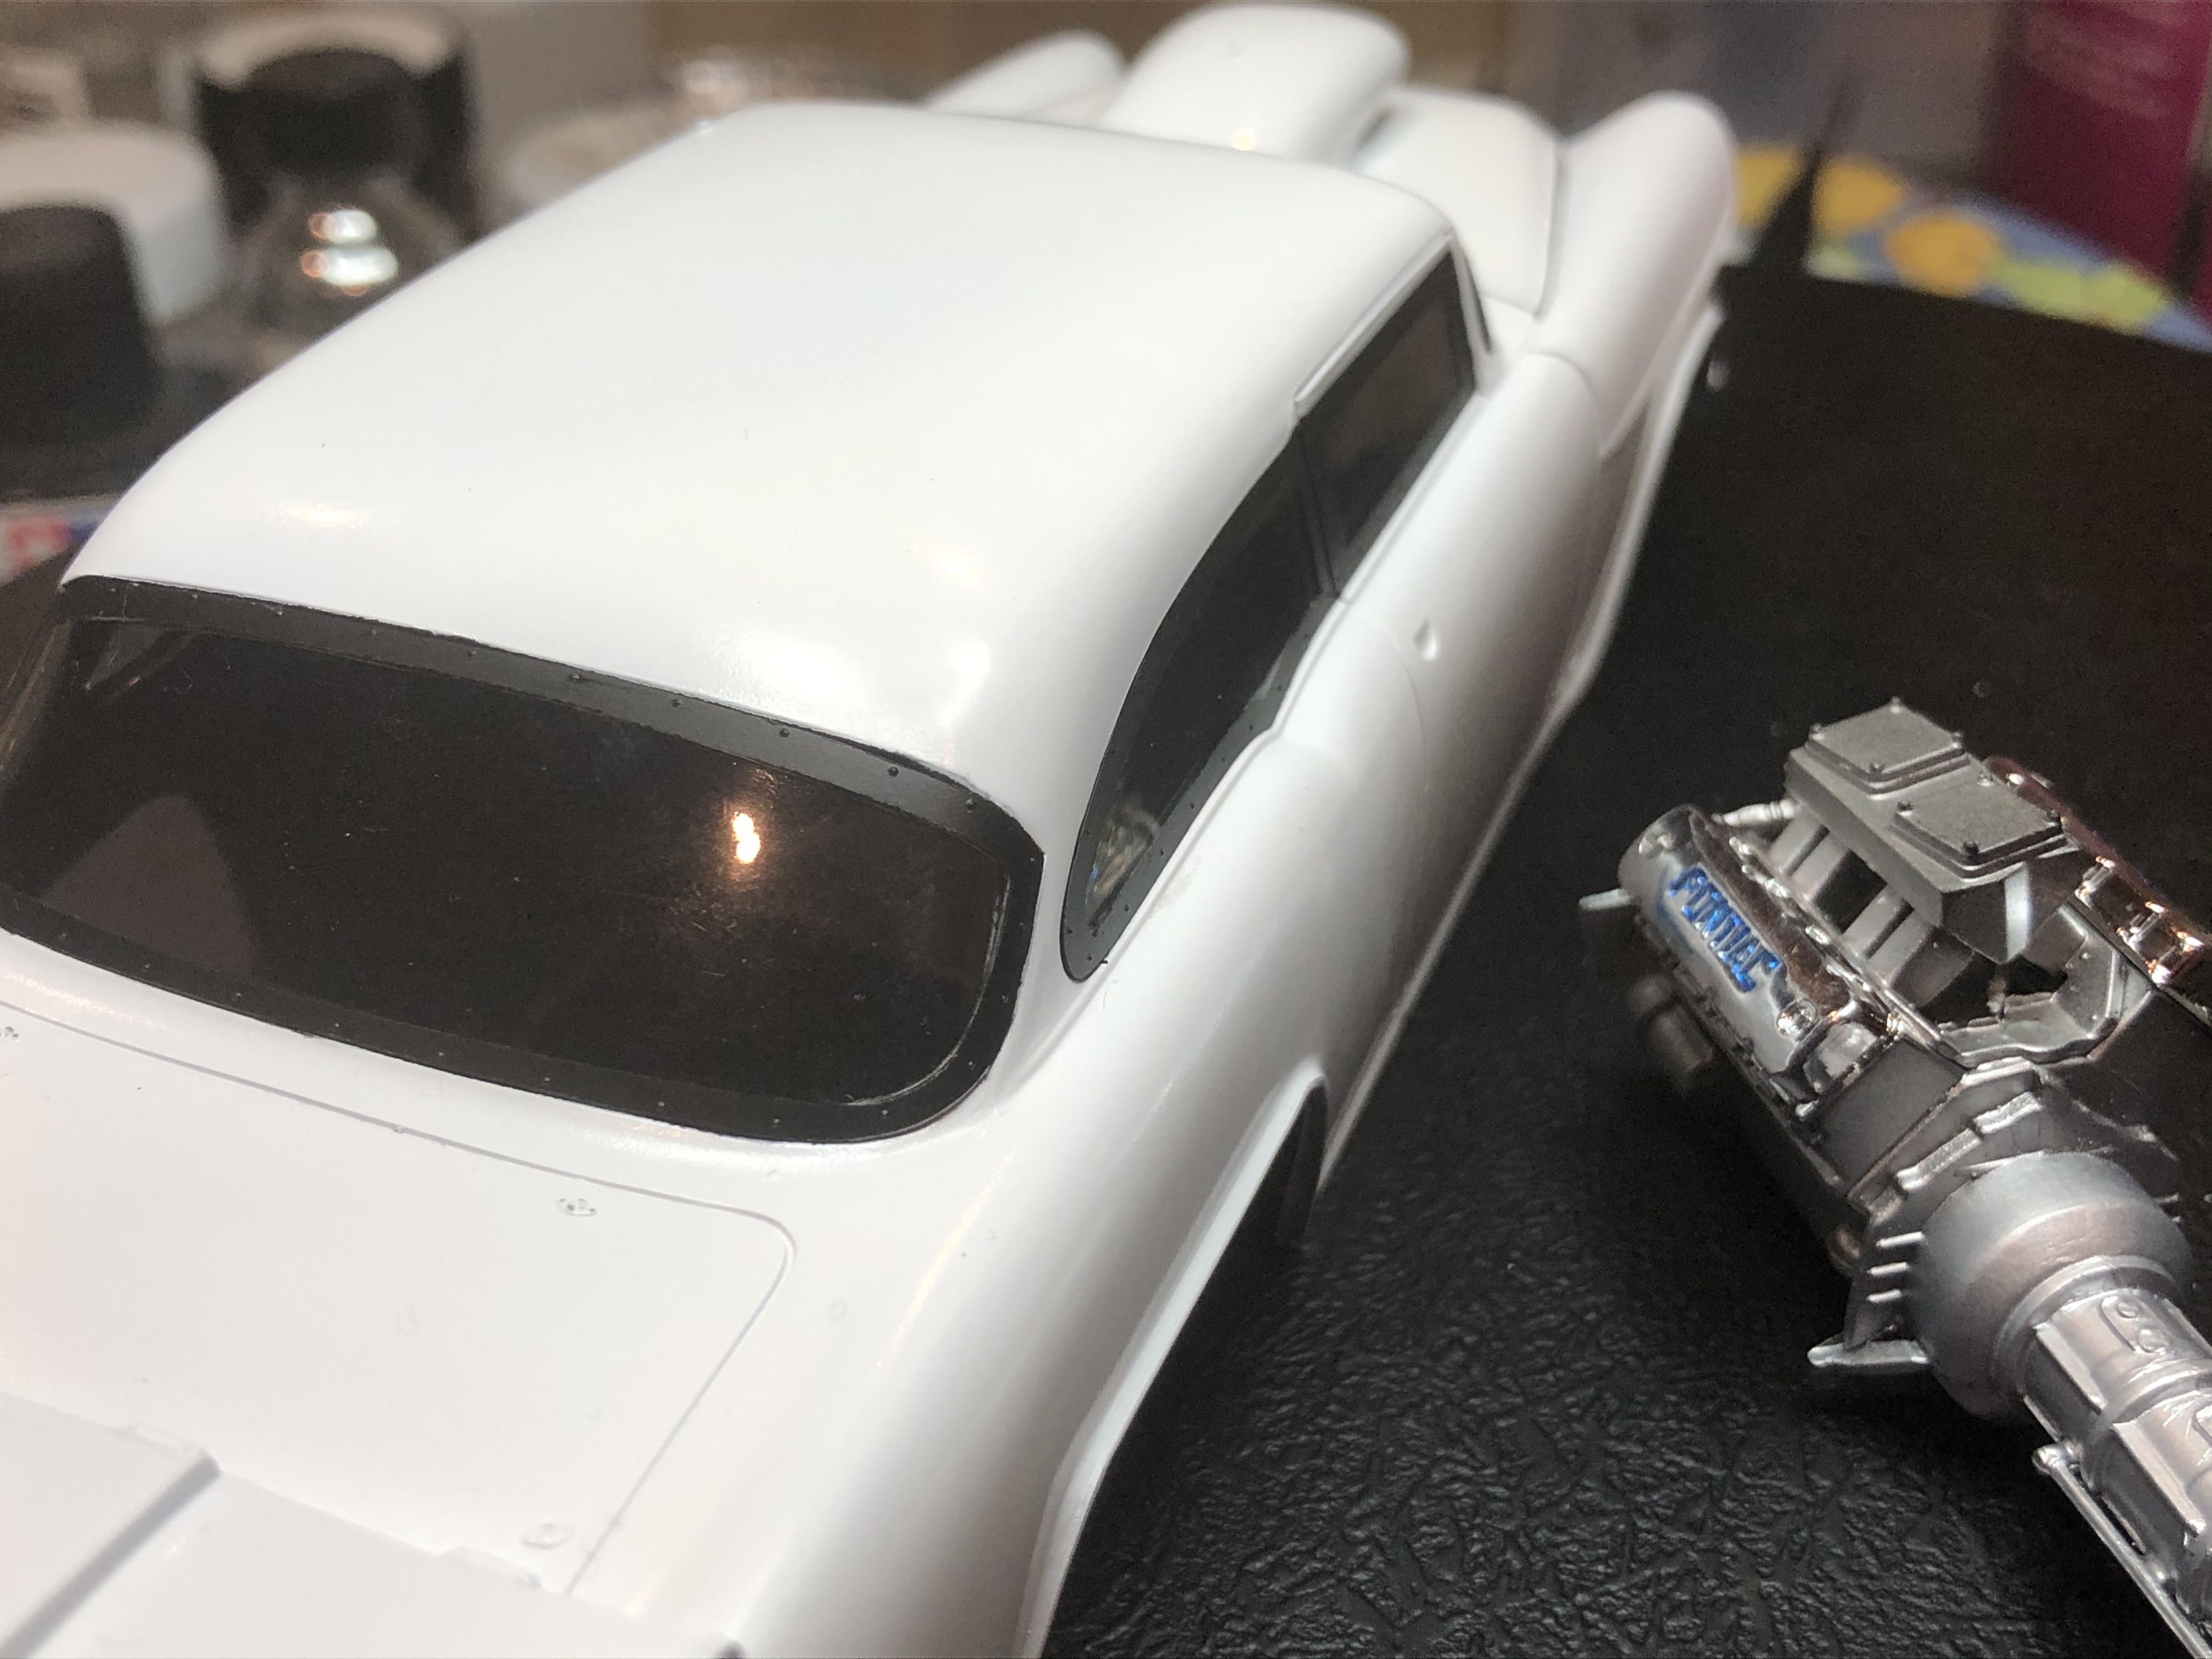
Cheers, D
I have fine wet sanded the white body paint and I'm happy that it's ready for decals now. I have masked and painted the black frames on the tinted clear parts and installed them, and detail painted the chrome rocker covers and fitted them as well.
Cheers, D

AussieReg
#007
Joined: June 09, 2009
KitMaker: 8,156 posts
Auto Modeler: 2,953 posts
Posted: Wednesday, May 20, 2020 - 03:26 AM UTC
Joe, really nice work on the Starliner conversion. Your modifications and little add-ins are coming together beautifully!
Cheers, D
Cheers, D
bomber14
Joined: February 02, 2015
KitMaker: 330 posts
Auto Modeler: 23 posts
Posted: Wednesday, May 20, 2020 - 03:37 AM UTC
thanks joel/damian. i have run into a problem though. i have primed the body/hood with tamiya white primer in the rattle can. i then gave a quick sanding with a 2400 pad and then sprayed the body with a enamel rattle can yellow from Model Car World. i am not the type to spray a light tack cote, i like going right to a wet cote which i have done with all my paints from MCW and have not had any troubles. i want to get it under a box cover ASAP to avoid dust.
the paint went on great, nice and smooth but when i checked the paint job the next morning i had many tiny specks all through the paint.some were little dots, others were like almost looking like little squiggle lines of dust or small bumps. don't know what caused it. the cans i used(i have two) are years old so i thought when i heated the can and shook it i loosened up some dried residue from the inside of the can.
so i tested the cans on spoons and no problem, nice and smooth. then i tried it on a scrap body and there were the specks again. scrap body did not have the tamiya primer. also did not warm the can for the test spoon/body. i also should mention i airbrushed the high points and ridges on the starliner body with decanted yellow to avoid it pulling away on the color cote when i sprayed it. i had no speck with the air brush (neo .35 needle)
anyone have any idea what is causing this?
thanks-joe

heavyjagdpanzer
Joined: February 17, 2013
KitMaker: 173 posts
Auto Modeler: 46 posts

Posted: Wednesday, May 20, 2020 - 03:45 AM UTC
Pnance26, I use Molotow on the wheels of my funny car. I sprayed the wheels with Tamiya white primer. I then airbrushed the wheels with Molotow straight, no thinner. I put the paint on wet, and it dries very glossy. It's easy to use, and I also used the fine point pens.
Stickframe
#362
Joined: December 01, 2013
KitMaker: 1,661 posts
Auto Modeler: 431 posts
Posted: Wednesday, May 20, 2020 - 06:58 AM UTC
Hi D, your Chevy is looking sweet!
Joe, you know, that problem you had with the paint, I had something similar happen a month or so ago - I guessed it was humidity, as I tried again a few days later (Tamyia from a can) and the problem didn't happen again.
Hi Joel, I only paint with acrylic, (Vallejo Model Air) and always use primer. In addition to providing a surface with some bite, it influences the final shade of the base coat, or in some cases, effectively establishes a color-clean surface over the color of the kit's base color (ie red or blue plastic, various shades of resin etc) Maybe I misread what you wrote?
For dull finishes, like armor, I use Vallejo acrylic primer, and for autos use Tamiya from the can.
For armor, I use a badger patriot airbrush, which allows a pretty generous amount of paint and a uniform flat base, but for cars, I spray using the Krome, which applies the paint in finer, more controlled layers.
For the autos, the primer makes a big difference as it will affect the final color of the base coat. If you look back at the Zakspeed F1, you'll see I used two different color primers under the final white base color. In one area, I used pink (in order to get a deep red, on other areas to be painted), and on a separate body part I used grey primer.
The difference in the top coat color shades is obvious - the grey primer led to a crisp, cool white, while the pink led to a warmer shade of white. I didn't want this result, but it was an interesting study,and one I'll remember not to do again.
OK gents, stay well and happy model building
Cheers
Nick
Joel_W
Joined: December 04, 2010
KitMaker: 11,666 posts
Auto Modeler: 2,974 posts
Posted: Wednesday, May 20, 2020 - 08:14 AM UTC
Joe,
Since the paint issue only happened over the Tamiya Acrylic lacquer primer but not on the spoon, it sounds like the flooded on enamel paint reacted with the primer as you're dealing with two different bases. A few lite tack coats might have prevented it. Nothing you can do about it but strip the paint off and start again since most likely all those issues go right through to the plastic.
Joel
Joel_W
Joined: December 04, 2010
KitMaker: 11,666 posts
Auto Modeler: 2,974 posts
Posted: Wednesday, May 20, 2020 - 08:18 AM UTC
Nick,
I always use either light Gray or white Acrylic Lacquer primers: Mr. Finisher1500 for the light Gray and Tamiya for the White.
As for Alcad 2, depending on the shade and its purpose I either use a gray or black primer base, but for Chrome light Aircraft Aluminum which is almost as shiny I don't use primer but Tamiya X-1 Gloss Black. The gloss Black is needed to produce that deep shine.
Joel
Joel_W
Joined: December 04, 2010
KitMaker: 11,666 posts
Auto Modeler: 2,974 posts
Posted: Wednesday, May 20, 2020 - 08:19 AM UTC
D,
The white color coat really looks smooth as silk. You shouldn't have any issues decaling right over it.
Joel
The white color coat really looks smooth as silk. You shouldn't have any issues decaling right over it.
Joel
Removed by original poster on 05/20/20 - 23:33:03 (GMT).
pnance26
Joined: January 22, 2016
KitMaker: 766 posts
Auto Modeler: 140 posts
Posted: Wednesday, May 20, 2020 - 09:24 AM UTC
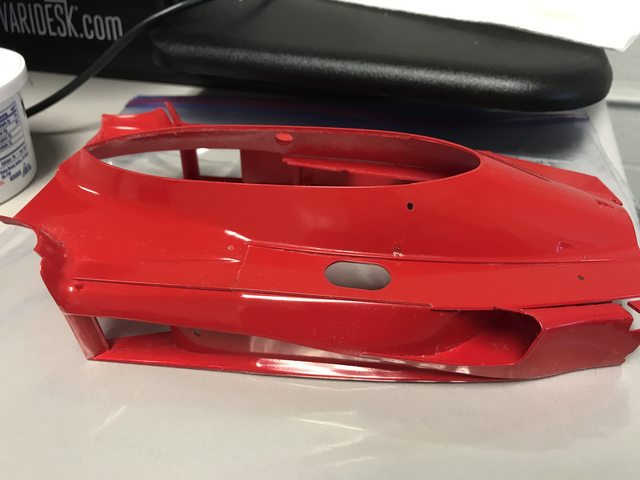
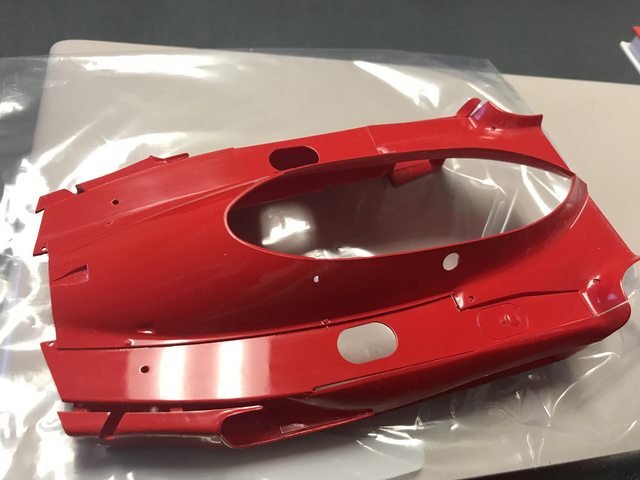
I'm showing you the body of my Ferrari ready for decals.

pnance26
Joined: January 22, 2016
KitMaker: 766 posts
Auto Modeler: 140 posts
Posted: Wednesday, May 20, 2020 - 09:38 AM UTC
Quoted Text
Patrick,
You were asking about Metallic modeling paints, which are generally Lacquer based. I was specifically referring to the Alcad2 line of Metallics that I've used for years. Not the Molotow Liquid Chrome which is listed on their site as an acrylic, but no other information.
If their Liquid acrylic Chrome is thinned for Air Brush, which I'm assuming is thinned for their pen line, then a higher flow psi will be needed to air brush it, and a larger needle/cone would be the right way to go.
I was referring to the pre-thinned Lacquer based line of Alcad Metallics. The 12-15 psi is their starting recommendation, as is the small air brush tip. As to what base is needed, that depends on which Metallic your air brushing and the effect that you want. Gray Primer to Gloss Black and a few in between, all of which are listed on their web site.
As a general rule, acrylics don't require a primer coat, and don't attack plastic, while lacquers do.
As for cleaning your air brush after using it, is different then cleaning it enough to switch colors or types of paint. I've always used plain Jane Lacquer Thinner from a big box hardware store, but would never use it to thin lacquer model paints. Just about every brand of model paint has a air brush cleaner that they recommend. Generally speaking they're rather expensive but don't do any better job of cleaning than LC does. The trick is to semi disassemble your AB so that you can clean the needle and tip. Dried on paint is the number one reason for a air brush to have issues the next time it's used.
Back flowing is when you block the tip so that you're forcing the LC back into the bowl to clean out any paint on the needle and nozzle.
Joel
Right now, I don't what I was asking but I was just going to use Molotow after seeing Chris's result. I don't have any AlClad but I do have the Molotow.
What is LC? Lacquer what? I get the L but not the "C". I do know about back flow. I didn't realize it was coming off as a question.
Thanks for the help.
Joel_W
Joined: December 04, 2010
KitMaker: 11,666 posts
Auto Modeler: 2,974 posts
Posted: Wednesday, May 20, 2020 - 09:58 AM UTC
Guys,
I'm sure that Joe was really poking fun at me not and not you Patrick, as I totally missed the Molotov reference and just assumed we're talking lacquers, and just rambled on and on.
My apologies for not paying closer attention to what was being said.
Joel
I'm sure that Joe was really poking fun at me not and not you Patrick, as I totally missed the Molotov reference and just assumed we're talking lacquers, and just rambled on and on.
My apologies for not paying closer attention to what was being said.
Joel

Szmann

Joined: September 02, 2014
KitMaker: 1,977 posts
Auto Modeler: 1,371 posts

Posted: Wednesday, May 20, 2020 - 10:42 AM UTC
Quoted Text
Right now, I don't what I was asking but I was just going to use Molotow after seeing Chris's result. I don't have any AlClad but I do have the Molotow.
What is LC? Lacquer what? I get the L but not the "C". I do know about back flow. I didn't realize it was coming off as a question.
Thanks for the help.
LC stands probably for "lacquer cleaner" - just the regular hardware store lacquer thinner; as said in your quoted text, it's being rather used as a cleaner than as a thinner. I did use it as a thinner for enamels and it works just fine - especially with Krylon range (marketed as hobby enamels, but as close as it gets to the MM lacquers).
Now, if you want to use Molotow for chroming, you better be prepared for a long wait - the thing cures maddeningly slow. My best bet it is Alclad or Testors / MM lacquers.
I caught up with the conversation, and I'm totally backing Joel's choices and methods!
Here a few examples from my Alclad experiences:


Gabriel

 |

WEB HOSTING BY


Copyright ©2021 Auto Modeler and Kitmaker Network, a subsidiary of Silver Star Enterprises
All Rights Reserved. Please read our Conditions of Use and Privacy Policy.
All Rights Reserved. Please read our Conditions of Use and Privacy Policy.