

Don,
So far, so good.
Looking forward to your next update.
Joel


Go to automodeler.com for the current dynamic site!
The Garage
For general automotive modeling or non-modeling topics.
For general automotive modeling or non-modeling topics.
Hosted by Jim Starkweather
Strip, Track & Trail Official Build Thread

Joel_W

Joined: December 04, 2010
KitMaker: 11,666 posts
Auto Modeler: 2,974 posts

Posted: Friday, April 10, 2020 - 08:50 AM UTC


tinbanger

Joined: February 04, 2008
KitMaker: 2,507 posts
Auto Modeler: 409 posts

Posted: Friday, April 10, 2020 - 09:43 AM UTC
Again welcome to all new builds! 
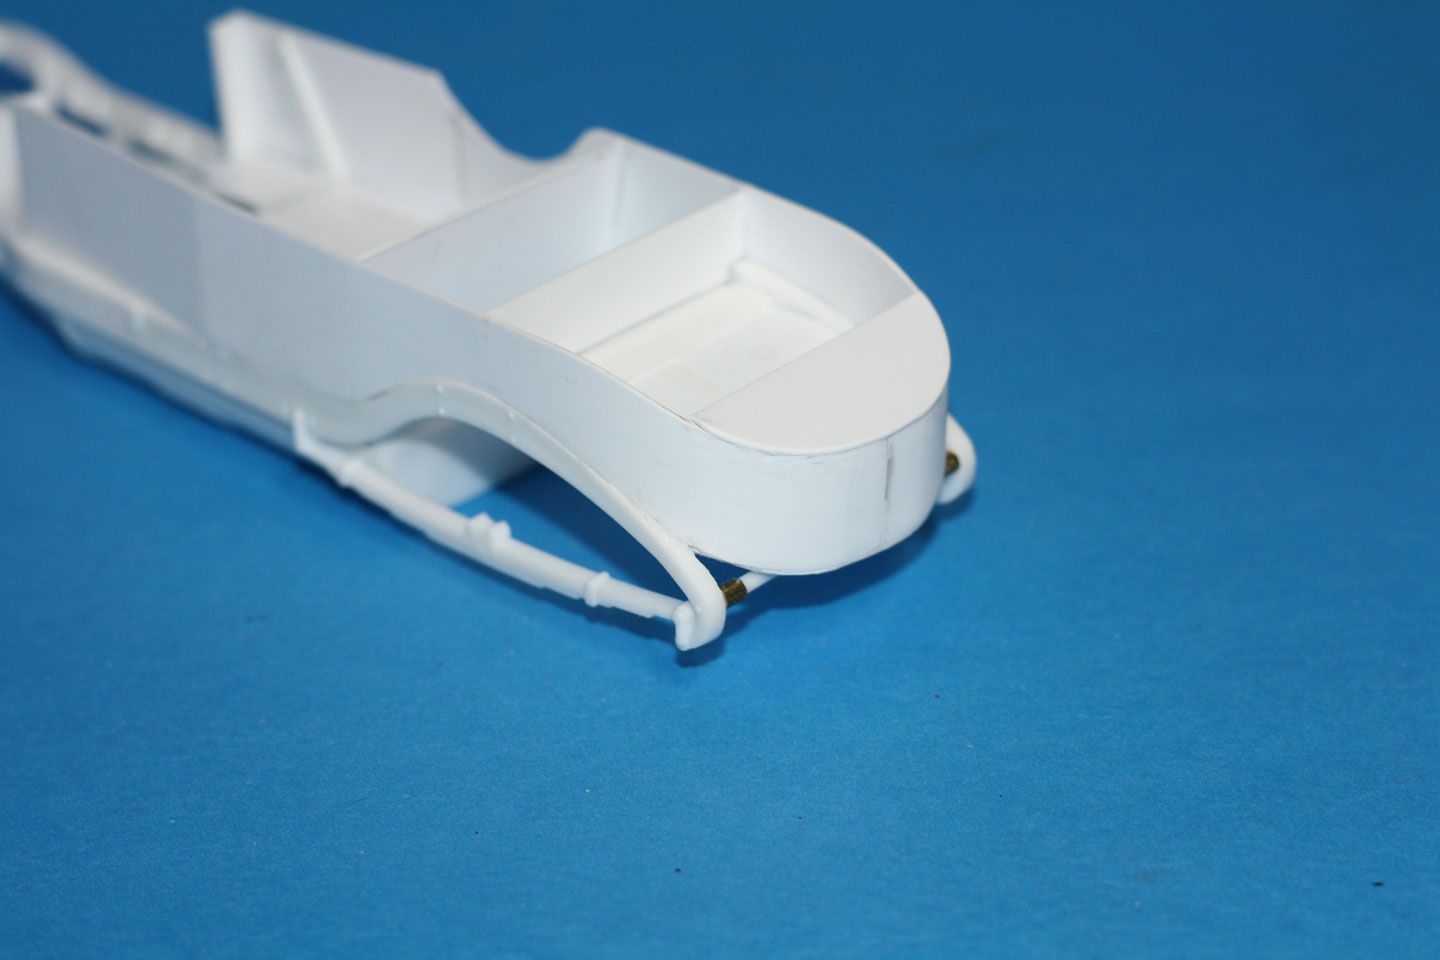
I have fabricated the rear tool box and now need to make a latch for it:-
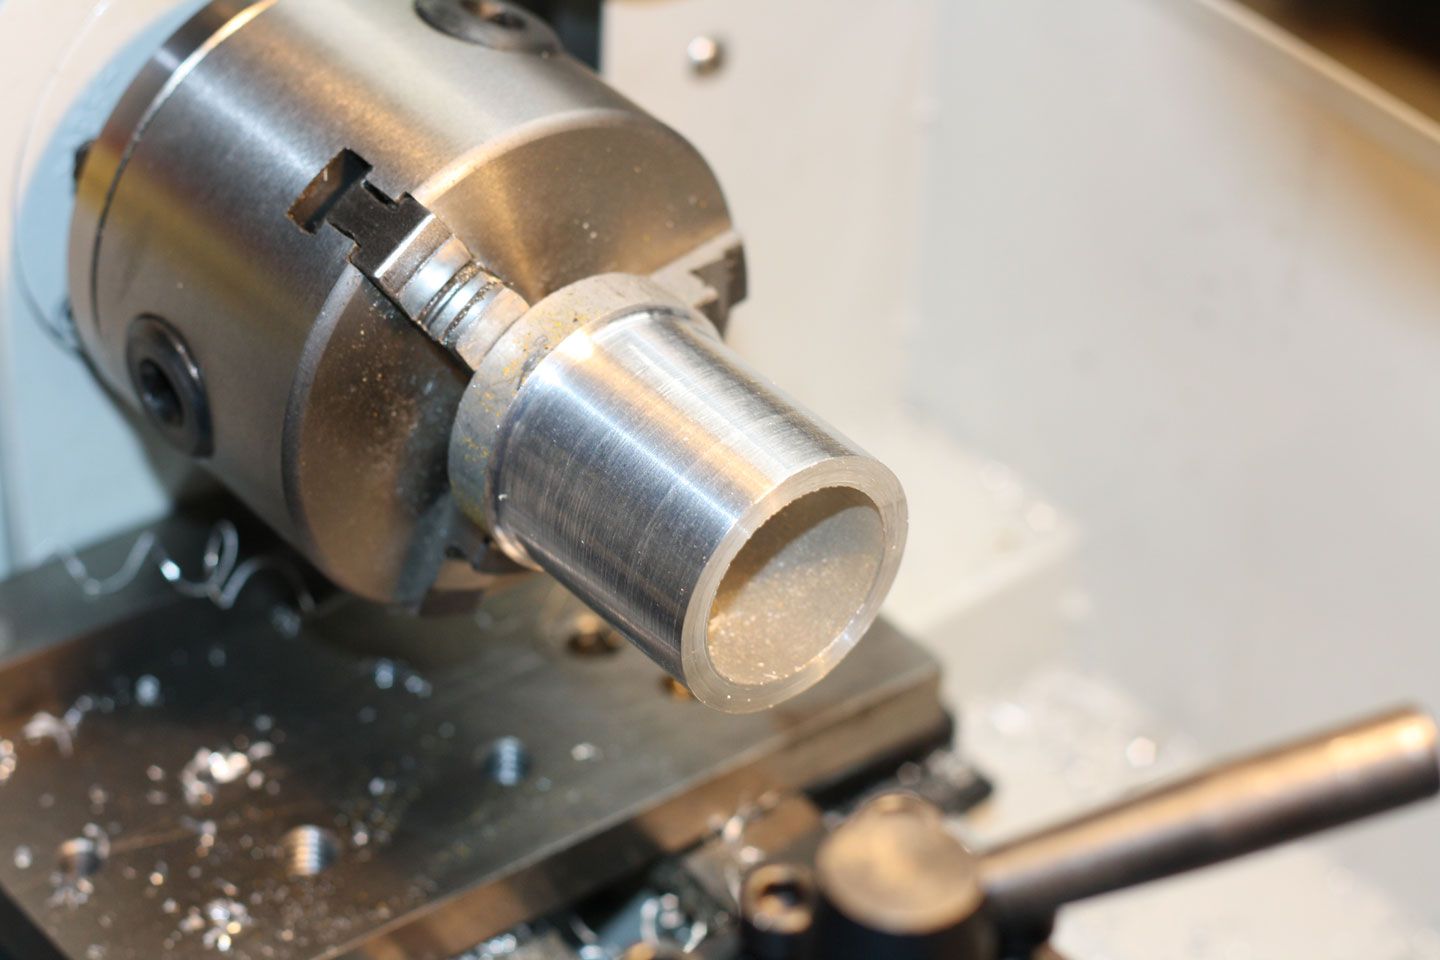
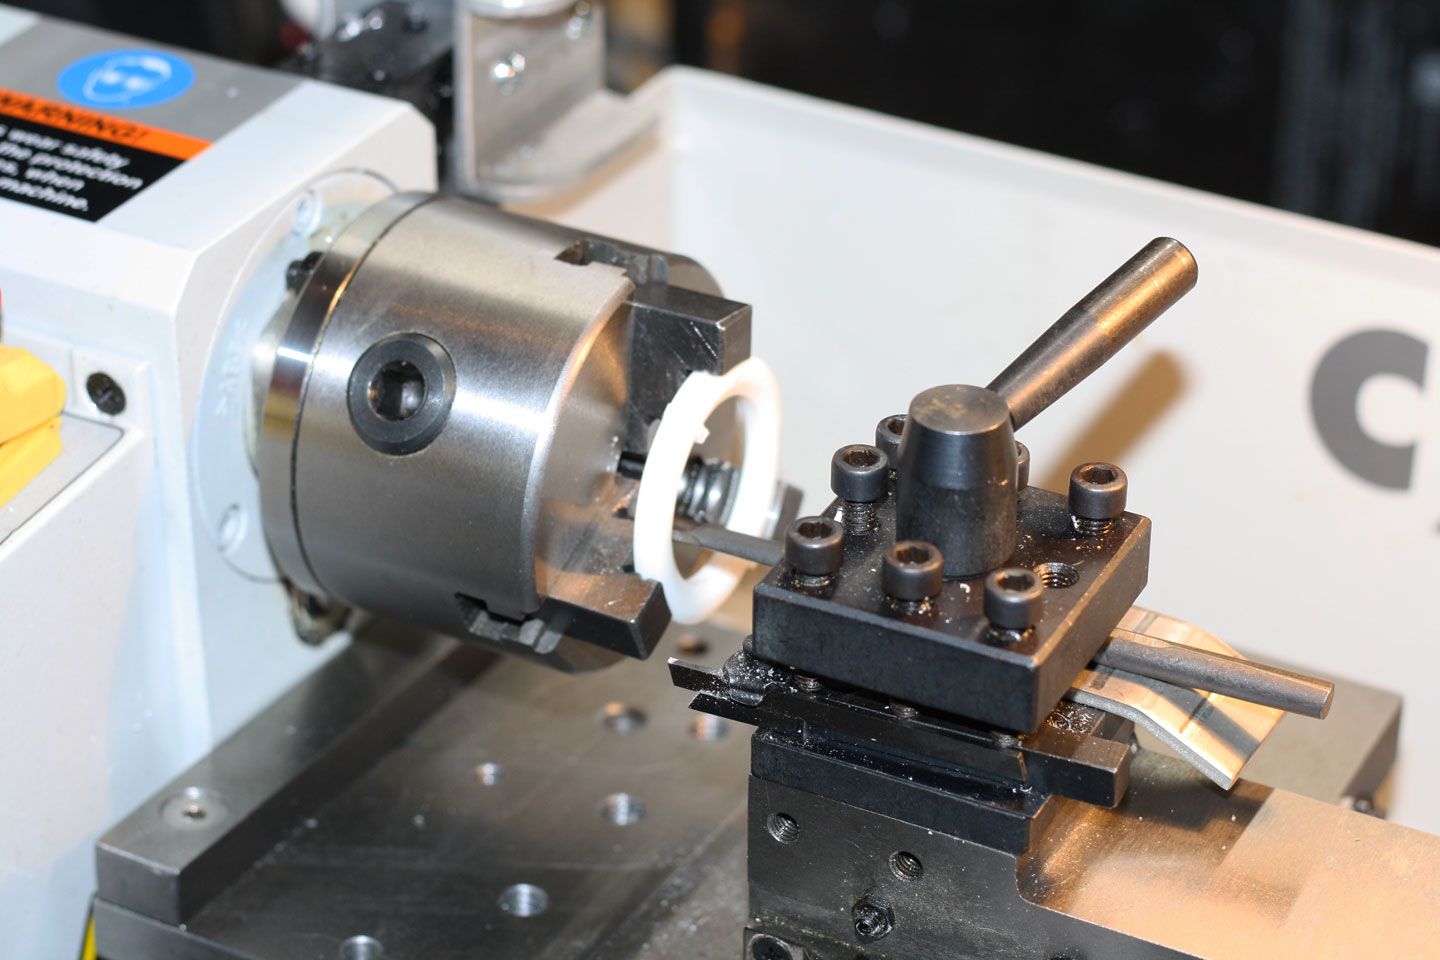
Cut up a piece of aluminum tube for the rims:-

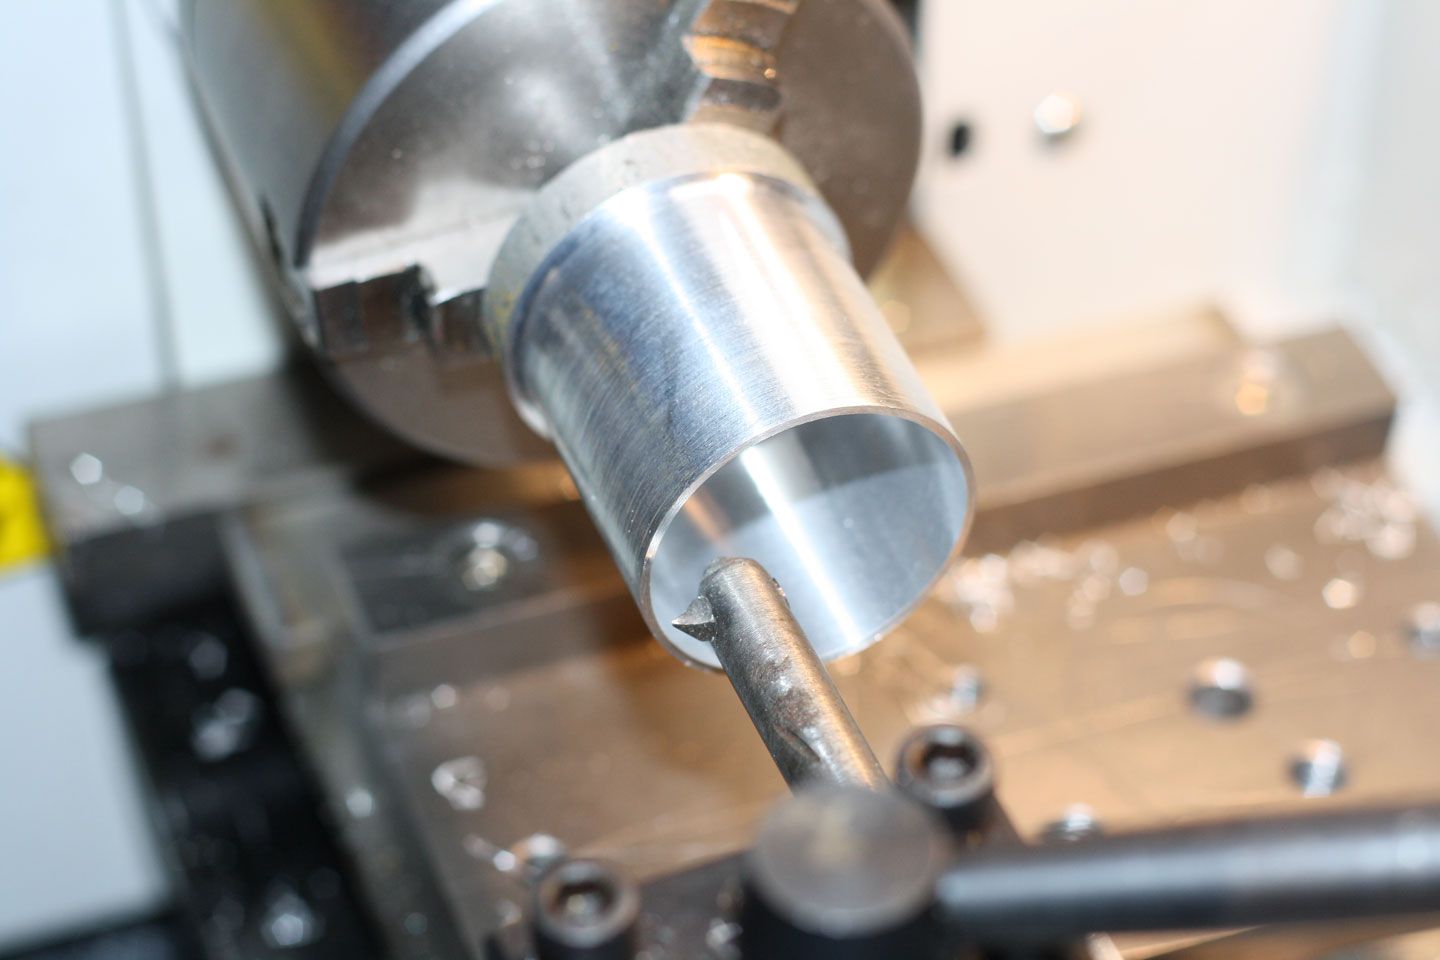
Turned the OD of the rim flange:-
Bored the inside rim diameter:-
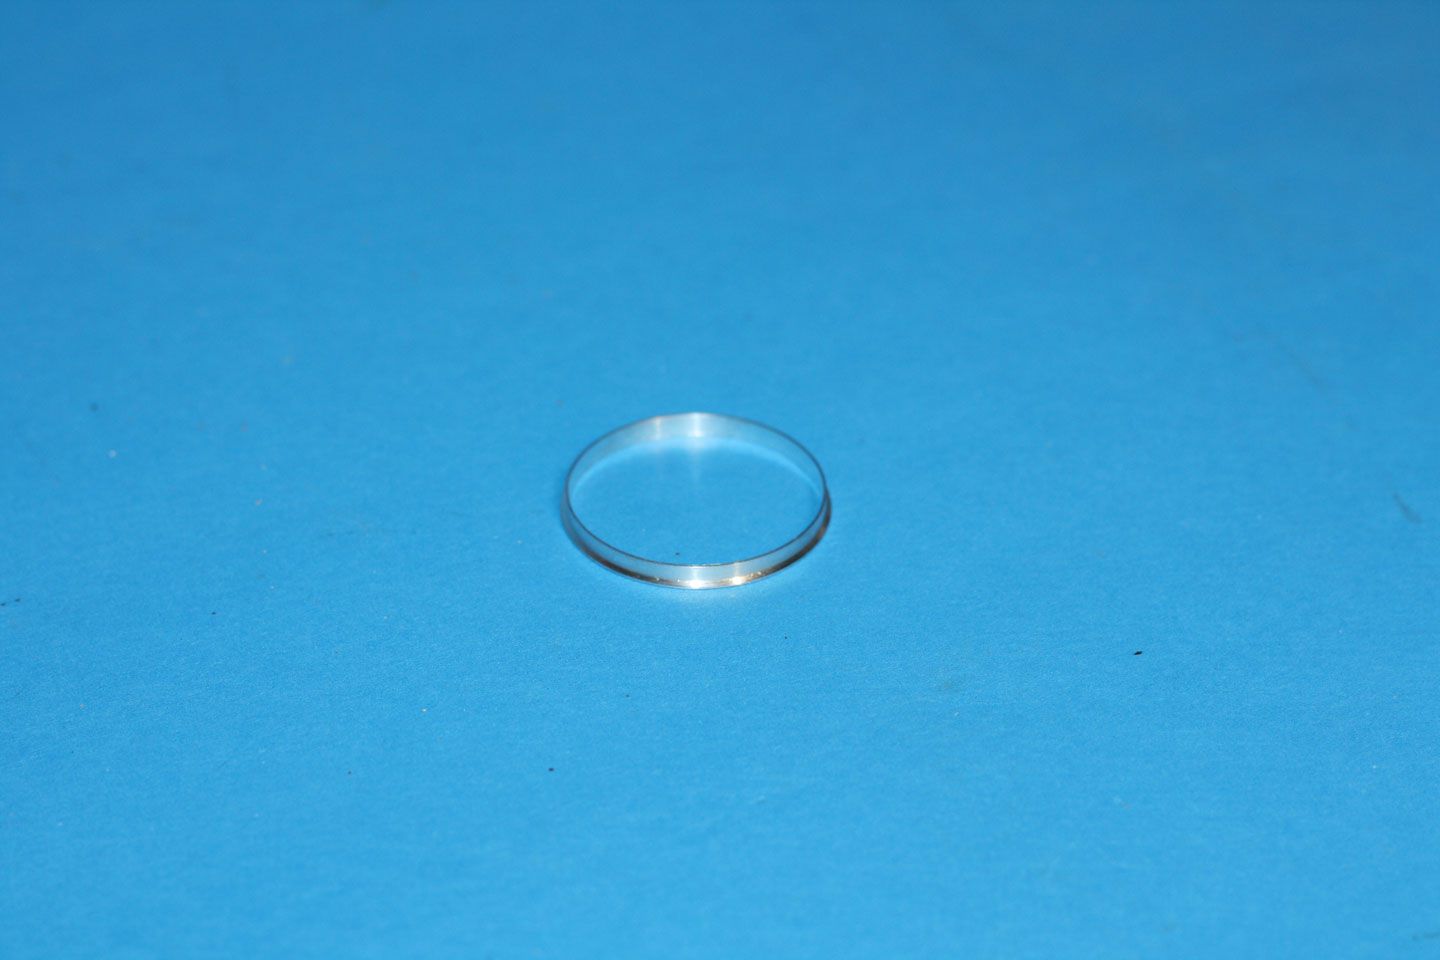
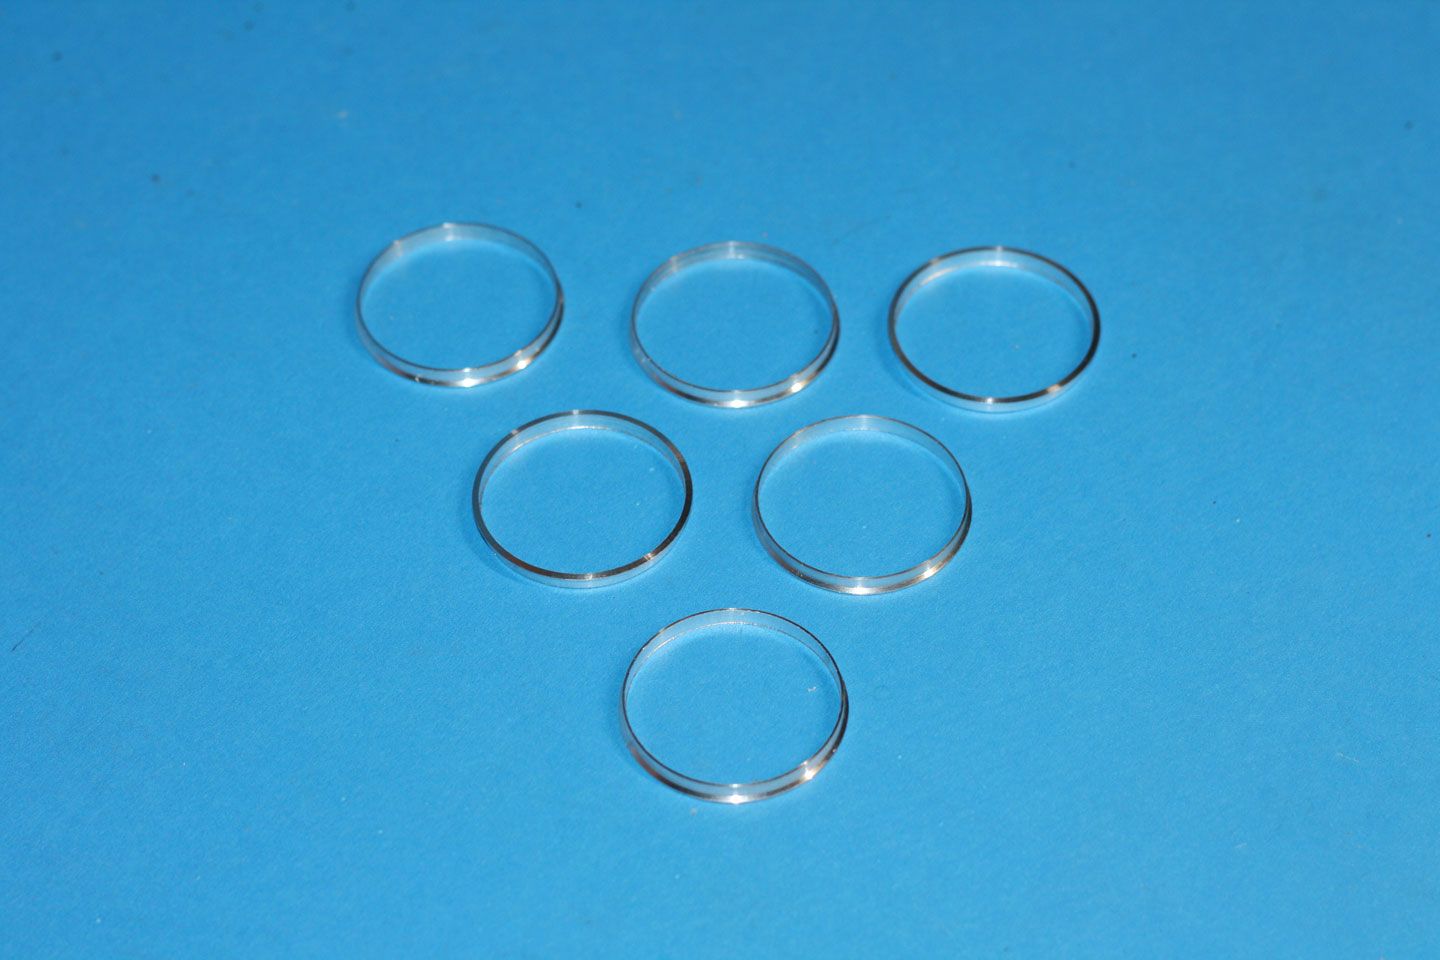
Parted off one sample:-
And then six more I will machine six more tomorrow:-
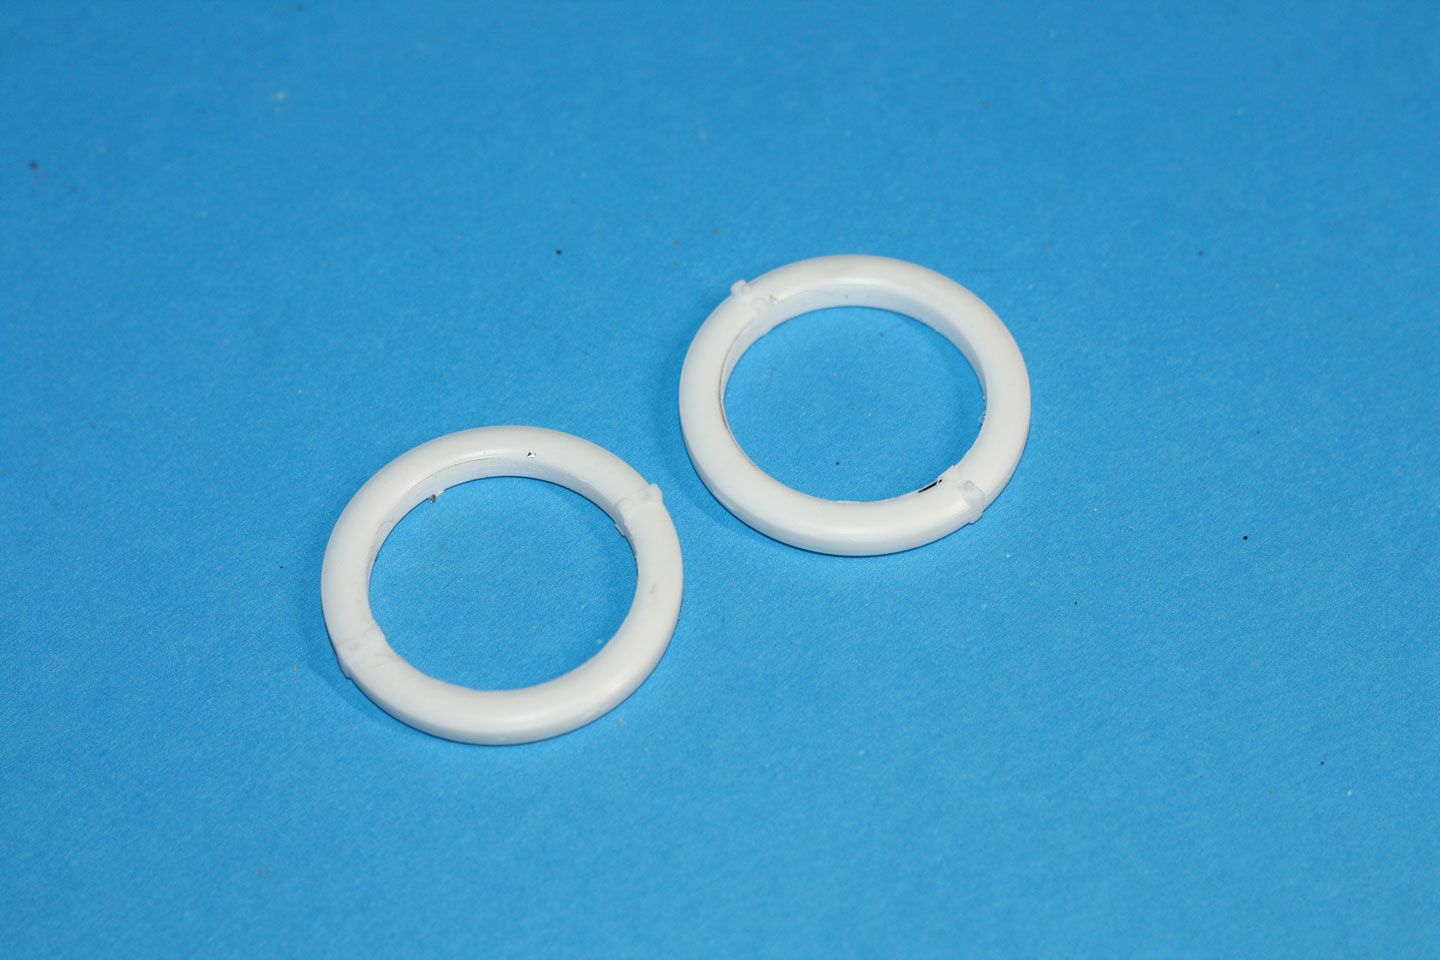
Bored out the two spare tires:-
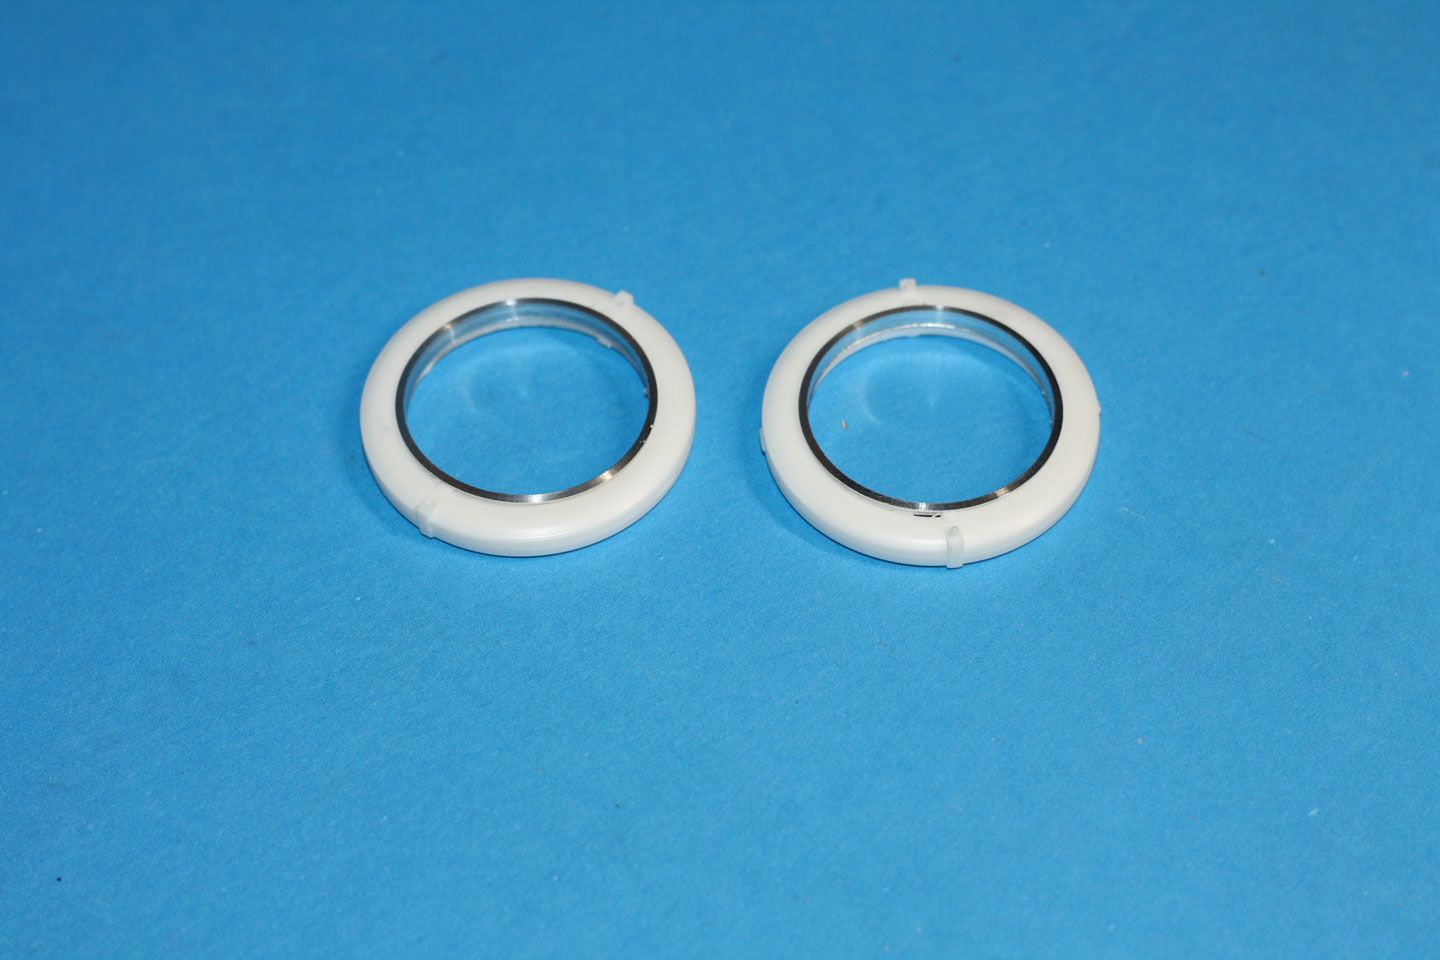
Test fit the rims and next clean them all up!
Next up for the rims after clean up will be to make a drill jig for the spokes.

I have fabricated the rear tool box and now need to make a latch for it:-
Cut up a piece of aluminum tube for the rims:-
Turned the OD of the rim flange:-
Bored the inside rim diameter:-
Parted off one sample:-
And then six more I will machine six more tomorrow:-
Bored out the two spare tires:-
Test fit the rims and next clean them all up!
Next up for the rims after clean up will be to make a drill jig for the spokes.

heavyjagdpanzer
Joined: February 17, 2013
KitMaker: 173 posts
Auto Modeler: 46 posts

Posted: Friday, April 10, 2020 - 11:37 AM UTC
Quoted Text
Again welcome to all new builds!
I have fabricated the rear tool box and now need to make a latch for it:-
Cut up a piece of aluminum tube for the rims:-
Outstanding machine work.
Turned the OD of the rim flange:-
Bored the inside rim diameter:-
Parted off one sample:-
And then six more I will machine six more tomorrow:-
Bored out the two spare tires:-
Test fit the rims and next clean them all up!
Next up for the rims after clean up will be to make a drill jig for the spokes.
Outstanding machine work.
heavyjagdpanzer
Joined: February 17, 2013
KitMaker: 173 posts
Auto Modeler: 46 posts
Posted: Friday, April 10, 2020 - 11:48 AM UTC
This is the fuel pump on the model I am building. The pins on the ends of the pump are about .030 in diameter. I am considering putting fuel lines on the model. I see several different websites offer fuel lines and various scale hoses, but none say if they are hollow, so I can slip them on the fuel pump and cut them to length. Does anyone know a website that sells scale fuel line that would work for this?
Thanks

Thanks

AussieReg

#007

Joined: June 09, 2009
KitMaker: 8,156 posts
Auto Modeler: 2,953 posts

Posted: Friday, April 10, 2020 - 12:13 PM UTC
Seriously, do I have to do this every couple of days? Well, again like the start of a race, the action is coming thick and fast until the field settles a bit, then it evens out to a steady flow, then there's a flurry of activity at the business end.
Running update on builds
10 days in, already 2000 views and over 150 posts
18 enlisted (plus 2, Jesper and Radu sign in guys!)
11 builds in progress
Aussiereg (Damian) - STRAIGHTLINE - '55 Chev Pro Sportsman (Charles Carpenter) - 1/25 Revell kit - Parts clean-up and sub assemblies
Joel_W (Joel) - FORMULA 1 - enlisted - Lotus 99T Honda (Ayrton Senna 1987) - 1/20 Tamiya kit
Joel_W (Joel) - INDY - enlisted - Lola T-8800 Newman Haas (Mario Andretti 1988) - 1/25 AMT kit
Dixon66 (David) - ENDURANCE GROUP 5[/b] - Zakspeed Capri - 1/24 Tamiya kit - Box opened, paint on order
tinbanger (Richard) - GRAND PRIX - 1914 Mercedes Racer - 1/16 Lindberg kit - Engine and chassis started, major panel works under way, custom milled wheels/tyres started
md72 (Mark) - INDY - enlisted - Target Reynard (Jimmy Vasser) - 1/25 Revell kit
Szmann (Gabriel) - NASCAR - Chev Monte Carlo (Tony Stewart) - 1/25 AMT/ERTL kit - Main assembly completed, body ready for decals and clear
Szmann (Gabriel) - NASCAR - Pontiac Grand Prix (Kyle Petty) - 1/24 Revell/Monogram kit - Box opened
Hwa-Rang (Jesper) - NASCAR - (TBA)
PasiAhopelto (Pasi) - NASCAR - enlisted - Olds 442 (Donnie Allison) - 1/25 Salvinos JR kit
forest1000 (David) - FORMULA 1 - enlisted - Williams Renault (Jaques Villeneuve) - 1/24 Revell/Monogram kit
jimb (Jim) - STRAIGHTLINE - '57 Ford Sedan Gasser - Engine, chassis, wheels completed and interior assembled
Cosimodo (Michael) - ENDURANCE - enlisted - 1971 Porsche 917/20
bluebell914 (Patrick) - ENDURANCE - enlisted - Ferrari P4 or 512S
2002hummer (Darrell) - GRAND PRIX - enlisted - Lotus Super Seven (Tamiya)
TacFireGuru (Mike) - NASCAR - enlisted - Chev Monte Carlo (Home Depot)
Stickframe (Nick) - ENDURANCE - McLaren F1 GTR Longtail - 1/24 Aoshima kit - Body surgery and scratch detail mania commenced
Lakota (Don) - ENDURANCE - Corvette C7.R - 1/25 Revell kit - Engine assembled, floor pan/chassis under way
RedwingNev (Neil) - GRAND PRIX - enlisted - Lotus 79 (1978 Mario Andretti?) - 1/20 Tamiya kit
rv1963 (Robert) - STRAIGHTLINE - '37 Chevy Gasser - 1/25 AMT kit- Engine detailing, 3D printed & custom milled parts
heavyjagdpanzer (Bill) - STRAIGHTLINE - Blue Max Funny Car - 1/25 Revell kit - Engine and Cage completed
bmwh548 (Radu) - RALLY - '99 WRC Subaru Impreza - 1/24 Tamiya kit - Box opened
If anybody has firmed up their proposed builds, or spotted anything wrong in the list, please let me know.
Cheers, D


rv1963
Joined: December 07, 2004
KitMaker: 1,888 posts
Auto Modeler: 806 posts

Posted: Friday, April 10, 2020 - 03:03 PM UTC
That is some outstanding work Richard, those wheels are going to look amazing, that's a nice lathe you have.
Damain and Joel thanks, Well i fixed the problem i chucked the bad jar in the garbage and used Chevy red by Testors the new paint dried faster in an hour than the other did in 12, looks pretty good to. i should have an update in a day or 2.
Damain and Joel thanks, Well i fixed the problem i chucked the bad jar in the garbage and used Chevy red by Testors the new paint dried faster in an hour than the other did in 12, looks pretty good to. i should have an update in a day or 2.
rv1963
Joined: December 07, 2004
KitMaker: 1,888 posts
Auto Modeler: 806 posts
Posted: Friday, April 10, 2020 - 03:09 PM UTC
Bill don't know of any scale hollow line, you might have to cut those small nubs off and drill holes for lines, just an idea. Detail master sells tons of stuff maybe they do.
heavyjagdpanzer
Joined: February 17, 2013
KitMaker: 173 posts
Auto Modeler: 46 posts
Posted: Friday, April 10, 2020 - 03:11 PM UTC
Quoted Text
Bill don't know of any scale hollow line, you might have to cut those small nubs off and drill holes for lines, just an idea. Detail master sells tons of stuff maybe they do.
Thanks

Szmann

Joined: September 02, 2014
KitMaker: 1,977 posts
Auto Modeler: 1,371 posts
Posted: Friday, April 10, 2020 - 04:53 PM UTC
Hi, Radu! Cool ricer. BTW, these "ricers" have basically closed down the American car production, they only hanging on trucks and Tesla now. Even Mustang it's going to be an electric SUV now! LOL
Don, nice to see some progres on the Corvette!
Richard, impressive machining work! At the beginning I thought maybe your project it's a little over-ambitious, but now all my doubts are vanished. Excellent!
Bill, I don't know any site, but you can do some female connectors from stretched tube from a q-tip, and then just use regular wire or stretched clear sprue to replicate hoses.
D., very neat and timely table keeping - good job!
On my side, I re-did the ribs on the windshield with grey instead of black, but then I dipped the clear parts in Future and I don't want to expose them to dust as yet. All touch-ups on the underside done and... still waiting for enamel to dry
Gabriel

bmwh548

Joined: March 09, 2020
KitMaker: 4 posts
Auto Modeler: 4 posts

Posted: Friday, April 10, 2020 - 06:35 PM UTC
Quoted Text
Radu, welcome to the Automodeler family! Great to see you here, and your "ricer" is a great addition to the ranks! There have been a lot of recent releases in the Rally Car kit range, proving to be very popular, and I am pleased to see one here.
Thank you Damian!
Quoted Text
Radu,
Great choice as the Subaru is one of Tamiya's best kits on the market. I've seen several builds and the bonus is that the Tamiya decals work just fine for a change. Looking forward to your build with great interest.
Thank you! It is a pretty good kit, my first Tamiya actually.
Quoted Text
Hi, Radu! Cool ricer.
Thank you Gabriel! I'll try to do right by the Japanese
Spent several hours last night trying to sand the mould line from the tires. On one hand I love how soft the rubber is, on the other it was a pain in the proverbial backside to convince it to work with me.
Left one done, right one original.
Joel_W
Joined: December 04, 2010
KitMaker: 11,666 posts
Auto Modeler: 2,974 posts
Posted: Saturday, April 11, 2020 - 01:26 AM UTC
Richard,
Your mill work is outstanding for sure. It sure does open up a whole new world for modeling.
Joel
Your mill work is outstanding for sure. It sure does open up a whole new world for modeling.
Joel
Joel_W
Joined: December 04, 2010
KitMaker: 11,666 posts
Auto Modeler: 2,974 posts
Posted: Saturday, April 11, 2020 - 01:33 AM UTC
Bill,
I've struggled with that exact issue plus proper scale sizes for various lines, hoses, etc. per scale. Nearly all the scale lines with the exception of the braided lines are solid. What I've found that has worked is clear fly fishing leaders. They're hollow so that they float.
The hard part is finding the smallest sizes. Bass Pro Shops has them. One package will last a long time. Just buy a few packages as they're really cheap compared to what modeling detail guys charge.
One thing that I'm always looking for is very small dia. coated wire so that I can strip it for hollow tubing. Not the easiest to find these days.
Joel
Joel_W
Joined: December 04, 2010
KitMaker: 11,666 posts
Auto Modeler: 2,974 posts
Posted: Saturday, April 11, 2020 - 01:39 AM UTC
Radu,
I really like both tires as Tamiya has done an excellent job with the tread pattern.
While we all sand the new tread pattern so that the centerline seam is gone, and the tire looks used, in real life new tires have that mold line exactly where it is, and the tire's tread is as shiny as the sidewalls.
Like you, I also prefer a slightly used look while the car is polished and waxed. Your tread really came out looking quite nice.
Joel
rv1963
Joined: December 07, 2004
KitMaker: 1,888 posts
Auto Modeler: 806 posts
Posted: Saturday, April 11, 2020 - 01:49 AM UTC
You guys are working really fast, guess Damain will have to do another update, lol.
heavyjagdpanzer
Joined: February 17, 2013
KitMaker: 173 posts
Auto Modeler: 46 posts
Posted: Saturday, April 11, 2020 - 02:25 AM UTC
Quoted Text
Bill,
I've struggled with that exact issue plus proper scale sizes for various lines, hoses, etc. per scale. Nearly all the scale lines with the exception of the braided lines are solid. What I've found that has worked is clear fly fishing leaders. They're hollow so that they float.
The hard part is finding the smallest sizes. Bass Pro Shops has them. One package will last a long time. Just buy a few packages as they're really cheap compared to what modeling detail guys charge.
One thing that I'm always looking for is very small dia. coated wire so that I can strip it for hollow tubing. Not the easiest to find these days.
Joel
Thanks, I had not thought of that. I am a fly fisherman, I will look in my fishing vest!
Joel_W
Joined: December 04, 2010
KitMaker: 11,666 posts
Auto Modeler: 2,974 posts
Posted: Saturday, April 11, 2020 - 05:08 AM UTC
Lotus Honda 99t Update #1
For our Strip, Track, & Trail GB, I decided on the Tamiya 1/20 scale 2007 second release Camel Lotus Honda 99t , which contains some new parts. Specifically different front and rear wing side plates so that the correct version of the 1987 Monoco F1 GP car can be built. The instructions have you start with the interior shell, front suspension, and cockpit, but I much prefer to start with the body prep, painting, decaling, and clearcoats. If nothing else that gives me a little boost of Mojo when I need it every so often.
The body shell is basically one piece with separate front & rear wings, as well the intake moldings for the radiators.
Sorry, but I forgot to take a picture of the rear wing parts.
The radiator intakes had some minor fit issues that needed sanding, shaping, and some putty work. I can see from some of the enlarged pictures that I've still got some final finishing work to do prior to priming.

Checking my references, I noticed that both front wings as well as the rear wings have a changable Gurney flap which can be changed to a larger, smaller, or completely removed as they deem necessary for the proper wing down force. They're held in place by nuts and bolts. And while Tamiya has molded them to the 3 wings, there's no nuts or bolts, which is strange as the body parts are literally covered with them. So I measured and drilled my own holes. The bolts and nuts will be represented by stretched Aluminum sprue and a black panel line wash.
Joel
For our Strip, Track, & Trail GB, I decided on the Tamiya 1/20 scale 2007 second release Camel Lotus Honda 99t , which contains some new parts. Specifically different front and rear wing side plates so that the correct version of the 1987 Monoco F1 GP car can be built. The instructions have you start with the interior shell, front suspension, and cockpit, but I much prefer to start with the body prep, painting, decaling, and clearcoats. If nothing else that gives me a little boost of Mojo when I need it every so often.
The body shell is basically one piece with separate front & rear wings, as well the intake moldings for the radiators.
Sorry, but I forgot to take a picture of the rear wing parts.
The radiator intakes had some minor fit issues that needed sanding, shaping, and some putty work. I can see from some of the enlarged pictures that I've still got some final finishing work to do prior to priming.
Checking my references, I noticed that both front wings as well as the rear wings have a changable Gurney flap which can be changed to a larger, smaller, or completely removed as they deem necessary for the proper wing down force. They're held in place by nuts and bolts. And while Tamiya has molded them to the 3 wings, there's no nuts or bolts, which is strange as the body parts are literally covered with them. So I measured and drilled my own holes. The bolts and nuts will be represented by stretched Aluminum sprue and a black panel line wash.
Joel
rv1963
Joined: December 07, 2004
KitMaker: 1,888 posts
Auto Modeler: 806 posts
Posted: Saturday, April 11, 2020 - 06:59 AM UTC
Good to see you have started Joel.
Engine update all details added at this point are glued on they will not move i hope, i added bolts to the front of the supercharger plate also added oil filter, injector hat, fuel lines, valve covers and all the pulleys.
Plenty more to add like butterflies to the hat, fuel lines, blower belt and plug wires. All comments welcome
Joel_W
Joined: December 04, 2010
KitMaker: 11,666 posts
Auto Modeler: 2,974 posts
Posted: Saturday, April 11, 2020 - 08:04 AM UTC
Robert,
I'm also glad that I finally started sooner then later.
I'm just blown away with your detailing, and all those metal fittings which just continues to put your engine in a whole new league.
Joel
I'm also glad that I finally started sooner then later.
I'm just blown away with your detailing, and all those metal fittings which just continues to put your engine in a whole new league.
Joel
Stickframe

#362
Joined: December 01, 2013
KitMaker: 1,661 posts
Auto Modeler: 431 posts

Posted: Saturday, April 11, 2020 - 08:07 AM UTC
Hi gents,
wow - nice to see so much progress here at the race shop!
Richard, wow turning your own rims - they look great, along with your scratch work. This group build seems to have brought out the lathes and milling machines - the results sure look good.
Hi Bill, I agree, the braided hoses are tough to get right. For larger diameter hoses, like for radiators, I use Tamiya 2mm (I insert thin solder wire to keep them stable), for smaller lines I like Pro tech - they have a thin wire inserted. You can drill into the part and insert the thin wire. Most of the time, I wrap the end of the hose with thin lead sheet, from a wine bottle, to make it look like there's a coupler of some kind in place.
You can see both of the braided lines I mentioned being used in My "fast F150" build. You'll also see I use whatever works, thin solder wire, regular wire and so on.
Hi Radu, welcome to the track! nice work on the tires, looking forward to seeing more!
Gabriel, you're so far out front I don't think we'll catch you! looking good.
Hi Joel, good to see your kit arrived, and you're up and running. I order from Spotmodel frequently and with good service. I'm guessing with the virus problems, postal services are bogged down, which under the circumstances is more than fair -- I've been stuck at home for over a month, so I'm glad to get anything in the mail!
Robert, man, that engine looks sweet! Looking forward to more.
With time on my hands because of the quarantine, my model shop has been busy. I've been working on the engine bay of the GTR F1. As I don't have an aftermarket detail kit for this, I've been doing what I can to make something convincing. At first glance, photos of this engine and engine bay don't appear to have much going on, but if you study them, you'll see there's actually plenty going on - tubes and hoses, linkages, heat shields, brackets and so on. Please take a look:

The details on this kit are pretty soft, but the basic form is there.


OK, back to the bench - stay well gents
Nick
wow - nice to see so much progress here at the race shop!
Richard, wow turning your own rims - they look great, along with your scratch work. This group build seems to have brought out the lathes and milling machines - the results sure look good.
Hi Bill, I agree, the braided hoses are tough to get right. For larger diameter hoses, like for radiators, I use Tamiya 2mm (I insert thin solder wire to keep them stable), for smaller lines I like Pro tech - they have a thin wire inserted. You can drill into the part and insert the thin wire. Most of the time, I wrap the end of the hose with thin lead sheet, from a wine bottle, to make it look like there's a coupler of some kind in place.
You can see both of the braided lines I mentioned being used in My "fast F150" build. You'll also see I use whatever works, thin solder wire, regular wire and so on.
Hi Radu, welcome to the track! nice work on the tires, looking forward to seeing more!
Gabriel, you're so far out front I don't think we'll catch you! looking good.
Hi Joel, good to see your kit arrived, and you're up and running. I order from Spotmodel frequently and with good service. I'm guessing with the virus problems, postal services are bogged down, which under the circumstances is more than fair -- I've been stuck at home for over a month, so I'm glad to get anything in the mail!
Robert, man, that engine looks sweet! Looking forward to more.
With time on my hands because of the quarantine, my model shop has been busy. I've been working on the engine bay of the GTR F1. As I don't have an aftermarket detail kit for this, I've been doing what I can to make something convincing. At first glance, photos of this engine and engine bay don't appear to have much going on, but if you study them, you'll see there's actually plenty going on - tubes and hoses, linkages, heat shields, brackets and so on. Please take a look:
The details on this kit are pretty soft, but the basic form is there.
OK, back to the bench - stay well gents
Nick
rv1963
Joined: December 07, 2004
KitMaker: 1,888 posts
Auto Modeler: 806 posts
Posted: Saturday, April 11, 2020 - 08:33 AM UTC
Joel, Nick thanks guys, Nick you did a lot great detail work since your last update, paint should really set that work off nice.
tinbanger
Joined: February 04, 2008
KitMaker: 2,507 posts
Auto Modeler: 409 posts
Posted: Saturday, April 11, 2020 - 09:11 AM UTC
Thank you for your comments Joel and welcome to the GB!
Today I have machined 8 rims for the road wheels:-
The wood rims were cut out and the wheel centers machined to accept the rims.
Another job to be machined will be the rear brake drums and front and rear wheel hubs.
Today I have machined 8 rims for the road wheels:-
The wood rims were cut out and the wheel centers machined to accept the rims.
Another job to be machined will be the rear brake drums and front and rear wheel hubs.
Joel_W
Joined: December 04, 2010
KitMaker: 11,666 posts
Auto Modeler: 2,974 posts
Posted: Saturday, April 11, 2020 - 09:12 AM UTC
Nick,
That's absolutely impressive looking. All those hand made details really add up to a very busy looking engine compartment.
Joel
That's absolutely impressive looking. All those hand made details really add up to a very busy looking engine compartment.
Joel
Joel_W
Joined: December 04, 2010
KitMaker: 11,666 posts
Auto Modeler: 2,974 posts
Posted: Saturday, April 11, 2020 - 09:14 AM UTC
Richard,
I'm really looking forward to how those wheels turn out.
Joel
I'm really looking forward to how those wheels turn out.
Joel
Joel_W
Joined: December 04, 2010
KitMaker: 11,666 posts
Auto Modeler: 2,974 posts
Posted: Saturday, April 11, 2020 - 09:24 AM UTC
Nick,
I've got one outstanding order from Spot model that was shipped nearly 3 weeks ago. At this point I'm getting a little concerned as the tracking from the USPS says that they still haven't even received my order. I'm giving it another week before contacting Spot customer service.
I don't mind having to wait a few weeks longer then the usual 3 weeks, but the tracking only lagged by a few days or so. Seems that that neither postal service can tell me where my package is.
Joel
Szmann
Joined: September 02, 2014
KitMaker: 1,977 posts
Auto Modeler: 1,371 posts
Posted: Saturday, April 11, 2020 - 11:43 AM UTC
Joel, I'm glad to see you starting, and, as usually, your update is consistent and well documented.
Yes, almost all instructions manuals are starting with the engine assembly, but the time efficiency requires differently. The most time consuming is the body prep and painting, as at least three layers of paint, (primer, lacquer) and sometimes hours of sanding & polishing are requested. Just look at my first NASCAR build - I started with the body - everything else is done and the bodywork still dragging behind - I'm not even ready for decals!
Good job on the intakes and also on the Gurney flaps screws. You really have the accuracy and technique on your side!
Robert, that engine looks so impeccable. Very realistic piece of work there! I keep watching your progress with very big eyes!
Nick, you had me laughing! Like anyone can see any basic detail anymore under that massive dose of exquisite scratch built details.
Richard, it seems like you are going to machine your way to the end of this GB. Great to see!
Update? Neeah! My Chevrolet's body it's still not ready for sanding - but it's very close. Tomorrow for sure! I did a few things on the Pontiac instead.
Gabriel
Yes, almost all instructions manuals are starting with the engine assembly, but the time efficiency requires differently. The most time consuming is the body prep and painting, as at least three layers of paint, (primer, lacquer) and sometimes hours of sanding & polishing are requested. Just look at my first NASCAR build - I started with the body - everything else is done and the bodywork still dragging behind - I'm not even ready for decals!
Good job on the intakes and also on the Gurney flaps screws. You really have the accuracy and technique on your side!
Robert, that engine looks so impeccable. Very realistic piece of work there! I keep watching your progress with very big eyes!
Quoted Text
The details on this kit are pretty soft, but the basic form is there
Nick, you had me laughing! Like anyone can see any basic detail anymore under that massive dose of exquisite scratch built details.
Richard, it seems like you are going to machine your way to the end of this GB. Great to see!
Update? Neeah! My Chevrolet's body it's still not ready for sanding - but it's very close. Tomorrow for sure! I did a few things on the Pontiac instead.
Gabriel
 |

WEB HOSTING BY


Copyright ©2021 Auto Modeler and Kitmaker Network, a subsidiary of Silver Star Enterprises
All Rights Reserved. Please read our Conditions of Use and Privacy Policy.
All Rights Reserved. Please read our Conditions of Use and Privacy Policy.