

Go to automodeler.com for the current dynamic site!


The Garage
For general automotive modeling or non-modeling topics.
For general automotive modeling or non-modeling topics.
Hosted by Jim Starkweather
Strip, Track & Trail Official Build Thread

rv1963

Joined: December 07, 2004
KitMaker: 1,888 posts
Auto Modeler: 806 posts

Posted: Tuesday, April 14, 2020 - 03:05 PM UTC
Thanks Damian, I brush painted the fins with the same enamel as the engine and when it's dry i moisten a q-tip with paint thinner and just wipe away the paint, for acrylic paint i use a wood tooth pick and gentle wipe away the paint.

AussieReg

#007

Joined: June 09, 2009
KitMaker: 8,156 posts
Auto Modeler: 2,953 posts

Posted: Tuesday, April 14, 2020 - 03:17 PM UTC
Quoted Text
Thanks Damian, I brush painted the fins with the same enamel as the engine and when it's dry i moisten a q-tip with paint thinner and just wipe away the paint, for acrylic paint i use a wood tooth pick and gentle wipe away the paint.
Excellent result, thanks for the tip!


Joel_W
Joined: December 04, 2010
KitMaker: 11,666 posts
Auto Modeler: 2,974 posts

Posted: Wednesday, April 15, 2020 - 02:22 AM UTC
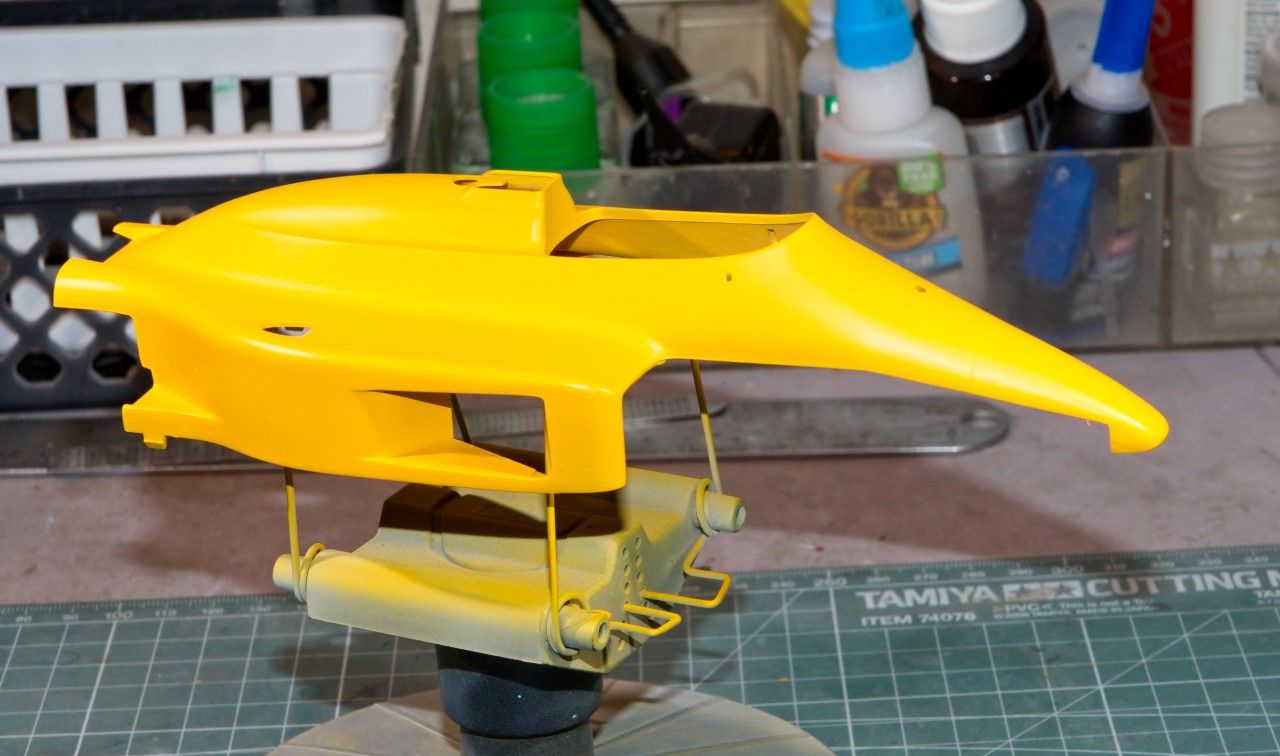
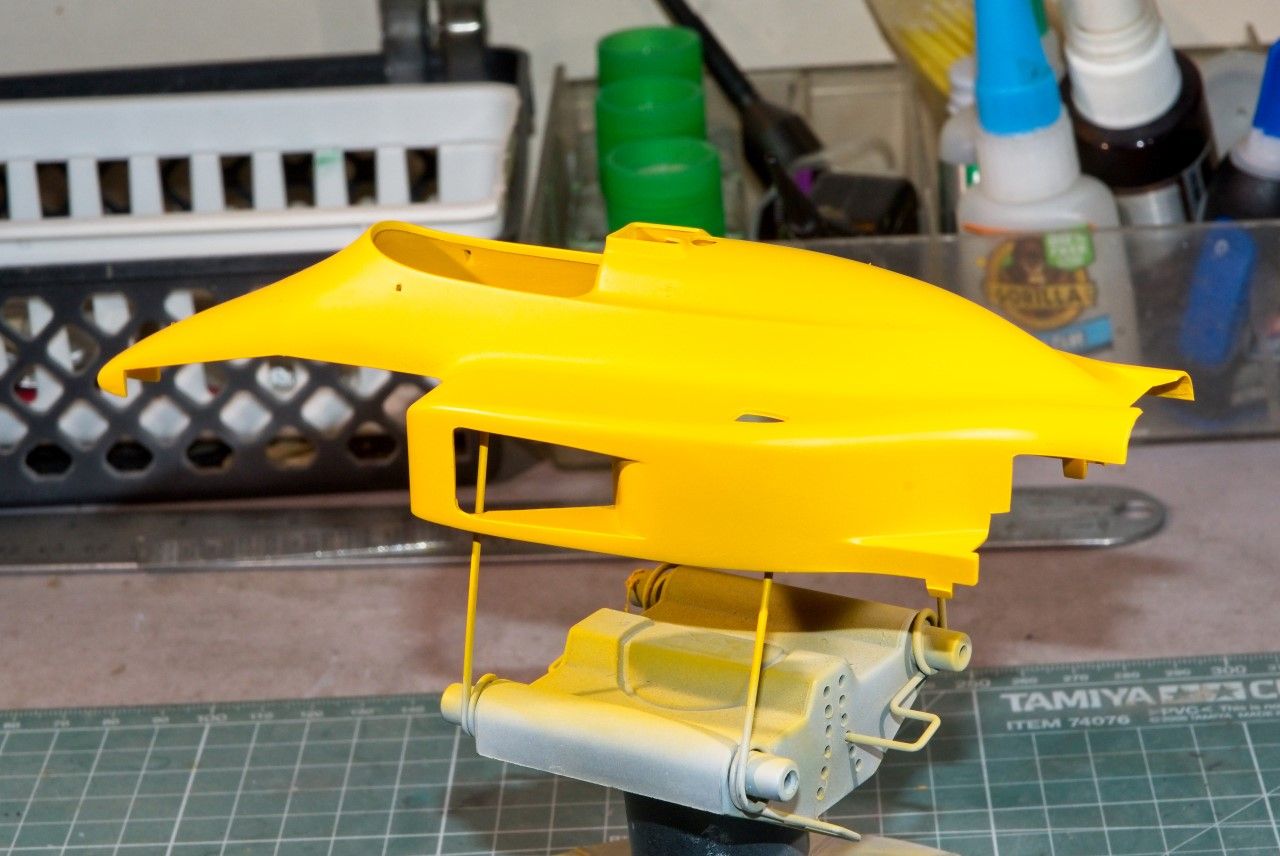
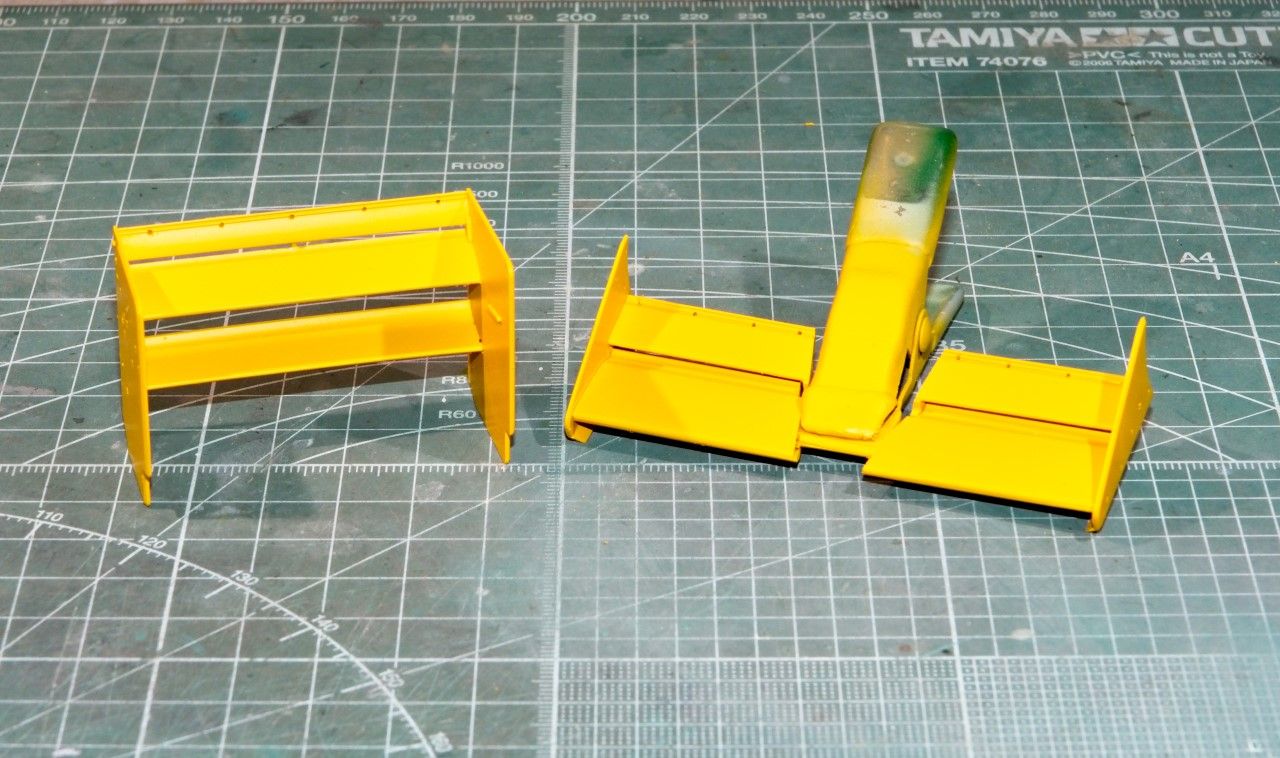
Yesterday the rain finally stopped for one day, so I was able to vent my paint booth outside and do some serious painting. Naturally today it's raining once again.
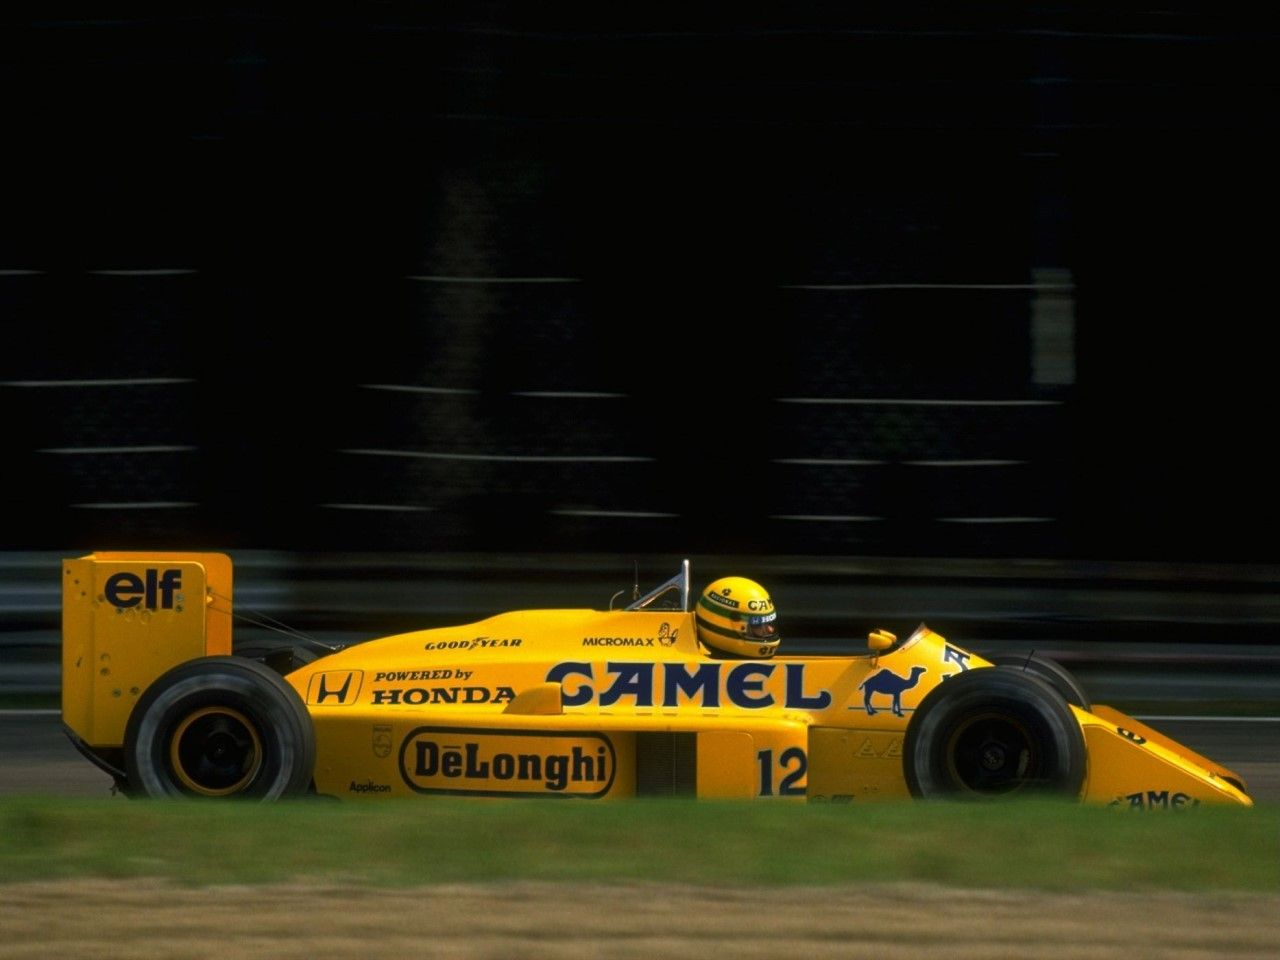
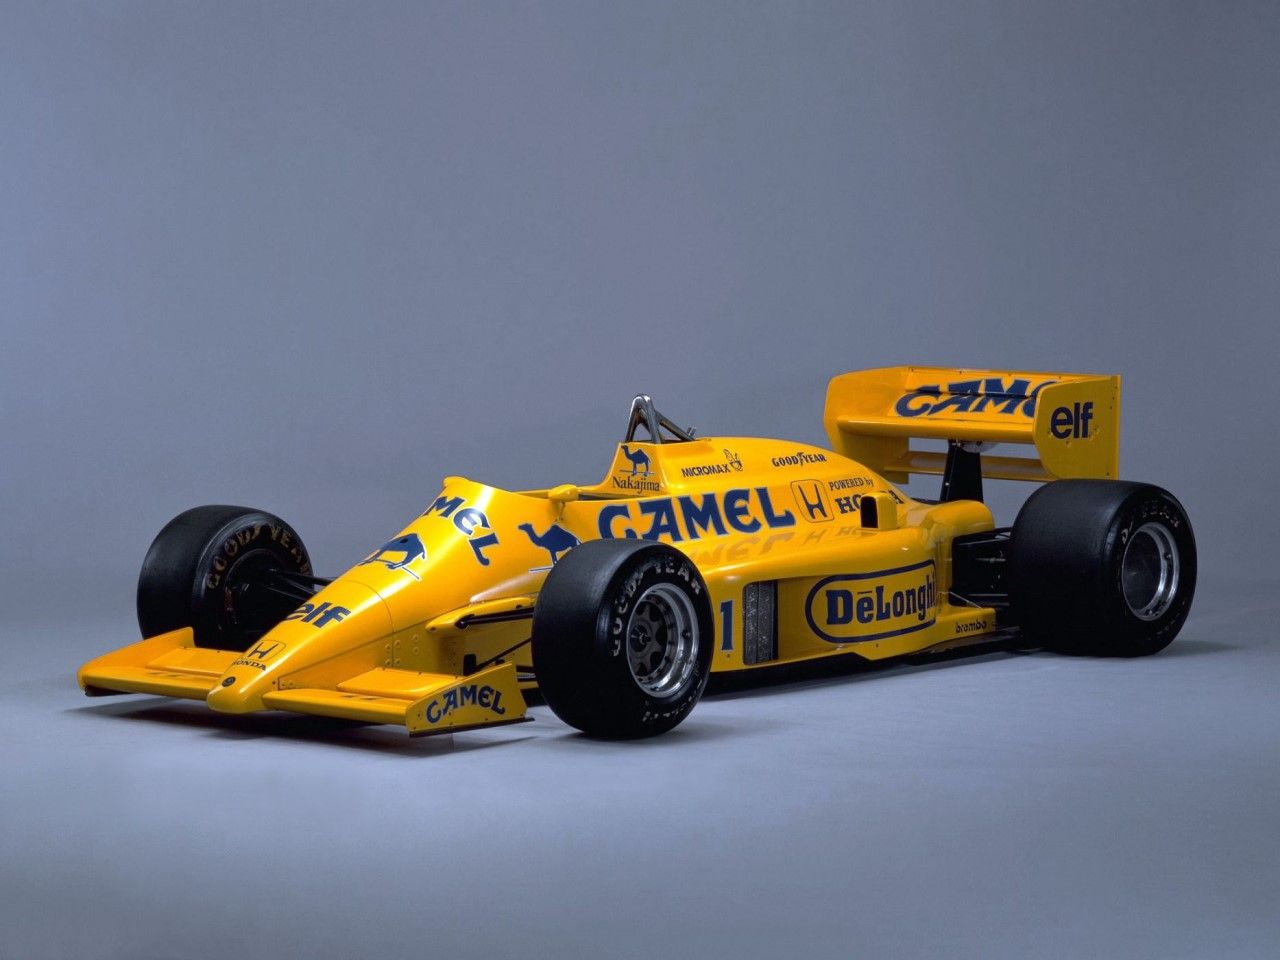
The Camel Lotus Honda is a specific shade of Yellow that Gravity of Spain has in their Lotus line of paints: GC 156. Usually, I would air brush a base coat of white over the primer then the Yellow color, I asked Gravity's customer service about needing the base coat, and they said that the paint color was formulated to go over their light Gray primer. So while I don't use their primer (way to expensive especially as it's also pre-thinned), I went with my usual primer.
I prepped the body shell, wings, body panels, mirrors, and turbo intakes with a very lite rub down of Tamiya #3000 sponge wet just to get the surface as smooth as possible, but still have a little bite left to it. Then a wipe down with Iso Alcohol to remove any dried on residue.
Over the weekend I did my 6 month maintenance on my compressor by blowing out the tank of all that blackish/brown condensed water, checked and tightened every screw, nut & bolt, which finally solved the small air leak issue I had that just got worse as I used the compressor. So I wasn't concerned about the rather long paint session being consistent from start to finish.
I opted for my .5mm Grex Genesis setup, set the psi flow rate to 16 psi, gave the pre-thinned Gravity paint a good shaking till the bottom of the bottle had no pigment stuck to the glass. loaded up the paint cup, and headed on over to the booth.
I usually apply 1 lite tack coat, then a heavier tack coat, and then lite/even wet coats. But with Yellow, it's a whole new ballgame. I applied enough tack coats till I have consistent Yellow coverage. Then re-adjusted the amount of paint flow to what I usually use and applied 6 lite color coats one right after the other as I had some many different parts to paint that it took a good 5 min to go through each cycle. For the last 2 coats which were literally using the last of the jar of paint which I've never been faced with before (I always start with a full bottle), I slowed my passes down and doubled up to get a wet smooth wet coat.
Gotta admit that I was worried I'd be running out of paint, but I finished the job with a few drops to spare.
Into the drying bin. A hour later after venting the bin I checked the body shell and parts, and I was more then satisfied with the paint, color, and the overall finish.
Since the paint is Lacquer, I took some quick pictures after dinner for this update. No surprises this time, but I did have issues with my quick photo setup as the Yellow is a few shades to intense compared to the real deal. Will have to work on my photo setup when the time comes for the final pictures.
Here's a few pictures of the painted shell and wings.
Joel


Szmann

Joined: September 02, 2014
KitMaker: 1,977 posts
Auto Modeler: 1,371 posts
Posted: Wednesday, April 15, 2020 - 04:47 AM UTC
Quoted Text
Street racing builds will be allowed after the builder has completed a build following the group build Rule 1
I didn't knew it before, because there is no mention on the box, but the decals sheet has racing numbers as well. Two sets, actually (17 modern and 106 vintage)
 I really don't mind the decision either way, because I announced the build on TCC waiting list as well, and I'm going to blog it separately anyways. It's all cool.
Quoted Text
Gabriel, so close to the chequered flag already! The decals look to have settled very nicely, and that gloss coat is beautiful. Great work!
Thanks, Damian! Yes, the decals went snuggly and 2k helps a lot with pressing them into the panel lines, because the resin shrinks when dries.
UPDATE
The resin it's now dry enough to handle, and I ran a test fit, stance check after installing the wheels. Looks good, I dare say:


By tomorrow I will attempt to sand and polish the body and, if successful, I will install the glazed surfaces as well.
Cheers!
Gabriel

Szmann
Joined: September 02, 2014
KitMaker: 1,977 posts
Auto Modeler: 1,371 posts
Posted: Wednesday, April 15, 2020 - 05:01 AM UTC
Joel, you did an excellent job with such a capricious paint as yellow. Yes, the tone looks oversaturated - on my screen comes closer to zinc yellow than to Camel yellow. The clear coat will add depth to the color as well. But I know the color it's very hard to catch under artificial light - as is very sensitive to light temperature.
That setting doesn't add up in my books, unless the "pre-thinned" means "water thin". It's true, I never used a Grex, but the lowest I can go with my 0.4mm it's 18 psi, using thicker paint. The good thing is that it worked for you and you have achieved a very nice result. The amount of paint you have spent it's also an indicator that the paint it's either too thin, either starved of pigment. Either way, doesn't sound like a good deal to me.
Other than that, I'm glad for your result - it is nice indeed!
Gabriel
Quoted Text
I opted for my .5mm Grex Genesis setup, set the psi flow rate to 16 psi, gave the pre-thinned Gravity paint a good shaking till the bottom of the bottle had no pigment stuck to the glass. loaded up the paint cup, and headed on over to the booth.
That setting doesn't add up in my books, unless the "pre-thinned" means "water thin". It's true, I never used a Grex, but the lowest I can go with my 0.4mm it's 18 psi, using thicker paint. The good thing is that it worked for you and you have achieved a very nice result. The amount of paint you have spent it's also an indicator that the paint it's either too thin, either starved of pigment. Either way, doesn't sound like a good deal to me.
Other than that, I'm glad for your result - it is nice indeed!
Gabriel
Joel_W
Joined: December 04, 2010
KitMaker: 11,666 posts
Auto Modeler: 2,974 posts
Posted: Wednesday, April 15, 2020 - 05:49 AM UTC
Gabriel,
I've always had issues with photographing Yellow indoors. I'll have to work on it, or try natural light.
Gravity paint is literally as thin as water. My primer mix is almost as thin, so air brushing @ a flow rate of 16-18 psi has become my standard.
Tamiya acrylics cut I now also cut @ 2:3 but need to shoot it at no lower then 18 psi.
Joel
Joel_W
Joined: December 04, 2010
KitMaker: 11,666 posts
Auto Modeler: 2,974 posts
Posted: Wednesday, April 15, 2020 - 06:35 AM UTC
Gabriel,
I took another closer look at two restorations. Both have almost Identical Yellow Camel colors. I think I'm closer then I thought. What's your take on color match?
Joel
My painted body. The lighting is way to direct on the top for starters.
I took another closer look at two restorations. Both have almost Identical Yellow Camel colors. I think I'm closer then I thought. What's your take on color match?
Joel
My painted body. The lighting is way to direct on the top for starters.
Szmann
Joined: September 02, 2014
KitMaker: 1,977 posts
Auto Modeler: 1,371 posts
Posted: Wednesday, April 15, 2020 - 07:00 AM UTC
Joel, definitely they are very close as saturation and brightness. I feel yours it's lacking just a little of that underlying brownish-orangey shade (that I see it every day on my pack as well). But I'll say not to sweat over it - the clear will darken it anyhow and the dark colour of the decals will sharpen the contrast as well. You'll be gold - I bet!
Gabriel
Gabriel

Stickframe

#362
Joined: December 01, 2013
KitMaker: 1,661 posts
Auto Modeler: 431 posts

Posted: Wednesday, April 15, 2020 - 09:30 AM UTC
Hello model builders,
I'm making headway with the Mclaren GTR. Unlike many of you, I don't paint the body first, though it's tempting - looking good there Joel! I don't because I usually dryfit and modify along the way of the build. This often results in glue blobs, add on details, cut off parts, and scrapes, all of which needs to be cleaned off before I paint.
In the spirit of that, take a look. I think the body is about done. It has a removable nose and tail. First, all together, and what appears to be a predicable and clean fit:


and parts removed:


The front end was tricky, as there is a curved guide, used to hold the windshield in place, that's typically supposed to be glued under the bodywork. For this, I needed to mound it to the back portion of the body. As you might guess, there are no mounting points for this, so I used a combination of metal rods and evergreen - I don't want this to snap off, and it needs to be set in a specific location to retain the window. While I was at it, I filled some gaps that wouldn't otherwise be seen, and some mesh behind the front tires, on air ducts.
The rear was a challenge too, as I want the part to fit flush. I wound up using metal tubes and rods to make this work
Ok, stay well --
Nick
I'm making headway with the Mclaren GTR. Unlike many of you, I don't paint the body first, though it's tempting - looking good there Joel! I don't because I usually dryfit and modify along the way of the build. This often results in glue blobs, add on details, cut off parts, and scrapes, all of which needs to be cleaned off before I paint.
In the spirit of that, take a look. I think the body is about done. It has a removable nose and tail. First, all together, and what appears to be a predicable and clean fit:
and parts removed:
The front end was tricky, as there is a curved guide, used to hold the windshield in place, that's typically supposed to be glued under the bodywork. For this, I needed to mound it to the back portion of the body. As you might guess, there are no mounting points for this, so I used a combination of metal rods and evergreen - I don't want this to snap off, and it needs to be set in a specific location to retain the window. While I was at it, I filled some gaps that wouldn't otherwise be seen, and some mesh behind the front tires, on air ducts.
The rear was a challenge too, as I want the part to fit flush. I wound up using metal tubes and rods to make this work
Ok, stay well --
Nick
Joel_W
Joined: December 04, 2010
KitMaker: 11,666 posts
Auto Modeler: 2,974 posts
Posted: Wednesday, April 15, 2020 - 09:32 AM UTC
Gabriel
That's pretty much my thinking as well, plus the decals and solutions will change the color ever so slightly since I decal right on top of the paint.
Joel
That's pretty much my thinking as well, plus the decals and solutions will change the color ever so slightly since I decal right on top of the paint.
Joel
Joel_W
Joined: December 04, 2010
KitMaker: 11,666 posts
Auto Modeler: 2,974 posts
Posted: Wednesday, April 15, 2020 - 09:43 AM UTC
Nick,
Old habits are hard to break. I've had a few issues from painting and finishing the body shells 1st, but most of the time it turns out ok.
Your body shell really looks like it fits like a glove. Is the reason for the fabrication of mounts for the front and rear glass because you have both decks removable? I'm looking forward to seeing how this all pans out.
Joel

forest1000

Joined: December 14, 2014
KitMaker: 80 posts
Auto Modeler: 44 posts

Posted: Wednesday, April 15, 2020 - 09:51 AM UTC
Quoted Text
Gabriel
That's pretty much my thinking as well, plus the decals and solutions will change the color ever so slightly since I decal right on top of the paint.
Joel
I think you two are spot on about the colour. It's pretty difficult to find the colour you're satisfied with, especially with yellow and white.
I've two kits with a similar situation. An Audi A4 DTM and Penzoil Nissan. Both yellow, that have been sitting because finding an acceptable yellow is a rabbit hole. I did find a yellow I really like but it's for AMG cars called Solarbeam Yellow, a two-part paint made by Splash Paints. I thought it was pretty good for Camel Yellow, too, after I revisited it with your issues.
Anyway, I'm faced with the blue and white choices and situation for the Villeneuve Williams Renault for this group build. Again, I'll probably chose what looks right to my eye.
Joel_W
Joined: December 04, 2010
KitMaker: 11,666 posts
Auto Modeler: 2,974 posts
Posted: Wednesday, April 15, 2020 - 10:46 AM UTC
David,
Boy do I hear ya on color choices. One of the reasons I really like Gravity, Zero,& MCW paints is that all their paints are car specific. In the case of the Camel Yellow for the Lotus, it's by Gravity. I do wonder just how the Zero paint would match up?
Joel
Boy do I hear ya on color choices. One of the reasons I really like Gravity, Zero,& MCW paints is that all their paints are car specific. In the case of the Camel Yellow for the Lotus, it's by Gravity. I do wonder just how the Zero paint would match up?
Joel
forest1000
Joined: December 14, 2014
KitMaker: 80 posts
Auto Modeler: 44 posts
Posted: Wednesday, April 15, 2020 - 11:49 AM UTC
Quoted Text
David,
Boy do I hear ya on color choices. One of the reasons I really like Gravity, Zero,& MCW paints is that all their paints are car specific. In the case of the Camel Yellow for the Lotus, it's by Gravity. I do wonder just how the Zero paint would match up?
Joel
I think it would be interesting to do that sort of colour study, too. It's the presentation that would let you down because of different monitors etc., even if they were represented by CMYK values. Like the artwork I'm doing for Goodyear tire logos, their yellow is easy to make with the company's CMYK values, however, once printed, you're subject to the printers abilities, too. Horseshoes and hand grenades.
AussieReg
#007
Joined: June 09, 2009
KitMaker: 8,156 posts
Auto Modeler: 2,953 posts
Posted: Wednesday, April 15, 2020 - 07:30 PM UTC
Joel, very nice work on the colour coat, as the others have said already yellow is an unforgiving colour to work with! I think that a combination of decals, clear coat and dark trims and wheels will make this really close to the original!
Gabriel, great to see your NASCAR on its feet! Looking good.
Nick, the McLaren really is an evil looking body in black! Your modifications are coming along very well indeed!
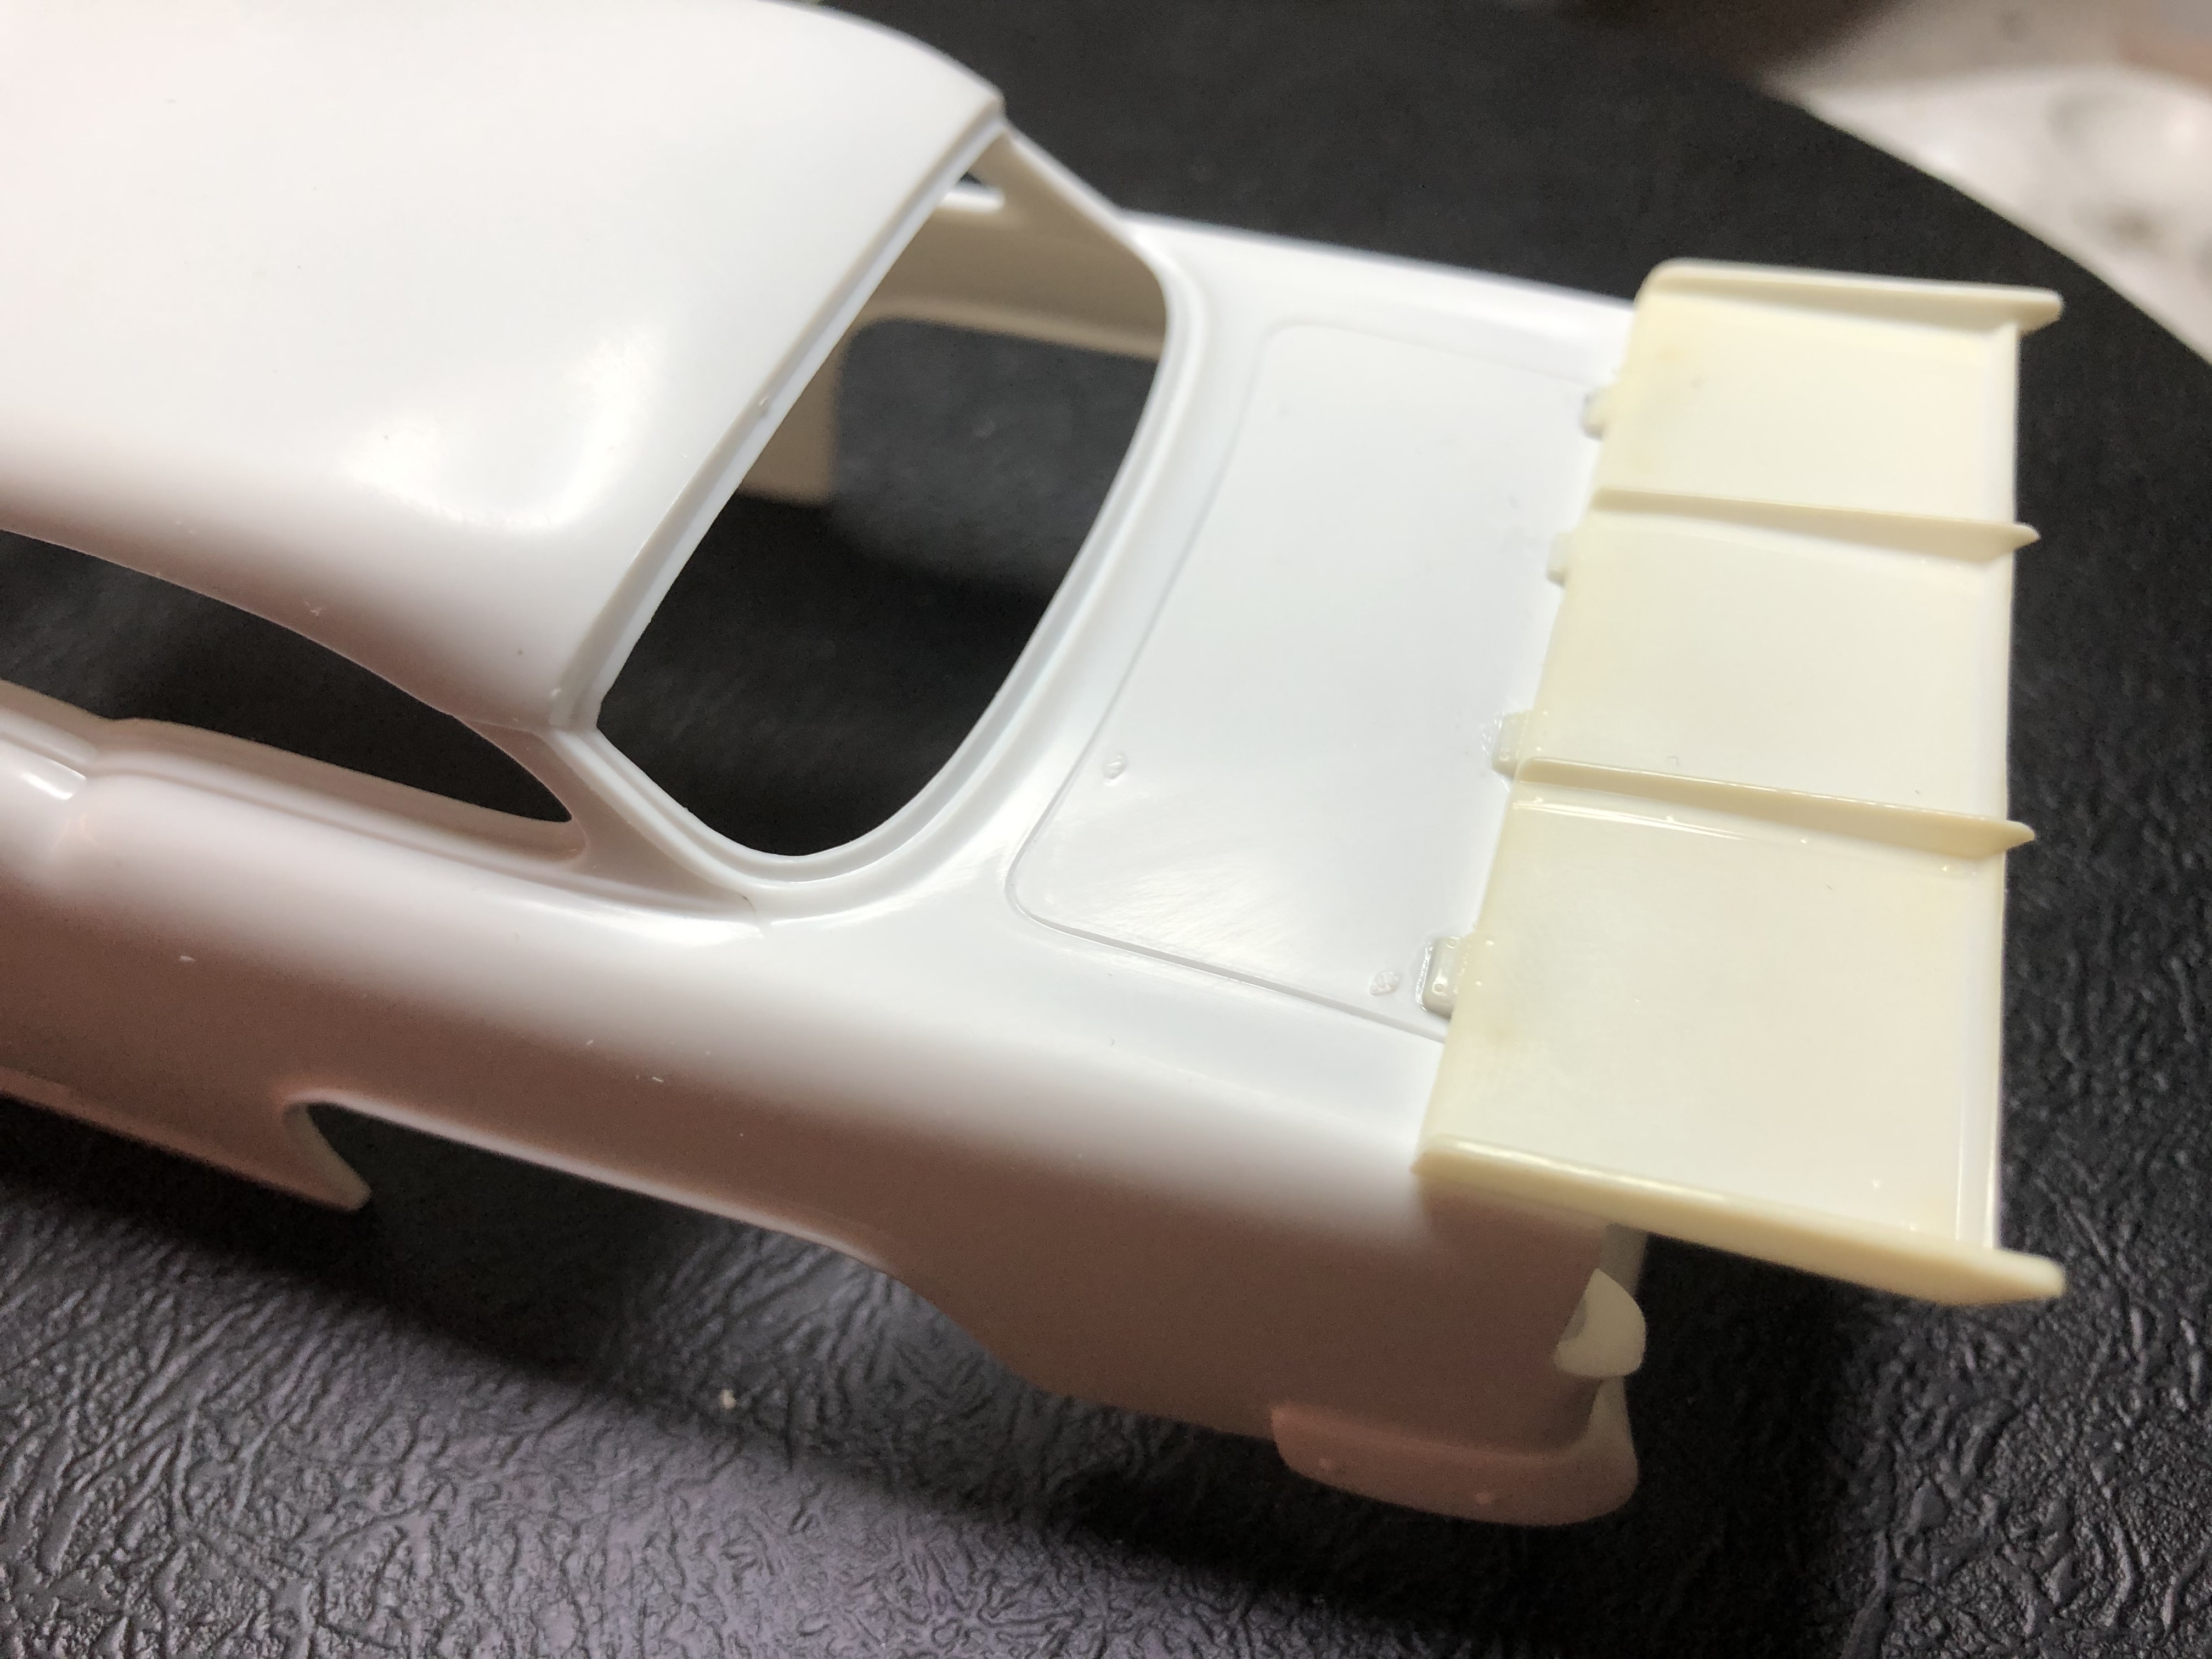
Grabbing a little time here and there on my build, I got the spoiler cemented in place nicely. Only minor work was needed to widen out the outer two mounting points on the body to line them up with the lugs on the spoiler. There was a very fine resulting gap that I filled by putting a drop of sprue-goo into the hole from underneath the body and "wicking" it up to the top using a fine brush dipped in TET. The spoiler was supplied on the chrome sprue in the kit, and the chrome was really nice on it. It is a shame that I had to strip it because all of the reference images I can find show the spoiler is white like the body.
A little more tidy up to do on the body then primer time.
Cheers, D
Gabriel, great to see your NASCAR on its feet! Looking good.
Nick, the McLaren really is an evil looking body in black! Your modifications are coming along very well indeed!
Grabbing a little time here and there on my build, I got the spoiler cemented in place nicely. Only minor work was needed to widen out the outer two mounting points on the body to line them up with the lugs on the spoiler. There was a very fine resulting gap that I filled by putting a drop of sprue-goo into the hole from underneath the body and "wicking" it up to the top using a fine brush dipped in TET. The spoiler was supplied on the chrome sprue in the kit, and the chrome was really nice on it. It is a shame that I had to strip it because all of the reference images I can find show the spoiler is white like the body.
A little more tidy up to do on the body then primer time.
Cheers, D
Joel_W
Joined: December 04, 2010
KitMaker: 11,666 posts
Auto Modeler: 2,974 posts
Posted: Thursday, April 16, 2020 - 12:42 AM UTC
D,
Thanks for checking out the base Camel Yellow paint. The more I look at the pictures compared to in person, the lighting is playing all kinds of tricks. I guess I'll get use to it as the next step is a little love with some 8,000 & 12,000 so decaling can start soon.
Gabriel,
Tony Stewart would certainly approve of how the body looks decaled and glossed. [ ]
Joel
Szmann
Joined: September 02, 2014
KitMaker: 1,977 posts
Auto Modeler: 1,371 posts
Posted: Thursday, April 16, 2020 - 03:15 PM UTC
Thanks, Damian! Yes - and that's the feeble point. I was till to lazy to even attempt to print decals I found online - a whole sheet for under 10 USD - both yellow and white - but these times are not the best ones to shop around
Joel, yes, I've nailed it this time with my 2K. Please see the update.
UPDATE
The last two pieces which I almost forgot of - thankfully I had another look on the instructions before closing the case - the fuel filler pipe and the fuel hose were added. Removing the seams and polishing contorted clear parts it's exactly as exciting as it sounds like. Equally pleasing it's to paint straight silver lines on round clear parts. The fuel hose I painted orange for not having transparent yellow nor being kin to make some. Fortunately it's orange not green, otherwise Tony Stewart would have driven the only Diesel car in NASCAR.

Polishing the body ate my modelling time today, but it was sort of pleasant, because it worked! It's only now that I've noticed that 2 component Splash 2K it's softer than 3 component No Name 2K. The glossy surface broke very easy with 1000 Tamiya sanding sponge, then I jumped straight to 3000 grit. All worked, even the three compounds from Tamiya. Probably one of my best finishes of late, although I've ran into Joel's problem: I forgot how to photograph orange If I catch the glare, I cannot catch the hue... oh, well, tomorrow I'm going to play more with the settings. For now, the nearly completed build, before waxing because I need to clean again the windows and to touch up the white roof rails:


Cheers!
Gabriel
I found online - a whole sheet for under 10 USD - both yellow and white - but these times are not the best ones to shop around Joel, yes, I've nailed it this time with my 2K. Please see the update.
UPDATE
The last two pieces which I almost forgot of - thankfully I had another look on the instructions before closing the case - the fuel filler pipe and the fuel hose were added. Removing the seams and polishing contorted clear parts it's exactly as exciting as it sounds like. Equally pleasing it's to paint straight silver lines on round clear parts. The fuel hose I painted orange for not having transparent yellow nor being kin to make some. Fortunately it's orange not green, otherwise Tony Stewart would have driven the only Diesel car in NASCAR.
Polishing the body ate my modelling time today, but it was sort of pleasant, because it worked! It's only now that I've noticed that 2 component Splash 2K it's softer than 3 component No Name 2K. The glossy surface broke very easy with 1000 Tamiya sanding sponge, then I jumped straight to 3000 grit. All worked, even the three compounds from Tamiya. Probably one of my best finishes of late, although I've ran into Joel's problem: I forgot how to photograph orange
If I catch the glare, I cannot catch the hue... oh, well, tomorrow I'm going to play more with the settings. For now, the nearly completed build, before waxing because I need to clean again the windows and to touch up the white roof rails:Cheers!
Gabriel
Joel_W
Joined: December 04, 2010
KitMaker: 11,666 posts
Auto Modeler: 2,974 posts
Posted: Friday, April 17, 2020 - 12:49 AM UTC
Gabriel,
Just a super impressive finish so far. With the waxing next, it should be outstanding to say the least.
Nice save on the fuel system lines. The metal one goes from the fender where the fuel enters via those huge handheld containers down that pipe into the tank. The other line is the over flow line as you usually see fuel coming out of it as the car is pulling out of the pits. The color is actually pretty darn close to what those lines look like after fuel stains them.
Joel
Szmann
Joined: September 02, 2014
KitMaker: 1,977 posts
Auto Modeler: 1,371 posts
Posted: Friday, April 17, 2020 - 10:32 AM UTC
Quoted Text
Gabriel,
Just a super impressive finish so far. With the waxing next, it should be outstanding to say the least.
Nice save on the fuel system lines. The metal one goes from the fender where the fuel enters via those huge handheld containers down that pipe into the tank. The other line is the over flow line as you usually see fuel coming out of it as the car is pulling out of the pits. The color is actually pretty darn close to what those lines look like after fuel stains them.
Joel
Thanks, Joel! Yes, the finish isn't bad, but has imperfections. More I watched the pictures, more of these I found. There was still some orange peel on the black areas and I couldn't really clean my windows properly.
DOWNDATE
Well, one of these days when nothing works. I inspected the model today with fresh eyes and I couldn't pass over the cloudy windows, nor over the orange peel on the pillars. I dismantled the windows to clean them properly - even if that means to re-paint them and I sanded down the pillars with 1000 and 3000 grit - I still need to use the Tamiya compounds over but I completely lost my mojo because...
I try to do the Goodyear decals and I realized I'm out of decal paper. With the current situation, I'm not going to buy any soon and this build will go like that. Unfortunately.
There some good news there though - see What the postman brought today thread...
Gabriel
AussieReg
#007
Joined: June 09, 2009
KitMaker: 8,156 posts
Auto Modeler: 2,953 posts
Posted: Friday, April 17, 2020 - 11:17 AM UTC
Hi Gabriel. I'm sorry that you had to take a couple of steps backwards so close to the finish, but it is best to do that rather than look at the "finished" build knowing that you left things that you are unhappy with, and you have the skills to fix.
Cheers, D
Cheers, D
Stickframe
#362
Joined: December 01, 2013
KitMaker: 1,661 posts
Auto Modeler: 431 posts
Posted: Friday, April 17, 2020 - 02:38 PM UTC
Hi guys,
Gabriel too bad to hear about your headaches, but I do understand - the nagging "little" problem, that you just need to repair, turning into a big one. I'm sure you'll get it up to speed.
I'm making progress with the GTR - the rolling chassis is about done - built and painted, and to Gabriel's point, there are a few things I'll fix - for now though:

As you can see, I've been mixing subtle colors, and added some carbon fiber decal. I like the contrast in color -

Same story in the rear, adding bits and colors as I go. I added heat shields between the pipes and body.


As you might recall the nose and tail of this car are removable, so I added some detail not provided in the kit. I've already carved the rear wheel openings so the tires no longer rub.
And, Joel, you asked about the window frame I previously described attaching, so, here's what I meant:

You can see, this part is the retainer for the front window, but in the kit, it is attached under the hood, and not on the car body. But, for my build, I'm making the front/hood removable, so, I attached it. The locating points are not very big, so the connection needed to beefed up. As I've mentioned in other posts, I have a long history of doing modifications like this, then promptly knocking them off - so, for this, I inserted and glued metal pins and then built a subframe out of evergreen to keep this in place.
Stay well -
Cheers
Nick
Gabriel too bad to hear about your headaches, but I do understand - the nagging "little" problem, that you just need to repair, turning into a big one. I'm sure you'll get it up to speed.
I'm making progress with the GTR - the rolling chassis is about done - built and painted, and to Gabriel's point, there are a few things I'll fix - for now though:
As you can see, I've been mixing subtle colors, and added some carbon fiber decal. I like the contrast in color -
Same story in the rear, adding bits and colors as I go. I added heat shields between the pipes and body.
As you might recall the nose and tail of this car are removable, so I added some detail not provided in the kit. I've already carved the rear wheel openings so the tires no longer rub.
And, Joel, you asked about the window frame I previously described attaching, so, here's what I meant:
You can see, this part is the retainer for the front window, but in the kit, it is attached under the hood, and not on the car body. But, for my build, I'm making the front/hood removable, so, I attached it. The locating points are not very big, so the connection needed to beefed up. As I've mentioned in other posts, I have a long history of doing modifications like this, then promptly knocking them off - so, for this, I inserted and glued metal pins and then built a subframe out of evergreen to keep this in place.
Stay well -
Cheers
Nick
Joel_W
Joined: December 04, 2010
KitMaker: 11,666 posts
Auto Modeler: 2,974 posts
Posted: Saturday, April 18, 2020 - 01:31 AM UTC
Gabriel,
Sorry to hear that you've run into those last details, especially needing to make some new decals but you are out of clear decal paper. Hopefully, things will start to be getting better, and ordering some needed supplies will become easier.
Joel
Sorry to hear that you've run into those last details, especially needing to make some new decals but you are out of clear decal paper. Hopefully, things will start to be getting better, and ordering some needed supplies will become easier.
Joel
Joel_W
Joined: December 04, 2010
KitMaker: 11,666 posts
Auto Modeler: 2,974 posts
Posted: Saturday, April 18, 2020 - 01:36 AM UTC
Nick,
Excellent progress on the rolling chassis. I do like the various colors to simulate different CF applications, as that's the way I'm going with the Lotus. I do have one sheet of CF that I also might use, but I'm really not a big fan as they all look out of scale to me.
The primer coat really looks quite good. And thanks for posting that picture with the windshield support. You've certainly gone the extra mile on this kit.
Joel
Szmann
Joined: September 02, 2014
KitMaker: 1,977 posts
Auto Modeler: 1,371 posts
Posted: Saturday, April 18, 2020 - 03:55 PM UTC
Damian, I knew they are to haunt me after, and better this way...
Nick, the whole assembly looks terrific, and I like the CF integration as your mods as well. Looking impressive from all angles so far...
Thanks, Joel. Yes, I'm not declaring this build close as yet - I still have time to address the situation with decals in the following months.
As for the windows, I sank them since this morning in a bath of Windex to remove all the paint and Pledge, because I couldn't tell anymore where were scratches from plastic and where scratches on the pledge coat. It's about time to take them out and start all over again.
Gabriel
Joel_W
Joined: December 04, 2010
KitMaker: 11,666 posts
Auto Modeler: 2,974 posts
Posted: Sunday, April 19, 2020 - 12:59 AM UTC
Gabriel,
I've got 100% complete confidence in you to get it across the finish line with time to spare.
Joel
I've got 100% complete confidence in you to get it across the finish line with time to spare.
Joel
 |

WEB HOSTING BY


Copyright ©2021 Auto Modeler and Kitmaker Network, a subsidiary of Silver Star Enterprises
All Rights Reserved. Please read our Conditions of Use and Privacy Policy.
All Rights Reserved. Please read our Conditions of Use and Privacy Policy.