

Go to automodeler.com for the current dynamic site!


The Garage
For general automotive modeling or non-modeling topics.
For general automotive modeling or non-modeling topics.
Hosted by Jim Starkweather
Strip, Track & Trail Official Build Thread

rv1963

Joined: December 07, 2004
KitMaker: 1,888 posts
Auto Modeler: 806 posts

Posted: Saturday, April 11, 2020 - 12:01 PM UTC
Thanks Gabriel.

Dixon66
Joined: December 12, 2002
KitMaker: 1,500 posts
Auto Modeler: 645 posts

Posted: Saturday, April 11, 2020 - 01:01 PM UTC
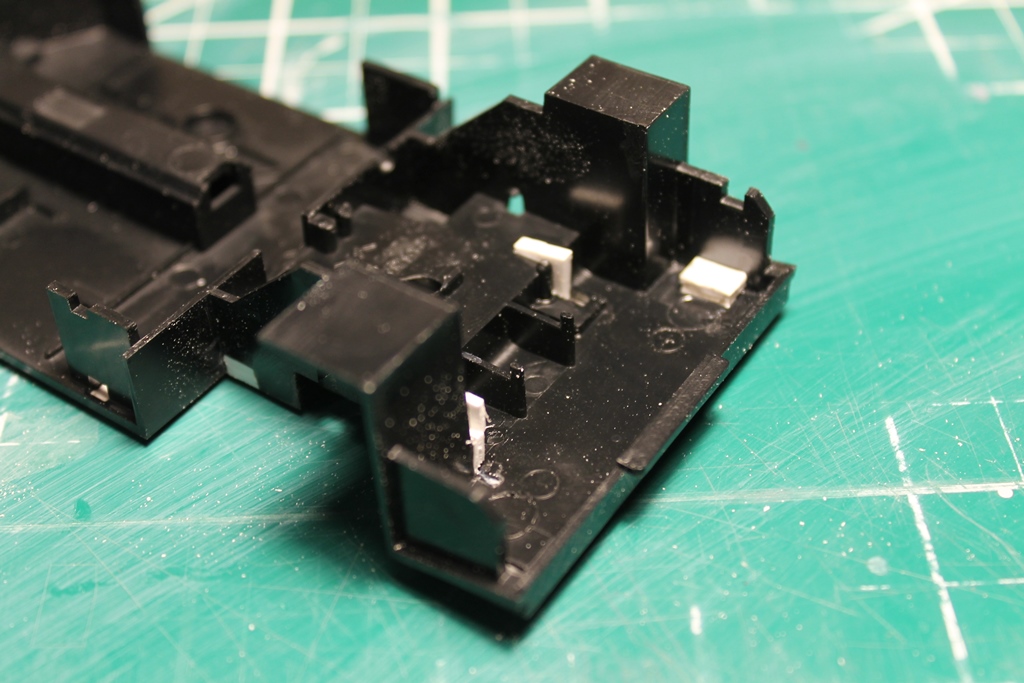
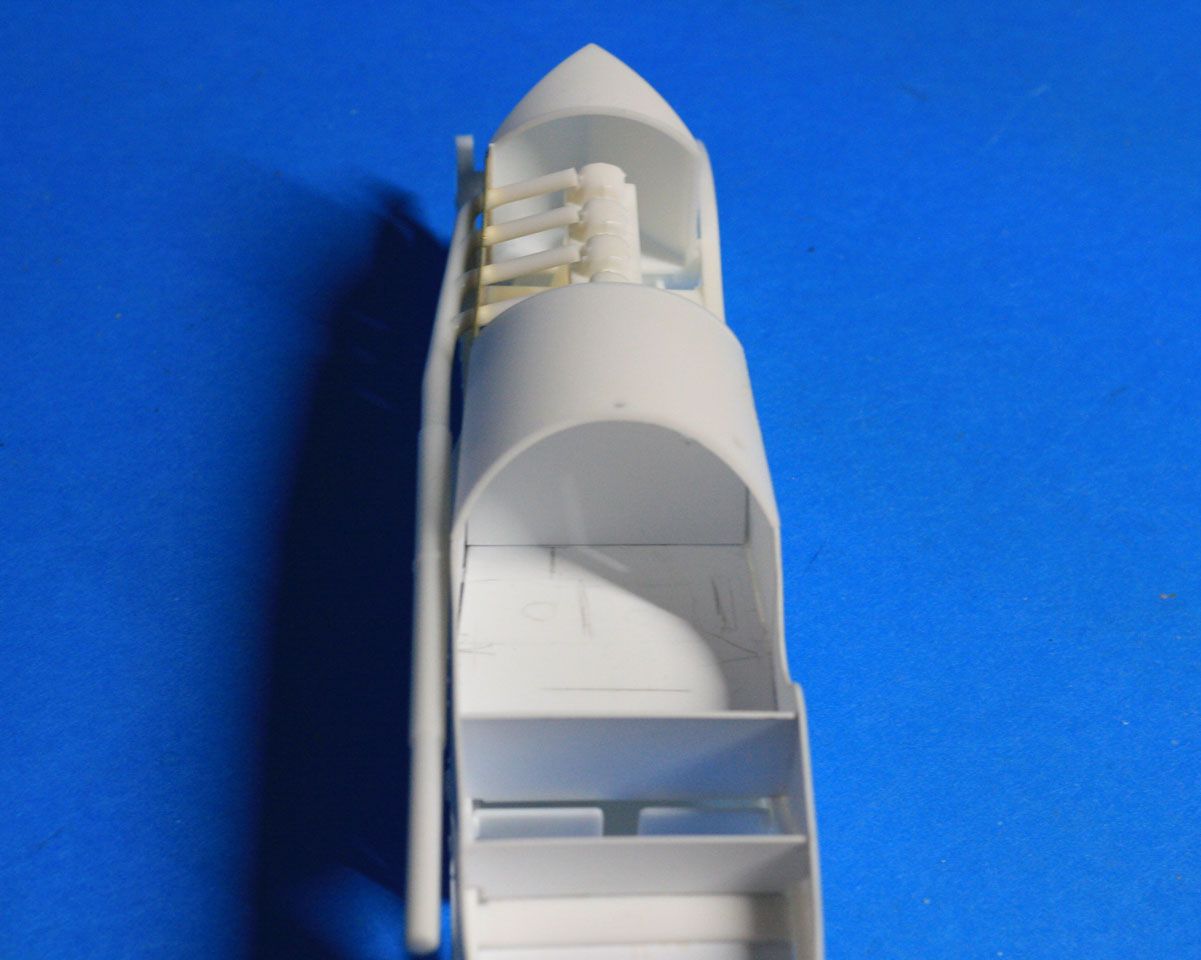
Not much of an update from me. The Tamiya Capri molds were born in 1979 and as such were also born as motorized. Started filling the motorization holes and slots in the chassis pan. won't be perfect, but will be better than huge holes.
Other than working on that, I filled some seatbelt slots in the seat that are in the wrong location and opened up new ones in a more appropriate location in the side.
The interior roll cage structure is lacking anything forward of the main hoop. I'm going to try to scratch the forward bars. .080" seems to match the Tamiya one pretty well.

AussieReg

#007

Joined: June 09, 2009
KitMaker: 8,156 posts
Auto Modeler: 2,953 posts

Posted: Saturday, April 11, 2020 - 10:15 PM UTC
Vale Stirling Moss, a true icon and legend of the racing community.


Dixon66
Joined: December 12, 2002
KitMaker: 1,500 posts
Auto Modeler: 645 posts
Posted: Saturday, April 11, 2020 - 10:37 PM UTC
Quoted Text
Vale Stirling Moss, a true icon and legend of the racing community.
Had just seen that. RIP

RedwingNev

Joined: February 07, 2004
KitMaker: 911 posts
Auto Modeler: 28 posts

Posted: Saturday, April 11, 2020 - 10:44 PM UTC
Yes, sad news, an absolute motorsport legend.

Joel_W
Joined: December 04, 2010
KitMaker: 11,666 posts
Auto Modeler: 2,974 posts

Posted: Sunday, April 12, 2020 - 01:09 AM UTC
David,
I'm looking forward to how your over coming all that motorized concessions to accuracy was handled. I tried with the Tamiya 1/18 scale Lola T160, and gave up after a while out of pure frustration.
Joel
I'm looking forward to how your over coming all that motorized concessions to accuracy was handled. I tried with the Tamiya 1/18 scale Lola T160, and gave up after a while out of pure frustration.
Joel

Joel_W
Joined: December 04, 2010
KitMaker: 11,666 posts
Auto Modeler: 2,974 posts
Posted: Sunday, April 12, 2020 - 01:14 AM UTC
Just saw the news that one of the original Road Racing Icons, Sterling Moss passed this morning @ 90 years of age. May he rest in peace.
For racing fans of my generation, he'll always be remembered, and never forgotten for his brilliance on the track.
Joel
For racing fans of my generation, he'll always be remembered, and never forgotten for his brilliance on the track.
Joel
Dixon66
Joined: December 12, 2002
KitMaker: 1,500 posts
Auto Modeler: 645 posts
Posted: Sunday, April 12, 2020 - 01:23 AM UTC
Quoted Text
David,
I'm looking forward to how your over coming all that motorized concessions to accuracy was handled. I tried with the Tamiya 1/18 scale Lola T160, and gave up after a while out of pure frustration.
Joel
I think I'm just going to plug the holes and such. I'm not going to try to go super accurate, just nothing opened up. The area around the fuel cell has some complex curves that I'll try to sand in once all the TET has set up. I figure I'll be losing the little rivet detail there is, may or may not try to bring it back.
There will be some artistic license on the interior as well.
Dixon66
Joined: December 12, 2002
KitMaker: 1,500 posts
Auto Modeler: 645 posts
Posted: Sunday, April 12, 2020 - 10:03 AM UTC
Update, while waiting for the dull coat on the A-Wing to dry I got some work done plugging the holes in the chassis. The inside is ugly and hidden under the fuel cell.

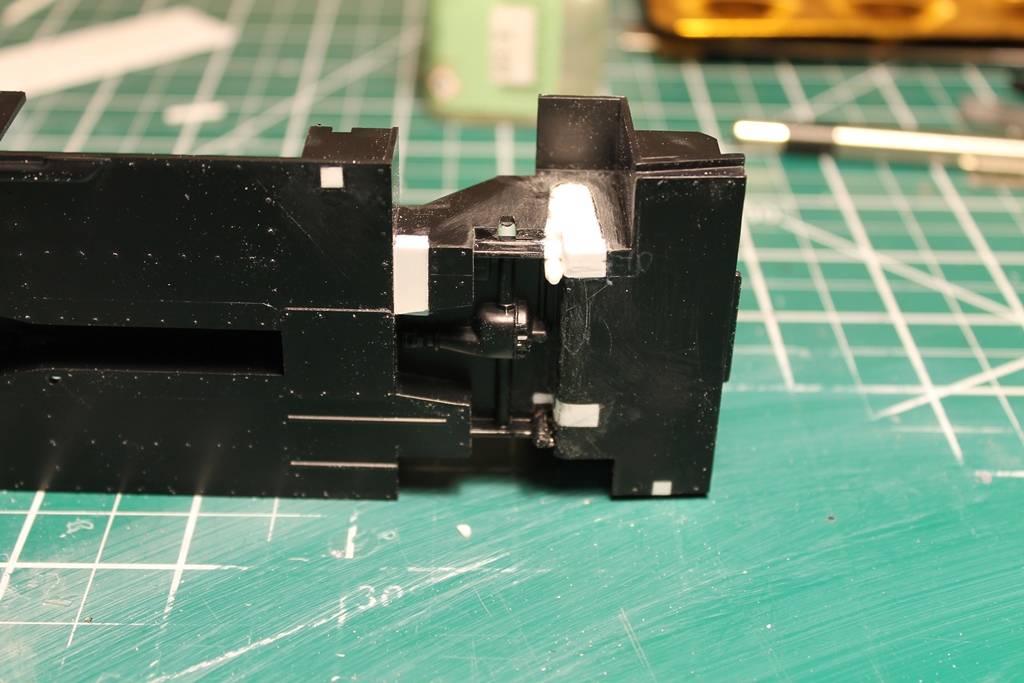
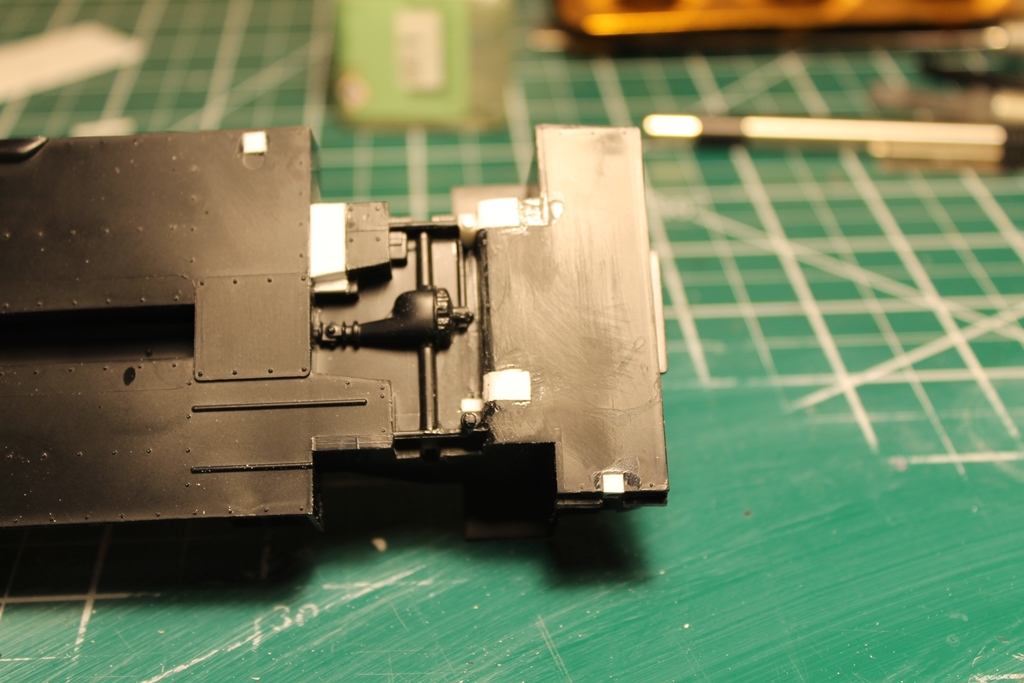
Inspired by Nick, I had a go at scratching some ductwork. I stripped down some wire and found some that was around .020 thick. I wrapped that around some .100 rod and then wrapped that with some old BMF scrap.
Inspired by Nick, I had a go at scratching some ductwork. I stripped down some wire and found some that was around .020 thick. I wrapped that around some .100 rod and then wrapped that with some old BMF scrap.

Szmann

Joined: September 02, 2014
KitMaker: 1,977 posts
Auto Modeler: 1,371 posts
Posted: Sunday, April 12, 2020 - 10:39 AM UTC
David, you're doing well. The model you're building now rivalize with my recently finished Ferrari in term of quality: not very pleasant. KUTGW!
UPDATE
Eventually the paint on my Chevy was dry today and I could sand it down. Not much work, just the "normal" pimples to pe flattened. After which I masked the body to paint the black trim:

The lower sections of the body ant the pillars painted:

I used Vallejo Air RLM66 because in case of seepage it is easy to rub it out from enamel surface with some alcohol

With the acrylic paint touch-dry I went in a four hour decalling session. No particular problem encountered here, just the usual drill with Micro Set and Micro Sol:


I need to further touch up the paint, paint the windows frames then I am ready for 2K.
Cheers!
Gabriel
UPDATE
Eventually the paint on my Chevy was dry today and I could sand it down. Not much work, just the "normal" pimples to pe flattened. After which I masked the body to paint the black trim:
The lower sections of the body ant the pillars painted:
I used Vallejo Air RLM66 because in case of seepage it is easy to rub it out from enamel surface with some alcohol
With the acrylic paint touch-dry I went in a four hour decalling session. No particular problem encountered here, just the usual drill with Micro Set and Micro Sol:
I need to further touch up the paint, paint the windows frames then I am ready for 2K.
Cheers!
Gabriel
rv1963
Joined: December 07, 2004
KitMaker: 1,888 posts
Auto Modeler: 806 posts
Posted: Sunday, April 12, 2020 - 10:52 AM UTC
Nice start David, Great paint work and decals Gabriel.
Dixon66
Joined: December 12, 2002
KitMaker: 1,500 posts
Auto Modeler: 645 posts
Posted: Sunday, April 12, 2020 - 02:05 PM UTC
Thanks Gabriel, at least this one has the excuse of being from an age 40 years ago.
Thanks Robert.
One note is the removed section of the molded in Watts Link. I'm going to add a .040 rod to complete the assy. For those that don't know, the Panhard bar keeps an axle centered on a non triangulated four link making it a 5 link. The Watts Link style goes one step further in that it has a bar on each side attached to a swiveling link in the middle that forces the axle to stay centered where a Panhard bar causes the axle to move slightly side to side as the suspension cycles.
Quoted Text
Nice start David, Great paint work and decals Gabriel.
Thanks Robert.
One note is the removed section of the molded in Watts Link. I'm going to add a .040 rod to complete the assy. For those that don't know, the Panhard bar keeps an axle centered on a non triangulated four link making it a 5 link. The Watts Link style goes one step further in that it has a bar on each side attached to a swiveling link in the middle that forces the axle to stay centered where a Panhard bar causes the axle to move slightly side to side as the suspension cycles.

Stickframe

#362
Joined: December 01, 2013
KitMaker: 1,661 posts
Auto Modeler: 431 posts

Posted: Sunday, April 12, 2020 - 02:49 PM UTC
Hi guys,
David, I really like the trick for the flex tube - neat idea. I'm looking forward to seeing you build up the rear end! I guess having a kit that's basically light on detail, but generally right/correct gives you a nice base to do what you want - cool, and as long as you're patching all the gaps, why not keep going?
Gabriel, nice paint as always but man, you're flying through this!
I painted up the engine bay, and while I had some fun picking materials - using foil around sensor wires coming from exhaust, and textured foil (from a San Pelligrino soda can lid), for heat protection, this isn't my favorite looking engine bay (the Nissan R390 GT1, or Toyota GT-One TS020 bays for example "look" great, even in 1/24). Clearly it was effective, despite my critique!!
OK, take a look:


The monocoque on this car and lots of other parts are carbon fiber. The kit comes with a few decals of this, but not many. So instead of trying to cobble something together using sheets of fiber decal, I decided to try colors and washes to get a similar look. I'm basically happy with the results.
Ok, keep building guys
Cheers
Nick
David, I really like the trick for the flex tube - neat idea. I'm looking forward to seeing you build up the rear end! I guess having a kit that's basically light on detail, but generally right/correct gives you a nice base to do what you want - cool, and as long as you're patching all the gaps, why not keep going?
Gabriel, nice paint as always but man, you're flying through this!
I painted up the engine bay, and while I had some fun picking materials - using foil around sensor wires coming from exhaust, and textured foil (from a San Pelligrino soda can lid), for heat protection, this isn't my favorite looking engine bay (the Nissan R390 GT1, or Toyota GT-One TS020 bays for example "look" great, even in 1/24). Clearly it was effective, despite my critique!!
OK, take a look:
The monocoque on this car and lots of other parts are carbon fiber. The kit comes with a few decals of this, but not many. So instead of trying to cobble something together using sheets of fiber decal, I decided to try colors and washes to get a similar look. I'm basically happy with the results.
Ok, keep building guys
Cheers
Nick
Szmann
Joined: September 02, 2014
KitMaker: 1,977 posts
Auto Modeler: 1,371 posts
Posted: Sunday, April 12, 2020 - 11:30 PM UTC
Thanks, Robert!
Nick, beautiful detailing in the engine bay! Yes, one of the contestants in TCC it's building just now a Nissan 390 by Tamiya and the engine it's a gem!
I was just talking with somebody about the best method to replicate CF by painting and we assessed that perhaps the best way it's Tamiya smoke over a metallic colour - gunmetal, silver, pale gold or dark copper - depending on the effect and kind of CF you're after.
Gabriel
AussieReg
#007
Joined: June 09, 2009
KitMaker: 8,156 posts
Auto Modeler: 2,953 posts
Posted: Monday, April 13, 2020 - 12:38 AM UTC
You guys are absolutely smashing this! I've hardly had a chance to touch mine, but I'm loving watching the work going on here. I will just survive vicariously through you all for a while!
Running update on builds
12 days in, already almost 2800 views and over 180 posts
19 enlisted (plus 1, Jesper sign in please mate!)
12 builds in progress
Aussiereg (Damian) - STRAIGHTLINE - '55 Chev Pro Sportsman (Charles Carpenter) - 1/25 Revell kit - Parts clean-up and sub assemblies
Joel_W (Joel) - FORMULA 1 - Lotus 99T Honda (Ayrton Senna 1987) - 1/20 Tamiya kit - Body work commenced
Joel_W (Joel) - INDY - enlisted - Lola T-8800 Newman Haas (Mario Andretti 1988) - 1/25 AMT kit
Dixon66 (David) - ENDURANCE GROUP 5[/b] - Zakspeed Capri - 1/24 Tamiya kit - Paint on order, repairs, mods and scratch detailing under way
tinbanger (Richard) - GRAND PRIX - 1914 Mercedes Racer - 1/16 Lindberg kit - Engine and chassis started, major panel works under way, custom milled wheels/tyres started
md72 (Mark) - INDY - enlisted - Target Reynard (Jimmy Vasser) - 1/25 Revell kit
Szmann (Gabriel) - NASCAR - Chev Monte Carlo (Tony Stewart) - 1/25 AMT/ERTL kit - Main assembly completed, body decalled ready for clear
Szmann (Gabriel) - NASCAR - Pontiac Grand Prix (Kyle Petty) - 1/24 Revell/Monogram kit - Floor pan primed, engine assembled and painted, body painted
Hwa-Rang (Jesper) - NASCAR - (TBA)
PasiAhopelto (Pasi) - NASCAR - enlisted - Olds 442 (Donnie Allison) - 1/25 Salvinos JR kit
forest1000 (David) - FORMULA 1 - enlisted - Williams Renault (Jaques Villeneuve) - 1/24 Revell/Monogram kit
jimb (Jim) - STRAIGHTLINE - '57 Ford Sedan Gasser - Engine, chassis, wheels completed and interior assembled
Cosimodo (Michael) - ENDURANCE - enlisted - 1971 Porsche 917/20
bluebell914 (Patrick) - ENDURANCE - enlisted - Ferrari P4 or 512S
2002hummer (Darrell) - GRAND PRIX - enlisted - Lotus Super Seven (Tamiya)
TacFireGuru (Mike) - NASCAR - enlisted - Chev Monte Carlo (Home Depot)
Stickframe (Nick) - ENDURANCE - McLaren F1 GTR Longtail - 1/24 Aoshima kit - Body surgery and scratch detail mania commenced
Lakota (Don) - ENDURANCE - Corvette C7.R - 1/25 Revell kit - Engine assembled, floor pan/chassis under way
RedwingNev (Neil) - GRAND PRIX - enlisted - Lotus 79 (1978 Mario Andretti?) - 1/20 Tamiya kit
rv1963 (Robert) - STRAIGHTLINE - '37 Chevy Gasser - 1/25 AMT kit- Engine detailing, 3D printed & custom milled parts
heavyjagdpanzer (Bill) - STRAIGHTLINE - Blue Max Funny Car - 1/25 Revell kit - Engine and Cage completed
bmwh548 (Radu) - RALLY - '99 WRC Subaru Impreza - 1/24 Tamiya kit - Wheels and tyres
If anybody has firmed up their proposed builds, or spotted anything wrong in the list, please let me know.
Cheers, D
Joel_W
Joined: December 04, 2010
KitMaker: 11,666 posts
Auto Modeler: 2,974 posts
Posted: Monday, April 13, 2020 - 02:07 AM UTC
David,
You're doing a great job on plugging all those holes. As long as nothing will show, that's the main thing.
I'm really impressed with how you made that duct work. Another tool for my work bag when needed.
Joel
You're doing a great job on plugging all those holes. As long as nothing will show, that's the main thing.
I'm really impressed with how you made that duct work. Another tool for my work bag when needed.
Joel
Joel_W
Joined: December 04, 2010
KitMaker: 11,666 posts
Auto Modeler: 2,974 posts
Posted: Monday, April 13, 2020 - 02:12 AM UTC
Gabriel,
The black trim came out perfect, very nicely done. And the decals look great. Sure looks like they aged extremely well.
I'm sure that Stewart would approve.
Joel
The black trim came out perfect, very nicely done. And the decals look great. Sure looks like they aged extremely well.
I'm sure that Stewart would approve.
Joel
Joel_W
Joined: December 04, 2010
KitMaker: 11,666 posts
Auto Modeler: 2,974 posts
Posted: Monday, April 13, 2020 - 02:18 AM UTC
Nick,
As I said, I'm following your build very closely, as I like your methods and theory of detailing. To me, the combination of so many various colors both paint and parts really makes the engine compartment come alive.
For what it's worth, my theory about CF decaling is basically the same as yours. I rather use various shades of paint. I've even got a CF colored paint from Gravity that I'm going to be trying.
I'm going to post some pictures in my Lotus Honda build when I get to the engine and chassis part of the build where the real car's CF looks just like shades of gray until you get very close. As we scale down in size to 1/24 scale, that becomes very evident of the out of scale effect on many of the decals.
Joel
Joel_W
Joined: December 04, 2010
KitMaker: 11,666 posts
Auto Modeler: 2,974 posts
Posted: Monday, April 13, 2020 - 02:20 AM UTC
D,
Those numbers continue to be more and more impressive. As usual, thanks for keeping all those stats up to date.
Joel
Those numbers continue to be more and more impressive. As usual, thanks for keeping all those stats up to date.
Joel

jimb
Joined: August 25, 2006
KitMaker: 2,539 posts
Auto Modeler: 1,405 posts

Posted: Monday, April 13, 2020 - 02:32 AM UTC
Gabriel, your NASCAR is looking great. Very nice paint & decal work.
Nick, that engine bay looks amazing. Fantastic detailing.
Jim
Nick, that engine bay looks amazing. Fantastic detailing.
Jim
rv1963
Joined: December 07, 2004
KitMaker: 1,888 posts
Auto Modeler: 806 posts
Posted: Monday, April 13, 2020 - 03:12 AM UTC
Well done Nick, knew it would look great in paint.
Dixon66
Joined: December 12, 2002
KitMaker: 1,500 posts
Auto Modeler: 645 posts
Posted: Monday, April 13, 2020 - 03:57 AM UTC
Thanks Joel.
Nick, damn, I've run out of words for your builds.
Gabriel, both your NASCAR builds look great.
Looking forward to seeing more of everyone's builds.
Nick, damn, I've run out of words for your builds.
Gabriel, both your NASCAR builds look great.
Looking forward to seeing more of everyone's builds.
Szmann
Joined: September 02, 2014
KitMaker: 1,977 posts
Auto Modeler: 1,371 posts
Posted: Monday, April 13, 2020 - 07:00 AM UTC
Quoted Text
Gabriel,
The black trim came out perfect, very nicely done. And the decals look great. Sure looks like they aged extremely well.
I'm sure that Stewart would approve.
Joel
Thanks, Joel! The trim was a little unruly at the base of the rear right pillar, but fixed by brush. I was a little worried about decals indeed, and I applied 2K cautiously. Please see the update.
Jim, thank you! I liked this kit so far indeed.
Damian, the stats are growing out of proportion
 in the good meaning. Somebody should pay you at least part time for keeping them
 Tanks, David!
Update
This is going to be a short one, but perhaps a very meaningful one.
First I checked the decals for lifted corners and such. Nothing of importance - I just needed to slightly slice thru one at the base of pillar B on the right side. No biggie. Then I cleaned the body, because had lots ow water, glue and Microsol marks. Easier to say than to do. Apparently these decals were very reach on glue and it won't come off unless I used water diluted IPA, wiping very well on the painted surfaces, and very gentle on the decaled surfaces.
Then I painted the front and rear windows frames, with the same RLM66, corrected the pillar C trim on the right side and the fron trim, damaged accidentally during handling - all done by brush.
Preparation for 2K coating were done rigorously, well cleaning everything in attempt to avoid cross-contamination. I was still afraid to build too much 2K at once on the old decals and I built the tac coat very slowly, more like a haze at first. 5 minutes break, then emptied my AB cup bur was not enough. I still had some rough areas, especially the sides and the trunk lid.
I took a 15 minutes flashing break, time in which I mixed another resin batch (3/4 AB cup), and sprayed again, this time aiming directly to a semi-wet coat, followed by a wet one. It worked good and for what I can say right now, the imperfections are just a few. I cannot handle it properly for closer inspection yet, because it rests in my photo tent and I don't want to generate dust shuffling around.
This is the result:

I have used Splash bi-component resin, sprayed thru my Evolution 0.44mm @ 20 psi.

Now the to do list has become really narrow: add the windows, painted already, the trunk detail and close off the build!
Gabriel

tinbanger

Joined: February 04, 2008
KitMaker: 2,507 posts
Auto Modeler: 409 posts

Posted: Monday, April 13, 2020 - 07:43 AM UTC
Gabriel great build!
We still have over 5 months to go what are you going to build next?
Working on the "Bonnet" and the model ones are to thick to be modeled open so out comes the brass sheet:-
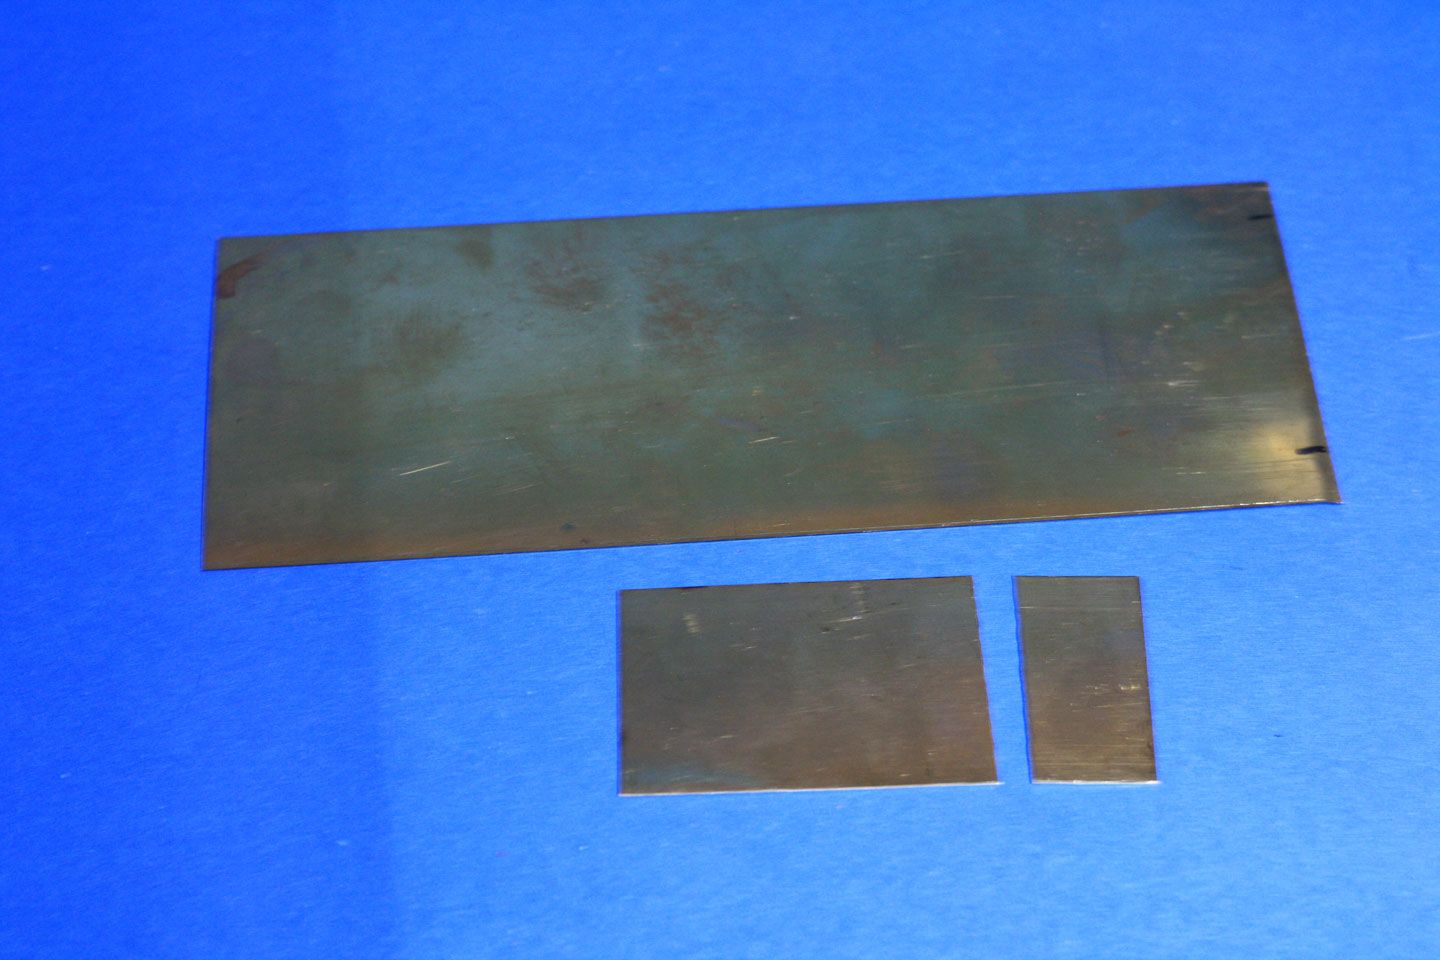
working on the exhaust side first as this will be built closed:-
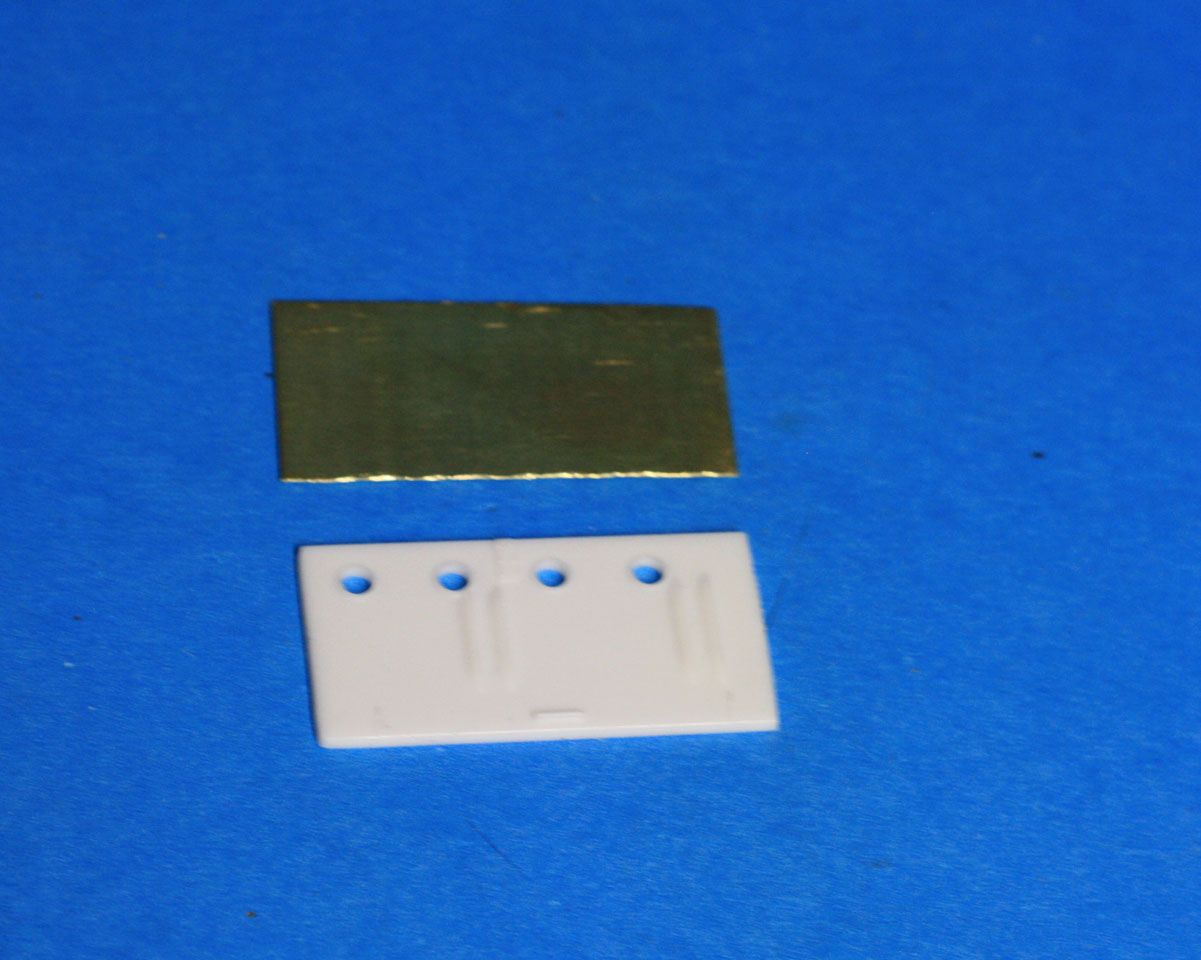
Screwed to a piece of pine and drilled:-
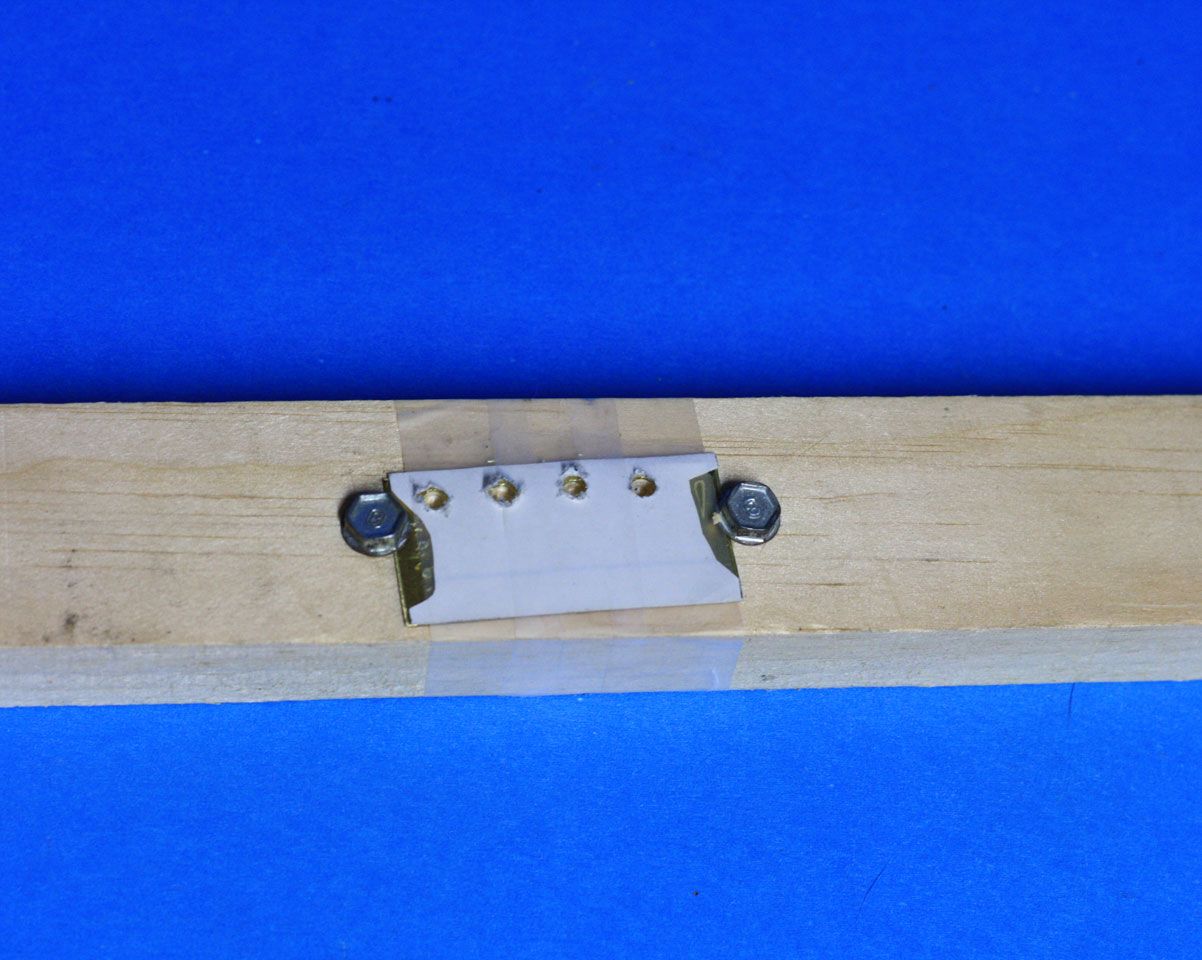
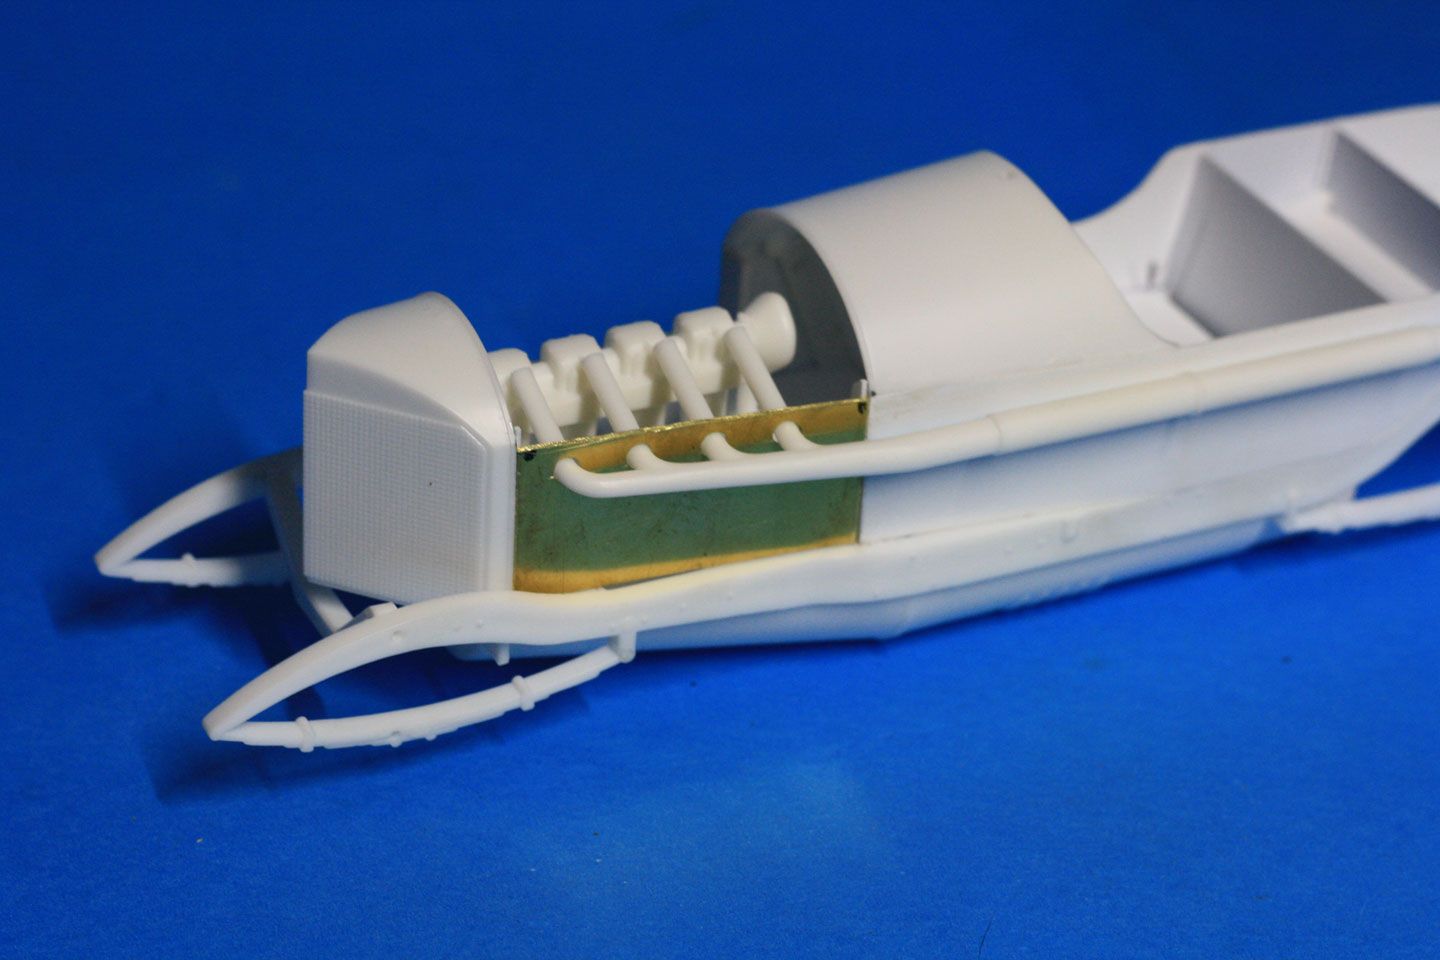
The exhaust pipes makes pipe stand off from the body so trimming and reshape.

Pipe is also to short so I will extend it brass tube.
Also correcting the fuel tank:-
Take care all!
We still have over 5 months to go what are you going to build next?
Working on the "Bonnet" and the model ones are to thick to be modeled open so out comes the brass sheet:-
working on the exhaust side first as this will be built closed:-
Screwed to a piece of pine and drilled:-
The exhaust pipes makes pipe stand off from the body so trimming and reshape.
Pipe is also to short so I will extend it brass tube.
Also correcting the fuel tank:-
Take care all!
Szmann
Joined: September 02, 2014
KitMaker: 1,977 posts
Auto Modeler: 1,371 posts
Posted: Monday, April 13, 2020 - 08:00 AM UTC
What! Richard, that so simple and efficient that it's brilliant! Good one!
I actually opened a separate thread with a second entry for GB, also a NASCAR and... you're right: what's next? I'm planning it just now. There is a chance that the next will be a beefed up Scirocco if suits the rules of the GB.
Gabriel
Quoted Text
Gabriel great build!
We still have over 5 months to go what are you going to build next?
I actually opened a separate thread with a second entry for GB, also a NASCAR and... you're right: what's next? I'm planning it just now. There is a chance that the next will be a beefed up Scirocco if suits the rules of the GB.
Gabriel
 |

WEB HOSTING BY


Copyright ©2021 Auto Modeler and Kitmaker Network, a subsidiary of Silver Star Enterprises
All Rights Reserved. Please read our Conditions of Use and Privacy Policy.
All Rights Reserved. Please read our Conditions of Use and Privacy Policy.