

Patrick,
Now that's one killer build for sure under any circumstances, but a time line of 7 weeks, now that's real pressure. I'll be in your corner for sure on this one.
Joel


Go to automodeler.com for the current dynamic site!
The Garage
For general automotive modeling or non-modeling topics.
For general automotive modeling or non-modeling topics.
Hosted by Jim Starkweather
Strip, Track & Trail Official Build Thread

Joel_W

Joined: December 04, 2010
KitMaker: 11,666 posts
Auto Modeler: 2,974 posts

Posted: Monday, August 03, 2020 - 12:30 AM UTC


pnance26
Joined: January 22, 2016
KitMaker: 766 posts
Auto Modeler: 140 posts

Posted: Monday, August 03, 2020 - 06:13 AM UTC
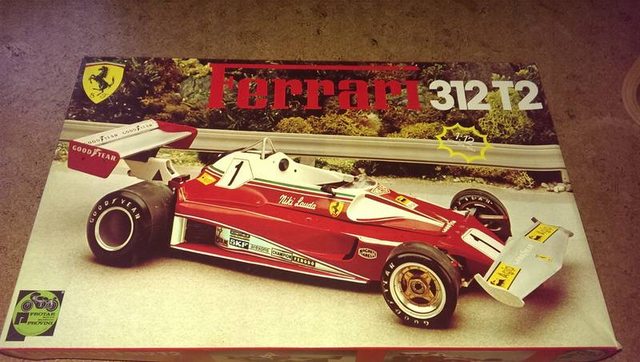
So, it's on to the ride that almost took Niki Lauda's life in 1976 at the Nurburing. Lauda had tried to lead a driver refusal to race after weather indicated there was to be rain. He lost the vote by one.
This was the last race to be run on the 14.19 mile track. Because of the length of the track, only 14 laps were scheduled. The sheer size of the circuit meant several things, not the least of which the weather could be considerably different in different parts of the track. It also made television coverage impossible. But the most dangerous part of the course was the lack of emergency response units around the track. Normally, there would be first aid and safety all the way around. It would take five times as many marshals, track workers, and aid personnel as a normal track and the German organizers were unable to provide all the workers necessary for a safe race.
Lauda started second, next to his rival James Hunt, on the front row. Lauda, as well as most of the field, started the race on "wets" but changed to dry tires at the end of lap one. "Just after the fast left kink before the Bergwerk right hand curve, his Ferrari 312T2 snapped to the right and spun through the fencing into an earth bank. The car bounced back onto the track, enveloped in flames. Guy Edwards managed to avoid the Ferrari, but Harald Ertl and Brett Lunger both hit it. All three drivers stopped and tried to get Lauda out of the flames and they were joined by Merzario, who stopped his Wolf Williams after seeing the wreck. Lauda had suffered serious burns and was rushed by helicopter to the Bundeswehr hospital in Koblenz; from there he was flown to the Trauma Clinic in Ludwigshafen, home to Germany's most advanced burn ward at the time, where he fought for his life for the next few days."-Wikipedia
So here we go, with a 44 year old kit! I am sure some of the teeny weeny parts are brittle so I need to exercise extreme caution and patience.
Removed by original poster on 08/03/20 - 20:47:03 (GMT).
Removed by original poster on 08/03/20 - 20:55:34 (GMT).
Removed by original poster on 08/03/20 - 21:03:26 (GMT).

tinbanger

Joined: February 04, 2008
KitMaker: 2,507 posts
Auto Modeler: 409 posts

Posted: Monday, August 03, 2020 - 09:10 AM UTC
Great participation and builds!
Sorry for the post deletes,I am having trouble with Photobucket!
Here is an update :-
I used milliput for the seat cushions:-

Seat primed next to the kit bench seat:-

Body Primed:-

Test fitting:-

Some light sanding on the hood to remove paint run.

Sorry for the post deletes,I am having trouble with Photobucket!
Here is an update :-
I used milliput for the seat cushions:-
Seat primed next to the kit bench seat:-
Body Primed:-
Test fitting:-
Some light sanding on the hood to remove paint run.
pnance26
Joined: January 22, 2016
KitMaker: 766 posts
Auto Modeler: 140 posts
Posted: Monday, August 03, 2020 - 09:44 AM UTC
I really like the seats! What a vast improvement!
Will be following along!
Will be following along!
pnance26
Joined: January 22, 2016
KitMaker: 766 posts
Auto Modeler: 140 posts
Posted: Monday, August 03, 2020 - 10:19 AM UTC
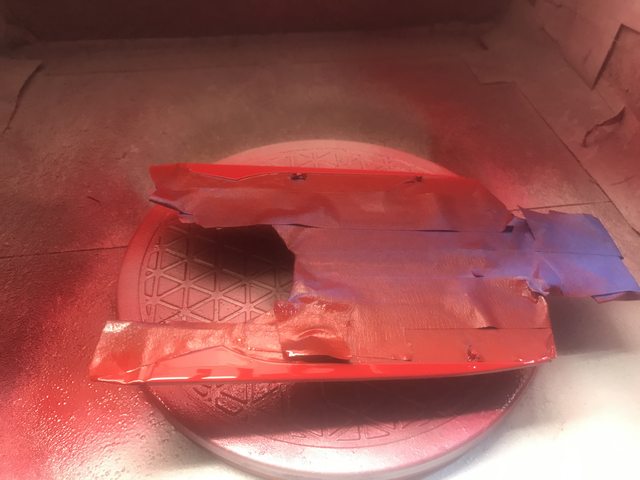
Steps 1 and 2 complete and joined by hoses... just waiting on bottom tray to dry as there was Italian Red involved! (Step 3)
Steps 1 and 2 go on Step 3... so that's it until tomorrow.
I could get sucked into another build but I think not...
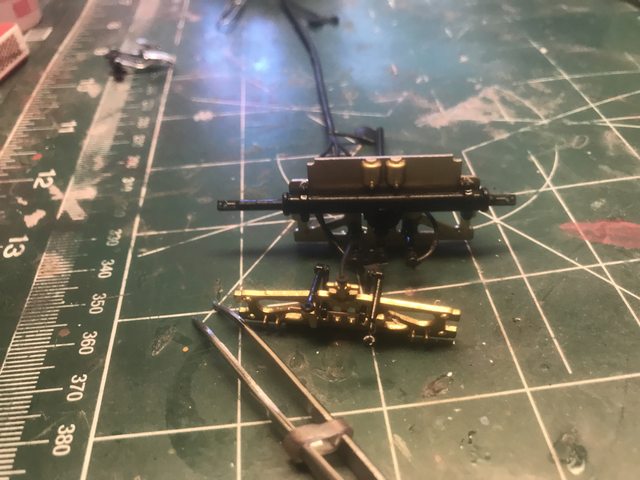
Your comments are always welcome!
Steps 1 and 2 go on Step 3... so that's it until tomorrow.
I could get sucked into another build but I think not...
Your comments are always welcome!

AussieReg

#007

Joined: June 09, 2009
KitMaker: 8,156 posts
Auto Modeler: 2,953 posts

Posted: Monday, August 03, 2020 - 01:49 PM UTC
Great to see more really good progress reports coming through.
Richard, those seats are such a lift from the kit bench, and seeing the body in primer with test fitting of the sub assemblies is a major milestone, excellent work.
Patrick, very nice looking detail already. To see another big scale kit in the forums is really great!
Cheers, D
Richard, those seats are such a lift from the kit bench, and seeing the body in primer with test fitting of the sub assemblies is a major milestone, excellent work.
Patrick, very nice looking detail already. To see another big scale kit in the forums is really great!
Cheers, D


Cosimodo

#335

Joined: September 03, 2013
KitMaker: 1,808 posts
Auto Modeler: 701 posts

Posted: Monday, August 03, 2020 - 03:16 PM UTC
Agree with that. Richard those seats are a huge improvement. They look more comfy too!
Patrick your rate of out put is amazing. Looking forward to your build of this.
cheers
Michael
Patrick your rate of out put is amazing. Looking forward to your build of this.
cheers
Michael

md72
#439
Joined: November 05, 2005
KitMaker: 4,950 posts
Auto Modeler: 555 posts

Posted: Monday, August 03, 2020 - 06:46 PM UTC
Progress, not in paint only state. Rear suspension and transmission in place.
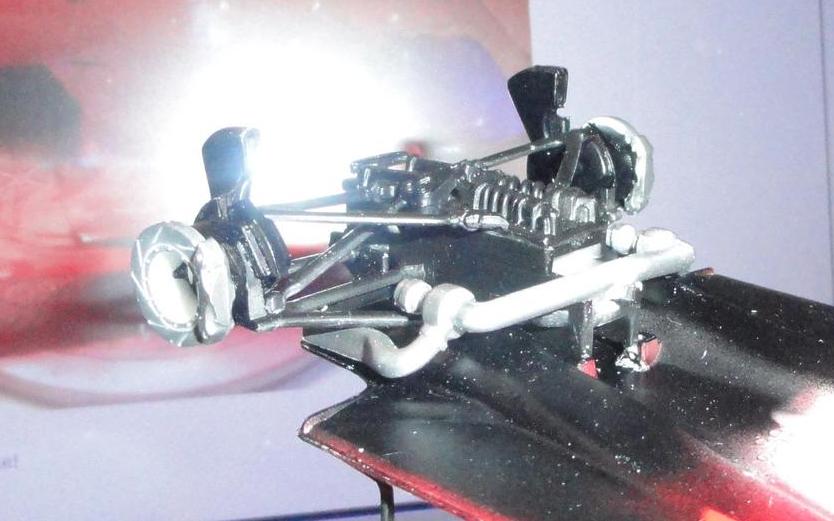
might need to paint the inside of the brakes and add some highlights to the transmission.
might need to paint the inside of the brakes and add some highlights to the transmission.

Joel_W
Joined: December 04, 2010
KitMaker: 11,666 posts
Auto Modeler: 2,974 posts
Posted: Tuesday, August 04, 2020 - 03:32 AM UTC
Richard,
Excellent job on making that twin seat with Milliput. The chassis and body in primer looks fantastic. And I'm really impressed with both your engine and the engine hood.
Joel
Excellent job on making that twin seat with Milliput. The chassis and body in primer looks fantastic. And I'm really impressed with both your engine and the engine hood.
Joel
Joel_W
Joined: December 04, 2010
KitMaker: 11,666 posts
Auto Modeler: 2,974 posts
Posted: Tuesday, August 04, 2020 - 03:42 AM UTC
Patrick,
Nice start to the Ferrari 312 T2 1/12 kit. Being the old Protar kit I'm sure that it's going to test your modeling skills quite often.
So far those assemblies look pretty good. As for the lower shell in Italian Red via rattle can, based on your previous painting with it, I'd venture to say that all will be up to your standard for sure.
joel
Joel_W
Joined: December 04, 2010
KitMaker: 11,666 posts
Auto Modeler: 2,974 posts
Posted: Tuesday, August 04, 2020 - 03:54 AM UTC
Mark,
Glad that you're making progress on the Revell Target Reynard. Unless you're going to have the engine cover removable, there's no need to do any detailing to the engine other then the exhausts and those brake intakes as the engine bay is pretty well hidden. I do agree with your intent to detail the brakes as they're visible through the wheels.
Joel
pnance26
Joined: January 22, 2016
KitMaker: 766 posts
Auto Modeler: 140 posts
Posted: Thursday, August 06, 2020 - 03:39 AM UTC
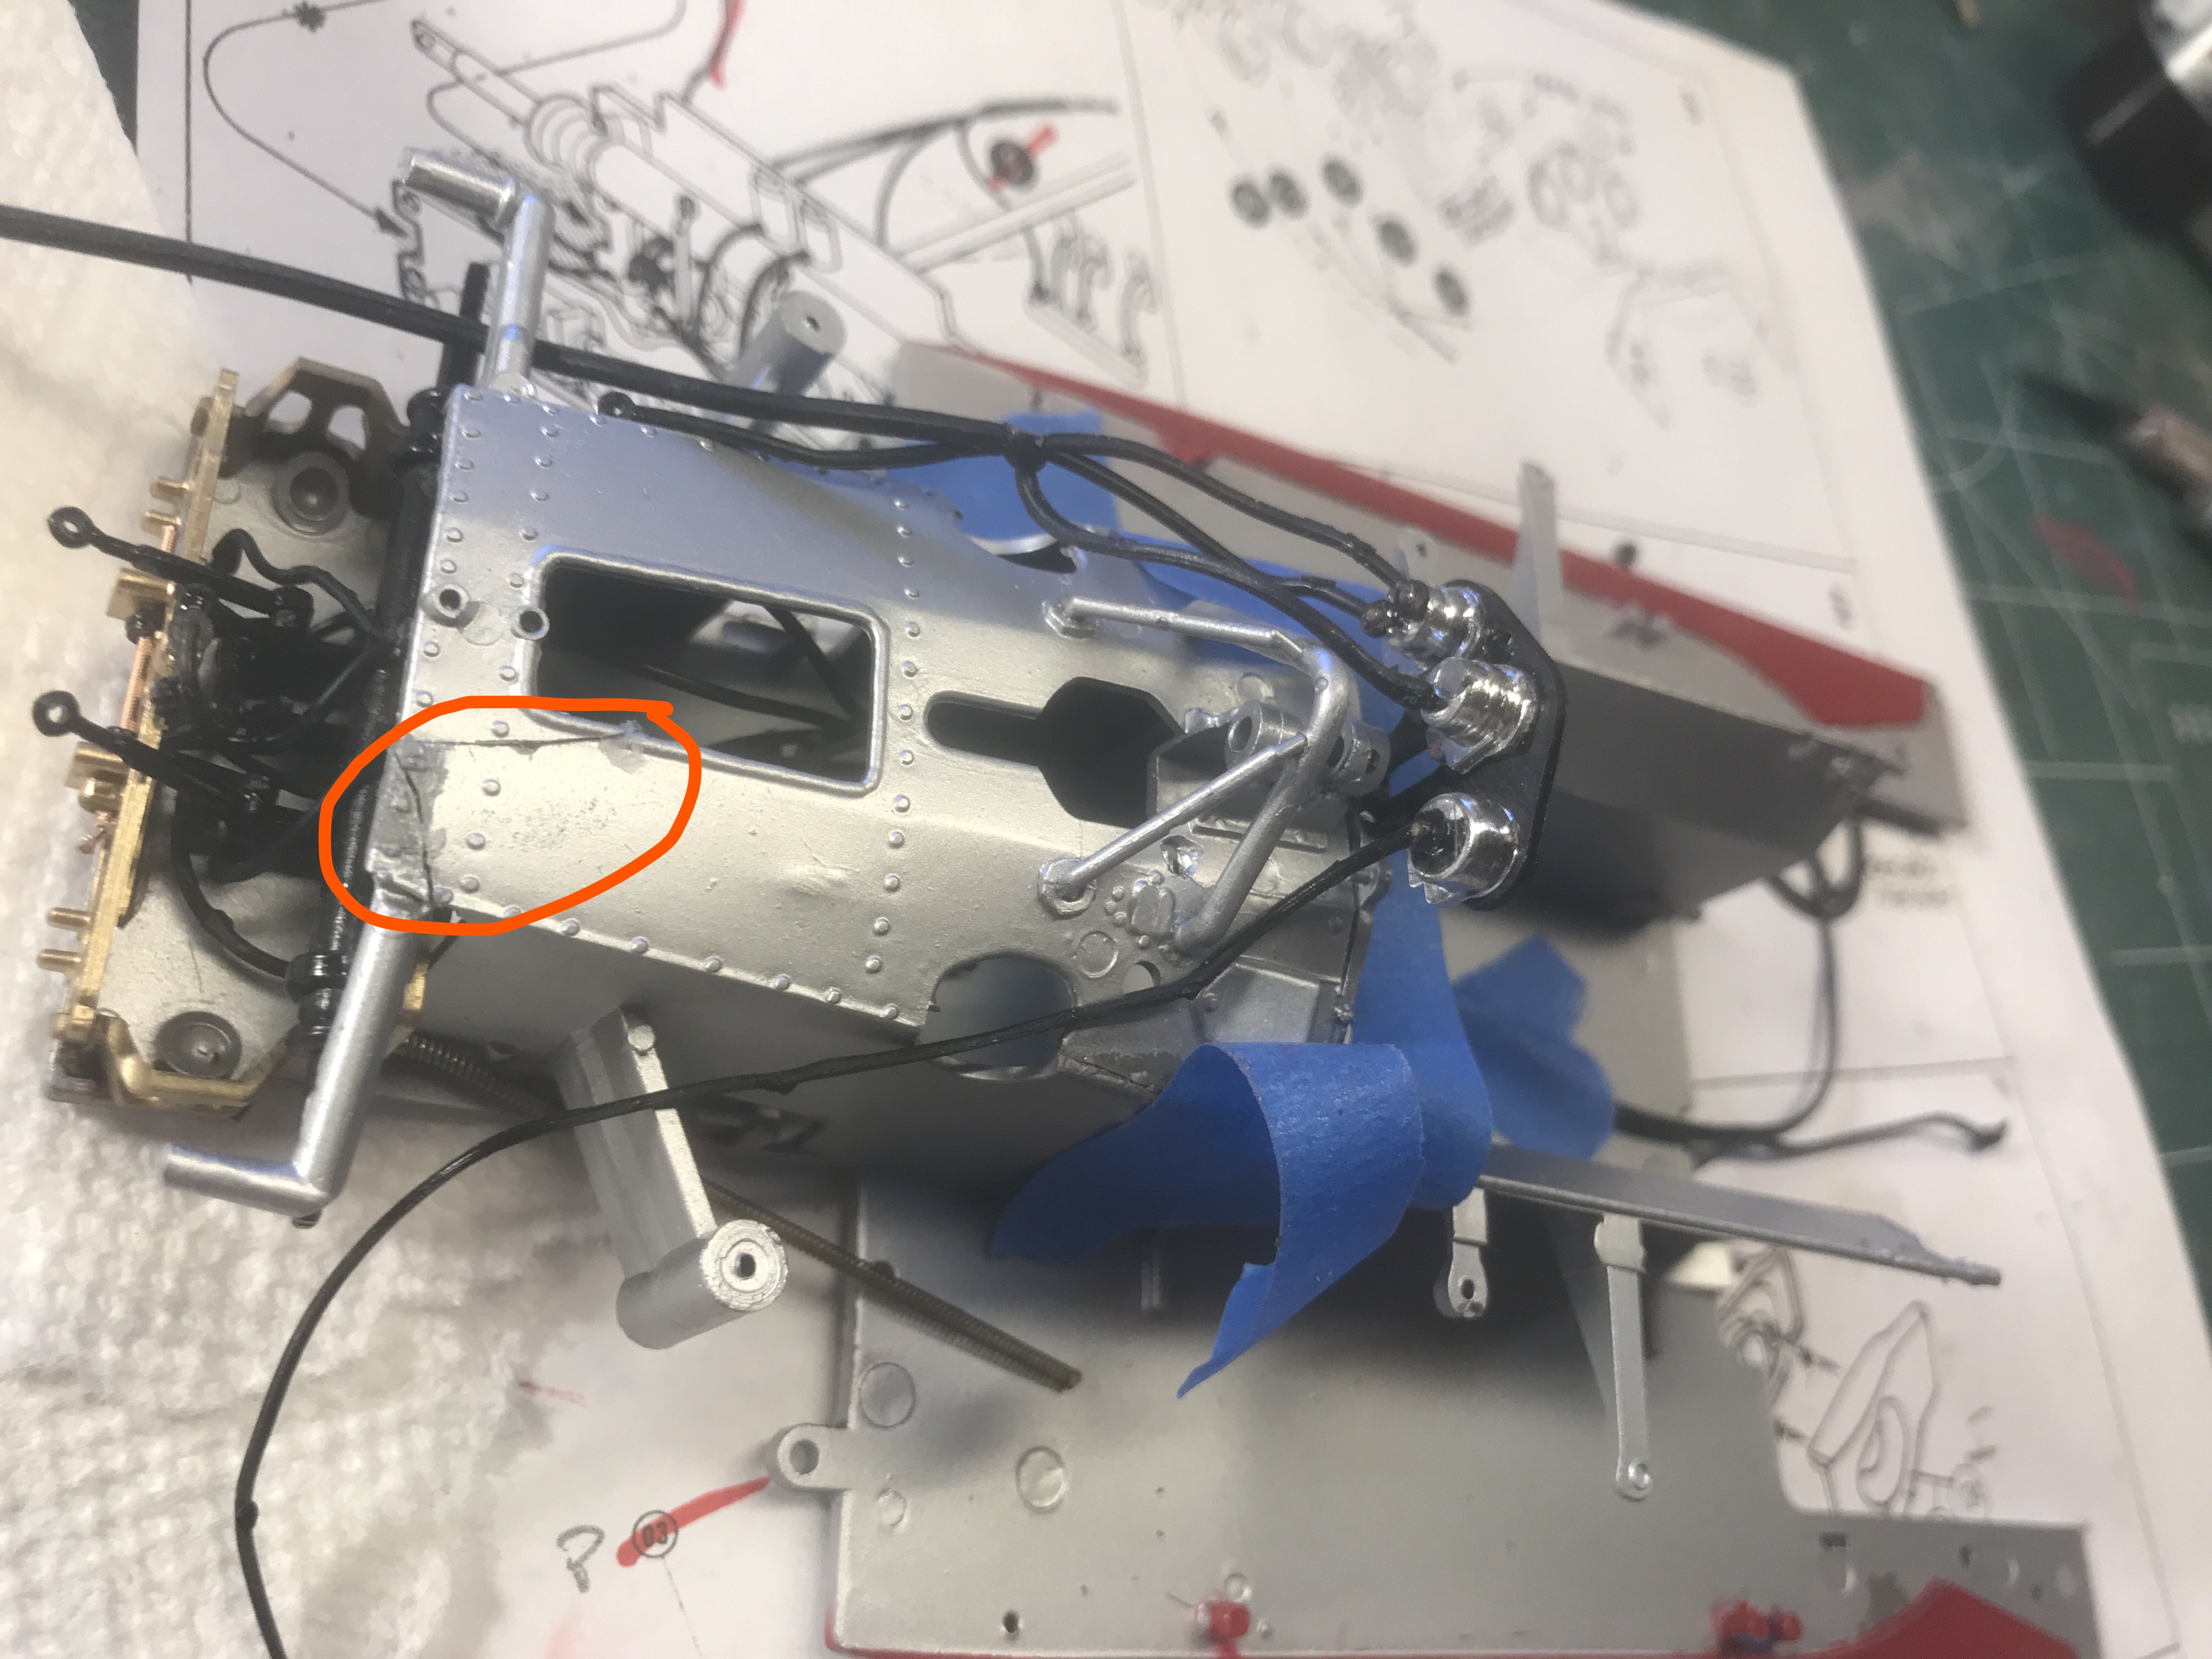
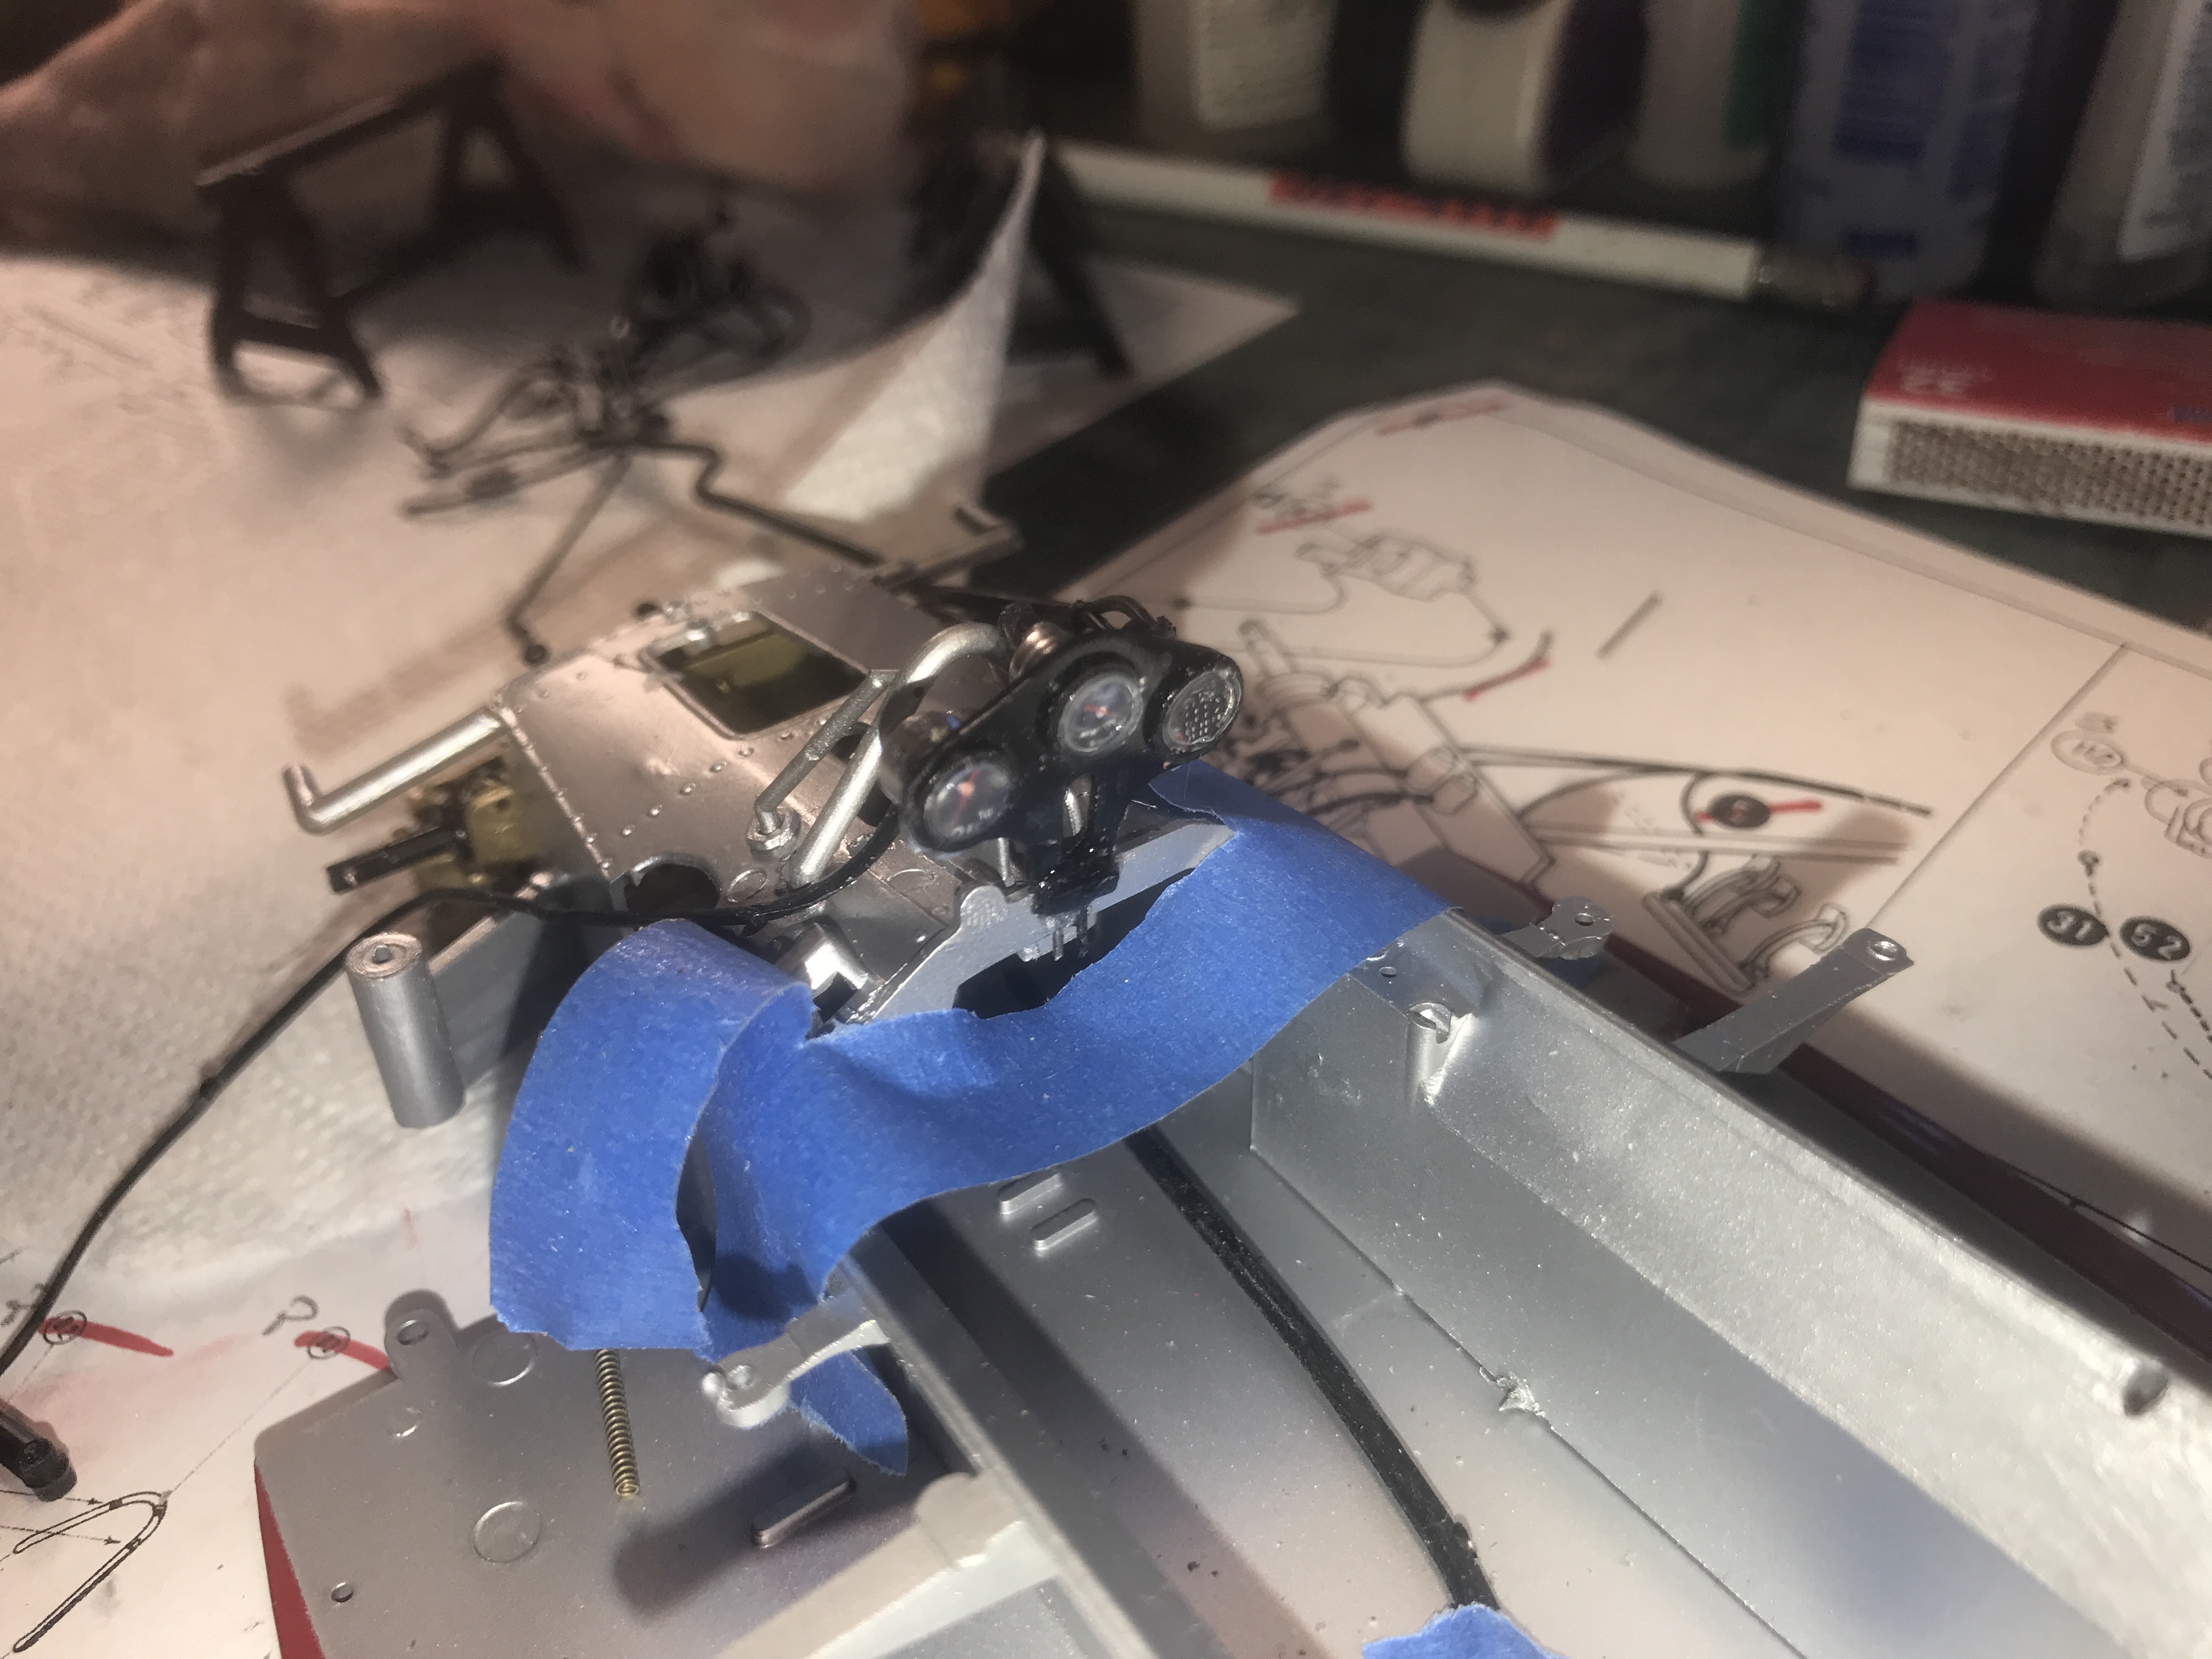
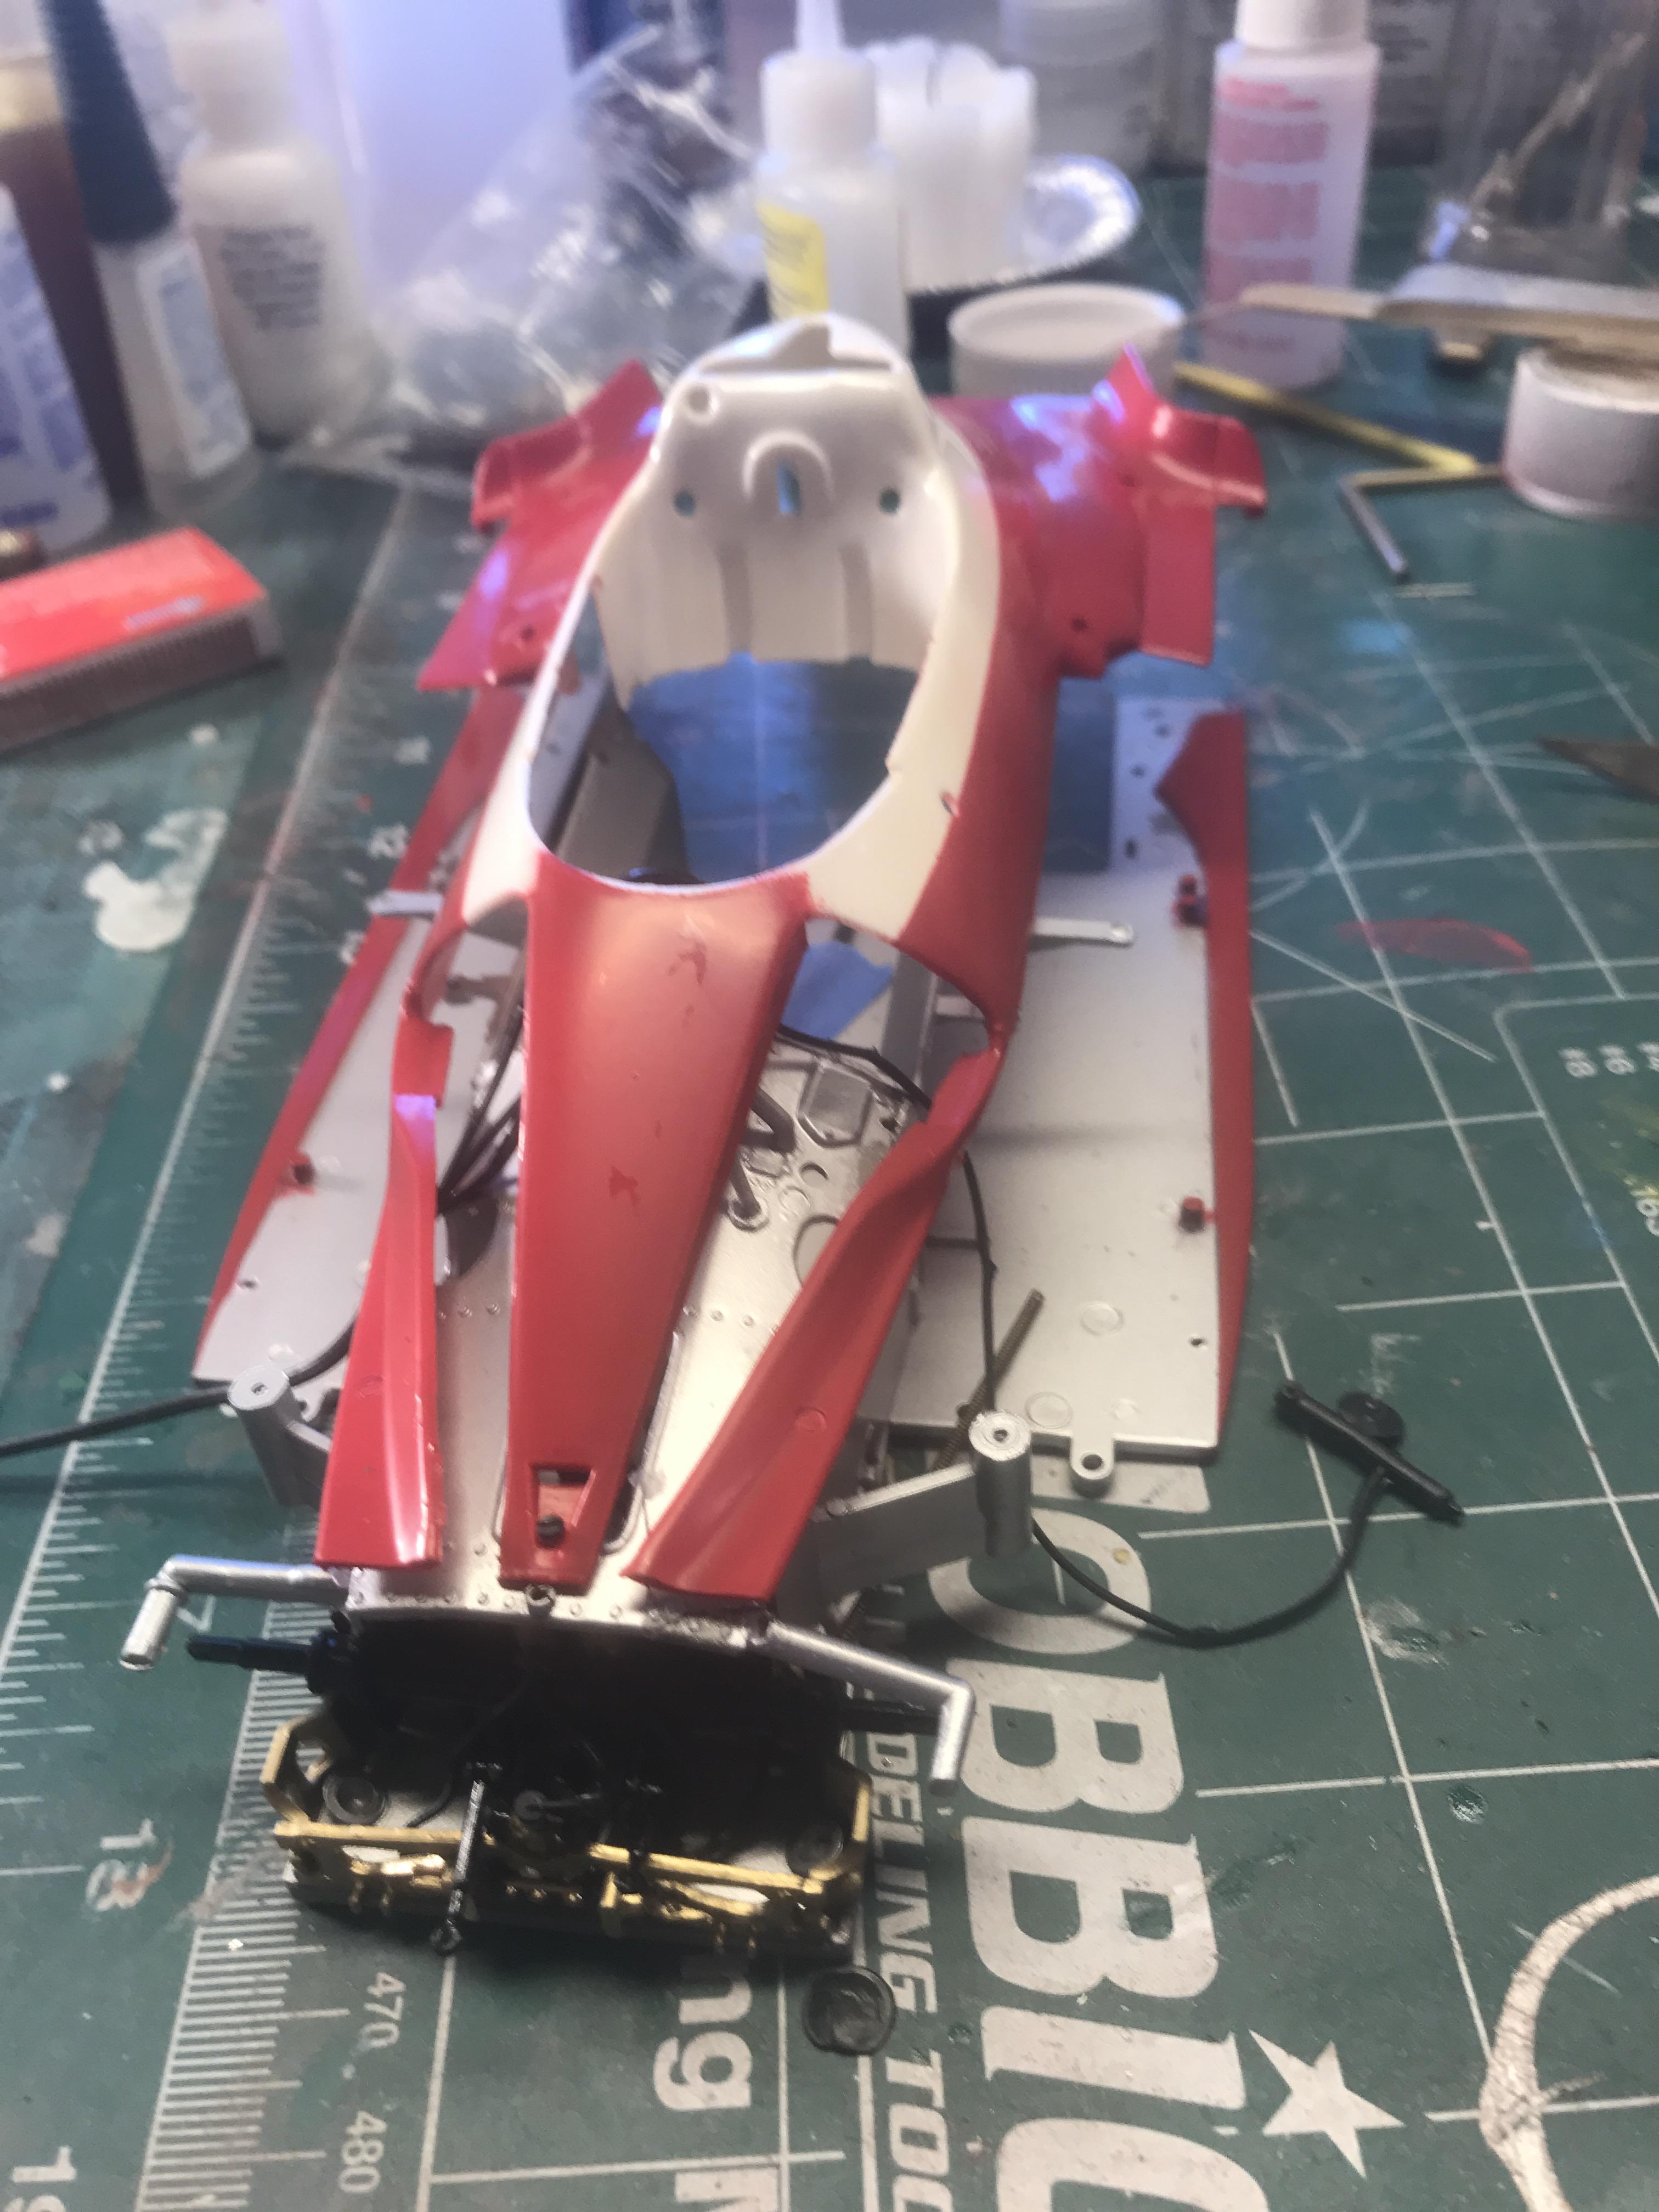
So, working with a 45 year old kit has its pitfalls... mainly old brittle plastic that gets warped and little posts that break off easily.
I have had to fabricate on suspension arm, pin two other parts and I am not sure what to do with the cracks. I could BMF over the entire tub but that could get weird.
Anyone else have a solution? The tub is screwed into place now and should not need any further movement, although I will try to do a bit of detailing on the cockpit switches etc...
Your comments are ALWAYS welcome...
Joel_W
Joined: December 04, 2010
KitMaker: 11,666 posts
Auto Modeler: 2,974 posts
Posted: Thursday, August 06, 2020 - 07:13 AM UTC
Patrick,
Impressive progress for sure. The detailing in 1/12 scale always makes a huge difference. As for the cracks, what I do with them depends on the size of the cracks. If I can I add a backer pc of plastic, then either Apoxie 2 part putty, and or CA Gel. How many layers just depends on how bad the cracks are.
Joel
pnance26
Joined: January 22, 2016
KitMaker: 766 posts
Auto Modeler: 140 posts
Posted: Friday, August 07, 2020 - 01:17 AM UTC
Quoted Text
Patrick,
Impressive progress for sure. The detailing in 1/12 scale always makes a huge difference. As for the cracks, what I do with them depends on the size of the cracks. If I can I add a backer pc of plastic, then either Apoxie 2 part putty, and or CA Gel. How many layers just depends on how bad the cracks are.
Joel
Thanks for the advice, Joel!
I ordered the Apoxie Sculpt yesterday. I have the aluminum BMF in stock, so I guess it's time to learn something new.

Joel_W
Joined: December 04, 2010
KitMaker: 11,666 posts
Auto Modeler: 2,974 posts
Posted: Friday, August 07, 2020 - 02:03 AM UTC
Patrick,
I love the Apoxie Sculpt. Easy to use, and the containers do an excellent job of sealing out the air. I've had mine for almost two years and it's as fresh and soft as the day I 1st opened them up.
Just do what Damian said, and work it down to the level of the plastic with water. That not only eliminates 75% of the sanding process, but also fills in the million and one air bubble holes. When it dries, it's rock hard, so less is always better.
I used if for filling the radiator air vents on my Lotus 49b. New build with 1st update in a day or so.
Joel
Cosimodo
#335
Joined: September 03, 2013
KitMaker: 1,808 posts
Auto Modeler: 701 posts
Posted: Friday, August 07, 2020 - 05:24 PM UTC
It's been a while on the Porsche.
After a calamity and losing a couple of pieces, all has been restored to some normalcy and Steps 9, 10 and 11 have been completed. This was the start to the cabin, suspension, brakes and oil radiator.
The tubular aluminium framing went together pretty well having learned from my experiences with the engine.

The floor is meant to represent a raw fibreglass finish. Most it will be covered by the two seats.
The brakes are nicely detailed in these kits and I added the brake lines for interest. Of course they won't be seen either once the body shell is in place.

The lost pieces were the fluid cylinders. I asked MFH for some replacements. Three days!!! after they told me that was doable I had them - Japan to NZ. Great customer service.
I added some lines, tubes and hoses from the radiator here as well.

The fuse board also got the wiring treatment to add some detail

And front on. Not much of a crash structure for these.

The next few steps have already substantial progress as I needed to do those to help getting the body ready for paint so more updates soon.
cheers
Michael
After a calamity and losing a couple of pieces, all has been restored to some normalcy and Steps 9, 10 and 11 have been completed. This was the start to the cabin, suspension, brakes and oil radiator.
The tubular aluminium framing went together pretty well having learned from my experiences with the engine.
The floor is meant to represent a raw fibreglass finish. Most it will be covered by the two seats.
The brakes are nicely detailed in these kits and I added the brake lines for interest. Of course they won't be seen either once the body shell is in place.
The lost pieces were the fluid cylinders. I asked MFH for some replacements. Three days!!! after they told me that was doable I had them - Japan to NZ. Great customer service.
I added some lines, tubes and hoses from the radiator here as well.
The fuse board also got the wiring treatment to add some detail
And front on. Not much of a crash structure for these.
The next few steps have already substantial progress as I needed to do those to help getting the body ready for paint so more updates soon.
cheers
Michael
Joel_W
Joined: December 04, 2010
KitMaker: 11,666 posts
Auto Modeler: 2,974 posts
Posted: Saturday, August 08, 2020 - 12:48 AM UTC
Michael,
Talk about great customer service. Now that's really impressive.
Great start to driver's compartment. Your representation of the fiberglass floor looks pretty darn realistic if you ask me. Scuffed up Fiberglass that gets abused during the building process past normal feet isn't the cleanest of areas for sure.
Joel
pnance26
Joined: January 22, 2016
KitMaker: 766 posts
Auto Modeler: 140 posts
Posted: Saturday, August 08, 2020 - 01:19 AM UTC
Is that the 1/12th Porsche, Michael?
Beautiful detailing!
Beautiful detailing!
md72
#439
Joined: November 05, 2005
KitMaker: 4,950 posts
Auto Modeler: 555 posts
Posted: Saturday, August 08, 2020 - 04:42 PM UTC
Progress at last:
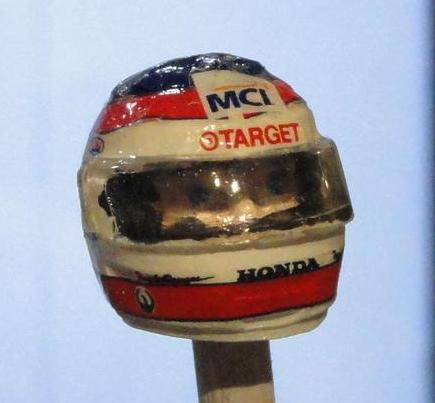
9 decals on the helmet and 8 more on the body, and one of those has to be applied and then painted over And almost none of these decals would flex into position. I ended up trying Micro-Sol, Tamiya MarkFit strong and Mr. Mark Setter. A couple of them are held on with thinned PVA or Future.
So now I've completed the first step
Maybe it will go faster now.
9 decals on the helmet and 8 more on the body, and one of those has to be applied and then painted over
And almost none of these decals would flex into position. I ended up trying Micro-Sol, Tamiya MarkFit strong and Mr. Mark Setter. A couple of them are held on with thinned PVA or Future.So now I've completed the first step
Maybe it will go faster now.
AussieReg
#007
Joined: June 09, 2009
KitMaker: 8,156 posts
Auto Modeler: 2,953 posts
Posted: Saturday, August 08, 2020 - 05:00 PM UTC
Quoted Text
9 decals on the helmet and 8 more on the body, and one of those has to be applied and then painted over
Sounds like an exercise in patience and experimentation Mark, well done pushing through and getting it done!
Looking forward to more (and hopefully easier) progress.
Cheers, D
AussieReg
#007
Joined: June 09, 2009
KitMaker: 8,156 posts
Auto Modeler: 2,953 posts
Posted: Saturday, August 08, 2020 - 05:13 PM UTC
It's come around quickly, but the superb progress reports keep rolling in!
Running update on builds
20 weeks in, 43 pages with over 25,400 views and 1070 posts
21 enlisted
13 builds in progress
12 completed builds
Szmann (Gabriel) - NASCAR - Chev Monte Carlo (Tony Stewart) - 1/25 AMT/ERTL kit - COMPLETED
Stickframe (Nick) - ENDURANCE - McLaren F1 GTR Longtail - 1/24 Aoshima kit - COMPLETED
Szmann (Gabriel) - NASCAR - Pontiac Grand Prix (Kyle Petty) - 1/24 Revell/Monogram kit - COMPLETED
rv1963 (Robert) - STRAIGHTLINE - '37 Chevy Gasser - 1/25 AMT kit- COMPLETED
jimb (Jim) - STRAIGHTLINE - '57 Ford Sedan Gasser - COMPLETED
Joel_W (Joel) - FORMULA 1 - Lotus 99T Honda (Ayrton Senna 1987) - 1/20 Tamiya kit - COMPLETED
pnance26 (Patrick) - FORMULA 1 - Ferrari 312T - 1/12 Tamiya kit - COMPLETED
Dixon66 (David) - TOURING GROUP 2 - 2006 Mustang GT- 1/25 Revell kit - COMPLETED
Dixon66 (David) - ENDURANCE GROUP 5 - Zakspeed Capri - 1/24 Tamiya kit - COMPLETED
Aussiereg (Damian) - STRAIGHTLINE - '55 Chev Pro Sportsman (Charles Carpenter) - 1/25 Revell kit - COMPLETED
Joel_W (Joel) - GT3 - Audi R8 LMS (2015) - 1/24 NuNu kit - COMPLETED
pnance26 (Patrick) - ENDURANCE - Porsche 956 Le Mans 1984 - 1/24 Tamiya kit - COMPLETED
Joel_W (Joel) - FORMULA 1 - Lotus 49B (Rob Walker 1968) - 1/20 Ebbro kit - Nose clip modification commenced
tinbanger (Richard) - GRAND PRIX - 1914 Mercedes Racer - 1/16 Lindberg kit - Body primed, test fitting sub assemblies
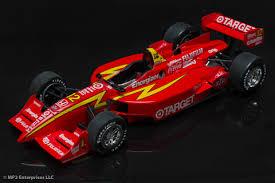
md72 (Mark) - INDY - Target Reynard (Jimmy Vasser) - 1/25 Revell kit - Fitting sub assemblies, parts painted, battling with stubborn decals
Szmann (Gabriel) - FORMULA 1 - Tyrrell P34 (Monaco 1977 #4) - 1/20 Tamiya kit kit - Engine complete, chassis plate and outer shell paint/decals
Hwa-Rang (Jesper) - NASCAR - (TBA)
PasiAhopelto (Pasi) - NASCAR - enlisted - Olds 442 (Donnie Allison) - 1/25 Salvinos JR kit - Chassis/ tub/cage assembled and primed, body primed
forest1000 (David) - FORMULA 1 - enlisted - Williams Renault (Jaques Villeneuve) - 1/24 Revell/Monogram kit
Cosimodo (Michael) - ENDURANCE - 1971 Porsche 917/20 - 1/12 MFH kit - Steps 1-11 of 26 completed, engine in tube frame, rear stowage assembly, interior framework and detailing under way
bluebell914 (Patrick) - ENDURANCE - enlisted - Ferrari P4 or 512S
2002hummer (Darrell) - GRAND PRIX - Lotus Super Seven (Tamiya) - Engine assembled and painted
TacFireGuru (Mike) - NASCAR - enlisted - Chev Monte Carlo (Home Depot)
Lakota (Don) - ENDURANCE - Corvette C7.R - 1/25 Revell kit - Engine assembled, floor pan/chassis under way
RedwingNev (Neil) - GRAND PRIX - enlisted - Lotus 79 (1978 Mario Andretti?) - 1/20 Tamiya kit
heavyjagdpanzer (Bill) - STRAIGHTLINE - Blue Max Funny Car - 1/25 Revell kit - Rolling chassis completed, body painted
bmwh548 (Radu) - RALLY - '99 WRC Subaru Impreza - 1/24 Tamiya kit - Wheels and tyres
bomber14 (Joe) - STOCK CAR - '60 Ford Starliner - AMT/ERTL kit - Rolling chassis/interior done, body paint under way. Personal injury holding up progress.
rv1963 (Robert) - TRANS-AM - '73 Mustang - 1/25 MPC kit- Parts prep, front end modifications
pnance26 (Patrick) - FORMULA 1 - Ferrari 312T2 - 1/12 Protar kit - Detailing and test fitting sub assemblies, delicately dealing with 40yo brittleness
If anybody has changed or firmed up their proposed builds, or spotted anything wrong in the list, please let me know.
Cheers, D
Running update on builds
20 weeks in, 43 pages with over 25,400 views and 1070 posts
21 enlisted
13 builds in progress
12 completed builds
Szmann (Gabriel) - NASCAR - Chev Monte Carlo (Tony Stewart) - 1/25 AMT/ERTL kit - COMPLETED
Stickframe (Nick) - ENDURANCE - McLaren F1 GTR Longtail - 1/24 Aoshima kit - COMPLETED
Szmann (Gabriel) - NASCAR - Pontiac Grand Prix (Kyle Petty) - 1/24 Revell/Monogram kit - COMPLETED
rv1963 (Robert) - STRAIGHTLINE - '37 Chevy Gasser - 1/25 AMT kit- COMPLETED
jimb (Jim) - STRAIGHTLINE - '57 Ford Sedan Gasser - COMPLETED
Joel_W (Joel) - FORMULA 1 - Lotus 99T Honda (Ayrton Senna 1987) - 1/20 Tamiya kit - COMPLETED
pnance26 (Patrick) - FORMULA 1 - Ferrari 312T - 1/12 Tamiya kit - COMPLETED
Dixon66 (David) - TOURING GROUP 2 - 2006 Mustang GT- 1/25 Revell kit - COMPLETED
Dixon66 (David) - ENDURANCE GROUP 5 - Zakspeed Capri - 1/24 Tamiya kit - COMPLETED
Aussiereg (Damian) - STRAIGHTLINE - '55 Chev Pro Sportsman (Charles Carpenter) - 1/25 Revell kit - COMPLETED
Joel_W (Joel) - GT3 - Audi R8 LMS (2015) - 1/24 NuNu kit - COMPLETED
pnance26 (Patrick) - ENDURANCE - Porsche 956 Le Mans 1984 - 1/24 Tamiya kit - COMPLETED
Joel_W (Joel) - FORMULA 1 - Lotus 49B (Rob Walker 1968) - 1/20 Ebbro kit - Nose clip modification commenced
tinbanger (Richard) - GRAND PRIX - 1914 Mercedes Racer - 1/16 Lindberg kit - Body primed, test fitting sub assemblies
md72 (Mark) - INDY - Target Reynard (Jimmy Vasser) - 1/25 Revell kit - Fitting sub assemblies, parts painted, battling with stubborn decals
Szmann (Gabriel) - FORMULA 1 - Tyrrell P34 (Monaco 1977 #4) - 1/20 Tamiya kit kit - Engine complete, chassis plate and outer shell paint/decals
Hwa-Rang (Jesper) - NASCAR - (TBA)
PasiAhopelto (Pasi) - NASCAR - enlisted - Olds 442 (Donnie Allison) - 1/25 Salvinos JR kit - Chassis/ tub/cage assembled and primed, body primed
forest1000 (David) - FORMULA 1 - enlisted - Williams Renault (Jaques Villeneuve) - 1/24 Revell/Monogram kit
Cosimodo (Michael) - ENDURANCE - 1971 Porsche 917/20 - 1/12 MFH kit - Steps 1-11 of 26 completed, engine in tube frame, rear stowage assembly, interior framework and detailing under way
bluebell914 (Patrick) - ENDURANCE - enlisted - Ferrari P4 or 512S
2002hummer (Darrell) - GRAND PRIX - Lotus Super Seven (Tamiya) - Engine assembled and painted
TacFireGuru (Mike) - NASCAR - enlisted - Chev Monte Carlo (Home Depot)
Lakota (Don) - ENDURANCE - Corvette C7.R - 1/25 Revell kit - Engine assembled, floor pan/chassis under way
RedwingNev (Neil) - GRAND PRIX - enlisted - Lotus 79 (1978 Mario Andretti?) - 1/20 Tamiya kit
heavyjagdpanzer (Bill) - STRAIGHTLINE - Blue Max Funny Car - 1/25 Revell kit - Rolling chassis completed, body painted
bmwh548 (Radu) - RALLY - '99 WRC Subaru Impreza - 1/24 Tamiya kit - Wheels and tyres
bomber14 (Joe) - STOCK CAR - '60 Ford Starliner - AMT/ERTL kit - Rolling chassis/interior done, body paint under way. Personal injury holding up progress.
rv1963 (Robert) - TRANS-AM - '73 Mustang - 1/25 MPC kit- Parts prep, front end modifications
pnance26 (Patrick) - FORMULA 1 - Ferrari 312T2 - 1/12 Protar kit - Detailing and test fitting sub assemblies, delicately dealing with 40yo brittleness
If anybody has changed or firmed up their proposed builds, or spotted anything wrong in the list, please let me know.
Cheers, D
Joel_W
Joined: December 04, 2010
KitMaker: 11,666 posts
Auto Modeler: 2,974 posts
Posted: Sunday, August 09, 2020 - 03:35 AM UTC
Mark,
Great job on that Helmet. I've never even tried on in 1/25,1/24, or 1/20 scale for the exact issues that you had to deal with.
Joel
Great job on that Helmet. I've never even tried on in 1/25,1/24, or 1/20 scale for the exact issues that you had to deal with.
Joel
 |

WEB HOSTING BY


Copyright ©2021 Auto Modeler and Kitmaker Network, a subsidiary of Silver Star Enterprises
All Rights Reserved. Please read our Conditions of Use and Privacy Policy.
All Rights Reserved. Please read our Conditions of Use and Privacy Policy.