Strip, Track & Trail Official Build Thread
New Jersey, United States
Joined: February 02, 2015
KitMaker: 330 posts
Auto Modeler: 23 posts
Posted: Sunday, May 10, 2020 - 04:54 AM UTC
Quoted Text
Quoted Text
Beautiful gloss finish and colour on that paint job Patrick! Can you please fill us in on the paint type and process you use?
I hope you've got your head around where all of those tubes go, I've got a twitching eye just trying to figure it out 
Cheers, D
To be honest the only thing painted so far is the airbox. The rest is raw plastic.
But heres my system... I wash ALL my kits in warm water. Then, after filling and sanding down to 2000 grit, I use Tamiya primer. A couple of mist coats to find the flaws and a quick swipe where needed with sand paper. I also try to wear gloves when handling the to be painted piece.
I then spray down my booth with water, use a make up brush to dust the surface and canned air as well. I am pretty big on rattle cans, Tamiya to be precise. I warm up a pot of water in an old coffee maker and warm the rattle can.
I use a bunch of different turntables to do a mist coat from about 9 inches... wait 20 minutes... 2nd mist coat... 20 minutes... then a wet coat from same distance with a slower pass. Wait a couple of hours and inspect. I will resend starting at 150 all the way to 2000. Then repeat if necessary.
Its my most OCD step after being such a crappy painter for so long.
Im using Tamiya Pure White and Tamiya Italian Red (eventually). Sorry to have fooled you! That extruded red is a little light for Ferrari IMHO.
Oh yeah, I do the underside in primer for no light bleed...
Hope this isnt too tedious. I do own an airbrush but its kind of a pain with thinner, leveler, flat/matte, clean up etc. I find rattle cans much easier even though more expensive.
patrick- nice work so far on your f-1. i always wanted to plumb and wire my f-1 engines but can never find good reference photos. where do you get yours? is there a site i can't find.
also do the same with my spraybooth i have a spray bottle with water on hand and i spray down the whole area not only the booth to keep the dust down. i even mist the area under the box covers u use th dry the bodies under. some times if it looks like there is a lot of static electricity i will spray the area with static guard. one thing i would suggest if you have not tried it yet is instead of ysing a makeup brush try a tack cloth. i found the brush makes more static electricity and just spreads the dust around. i just give the body a quick swipe just before painting.
looks great pat, can't wait to see it finished.
joe
Joel_W
 Associate Editor
New York, United States
Joined: December 04, 2010
KitMaker: 11,666 posts
Auto Modeler: 2,974 posts
Posted: Sunday, May 10, 2020 - 05:27 AM UTC
D,
Really one nice masking job. Sure looks like everything is covered to the T.
And yes, hindsight is the great equalizer for sure. Funny how it never occurred to me to sand them down as the real deal is just about flush to the surface. Oh well, as you said, I'll keep that in my mental file for down the road. This one I won't forget so soon.
Joel
On my Workbench:
Monogram 1/24 scale 427 Shelby Cobra
Just Completed:
Beemax 1/24 scale BMW M3 E30 1992 Evolution II
New Jersey, United States
Joined: February 02, 2015
KitMaker: 330 posts
Auto Modeler: 23 posts
Posted: Sunday, May 10, 2020 - 06:01 AM UTC
joel- really nice job so far. Senna was one of my favorite f-1 drivers.
bill- so far so good. you really made the wiring look natural and the cpckpit is nice and clean
damian- looking forward to your final paint job. can i ask why you chose to mask the bumpers and trim? are you not using bare metal foil?
sorry guys, time to go back to nascar.

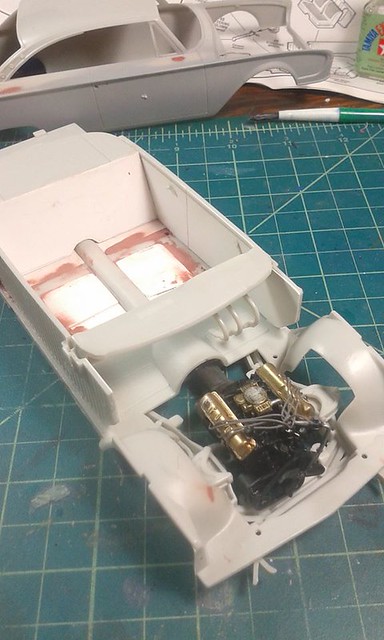
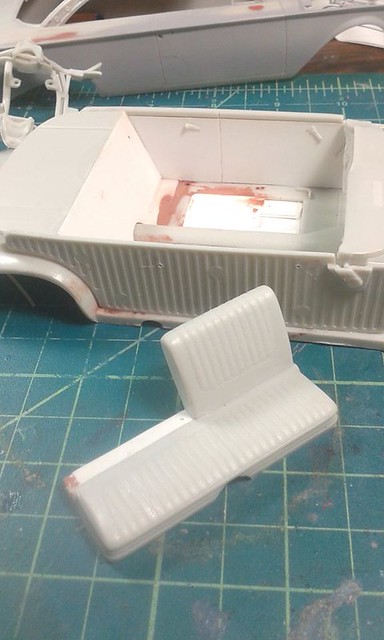
some progress over the past several weeks-
a mock up of the engine and interior tub. i cut out the chassis pan and replaced it with sheet plastic to allow the exhaust dumps to lay down flat. i plan to pass the dumps through the rail but not the body as was done in later years. and i opened the inner fenders to allow for the duel shocks.
then modified the bench seat. i will add a bolster and of course i have to add saftey belts since that is the sponsor of the car

" BORDER="0">
" BORDER="0">
Joel_W
Associate Editor New York, United States
Joined: December 04, 2010
KitMaker: 11,666 posts
Auto Modeler: 2,974 posts
Posted: Sunday, May 10, 2020 - 06:21 AM UTC
Joe,
Nice conversion work on the chassis as it already makes a huge visual difference. Looking forward to how you complete the modification to the front bench seat.
Joel
On my Workbench:
Monogram 1/24 scale 427 Shelby Cobra
Just Completed:
Beemax 1/24 scale BMW M3 E30 1992 Evolution II
AussieReg
Associate Editor 
#007
Victoria, Australia
Joined: June 09, 2009
KitMaker: 8,156 posts
Auto Modeler: 2,953 posts
Posted: Sunday, May 10, 2020 - 11:40 AM UTC
Joe, your engine looks great and the alterations to the floor pan and inner fenders are very neat and look like they will finish up nicely.
Quoted Text
damian- looking forward to your final paint job. can i ask why you chose to mask the bumpers and trim? are you not using bare metal foil?
Firstly, on the 1:1 car these are part of the fibreglass shell mould and are just painted silver. There is no actual chrome at all.
Secondly, I haven't tried BMF yet on such a large area with compound curves, and didn't want to use this build as a test-bed. Basically chicken
Cheers, D
ON the bench
Revell 1/24 '53 Corvette (building as '54)
Revell 1/24 BMW 507 Coupe and Cabrio
Italeri 1/48 Me262 B-1a/U1 Nightfighter
Monogram 1/24 '57 Chevy Nomad
Dragon 1/350 USS Frank Knox DD-742
New Jersey, United States
Joined: February 02, 2015
KitMaker: 330 posts
Auto Modeler: 23 posts
Posted: Sunday, May 10, 2020 - 12:09 PM UTC
damian yes i agree with the bumpers. i am sure someone somewhere has tried it but it would be difficult. i didn't realize the bumpers were molded on the car. i was mainly thinking of the trim for the BMF. i actually think the silver painted bumpers would look better.
joe
AussieReg
Associate Editor #007
Victoria, Australia
Joined: June 09, 2009
KitMaker: 8,156 posts
Auto Modeler: 2,953 posts
Posted: Sunday, May 10, 2020 - 12:27 PM UTC
Quoted Text
damian yes i agree with the bumpers. i am sure someone somewhere has tried it but it would be difficult. i didn't realize the bumpers were molded on the car. i was mainly thinking of the trim for the BMF. i actually think the silver painted bumpers would look better.
joe
I will give it a go one day for sure, probably after a few glasses of "liquid courage"

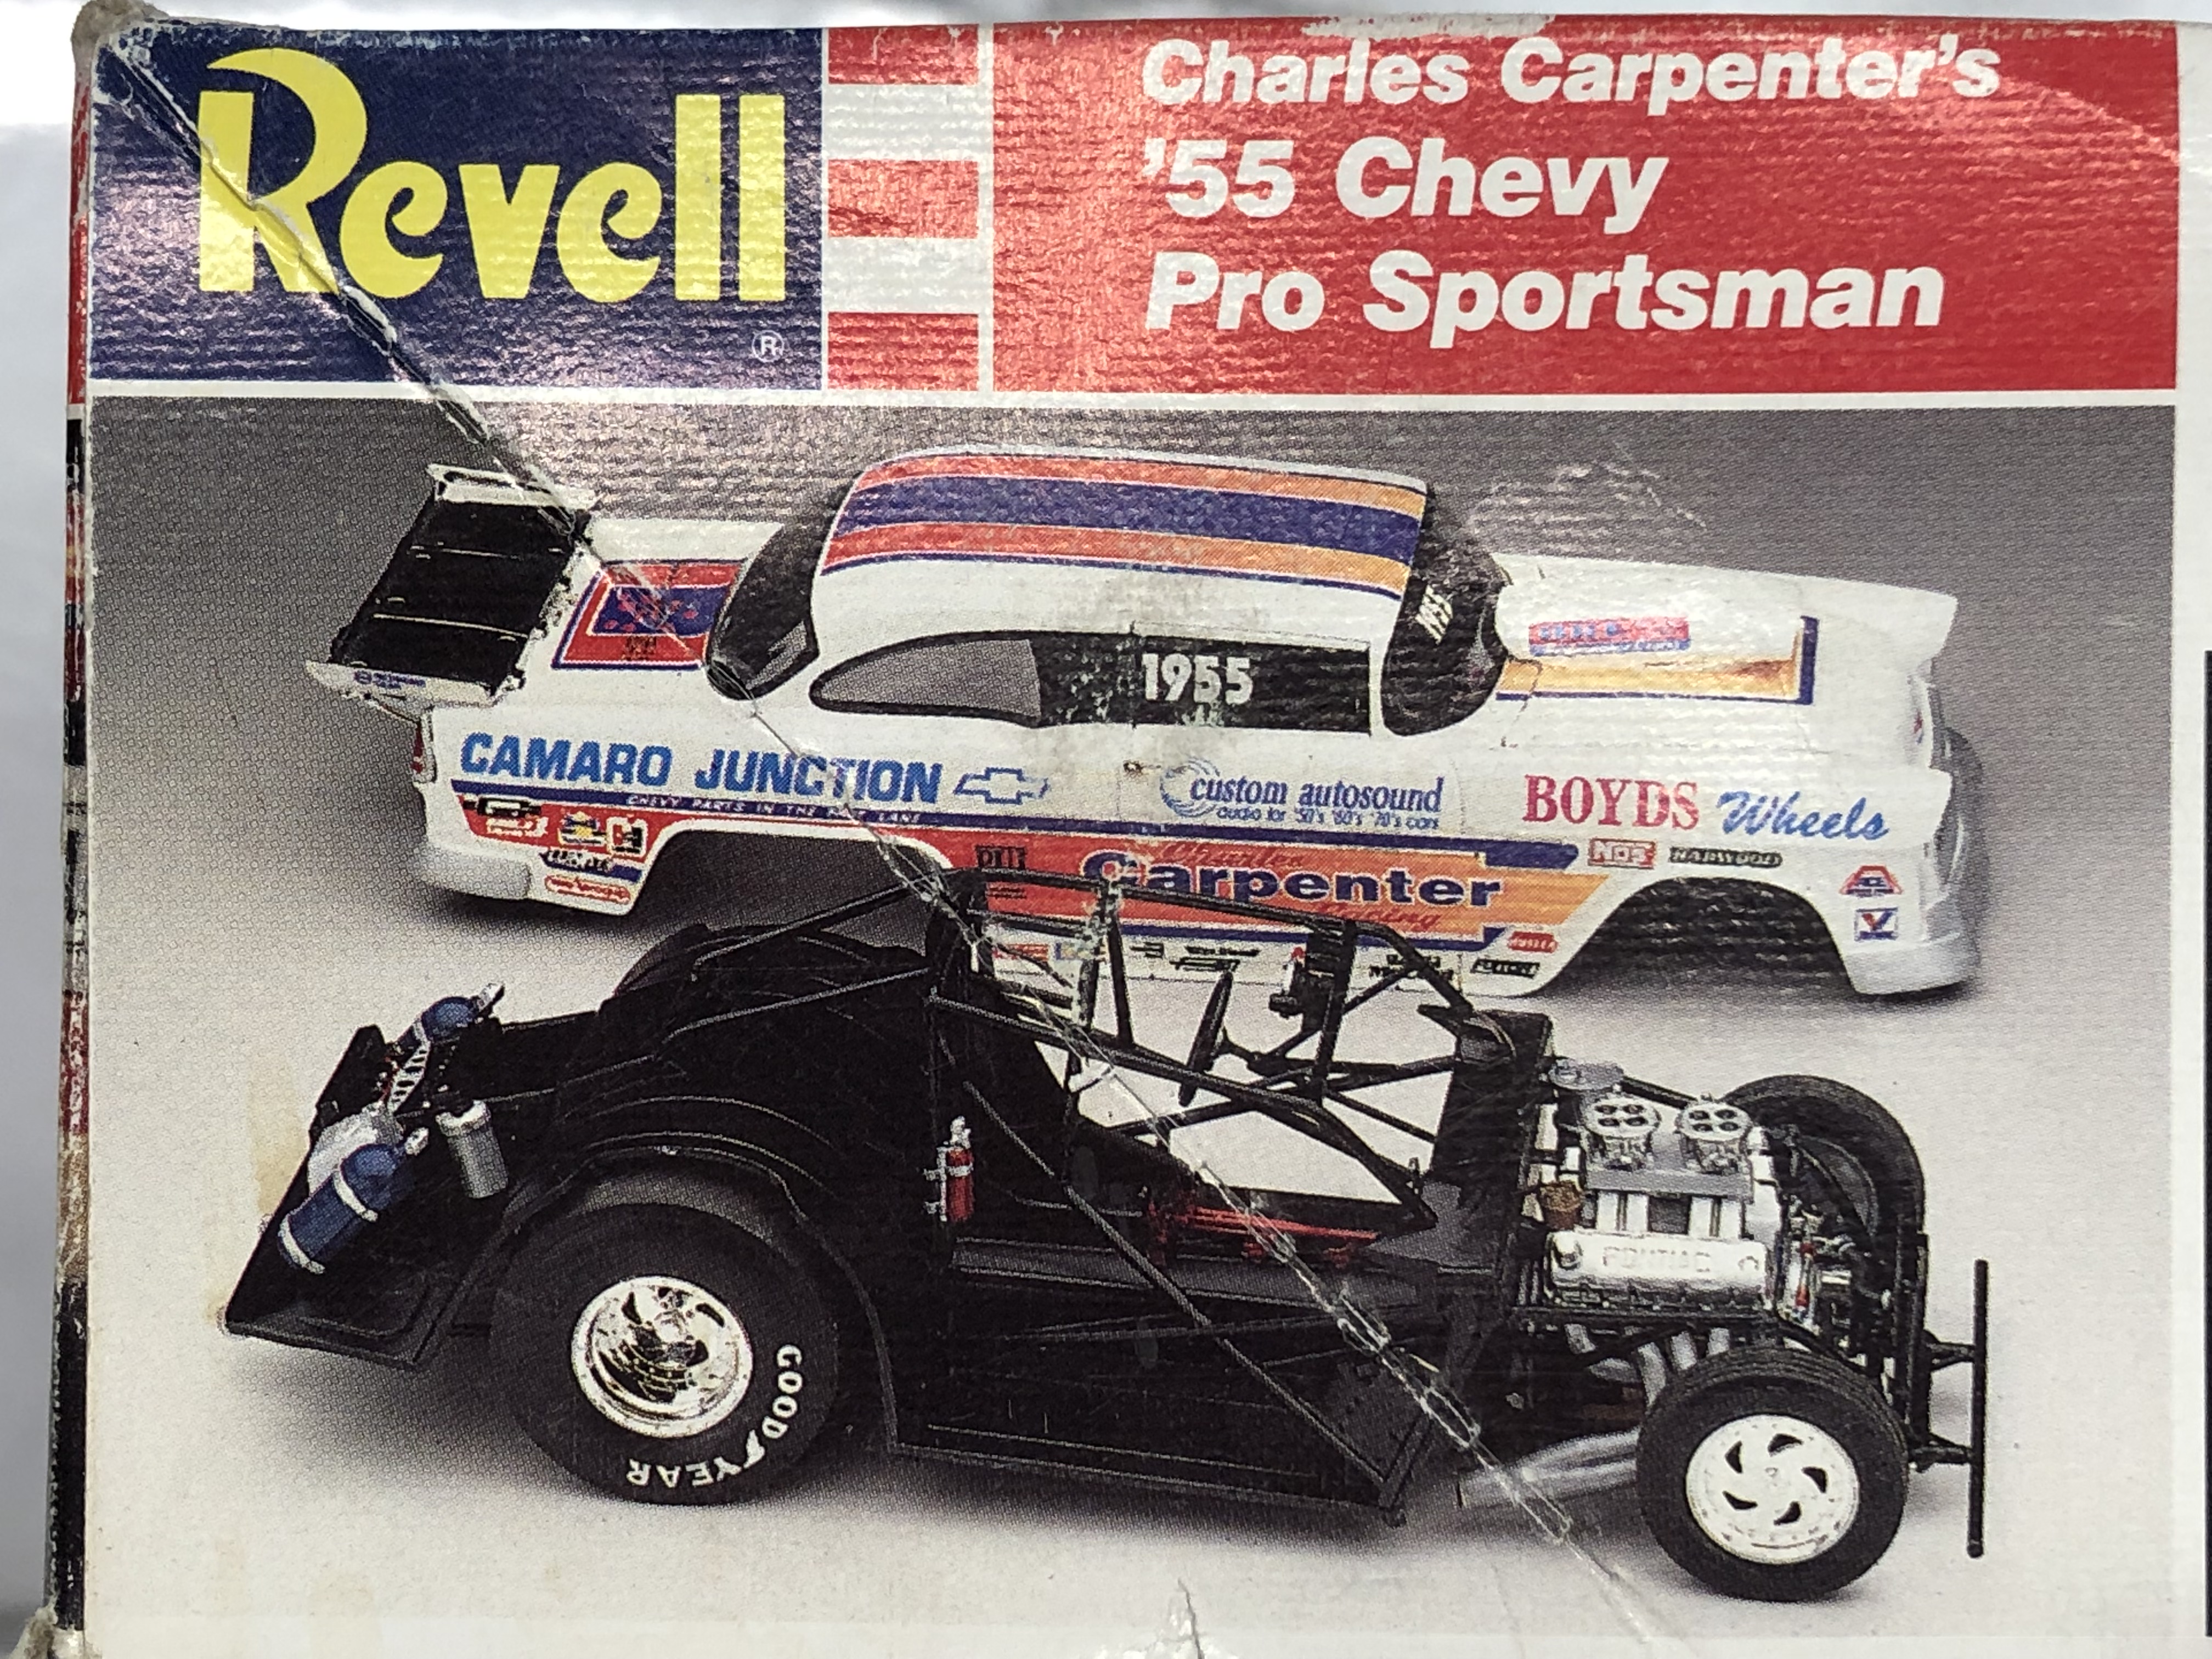
You can see in this photo that the headlights, turn signals and grille are all decals on the 1:1, and there is no chrome trim on the rest of the body (side trims or window frames for instance).

The biggest headache I can see coming up for me is the paint on the scoop. The kit provides a decal for the flat area on the bonnet around the base of the scoop but the scoop itself is left white, but as you can see in the image, as well as on the box art below, it is painted to match the centre-line stripes which are orange and a purple-blue which might be hard to match.
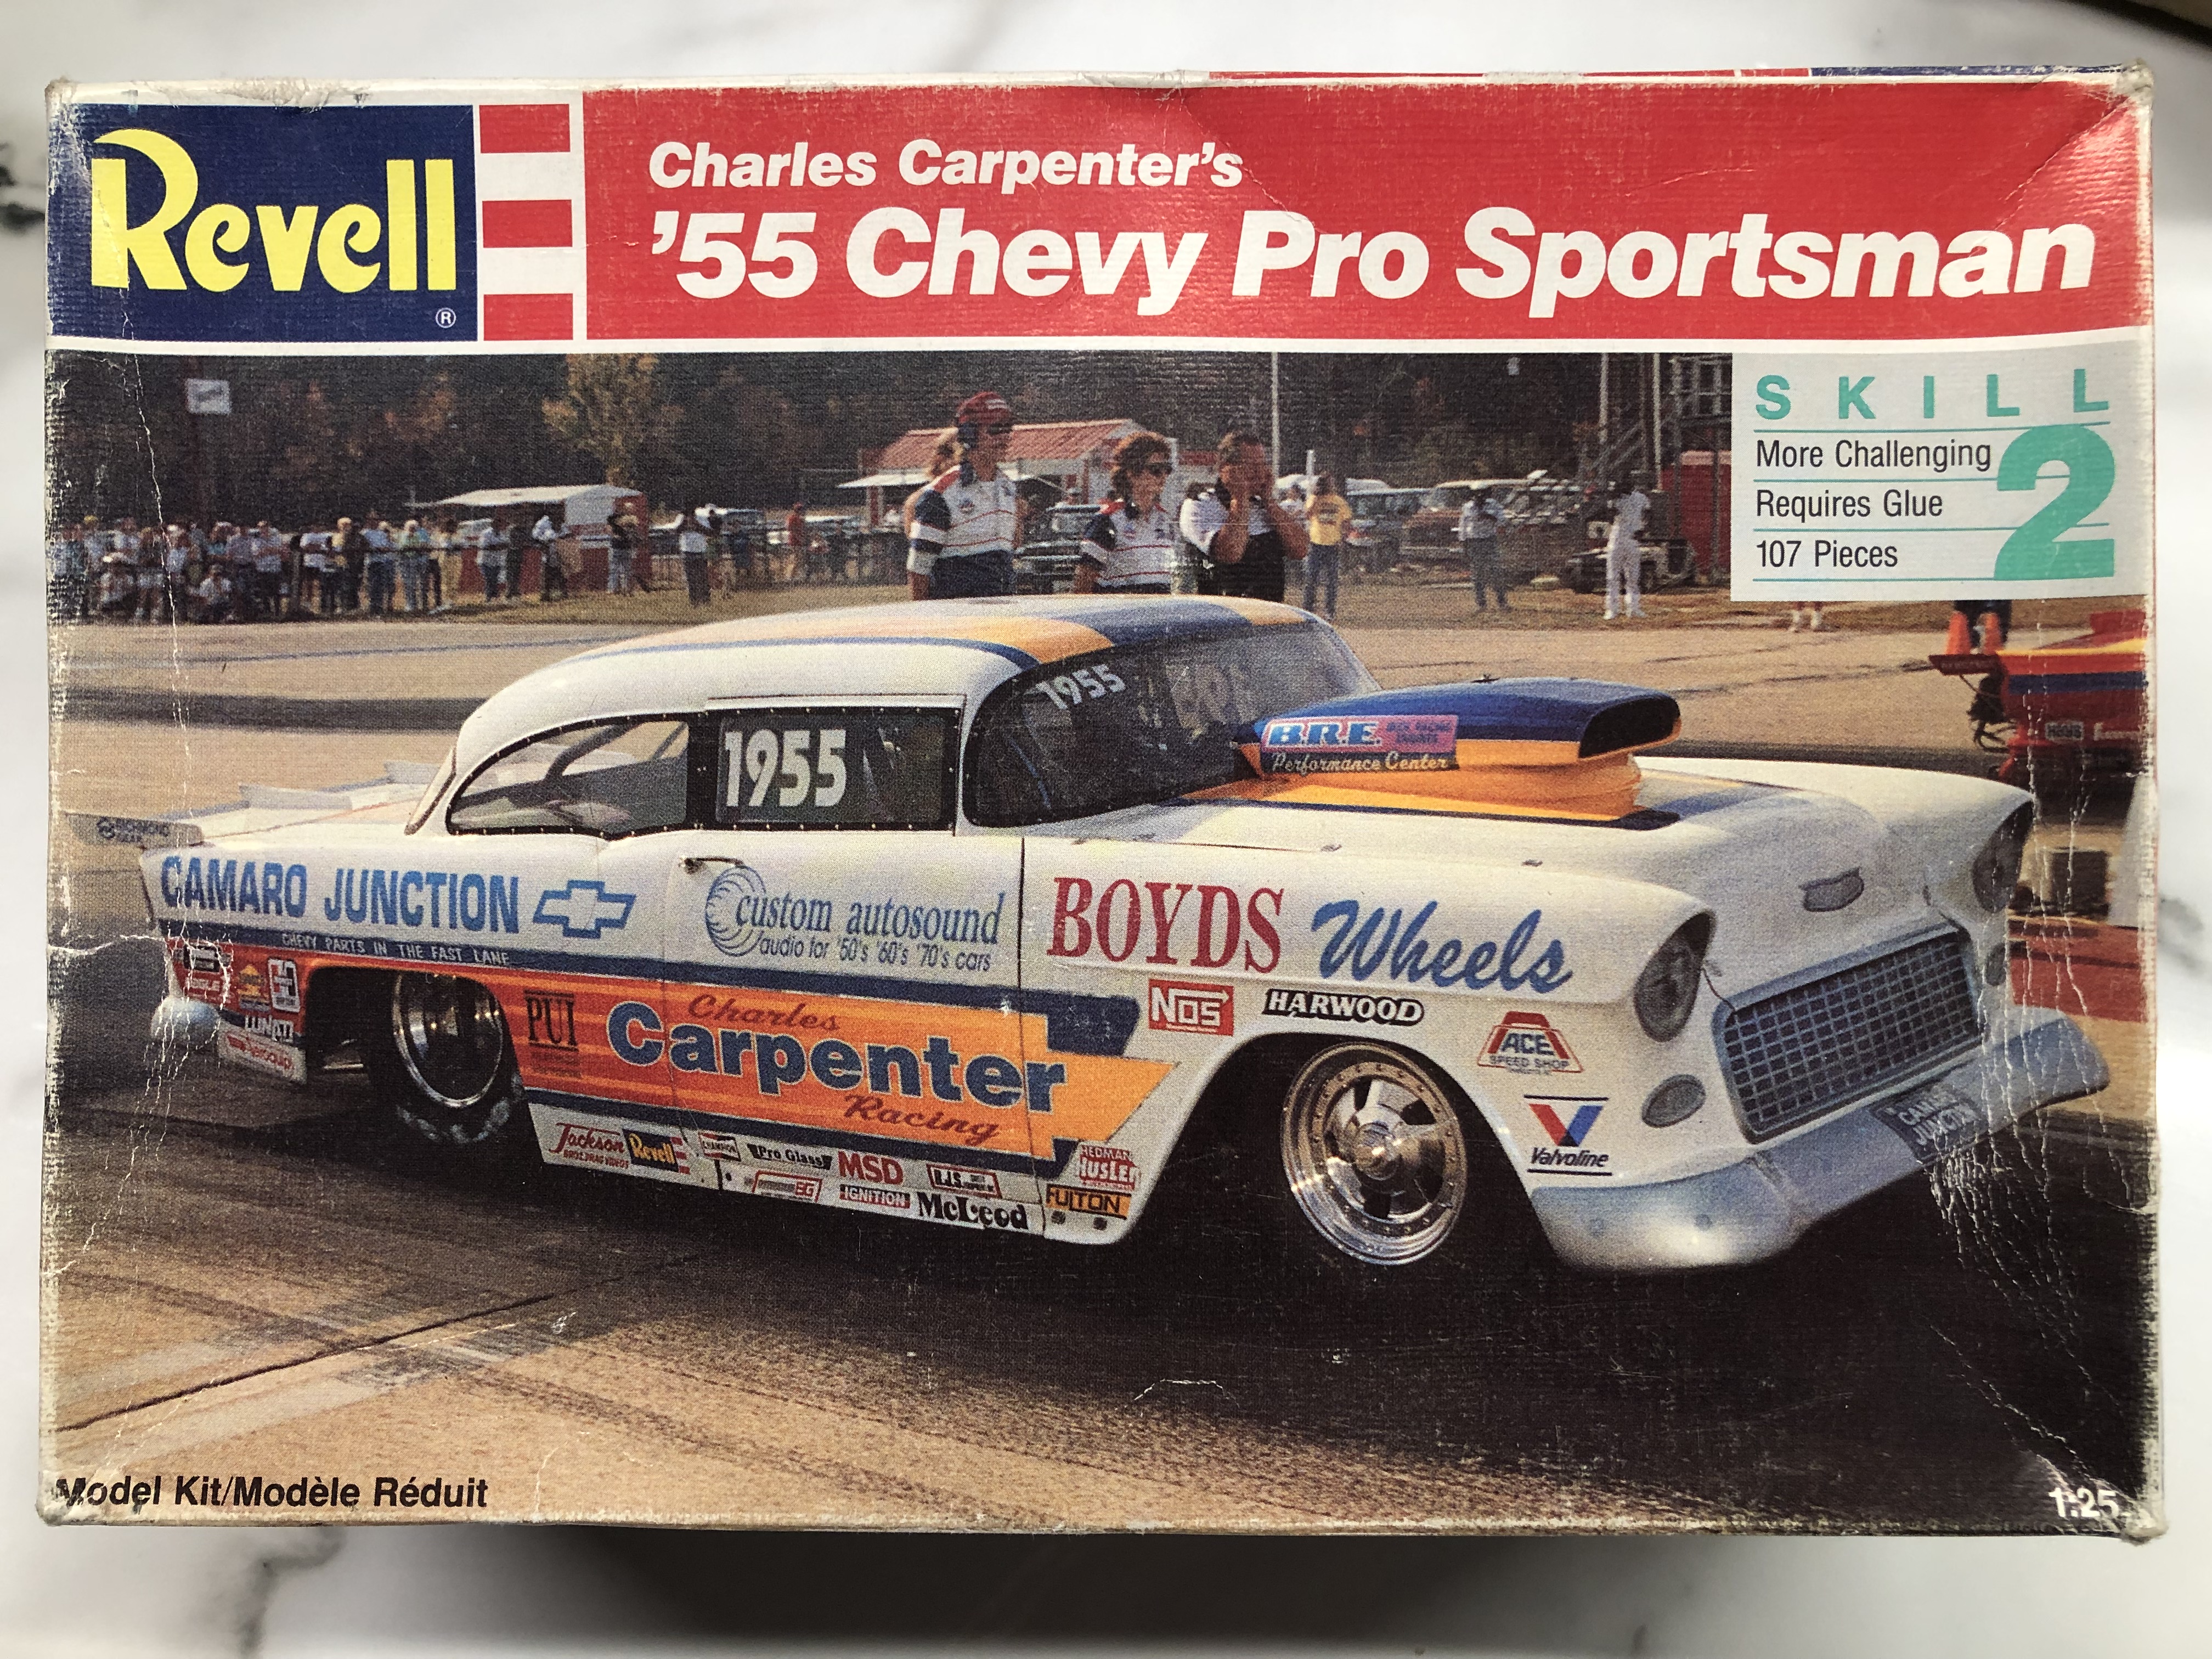
I need to decide whether to try to colour-match, which would be extremely obvious if I don't get it spot on, or take the artistic licence and leave the scoop white as the kit suggests in the image below.
Cheers, D
ON the bench
Revell 1/24 '53 Corvette (building as '54)
Revell 1/24 BMW 507 Coupe and Cabrio
Italeri 1/48 Me262 B-1a/U1 Nightfighter
Monogram 1/24 '57 Chevy Nomad
Dragon 1/350 USS Frank Knox DD-742
Georgia, United States
Joined: February 17, 2013
KitMaker: 173 posts
Auto Modeler: 46 posts
Posted: Sunday, May 10, 2020 - 01:43 PM UTC
bomber14,I love the gold valve covers. I am a big fan of NASCAR in the sixties.
On the bench, Blue Max, Mustang Funny car.
Airfix Hotspur glinder.
Ontario, Canada
Joined: December 14, 2014
KitMaker: 80 posts
Auto Modeler: 44 posts
Posted: Sunday, May 10, 2020 - 02:14 PM UTC
One of the sites I use for car photos is the ultimatecarpage.com. They have some pretty good photos of a lot of cars, usually my go to first.
On the bench:
Monogram deHavilland Mosquito
Tamiya PIAA Accord
Arii Focker Special, Tactical Pod Glaug
Monogram P-47
Tamiya P-47
Jo-Han Me-262
Revell Mongram Williams Renault FW 19
Joel_W
Associate Editor New York, United States
Joined: December 04, 2010
KitMaker: 11,666 posts
Auto Modeler: 2,974 posts
Posted: Monday, May 11, 2020 - 01:55 AM UTC
D,
I googled the car, and indeed there has been major changes to the nose clip and hood scoop both in shape and color.

This should make your life so much easier.
joel
On my Workbench:
Monogram 1/24 scale 427 Shelby Cobra
Just Completed:
Beemax 1/24 scale BMW M3 E30 1992 Evolution II
New Jersey, United States
Joined: February 02, 2015
KitMaker: 330 posts
Auto Modeler: 23 posts
Posted: Monday, May 11, 2020 - 06:49 AM UTC
damian i see in the last box photo the orange seems to fade from a red in the rear to the orange in front. it looks to me you could probably be able to use tamiya camel yellow for the scoop and hood as by that point it has completed the transition to the yellow orange. i am sure there is a paint match to be had for the purple with all the different paint companies out there.
joe
New Jersey, United States
Joined: February 02, 2015
KitMaker: 330 posts
Auto Modeler: 23 posts
Posted: Monday, May 11, 2020 - 07:00 AM UTC
Quoted Text
One of the sites I use for car photos is the ultimatecarpage.com. They have some pretty good photos of a lot of cars, usually my go to first.
david thank you very much. some great engine references. what i was looking for for f-1
joe
New Jersey, United States
Joined: February 02, 2015
KitMaker: 330 posts
Auto Modeler: 23 posts
Posted: Monday, May 11, 2020 - 07:11 AM UTC
Quoted Text
bomber14,I love the gold valve covers. I am a big fan of NASCAR in the sixties.
thanks bill. yes the gold really sets the engine off. from what i have found that was the color in the car most likely. i started making nascar kits in the early 90's. wasn't really interested in the early years, just the 80's 90's 2000's. but when nascar implemented the "car of tomorrow" crap i lost all interest in the sport. the cars were unattractive to me, a complete turn off. that is when i started to get interested in the early years. problem is information and reference photos are hard to come by. especially for the engine wiring and oil plumbing. i'm still looking for that ultimate nascar site /page with a collection of photos and info from that era but for the most part it still eludes me. fortunately i have some friends like tom mooty who were involved in that era for help and several FB groups that have members that actually worked on the cars back then. so i try my best. joe
New York, United States
Joined: December 07, 2004
KitMaker: 1,888 posts
Auto Modeler: 806 posts
Posted: Monday, May 11, 2020 - 08:37 AM UTC
Time for an update, i thought i would post a pic of the gasser masked and ready for paint, ever thing that is masked will stay white the rest will be orange.
I do not have high hopes for this paint job because i have already slipped with the knife and chipped the white paint near one of the back fenders. I think i can touch up that area by hand as long as when i remove the masking no other paint comes up with it, i also hope i don't get any paint sneak under the masking, wish me luck i will need it.

Joel_W
Associate Editor New York, United States
Joined: December 04, 2010
KitMaker: 11,666 posts
Auto Modeler: 2,974 posts
Posted: Monday, May 11, 2020 - 10:27 AM UTC
Robert,
Your masking looks really quite consistent, so it should be fine.
One thing I always do to help with leaks under the masking tape is a super lite tack coat that will really help to seal the tape edges. Then just build up your coats with lite even coats. Rarely do I get any bleed through.
Joel
On my Workbench:
Monogram 1/24 scale 427 Shelby Cobra
Just Completed:
Beemax 1/24 scale BMW M3 E30 1992 Evolution II
New York, United States
Joined: December 07, 2004
KitMaker: 1,888 posts
Auto Modeler: 806 posts
Posted: Monday, May 11, 2020 - 11:01 AM UTC
Thanks Joel, yeh i always put my first coat very light. I finished the orange coat about an hour ago and unmasked it not perfect but better than i first thought.
After a few days of drying i will do the touch up. I will post a pic Tuesday after the paint has dried a little more.
AussieReg
Associate Editor #007
Victoria, Australia
Joined: June 09, 2009
KitMaker: 8,156 posts
Auto Modeler: 2,953 posts
Posted: Monday, May 11, 2020 - 11:34 AM UTC
Joe, neat masking job there, looking forward to the reveal on the two-tone paint job!
David (Dixon66) is adding his
2006 Mustang GT - SCCA Conversion to the group build here while he waits for paint for his Zakspeed Capri. Please check out the dedicated build log to see the neat modification work going on there.
Cheers, D
ON the bench
Revell 1/24 '53 Corvette (building as '54)
Revell 1/24 BMW 507 Coupe and Cabrio
Italeri 1/48 Me262 B-1a/U1 Nightfighter
Monogram 1/24 '57 Chevy Nomad
Dragon 1/350 USS Frank Knox DD-742
New Hampshire, United States
Joined: December 12, 2002
KitMaker: 1,500 posts
Auto Modeler: 645 posts
Posted: Monday, May 11, 2020 - 11:57 AM UTC
Quoted Text
Joe, neat masking job there, looking forward to the reveal on the two-tone paint job!
David (Dixon66) is adding his 2006 Mustang GT - SCCA Conversion to the group build here while he waits for paint for his Zakspeed Capri. Please check out the dedicated build log to see the neat modification work going on there.
Cheers, D
Decals
D.Decals. Paint has been here for weeks, but not applying it until the decals get here, if they ever do.

Nice work on the Chevy thing.

Bill, the Blue Max looks great so far.
Can't wait to see more Robert, I think those colors will look awesome together.
The conversion is looking real good Joe. Part of the inspiration for my new build.
I love the smell of Tenax in the morning....It smells like a day off work.
I drive a Jeep, but i still bleed Ford Blue....
AussieReg
Associate Editor #007
Victoria, Australia
Joined: June 09, 2009
KitMaker: 8,156 posts
Auto Modeler: 2,953 posts
Posted: Monday, May 11, 2020 - 12:07 PM UTC
Sorry mate, my tired old brain-box is struggling to keep up with the pace of progress in this place!

Cheers, D
ON the bench
Revell 1/24 '53 Corvette (building as '54)
Revell 1/24 BMW 507 Coupe and Cabrio
Italeri 1/48 Me262 B-1a/U1 Nightfighter
Monogram 1/24 '57 Chevy Nomad
Dragon 1/350 USS Frank Knox DD-742
Netherlands Antilles
Joined: September 02, 2014
KitMaker: 1,977 posts
Auto Modeler: 1,371 posts
Posted: Monday, May 11, 2020 - 02:12 PM UTC
Quoted Text
Robert,
Your masking looks really quite consistent, so it should be fine.
One thing I always do to help with leaks under the masking tape is a super lite tack coat that will really help to seal the tape edges. Then just build up your coats with lite even coats. Rarely do I get any bleed through.
Joel
Glad to hear your unmasking went well,
Robert. It's still my biggest problem to date
Great advice,
Joel. It depends very much on the type of paint as well. The water-based or alcohol-based acrylics have a tendency to un-glue the tape edges, while the lacquer based ones seem to have no influence. Metallic paints leave the cleanest edges in my experience, followed by lacquer based acrylics. Enamels are the worst. Lacquers other than acrylics can be troublesome too.
Gabriel
Gabriel
Many of my builds can be seen on YT in video format. Please check 'Panzergrau Models' Channel.
New Hampshire, United States
Joined: December 12, 2002
KitMaker: 1,500 posts
Auto Modeler: 645 posts
Posted: Monday, May 11, 2020 - 02:20 PM UTC
I love the smell of Tenax in the morning....It smells like a day off work.
I drive a Jeep, but i still bleed Ford Blue....
Joel_W
Associate Editor New York, United States
Joined: December 04, 2010
KitMaker: 11,666 posts
Auto Modeler: 2,974 posts
Posted: Tuesday, May 12, 2020 - 01:41 AM UTC
Gabriel,
Agreed on the type of tape used. I only mask with Tamiya tape, but use other craft type types to fill in masking areas that are low tack. It's the low tack that's the problem. I've always found that store bought masking tape has a tendency to pull up paint. But I've never had an issue with the Tamiya type of tapes.
That is with the exception of their vinyl tapes which have little to almost no sticking power.
I also burnish the tape edges down with a Q tip or better yet with a metal burnisher I got from a hobby site years ago. It's got a flat type of rounded tip so I can't damage the paint nor tear the tape.
Joel
On my Workbench:
Monogram 1/24 scale 427 Shelby Cobra
Just Completed:
Beemax 1/24 scale BMW M3 E30 1992 Evolution II
AussieReg
Associate Editor #007
Victoria, Australia
Joined: June 09, 2009
KitMaker: 8,156 posts
Auto Modeler: 2,953 posts
Posted: Tuesday, May 12, 2020 - 02:37 AM UTC
Indeed, down here we call it "Hanging 5h1t on each other" and it is a national pastime! A healthy dose of banter is good for the soul, especially with the state of play around the world right now.
"Prime Time" for the '55 tonight.
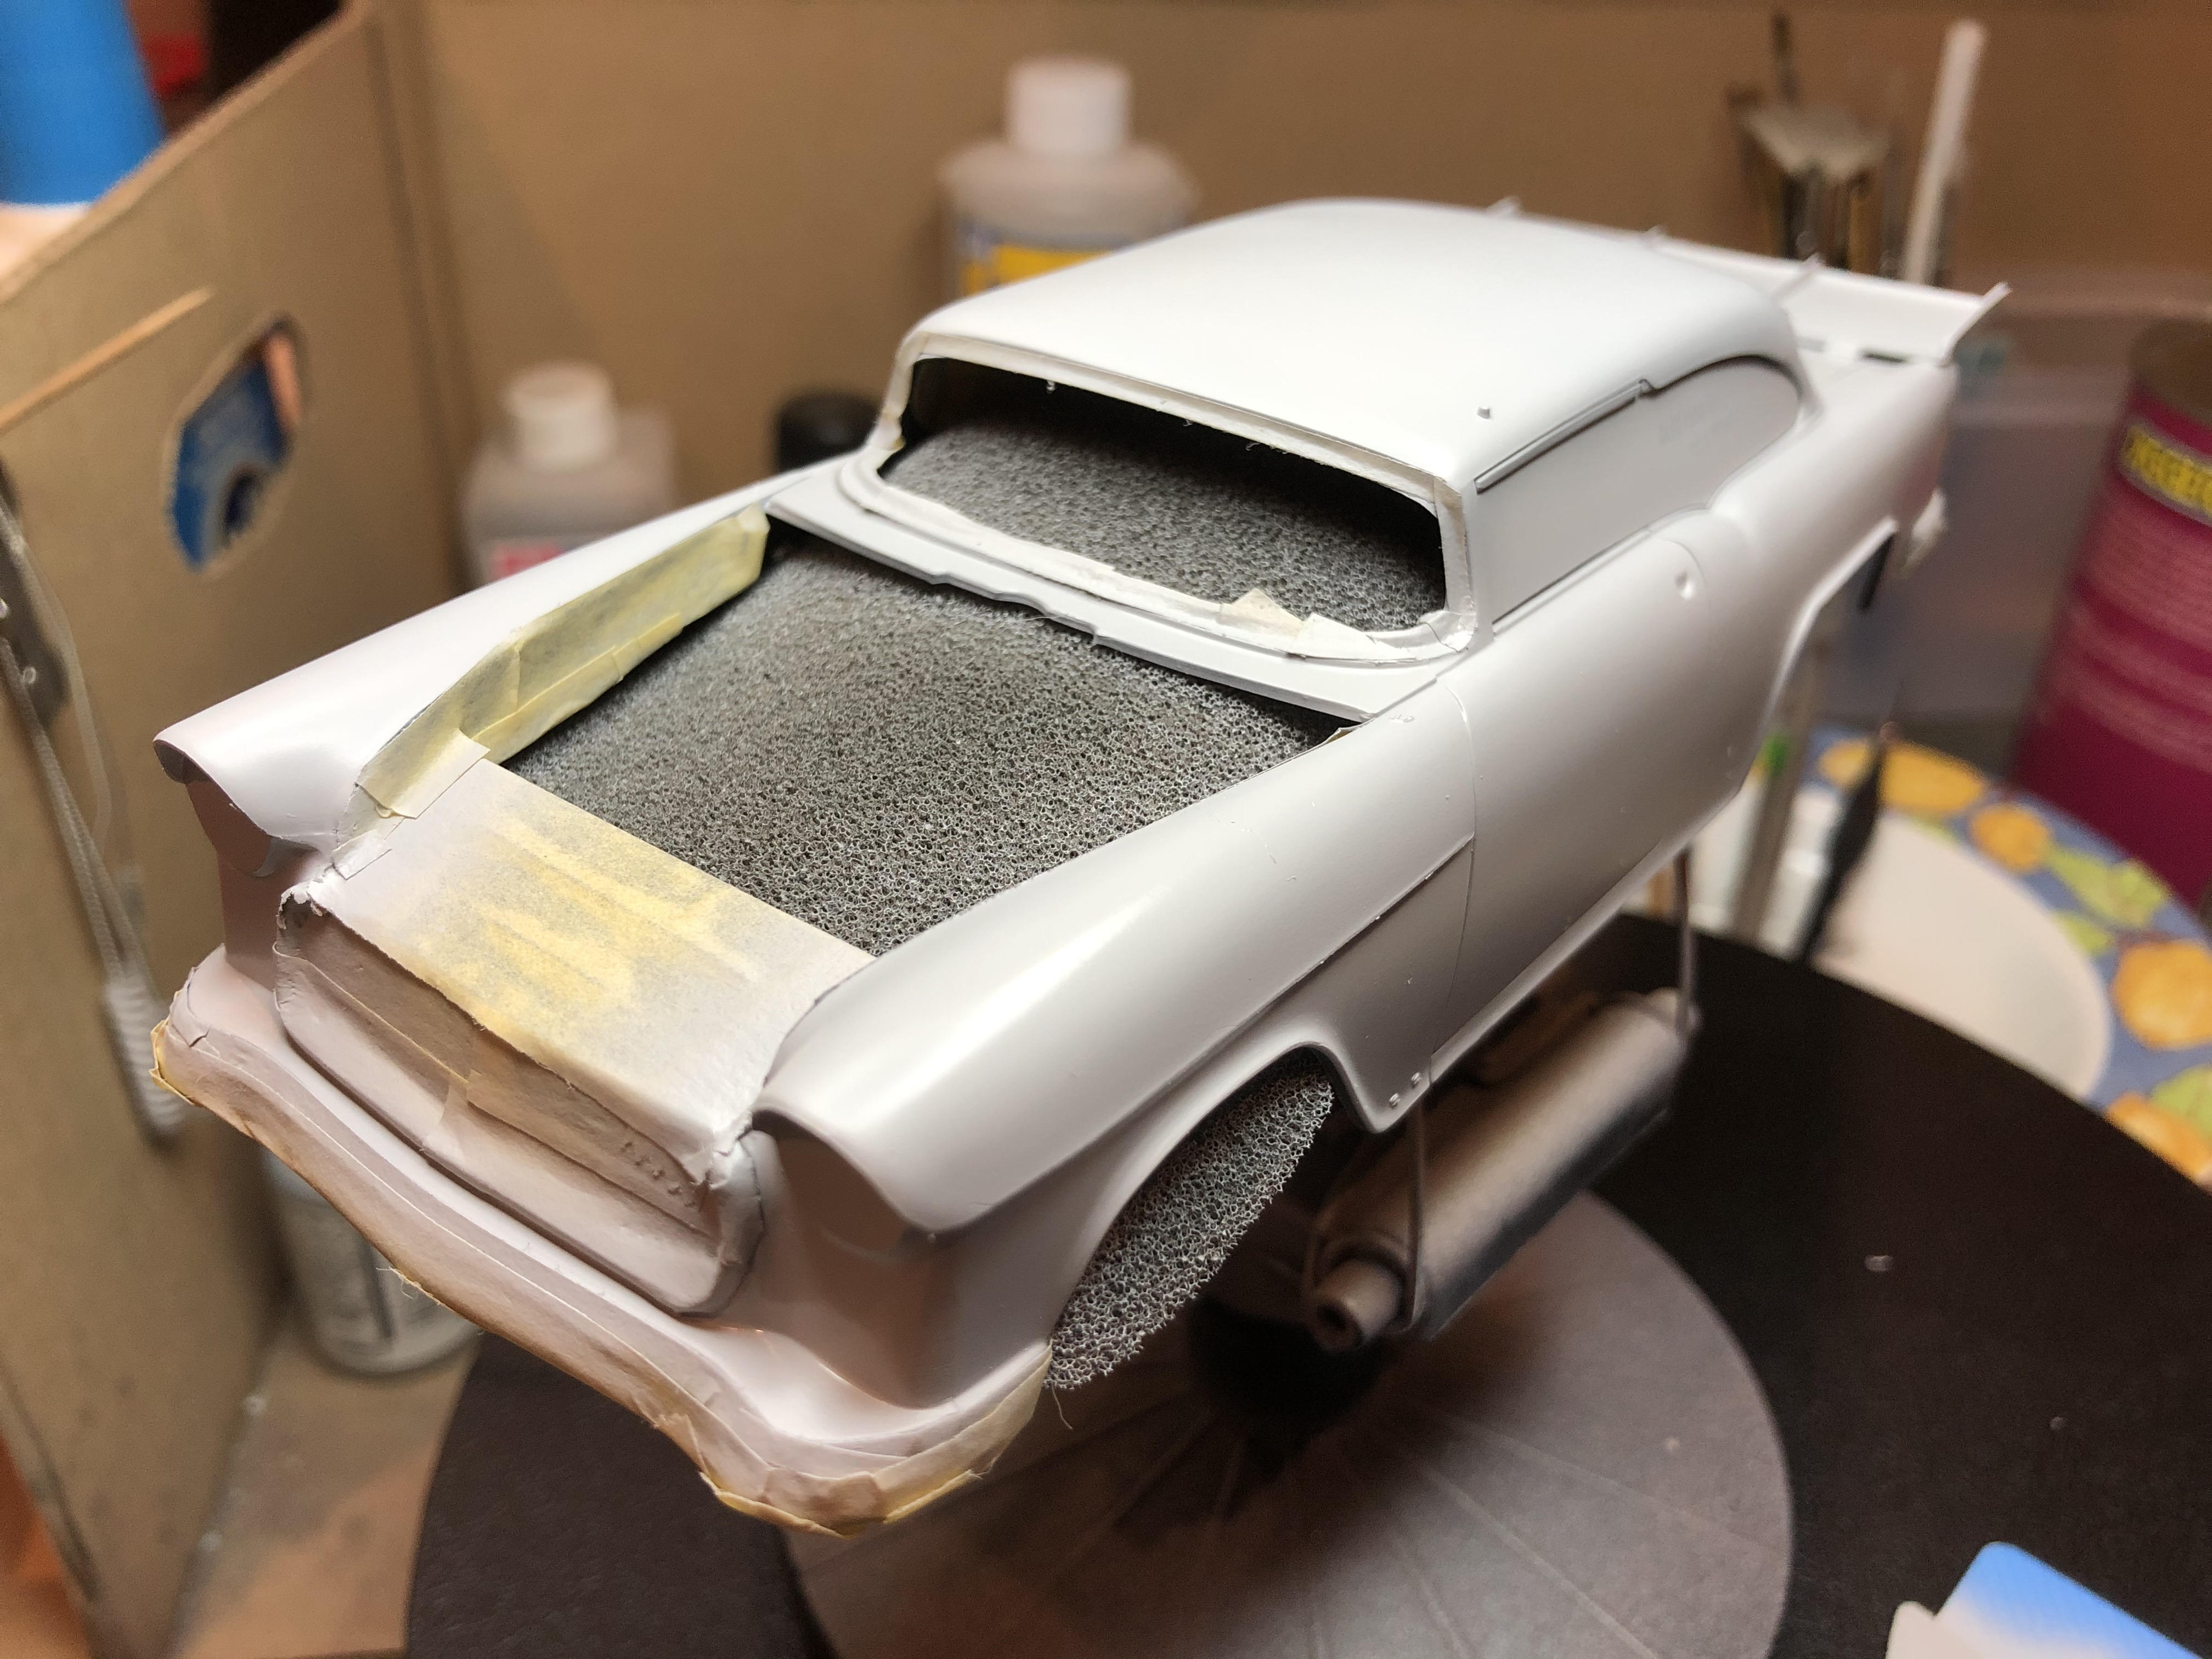
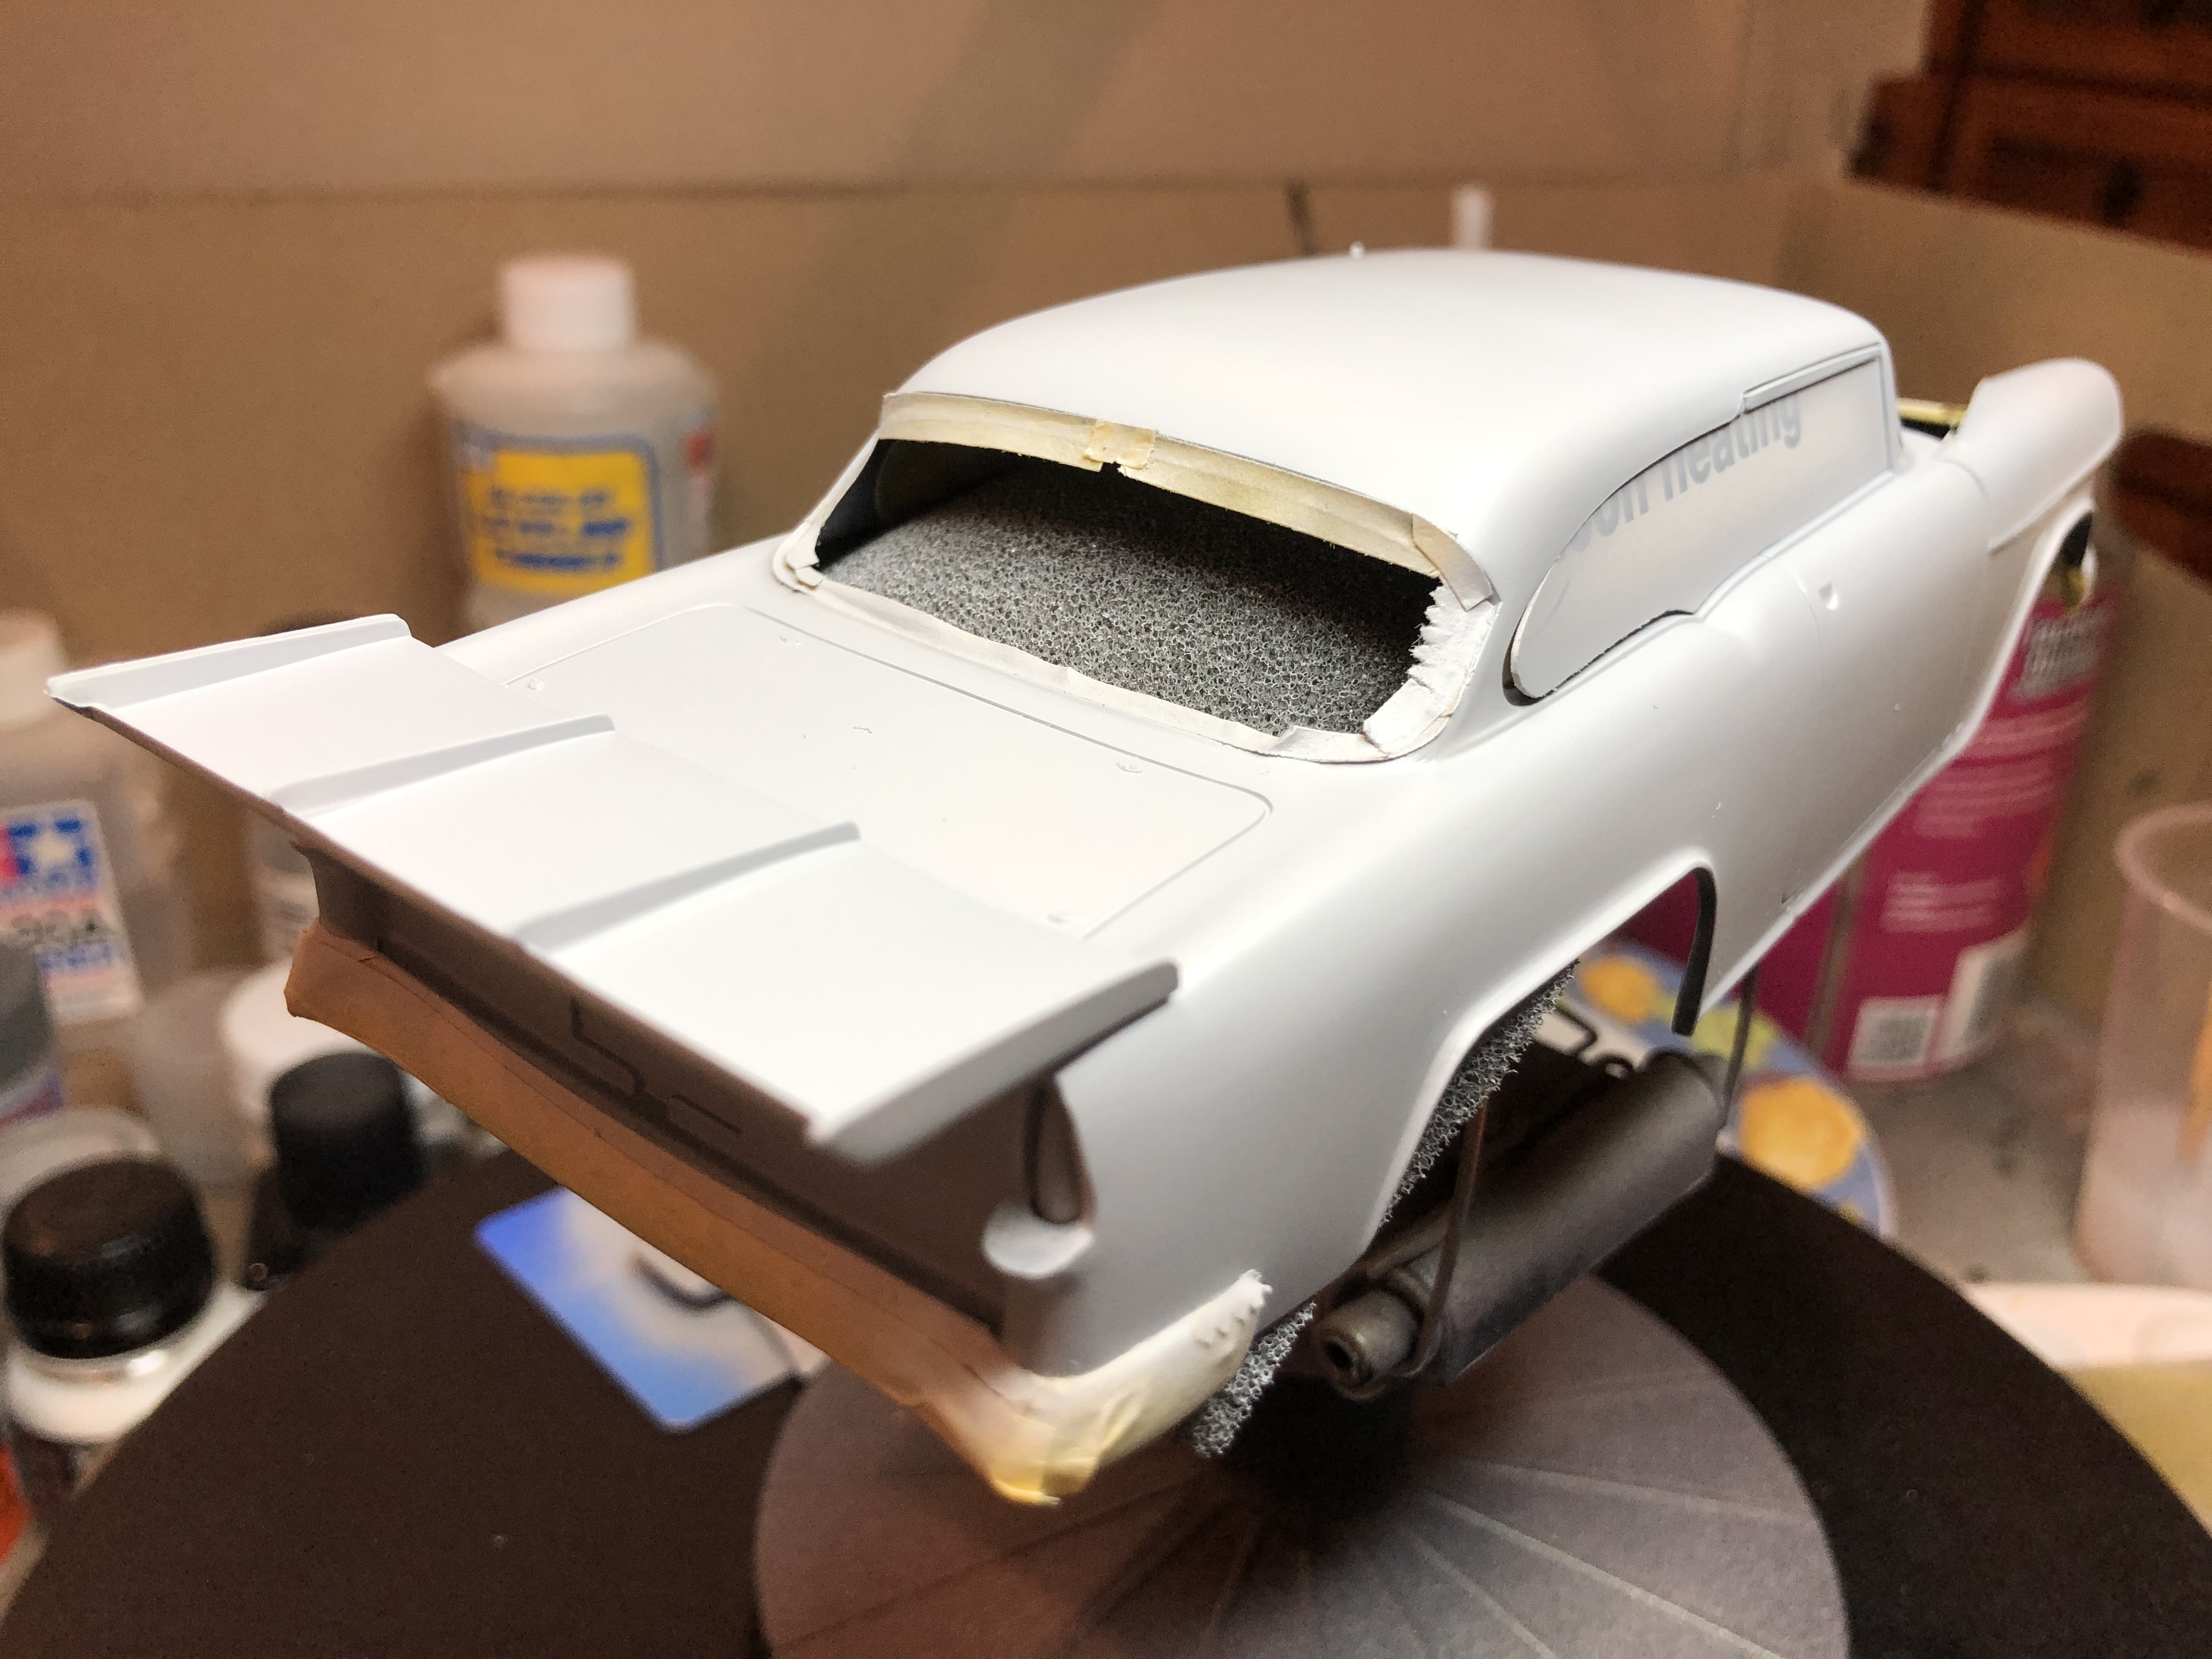
A day or so to set up, then a fine wet sand and ready for the top coat. There are quite a few very fine details on the body of this one, panel fasteners and such, so my wet sanding will need to be prior to the statutory Shiraz!
Cheers, D
ON the bench
Revell 1/24 '53 Corvette (building as '54)
Revell 1/24 BMW 507 Coupe and Cabrio
Italeri 1/48 Me262 B-1a/U1 Nightfighter
Monogram 1/24 '57 Chevy Nomad
Dragon 1/350 USS Frank Knox DD-742
New Jersey, United States
Joined: February 02, 2015
KitMaker: 330 posts
Auto Modeler: 23 posts
Posted: Tuesday, May 12, 2020 - 02:40 AM UTC
Quoted Text
Gabriel,
Agreed on the type of tape used. I only mask with Tamiya tape, but use other craft type types to fill in masking areas that are low tack. It's the low tack that's the problem. I've always found that store bought masking tape has a tendency to pull up paint. But I've never had an issue with the Tamiya type of tapes.
That is with the exception of their vinyl tapes which have little to almost no sticking power.
I also burnish the tape edges down with a Q tip or better yet with a metal burnisher I got from a hobby site years ago. It's got a flat type of rounded tip so I can't damage the paint nor tear the tape.
Joel
i have heard also of using a clear coat along the tape edge before the color coat. it is supposed seals the tape edge. i don't know how well it works though.
Netherlands Antilles
Joined: September 02, 2014
KitMaker: 1,977 posts
Auto Modeler: 1,371 posts
Posted: Tuesday, May 12, 2020 - 03:52 AM UTC
Quoted Text
i have heard also of using a clear coat along the tape edge before the color coat. it is supposed seals the tape edge. i don't know how well it works though.
Yes, this technique it is used by aircraft modellers in painting the canopies. Another version I've seen, when you mask for a bi-colour scheme, it is to spray the base (underlying) colour first. Like this, even if the masking has seepage, the first colour to seep in is the color that has to be there anyways. I never tried either one, but there is some logic.
Gabriel
Gabriel
Many of my builds can be seen on YT in video format. Please check 'Panzergrau Models' Channel.


