Strip, Track & Trail Official Build Thread

#335
Auckland, New Zealand
Joined: September 03, 2013
KitMaker: 1,808 posts
Auto Modeler: 701 posts
Posted: Sunday, June 21, 2020 - 12:37 PM UTC
Quoted Text
Michael,
Looking real good Sir. I'm more then impressed. Are those two "storage tanks" for gas? If so, the weight distribution must have been a major issue as they went through a load of fuel.
Joel
Hi Joel, not for gas, for luggage. You didn't have put anything in them, they just had to be there. Rules for different classes of Le Mans cars were odd at the best of times. The 908 did not require the spare tyre, luggage space or extra seat that the 917s did. Some classes today still require these, like the LM GTE cars.
cheers
Michael
Campaign:
Strip, Track and Trail - Porsche 917/20 - On the bench
Phantoms at 60 - F-4J Marines
Below 1000 tons - M50 minesweeper - Sailed for duty
#335
Auckland, New Zealand
Joined: September 03, 2013
KitMaker: 1,808 posts
Auto Modeler: 701 posts
Posted: Sunday, June 21, 2020 - 12:39 PM UTC
Quoted Text
Time for a little update on my '55 Pro Sportsman. I've been struggling with the tube frames around the engine bay. They fit very tightly around the headers, and if I have glued the headers on slightly out of position the tube frames press against them and won't sit neatly in position. I am playing around with them and doing some "In Field Styling Modifications" and they are almost there.
Cheers, D
Sounds like my issues. Good luck with those

cheers
Michael
Campaign:
Strip, Track and Trail - Porsche 917/20 - On the bench
Phantoms at 60 - F-4J Marines
Below 1000 tons - M50 minesweeper - Sailed for duty
Joel_W
 Associate Editor
New York, United States
Joined: December 04, 2010
KitMaker: 11,666 posts
Auto Modeler: 2,974 posts
Posted: Monday, June 22, 2020 - 12:35 AM UTC
Michael,
Thanks for the info. I always hated the spare tire and pass seat rules. Once they figured out how to make miniature tires, it really became a joke, and those pass seats got smaller and smaller.
Joel
On my Workbench:
Monogram 1/24 scale 427 Shelby Cobra
Just Completed:
Beemax 1/24 scale BMW M3 E30 1992 Evolution II
New Hampshire, United States
Joined: December 12, 2002
KitMaker: 1,500 posts
Auto Modeler: 645 posts
Posted: Tuesday, June 23, 2020 - 06:11 AM UTC
I love the smell of Tenax in the morning....It smells like a day off work.
I drive a Jeep, but i still bleed Ford Blue....
Joel_W
Associate Editor New York, United States
Joined: December 04, 2010
KitMaker: 11,666 posts
Auto Modeler: 2,974 posts
Posted: Tuesday, June 23, 2020 - 07:39 AM UTC
David,
Wow

Absolutely love the color. You nailed it for sure.
Joel
On my Workbench:
Monogram 1/24 scale 427 Shelby Cobra
Just Completed:
Beemax 1/24 scale BMW M3 E30 1992 Evolution II
New Hampshire, United States
Joined: December 12, 2002
KitMaker: 1,500 posts
Auto Modeler: 645 posts
Posted: Tuesday, June 23, 2020 - 08:43 AM UTC
Thanks Joel, hope I can do the decals justice.
I love the smell of Tenax in the morning....It smells like a day off work.
I drive a Jeep, but i still bleed Ford Blue....
Joel_W
Associate Editor New York, United States
Joined: December 04, 2010
KitMaker: 11,666 posts
Auto Modeler: 2,974 posts
Posted: Tuesday, June 23, 2020 - 09:17 AM UTC
David,
I'm betting on it. if you can paint that good, decals should be a breeze.
Joel
On my Workbench:
Monogram 1/24 scale 427 Shelby Cobra
Just Completed:
Beemax 1/24 scale BMW M3 E30 1992 Evolution II
AussieReg
Associate Editor #007
Victoria, Australia
Joined: June 09, 2009
KitMaker: 8,156 posts
Auto Modeler: 2,953 posts
Posted: Tuesday, June 23, 2020 - 04:45 PM UTC
Looks amazing David, great work!
Cheers, D
ON the bench
Revell 1/24 '53 Corvette (building as '54)
Revell 1/24 BMW 507 Coupe and Cabrio
Italeri 1/48 Me262 B-1a/U1 Nightfighter
Monogram 1/24 '57 Chevy Nomad
Dragon 1/350 USS Frank Knox DD-742
New Hampshire, United States
Joined: December 12, 2002
KitMaker: 1,500 posts
Auto Modeler: 645 posts
Posted: Wednesday, June 24, 2020 - 12:19 AM UTC
Thanks D.
Hope to start decals soon. The next two nights are tied up with conference calls to our Aus. offices and then our Japan dealer.
This work stuff is getting in the way...
I love the smell of Tenax in the morning....It smells like a day off work.
I drive a Jeep, but i still bleed Ford Blue....
California, United States
Joined: January 22, 2016
KitMaker: 766 posts
Auto Modeler: 140 posts
Posted: Wednesday, June 24, 2020 - 05:01 AM UTC
David, that looks really cool! Hope you have great success with the decals! I know you will!
Just completed-
1/24th Tamiya Porsche 956 Skoal Bandit
In the works:
1/12th Protar Ferrari 312T2 (shelved for time being)
ERTL D-8 Caterpillar Bulldozer
New Hampshire, United States
Joined: December 12, 2002
KitMaker: 1,500 posts
Auto Modeler: 645 posts
Posted: Wednesday, June 24, 2020 - 06:19 AM UTC
Thanks Patrick.
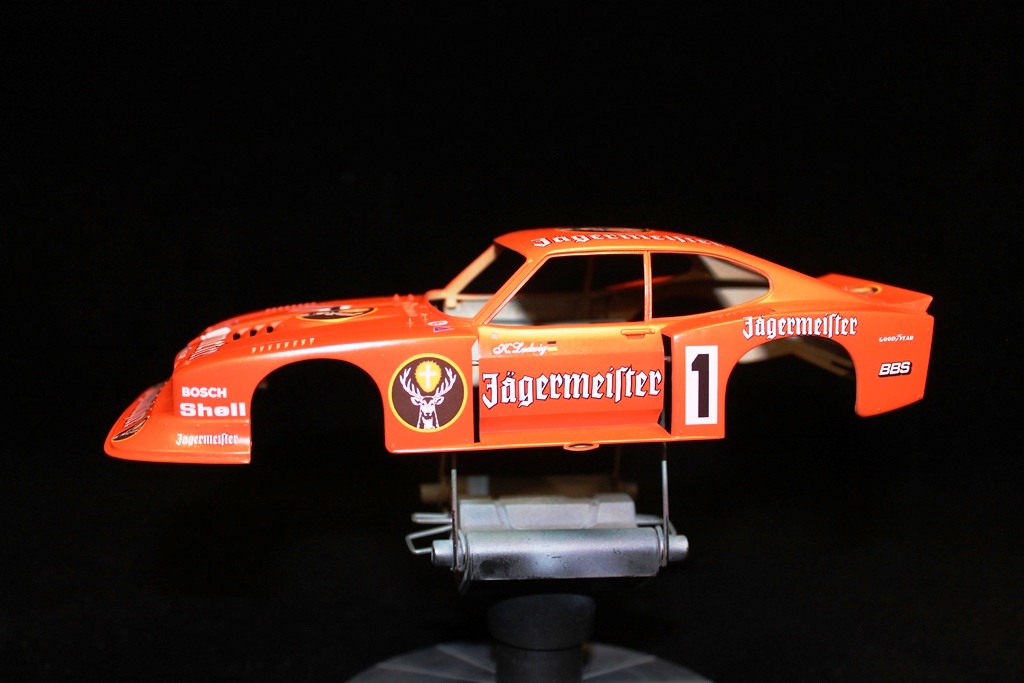
Did a test decal a couple minutes ago.
The decal company supplied silver blanks to go under the decals. I figured that is because they think the white isn't opaque enough to stop bleed through. Well, I tried a sacrificial one in an area that will be less seen without putting the silver backer down, it also had the distinction of being the only decal that really needs to settle over details.
The white is strong enough, and it settled quite well, but they are grabby and thin. Water, Set and Sol only on these.
My 8 PM conference call for this evening got pushed to next week so I may be able to lay a few down tonight.
I love the smell of Tenax in the morning....It smells like a day off work.
I drive a Jeep, but i still bleed Ford Blue....
Joel_W
Associate Editor New York, United States
Joined: December 04, 2010
KitMaker: 11,666 posts
Auto Modeler: 2,974 posts
Posted: Wednesday, June 24, 2020 - 07:46 AM UTC
David,
Interesting that they gave you silver backer decals. I would have thought that they would have used just plain white. Still, it's a really nice touch.
Joel
On my Workbench:
Monogram 1/24 scale 427 Shelby Cobra
Just Completed:
Beemax 1/24 scale BMW M3 E30 1992 Evolution II
New Hampshire, United States
Joined: December 12, 2002
KitMaker: 1,500 posts
Auto Modeler: 645 posts
Posted: Wednesday, June 24, 2020 - 11:53 AM UTC
Joel, I thought the silver was weird too. They have it on a lot of their sheets that use a darker color paint. One other weird thing is that their D&W on black scheme for this car doesn't have the silver.
Anyway, they are very slow going due to the thinness of them. Several of them curled under the backing paper as I was trying to slide them onto the body. I started with smaller ones and managed to get nine done in one hour this evening. Only 30 or so more to go.
I love the smell of Tenax in the morning....It smells like a day off work.
I drive a Jeep, but i still bleed Ford Blue....
#335
Auckland, New Zealand
Joined: September 03, 2013
KitMaker: 1,808 posts
Auto Modeler: 701 posts
Posted: Wednesday, June 24, 2020 - 12:08 PM UTC
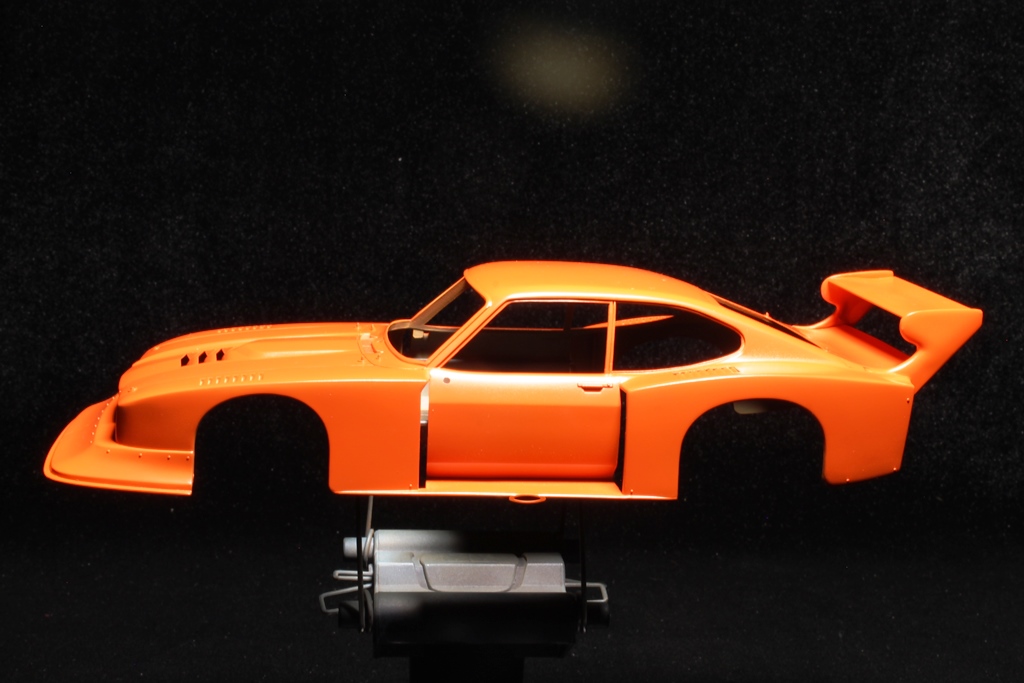
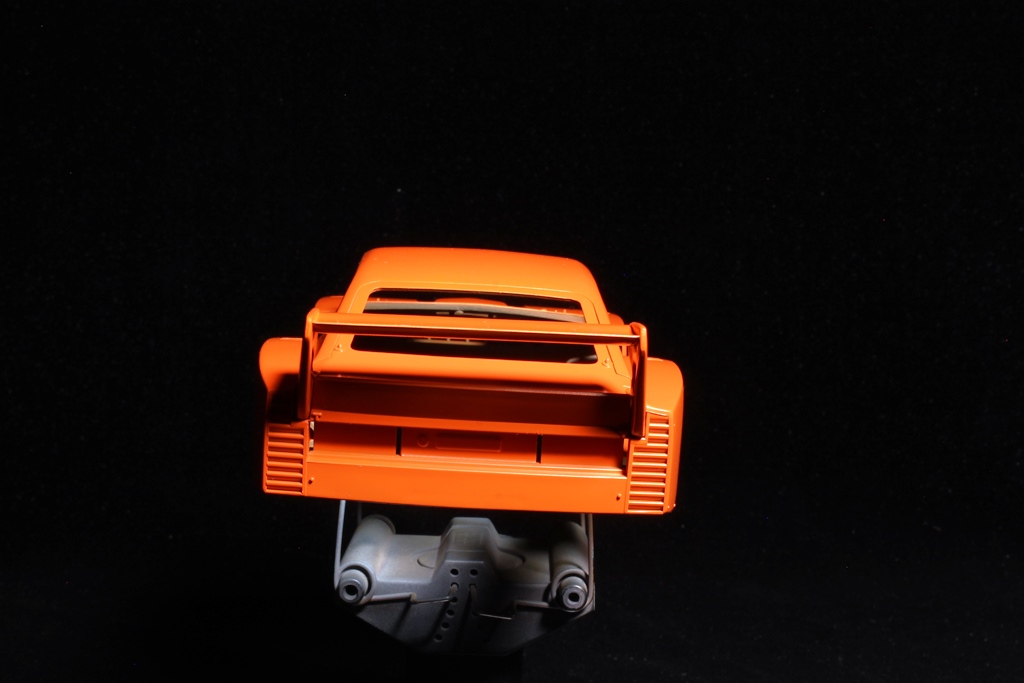
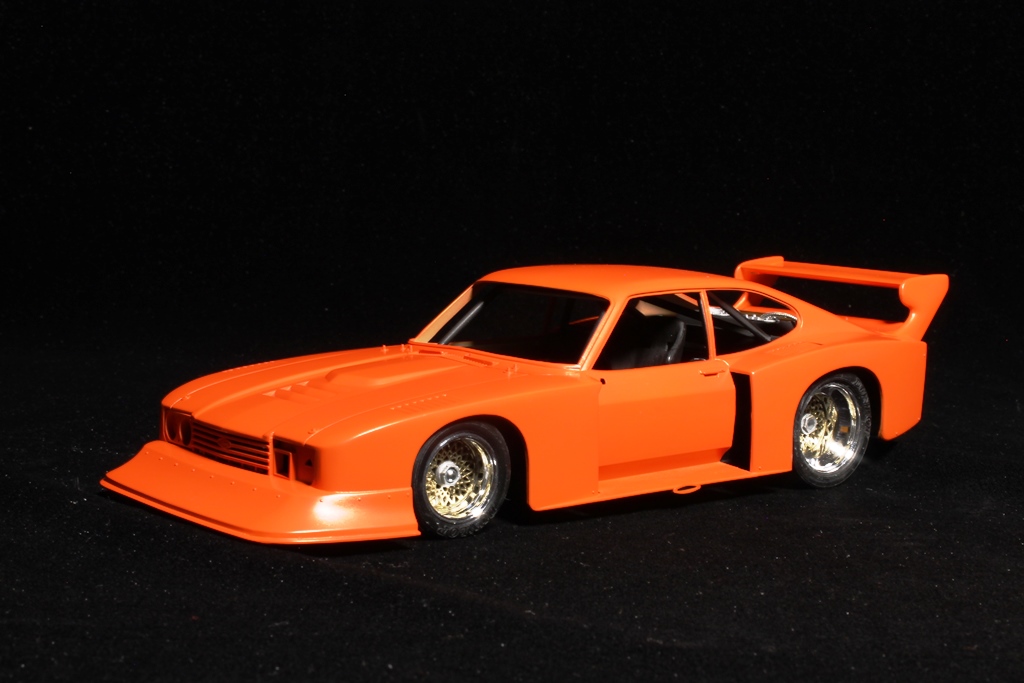
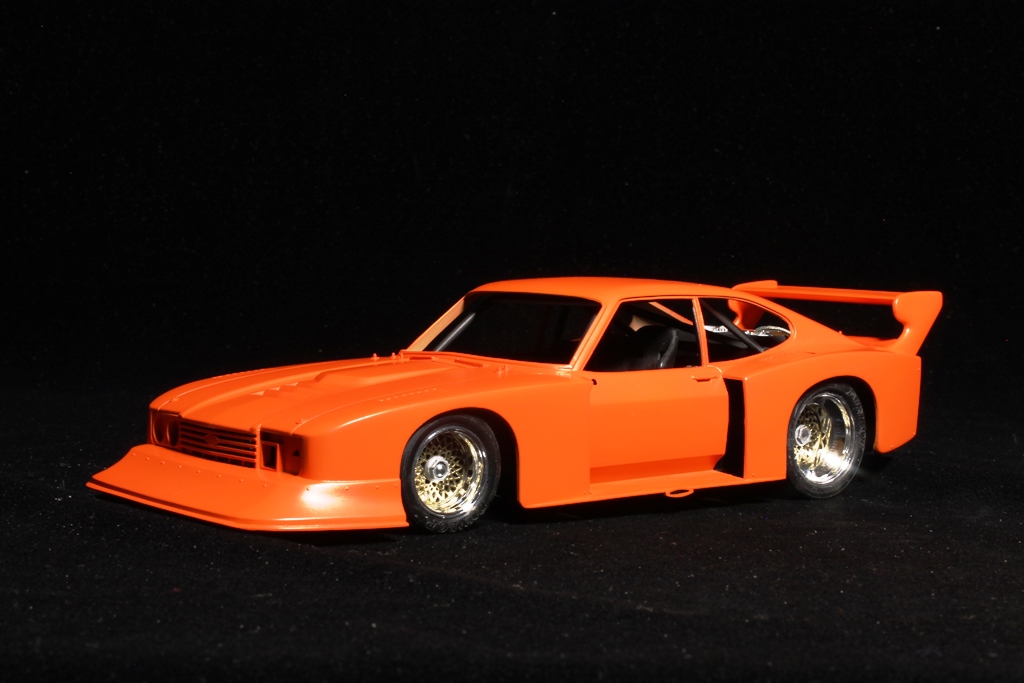
Looking good David. The colour certainly looks like Jägermeister Orange. Looking forward to see the decals go down.
cheers
Michael
Campaign:
Strip, Track and Trail - Porsche 917/20 - On the bench
Phantoms at 60 - F-4J Marines
Below 1000 tons - M50 minesweeper - Sailed for duty
Joel_W
Associate Editor New York, United States
Joined: December 04, 2010
KitMaker: 11,666 posts
Auto Modeler: 2,974 posts
Posted: Thursday, June 25, 2020 - 01:42 AM UTC
David,
If you're having issues with decals sticking ASAP to the plastic even with Micro Set, I go to Plan B, which is a little room temp water with a drop of liquid dishwashing detergent like Dawn. the Decals just slide right where you want them. Then a wick around the decal to start to settle it in followed by a lite pat. then comes the Micro Set followed by the Sol. The less you have to pressure move thin decals, the better you are.
Joel
On my Workbench:
Monogram 1/24 scale 427 Shelby Cobra
Just Completed:
Beemax 1/24 scale BMW M3 E30 1992 Evolution II
New Hampshire, United States
Joined: December 12, 2002
KitMaker: 1,500 posts
Auto Modeler: 645 posts
Posted: Thursday, June 25, 2020 - 03:45 AM UTC
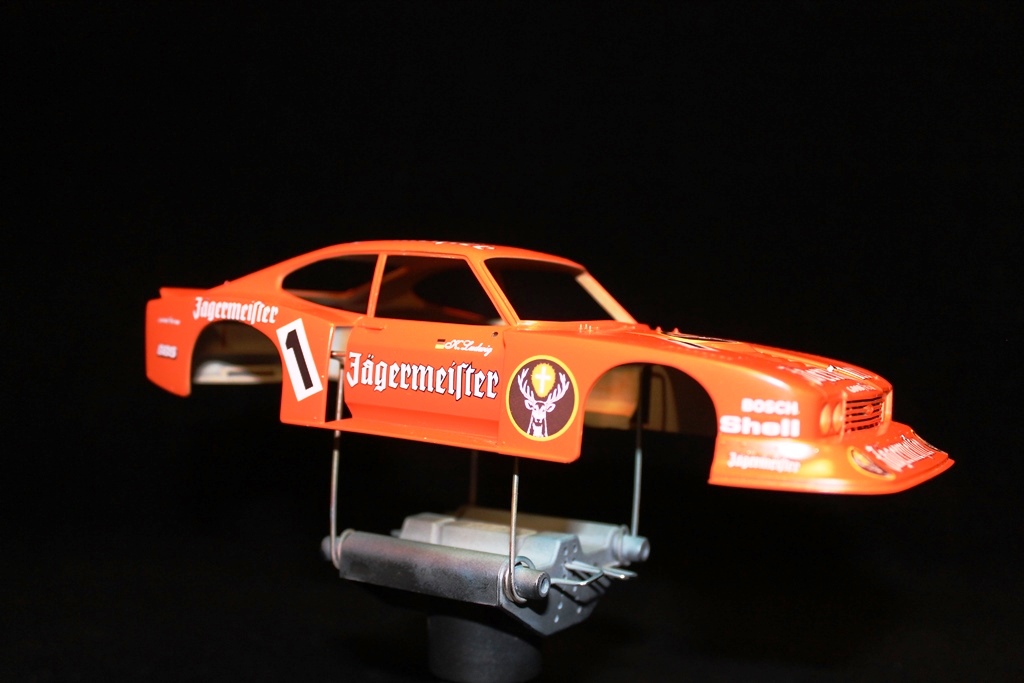
Thanks Michael, and also thanks for the umlauts too. I didn't feel like going into ASCII code to get them. Jägermeister LOL
Joel, they are only slightly clingy. I started to flood the area with wet water (your soap and water mix) after the first one that I tried as a test.
Mostly the issue is with trying to wrap under the backing paper, especially with smaller decals.
I've got a system that seems to be working pretty well for them now. Between calls today I was able to get a few more on.
I am getting a slight bleed on one or two of the Jägermeister lettering. Maybe the white isn't as consistent as it should be and the decal mfgr was right. Oh well, C'est le guerre. Too late now.
I love the smell of Tenax in the morning....It smells like a day off work.
I drive a Jeep, but i still bleed Ford Blue....
AussieReg
Associate Editor #007
Victoria, Australia
Joined: June 09, 2009
KitMaker: 8,156 posts
Auto Modeler: 2,953 posts
Posted: Thursday, June 25, 2020 - 08:21 PM UTC
Battling through the tube frame at the noisy end of my '55 Pro Sports. Radiator, coil springs and accumulator have been added since last update as well. I'm about 75% there on the engine bay area with a couple of straight braces to add then brake discs and tidy up the paint.
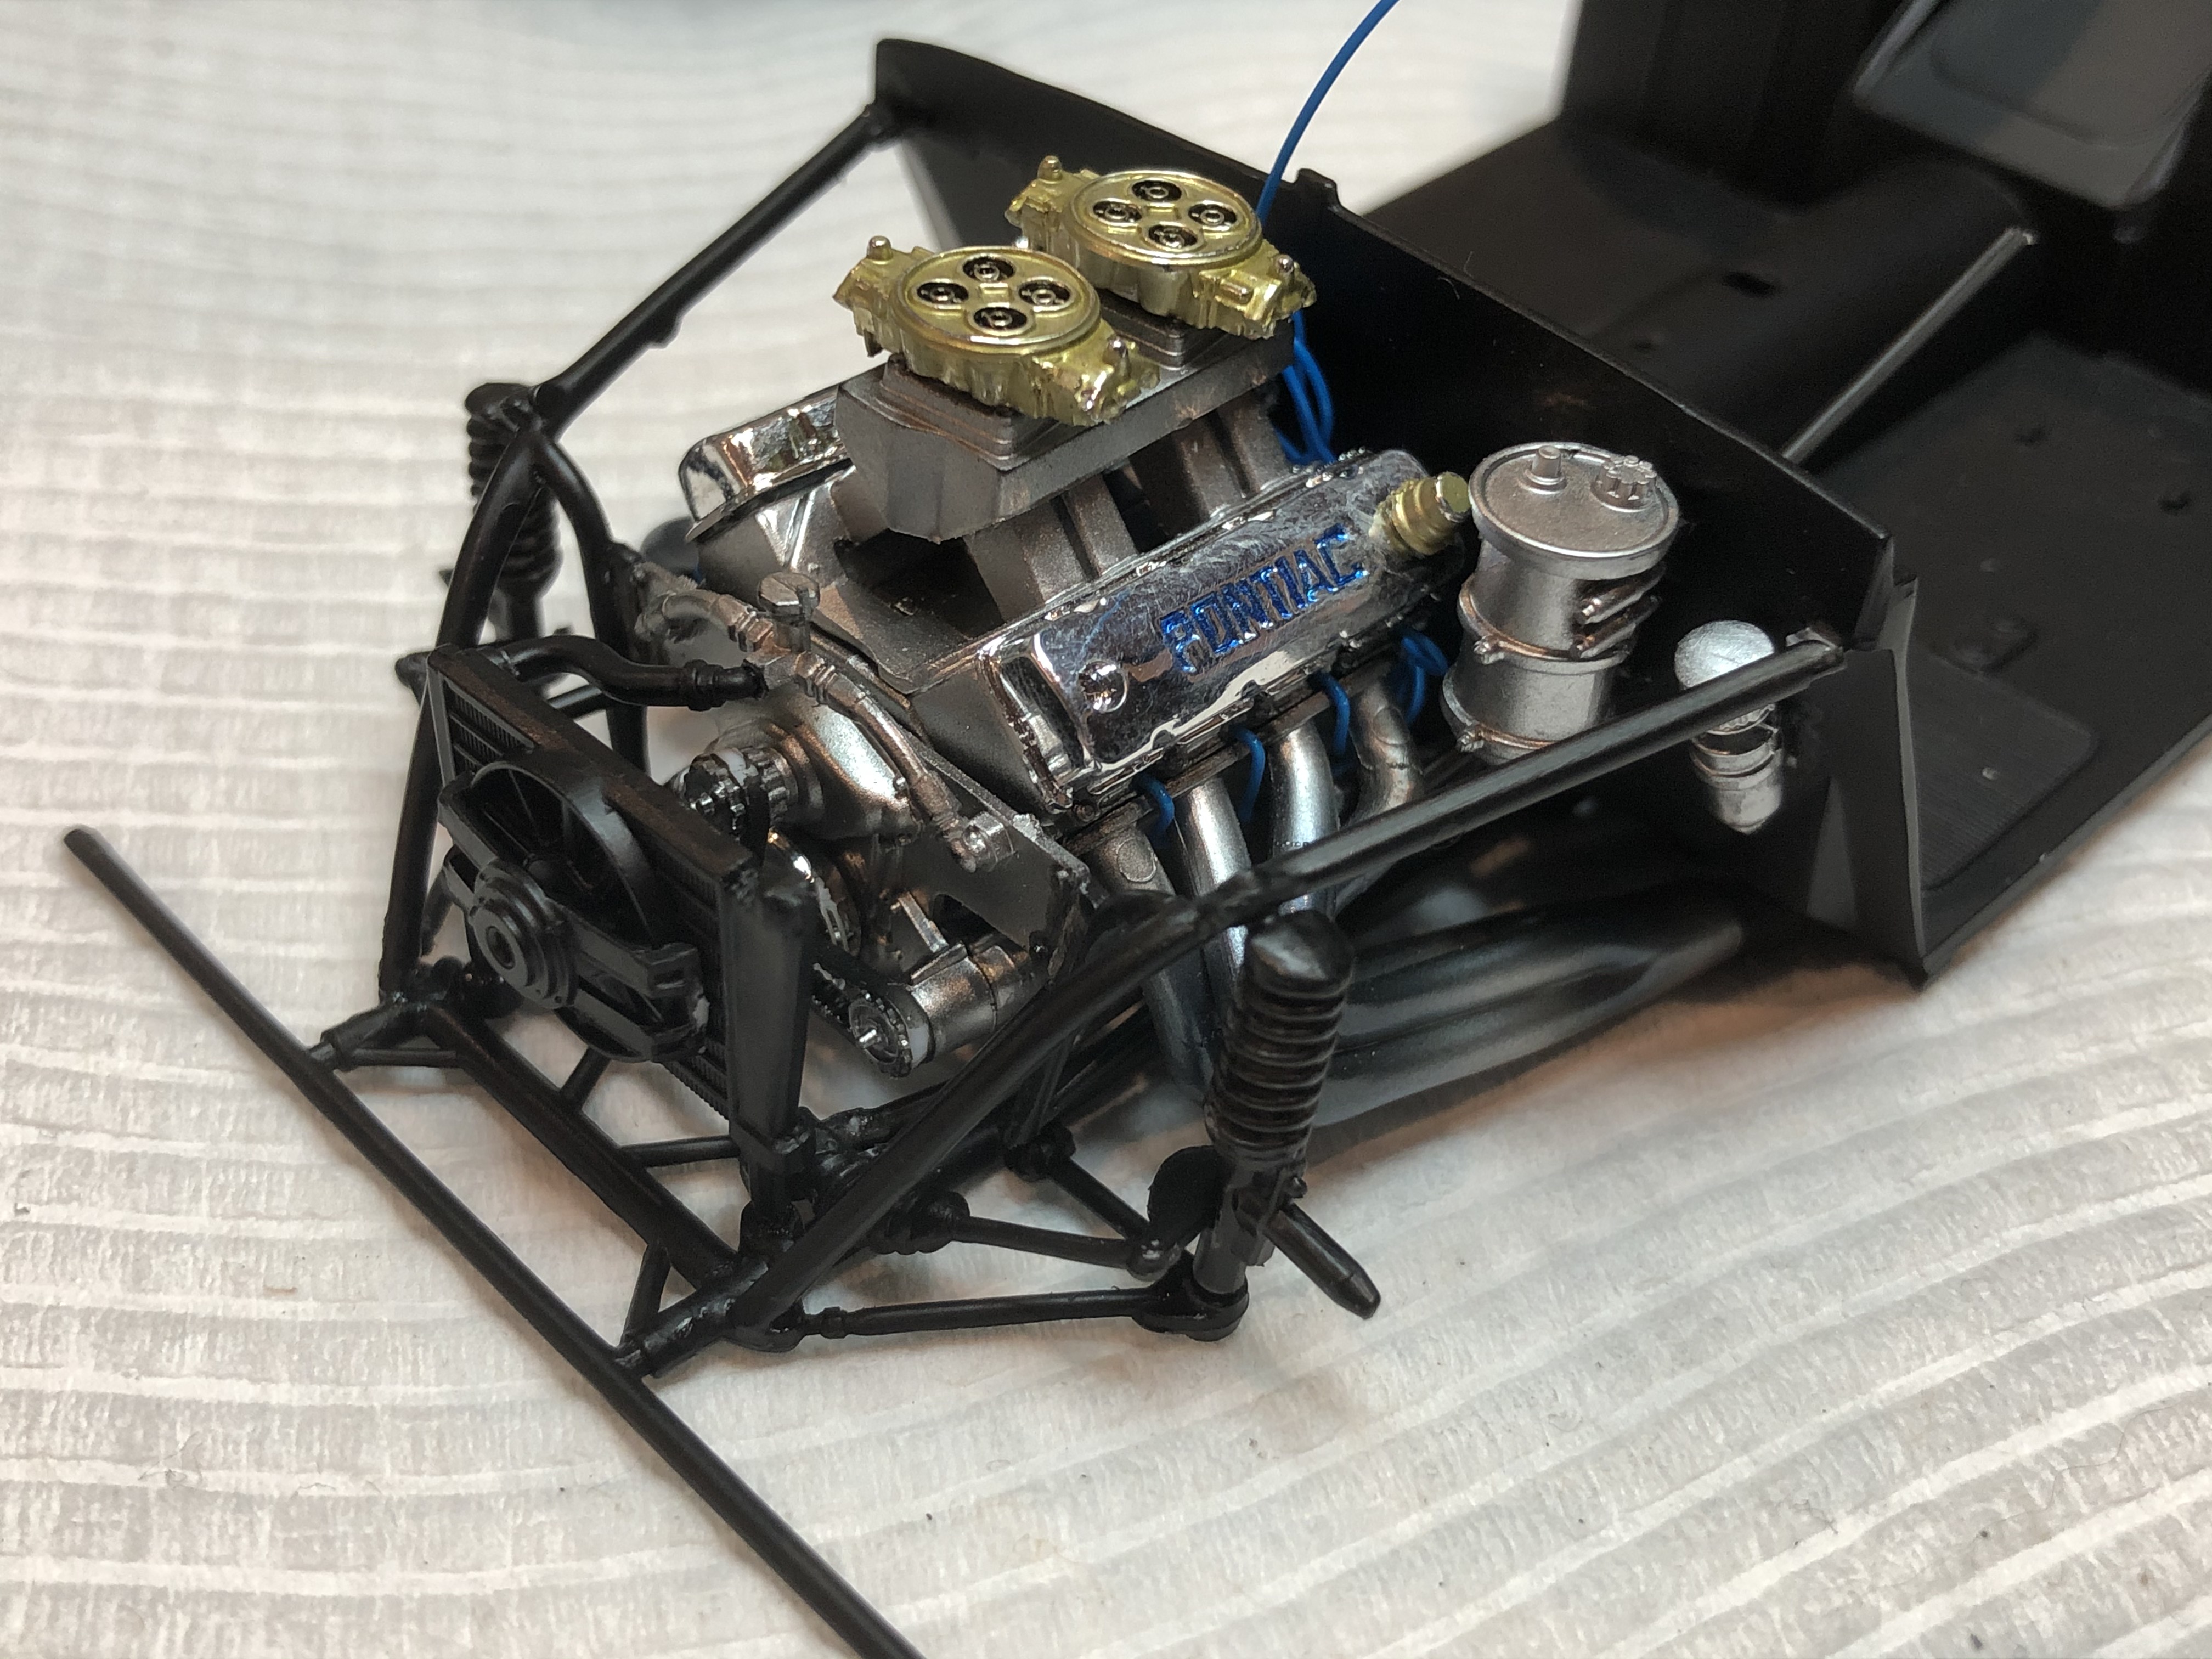
Cheers, D
ON the bench
Revell 1/24 '53 Corvette (building as '54)
Revell 1/24 BMW 507 Coupe and Cabrio
Italeri 1/48 Me262 B-1a/U1 Nightfighter
Monogram 1/24 '57 Chevy Nomad
Dragon 1/350 USS Frank Knox DD-742
New Hampshire, United States
Joined: December 12, 2002
KitMaker: 1,500 posts
Auto Modeler: 645 posts
Posted: Thursday, June 25, 2020 - 11:41 PM UTC
Looking great D. The bay bars, engine and equipment look real nice together.
I love the smell of Tenax in the morning....It smells like a day off work.
I drive a Jeep, but i still bleed Ford Blue....
Joel_W
Associate Editor New York, United States
Joined: December 04, 2010
KitMaker: 11,666 posts
Auto Modeler: 2,974 posts
Posted: Friday, June 26, 2020 - 12:53 AM UTC
D,
Your making excellent progress for sure.
Joel
On my Workbench:
Monogram 1/24 scale 427 Shelby Cobra
Just Completed:
Beemax 1/24 scale BMW M3 E30 1992 Evolution II
Joel_W
Associate Editor New York, United States
Joined: December 04, 2010
KitMaker: 11,666 posts
Auto Modeler: 2,974 posts
Posted: Friday, June 26, 2020 - 05:33 AM UTC
This week I've concentrated on the chassis, and what is modeled of the front & rear suspensions. Basically, both ends of the suspension are basic at best as the only way to see them is by looking at the bottom of the pan.
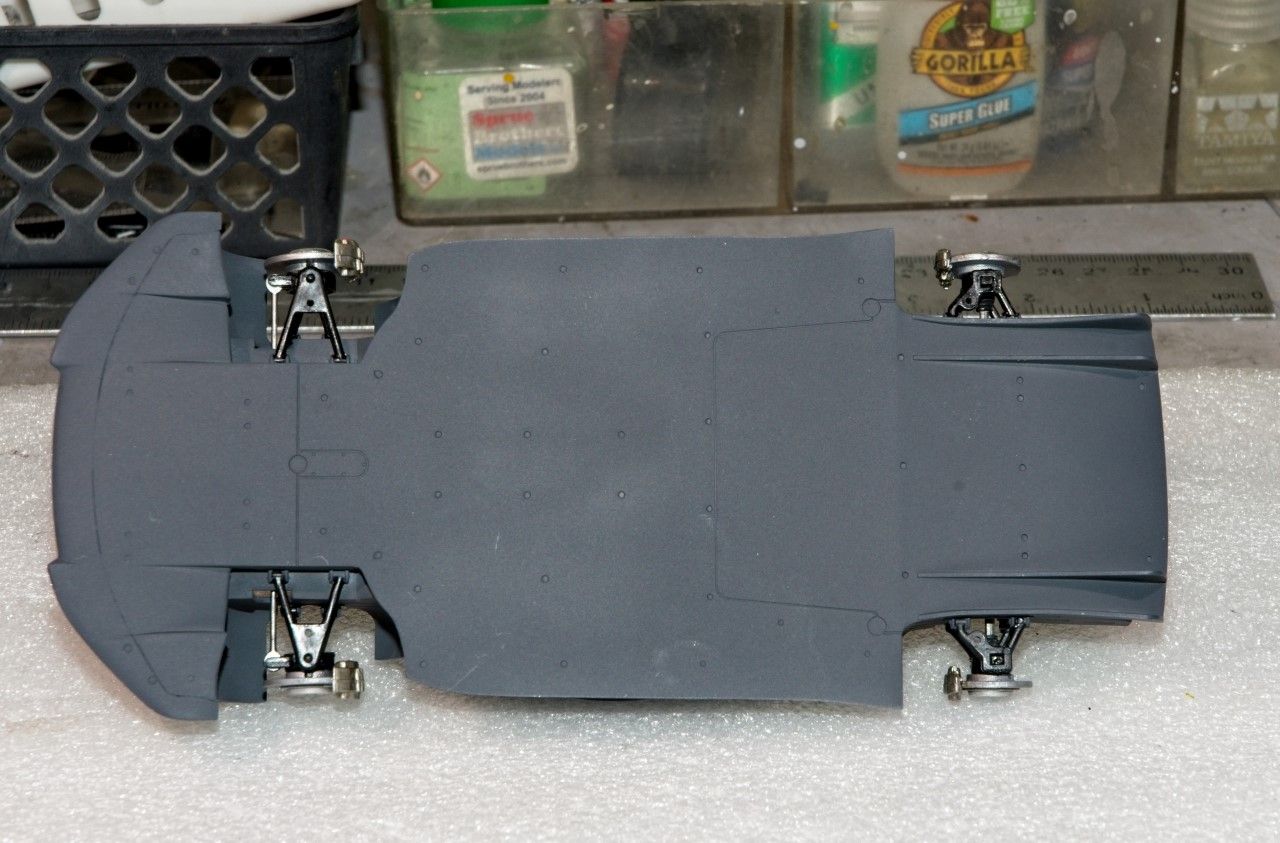
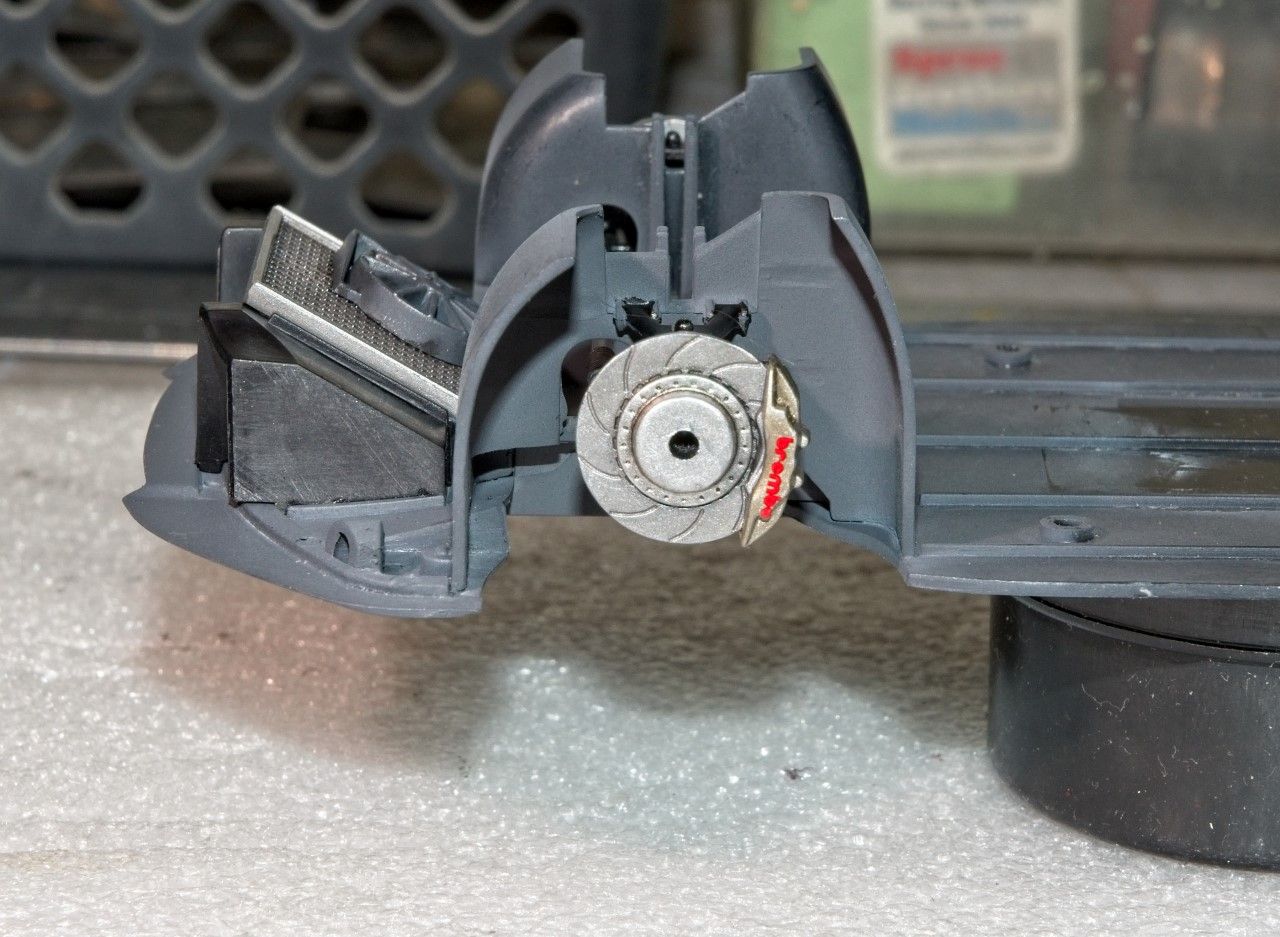
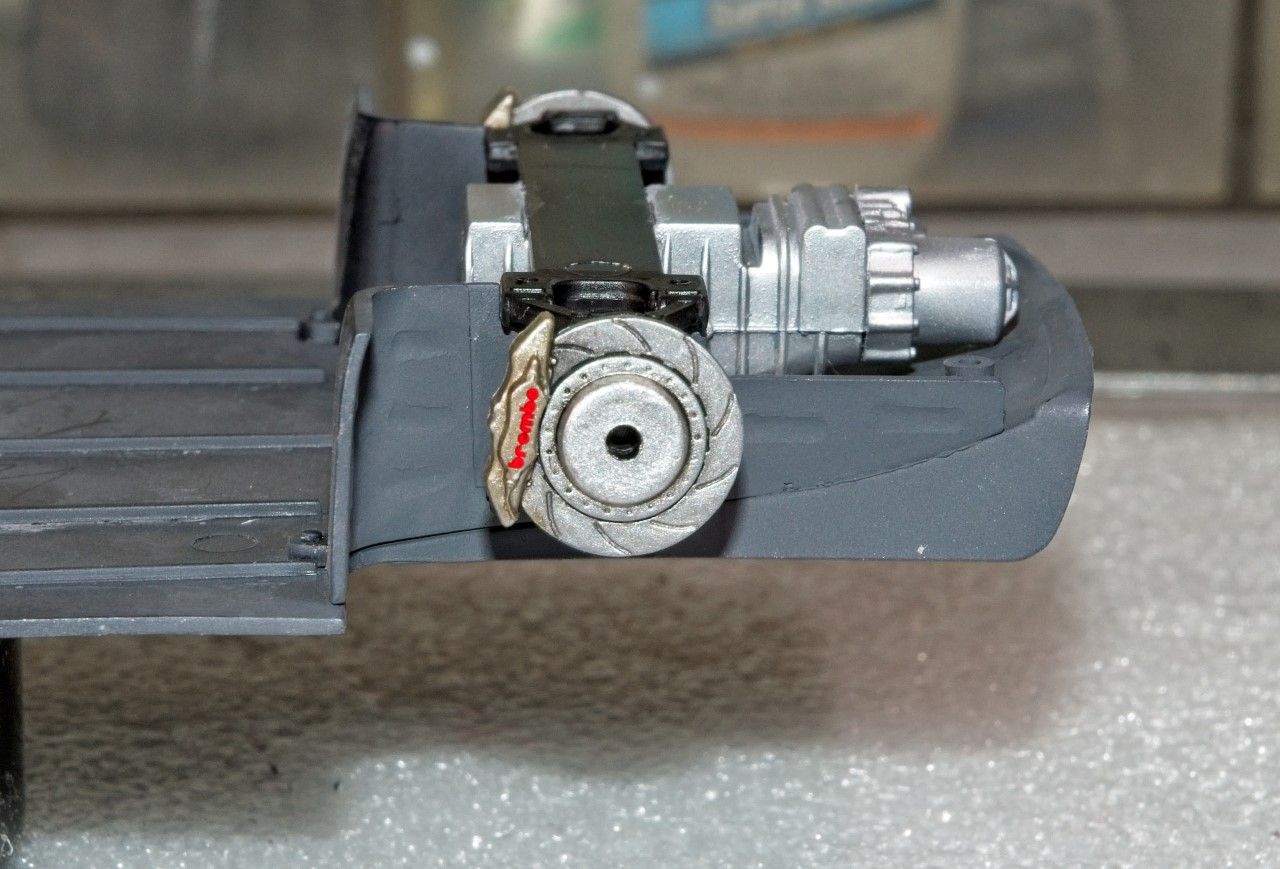
I air brushed the pan a darkish Gray to simulate Carbon Fiber. And since it's never going to be seen once it's in its display bin, it's more then good enough for the intended purpose. For me the focus is on the 4 disc brakes as you will clearly see them through the wheels. The discs are steel, the hubs Aluminum, and the Calibers Titanium Aluminum followed by the makers logo. I gave each disc a wash with Tamiya Black panel line wash just to help pop out the view details. I also painted the transaxle aluminum but once the interior is added, you'll never see it.
the Front brakes:
The Rear brakes:
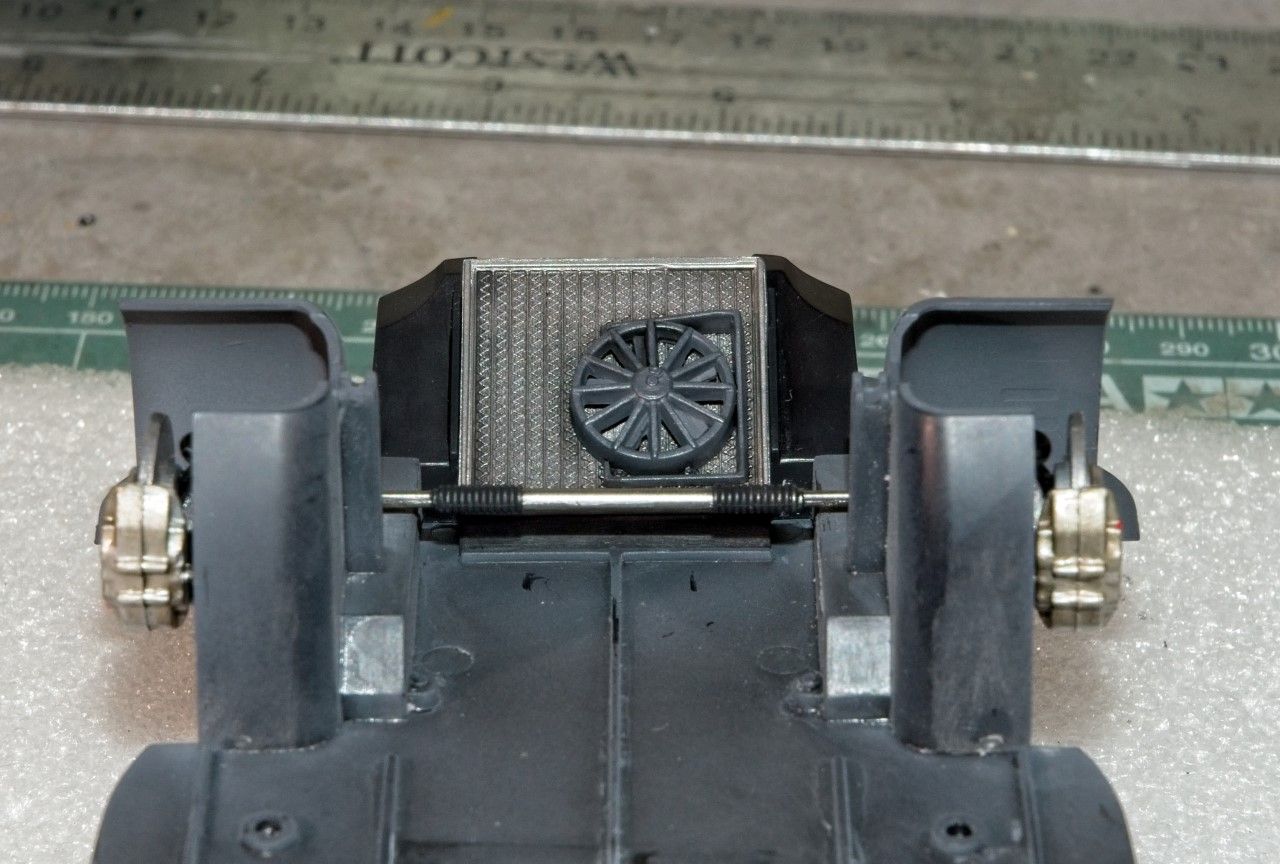
the radiator and fan housing will be visible when looking down through the radiator exhaust opening in the hood, so it was air brushed with Dark Gray to simulate CF, then dry brushed with a light Sky Gray.
The radiator assembly was air brushed polished Aluminum, and once dry the radiator core was given a few washes of Tamiya Black panel line wash.
As always, thanks for stopping by, and checking out my progress to date.
Joel
On my Workbench:
Monogram 1/24 scale 427 Shelby Cobra
Just Completed:
Beemax 1/24 scale BMW M3 E30 1992 Evolution II
New Hampshire, United States
Joined: December 12, 2002
KitMaker: 1,500 posts
Auto Modeler: 645 posts
Posted: Friday, June 26, 2020 - 06:30 AM UTC
Looking great Joel. Nice work on the brakes. Good color differentiation between the components and the wash makes it even better.
I love the smell of Tenax in the morning....It smells like a day off work.
I drive a Jeep, but i still bleed Ford Blue....
New Hampshire, United States
Joined: December 12, 2002
KitMaker: 1,500 posts
Auto Modeler: 645 posts
Posted: Friday, June 26, 2020 - 06:37 AM UTC
I love the smell of Tenax in the morning....It smells like a day off work.
I drive a Jeep, but i still bleed Ford Blue....
Joel_W
Associate Editor New York, United States
Joined: December 04, 2010
KitMaker: 11,666 posts
Auto Modeler: 2,974 posts
Posted: Friday, June 26, 2020 - 07:58 AM UTC
David,
Thanks for the thumbs up, it's greatly appreciated.
You decaling looks dead on perfect to me. I'd settle for it any day of the week.
Joel
On my Workbench:
Monogram 1/24 scale 427 Shelby Cobra
Just Completed:
Beemax 1/24 scale BMW M3 E30 1992 Evolution II
New Hampshire, United States
Joined: December 12, 2002
KitMaker: 1,500 posts
Auto Modeler: 645 posts
Posted: Friday, June 26, 2020 - 08:54 AM UTC
Thanks Joel, I appreciate it.
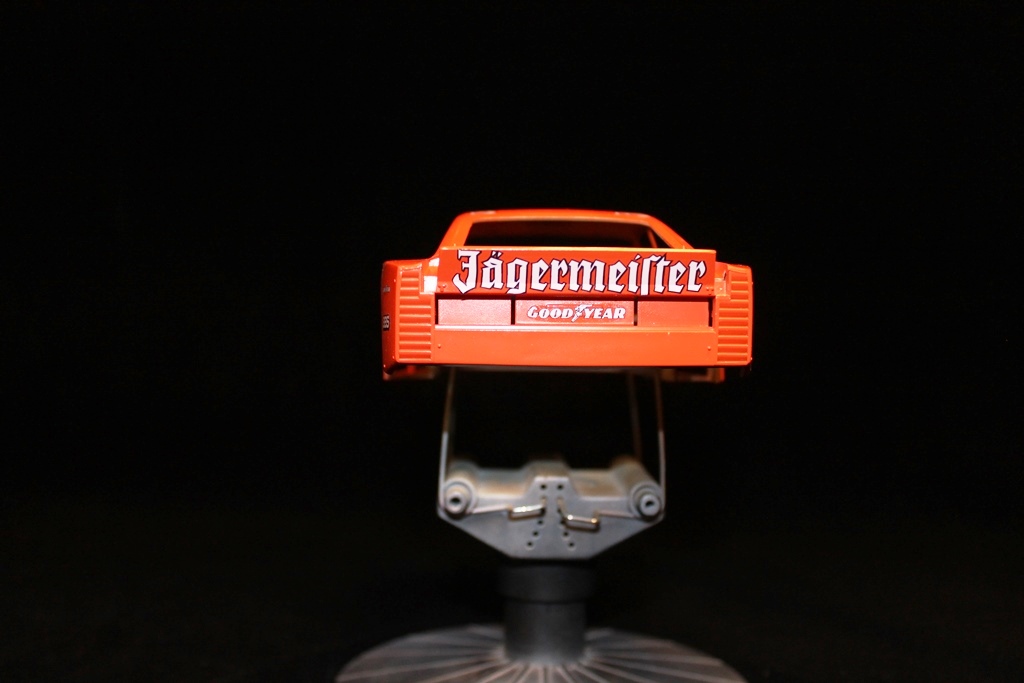
The one that stands out to me is the waviness of the one on the left door. Didn't even see it until the picture was on the computer.
I love the smell of Tenax in the morning....It smells like a day off work.
I drive a Jeep, but i still bleed Ford Blue....
California, United States
Joined: January 22, 2016
KitMaker: 766 posts
Auto Modeler: 140 posts
Posted: Friday, June 26, 2020 - 11:13 AM UTC
Wonderful work everyone! I am not getting much done these days as we are acclimating my wife back to work after 15 months of repair on her chassis (bilateral hip replacements), family springing in, and a planned visit by my son from Little Rock the first week of July.
I will try to get a little done this Sunday but it won't be much. Working in 1/24th scale is a bit more frustrating especially since this Porsche has THREE different colors on the pan... white, chrome, and semi-gloss black. And then there is the cockpit...
Anyway, it is a slow go... and I almost gave up and went back to 1/12th scale. But I will not be defeated as I spent $47 on decals! LOL!
Just completed-
1/24th Tamiya Porsche 956 Skoal Bandit
In the works:
1/12th Protar Ferrari 312T2 (shelved for time being)
ERTL D-8 Caterpillar Bulldozer