

Things have ground to a halt with summertime visits from family for the past two off weeks. Not much will get done with the 956 until July 16 which will be next free day for building!
I did get the lower pan painted which was a major pain. It is three colors (white, chrome, and semigloss black) with lots of angles and bending! Glad I am doing an all white with green livery! If I had done the box art car, I would be masking for yellow as well!
Carry on and happy July!


Go to automodeler.com for the current dynamic site!
The Garage
For general automotive modeling or non-modeling topics.
For general automotive modeling or non-modeling topics.
Hosted by Jim Starkweather
Strip, Track & Trail Official Build Thread

pnance26

Joined: January 22, 2016
KitMaker: 766 posts
Auto Modeler: 140 posts

Posted: Wednesday, July 01, 2020 - 02:29 AM UTC

rv1963
Joined: December 07, 2004
KitMaker: 1,888 posts
Auto Modeler: 806 posts

Posted: Wednesday, July 01, 2020 - 02:48 AM UTC
Nice finish David, the decals came out great.

Dixon66
Joined: December 12, 2002
KitMaker: 1,500 posts
Auto Modeler: 645 posts

Posted: Wednesday, July 01, 2020 - 03:51 AM UTC
Quoted Text
Nice finish David, the decals came out great.
Thank you Robert.
BTW, Happy Canada Day to our Canadian members!

AussieReg

#007

Joined: June 09, 2009
KitMaker: 8,156 posts
Auto Modeler: 2,953 posts

Posted: Wednesday, July 01, 2020 - 10:51 AM UTC
Quoted Text
Damian,
Just a question but why is there so much blue bleed over into the white spaces on the hood and the roof? Is it just the photograph? Also, why didn't the new decal cover all of the old decal? Seems like it should have gone all the way to the windshield...
I like the build but just wonder if the decals have a problem so I can avoid them...
When does it get chassis and frame? Looking forward to seeing it!
Patrick, there is no blue bleed. What you are seeing is faux-chrome on the decal itself. It is a thin silver stripe with random darker spots to represent some reflections. You can see it on the side decals on the 1:1 photo above as well. With regard to the white area above the windscreen, this was also present on the other decal, but because I had it reversed it was above the rear glass.
The decals are thin and strong and the colour is great, but they are bunching up a bit and creasing along the edges and even several sessions with hot water and softener havent convinced them to flatten out. I have used a scalpel blade to slice the higher creases and overlap them at the cut line in a couple of places.
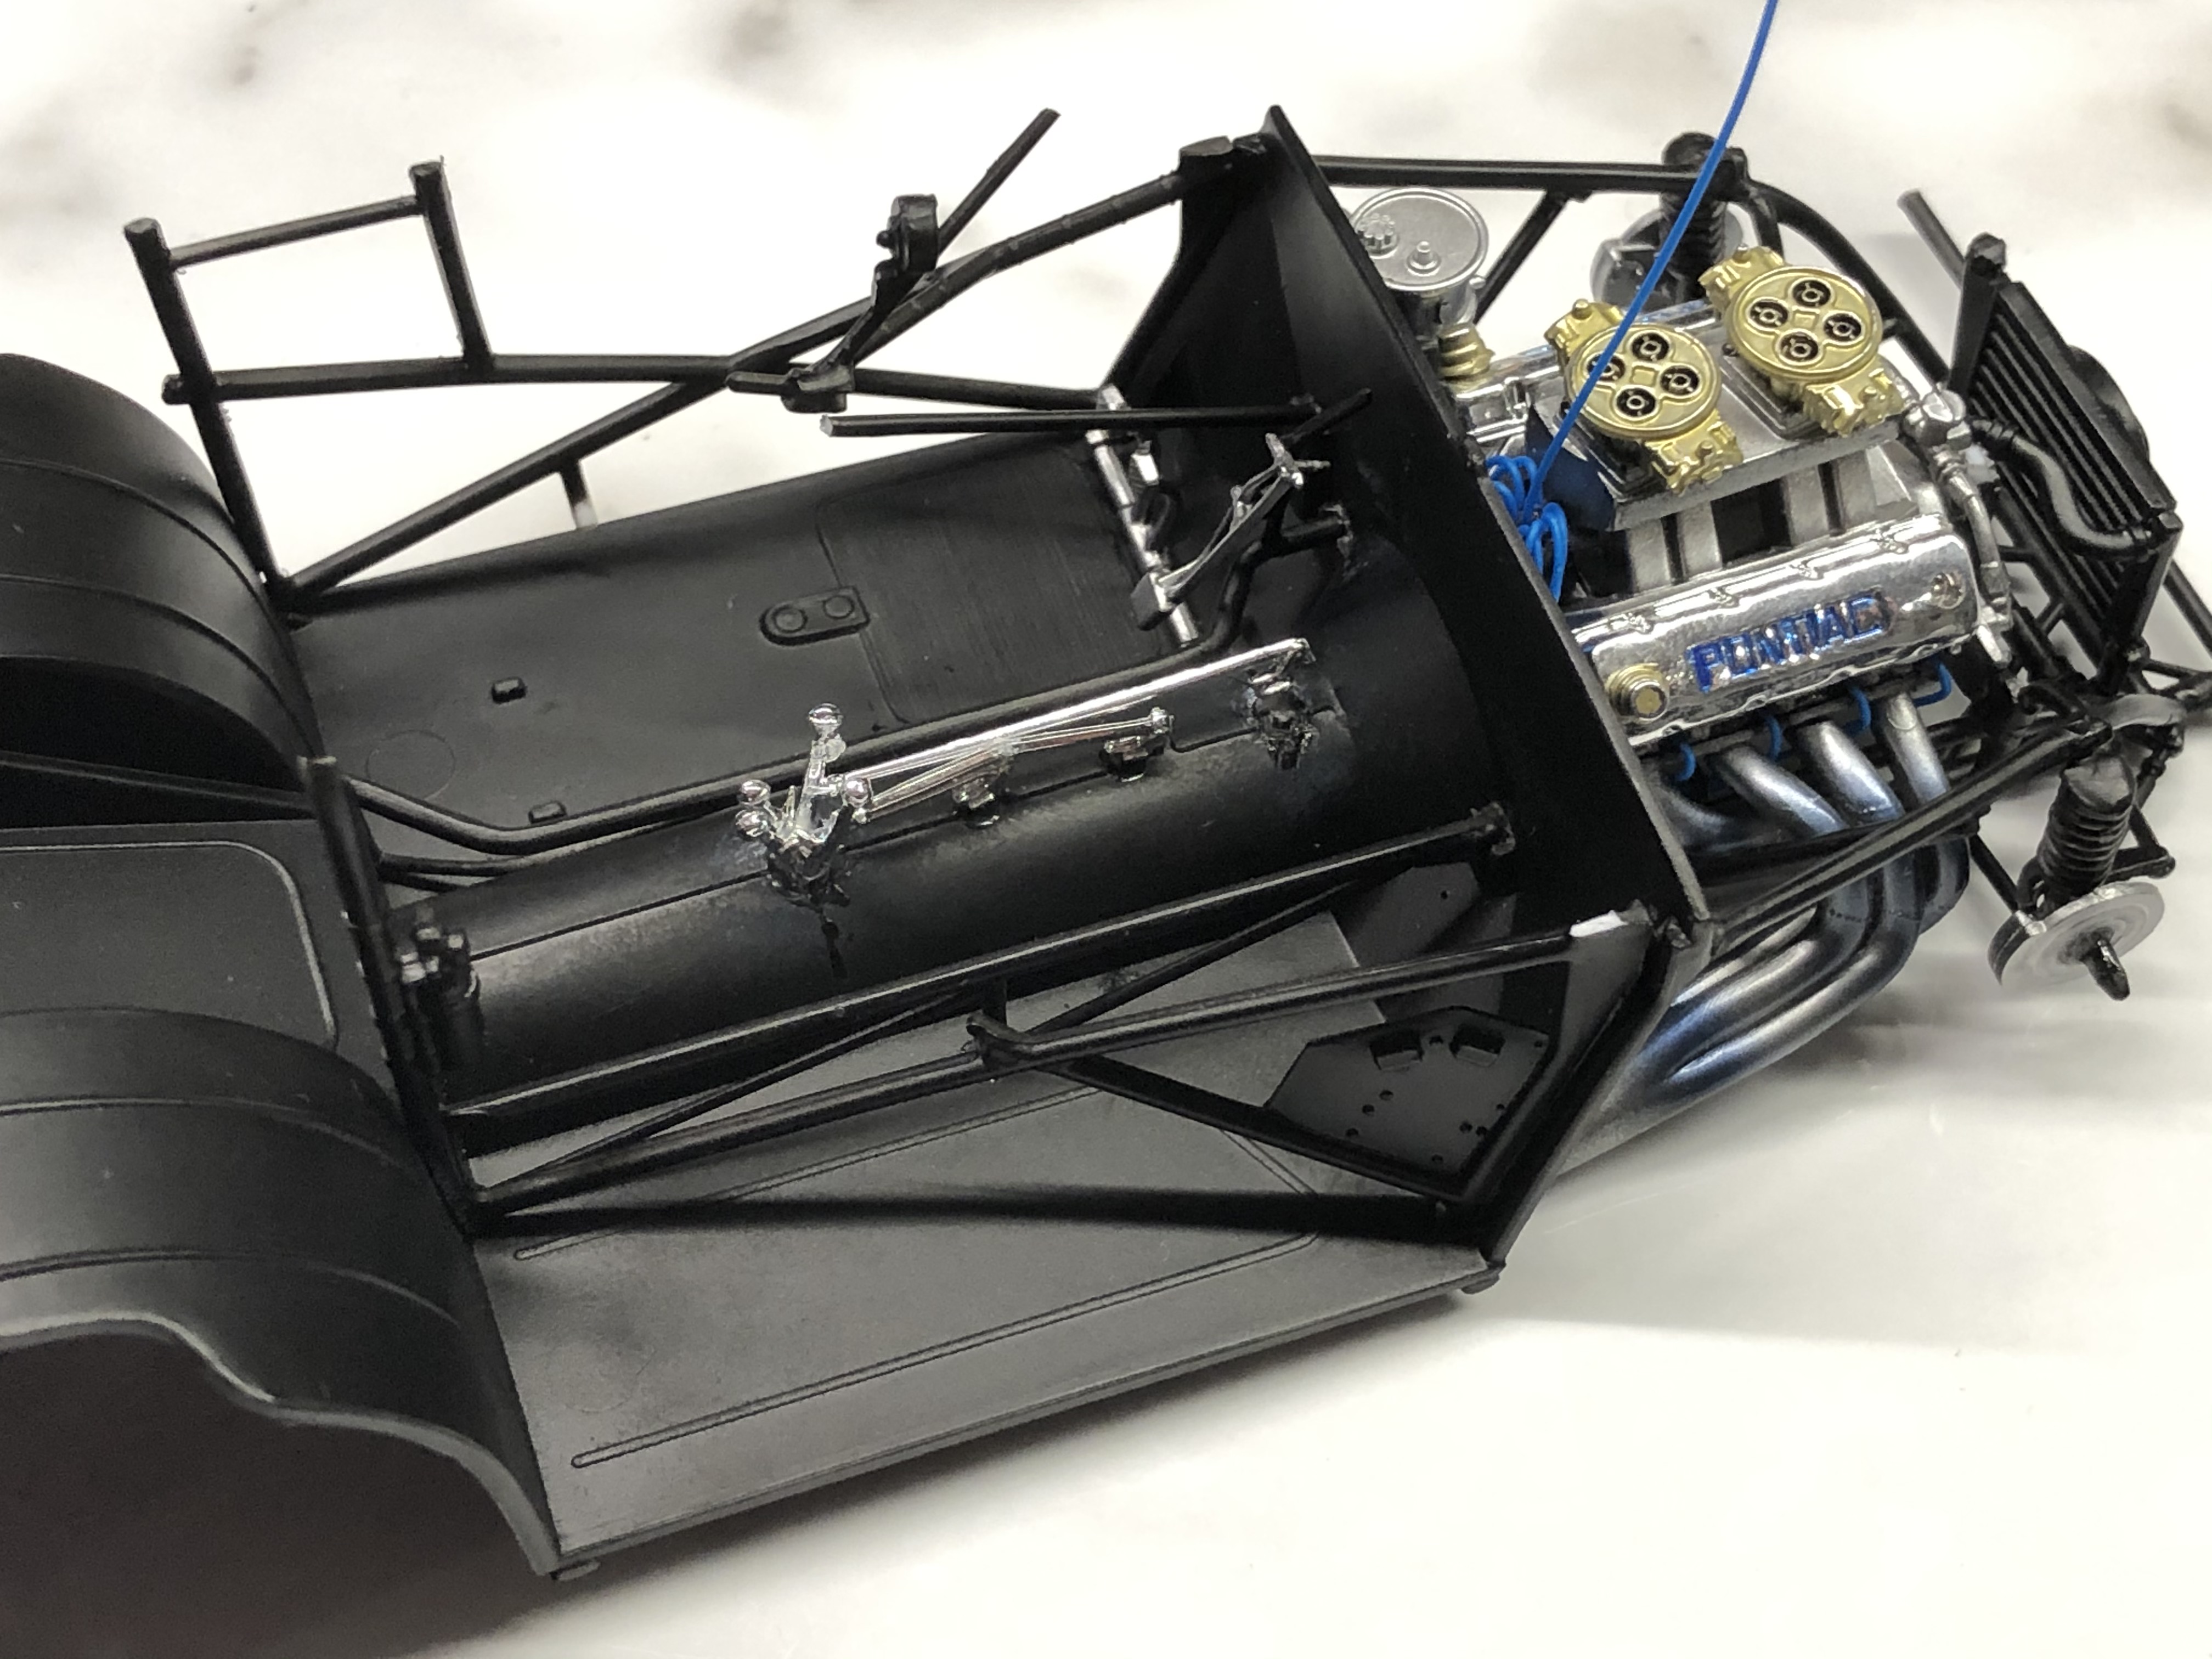
Ive got the engine bay area 90% done now, I just need to add a couple of small items and then on to the interior detail painting and assembly.
Cheers, D

AussieReg
#007
Joined: June 09, 2009
KitMaker: 8,156 posts
Auto Modeler: 2,953 posts
Posted: Friday, July 03, 2020 - 12:38 AM UTC
Engine bay assembly is complete, I just need to touch up and detail paint a couple of items.
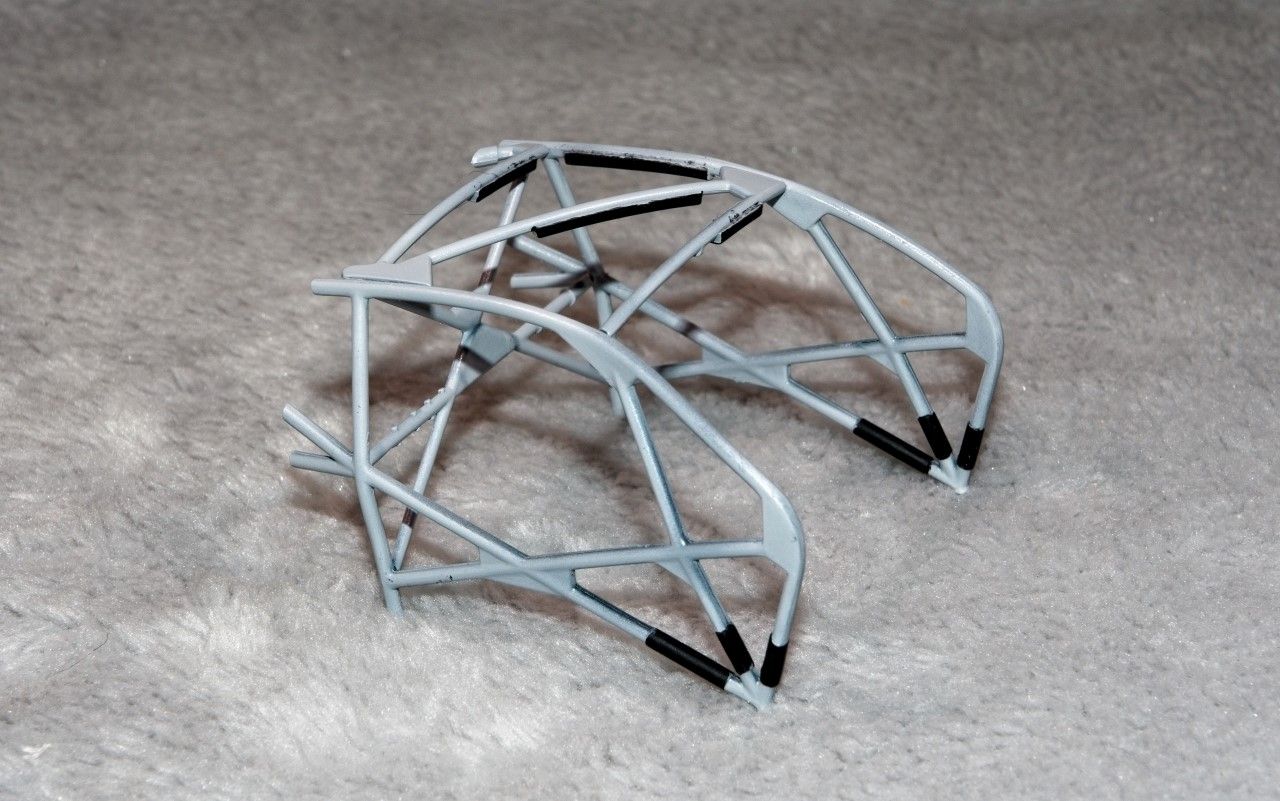
Interior roll cage and detail parts under way.

Cheers, D
Interior roll cage and detail parts under way.
Cheers, D

Joel_W
Joined: December 04, 2010
KitMaker: 11,666 posts
Auto Modeler: 2,974 posts

Posted: Friday, July 03, 2020 - 05:16 AM UTC
D,
Nicely done for sure.
Joel
Nicely done for sure.
Joel

Dixon66
Joined: December 12, 2002
KitMaker: 1,500 posts
Auto Modeler: 645 posts
Posted: Friday, July 03, 2020 - 08:35 AM UTC
Looking great D.!

2002hummer

#257

Joined: October 11, 2011
KitMaker: 812 posts
Auto Modeler: 108 posts

Posted: Friday, July 03, 2020 - 12:57 PM UTC
Great work D, I hope mine turns out 1/4 as good as yours

Cosimodo
#335

Joined: September 03, 2013
KitMaker: 1,808 posts
Auto Modeler: 701 posts

Posted: Friday, July 03, 2020 - 06:02 PM UTC
That roll cage looks really good. Is it all kit or part your own construction?
cheers
Michael
cheers
Michael
AussieReg
#007
Joined: June 09, 2009
KitMaker: 8,156 posts
Auto Modeler: 2,953 posts
Posted: Saturday, July 04, 2020 - 03:49 PM UTC
Thanks for the feedback folks, much appreciated as always!
Michael, the roll cage is all kit parts, and is going together quite well so far.
Cheers, D
Michael, the roll cage is all kit parts, and is going together quite well so far.
Cheers, D
AussieReg
#007
Joined: June 09, 2009
KitMaker: 8,156 posts
Auto Modeler: 2,953 posts
Posted: Sunday, July 05, 2020 - 03:43 PM UTC
Time for another status update, as always plenty going on and yet another great completed build!
We have just passed the half-way point, still plenty of time for some more great builds to hit the bench.
Running update on builds
14 weeks in, 37 pages with over 20,000 views and 900 posts
21 enlisted
13 builds in progress
9 completed builds
Szmann (Gabriel) - NASCAR - Chev Monte Carlo (Tony Stewart) - 1/25 AMT/ERTL kit - COMPLETED
Stickframe (Nick) - ENDURANCE - McLaren F1 GTR Longtail - 1/24 Aoshima kit - COMPLETED
Szmann (Gabriel) - NASCAR - Pontiac Grand Prix (Kyle Petty) - 1/24 Revell/Monogram kit - COMPLETED
rv1963 (Robert) - STRAIGHTLINE - '37 Chevy Gasser - 1/25 AMT kit- COMPLETED
jimb (Jim) - STRAIGHTLINE - '57 Ford Sedan Gasser - COMPLETED
Joel_W (Joel) - FORMULA 1 - Lotus 99T Honda (Ayrton Senna 1987) - 1/20 Tamiya kit - COMPLETED
pnance26 (Patrick) - FORMULA 1 - Ferrari 312T - 1/12 Tamiya kit - COMPLETED
Dixon66 (David) - TOURING GROUP 2 - 2006 Mustang GT- 1/25 Revell kit - COMPLETED
Dixon66 (David) - ENDURANCE GROUP 5 - Zakspeed Capri - 1/24 Tamiya kit - COMPLETED
Aussiereg (Damian) - STRAIGHTLINE - '55 Chev Pro Sportsman (Charles Carpenter) - 1/25 Revell kit - Engine bay detailing, rolling chassis and cage assembly. Body finished
Joel_W (Joel) - GT3 - Audi R8 LMS (2015) - 1/24 NuNu kit - Body painted and decalled, rolling chassis commenced
Joel_W (Joel) - INDY - enlisted - Lola T-8800 Newman Haas (Mario Andretti 1988) - 1/25 AMT kit
tinbanger (Richard) - GRAND PRIX - 1914 Mercedes Racer - 1/16 Lindberg kit - Engine painted, chassis started, major panel works under way, custom milled wheels/tyres and sheetmetal panels started
md72 (Mark) - INDY - Target Reynard (Jimmy Vasser) - 1/25 Revell kit - Parts Prep, sub assemblies started, parts painted
Szmann (Gabriel) - FORMULA 1 - Tyrrell P34 (Monaco 1977 #4) - 1/20 Tamiya kit kit - Engine complete, chassis plate and outer shell paint/decals
Hwa-Rang (Jesper) - NASCAR - (TBA)
PasiAhopelto (Pasi) - NASCAR - enlisted - Olds 442 (Donnie Allison) - 1/25 Salvinos JR kit
forest1000 (David) - FORMULA 1 - enlisted - Williams Renault (Jaques Villeneuve) - 1/24 Revell/Monogram kit
Cosimodo (Michael) - ENDURANCE - 1971 Porsche 917/20 - 1/12 MFH kit - Steps 1-8 of 26 completed, engine in tube frame, rear stowage assembly
bluebell914 (Patrick) - ENDURANCE - enlisted - Ferrari P4 or 512S
2002hummer (Darrell) - GRAND PRIX - Lotus Super Seven (Tamiya) - Engine assembled and painted
TacFireGuru (Mike) - NASCAR - enlisted - Chev Monte Carlo (Home Depot)
Lakota (Don) - ENDURANCE - Corvette C7.R - 1/25 Revell kit - Engine assembled, floor pan/chassis under way
RedwingNev (Neil) - GRAND PRIX - enlisted - Lotus 79 (1978 Mario Andretti?) - 1/20 Tamiya kit
heavyjagdpanzer (Bill) - STRAIGHTLINE - Blue Max Funny Car - 1/25 Revell kit - Rolling chassis completed, body painted
bmwh548 (Radu) - RALLY - '99 WRC Subaru Impreza - 1/24 Tamiya kit - Wheels and tyres
bomber14 (Joe) - STOCK CAR - '60 Ford Starliner - AMT/ERTL kit - Rolling chassis/interior done, body paint under way
rv1963 (Robert) - TRANS-AM - '73 Mustang - 1/25 MPC kit- Parts prep, front end modifications
pnance26 (Patrick) - ENDURANCE - Porsche 956 Le Mans 1984 - 1/24 Tamiya kit - Engine assembled and painted, lower pan painted
If anybody has changed or firmed up their proposed builds, or spotted anything wrong in the list, please let me know.
Cheers, D
Joel_W
Joined: December 04, 2010
KitMaker: 11,666 posts
Auto Modeler: 2,974 posts
Posted: Monday, July 06, 2020 - 01:15 AM UTC
D,
Those stats are just super impressive. And what's more, the interest from enlistees already with their original builds finished and in the books for the most part are still active in the GB.
Joel
Those stats are just super impressive. And what's more, the interest from enlistees already with their original builds finished and in the books for the most part are still active in the GB.
Joel
Dixon66
Joined: December 12, 2002
KitMaker: 1,500 posts
Auto Modeler: 645 posts
Posted: Monday, July 06, 2020 - 03:03 AM UTC
A full 1/3 of the enlistees have completed builds already with a couple more right on the home stretch.
Great job to all involved from management on down. LOL
Great job to all involved from management on down. LOL
Lakota
#123
Joined: November 17, 2008
KitMaker: 1,202 posts
Auto Modeler: 15 posts
Posted: Wednesday, July 08, 2020 - 12:54 AM UTC
Howdy Y'all 
Wow, this group build has really taken off. I stopped modeling for a few weeks due to demands at work. This COVID-19 virus is pretty serious.
I looked at my Revell Corvette C7.R to make a plan for painting. There are 2 colors I need some help with, Transparent Gray and Graphite Metallic. I looked these colors up on eBay and am toying with the thought of mixing my own colors. For Transparent Gray I was just going to use Neutral Gray, Aztek makes a "Transparent Gray" paint that looks similar to Neutral Gray, I don't know, what is the difference? For Graphite Metallic I was going to mix a metallic color such as gunmetal with flat black.
Let me know if I have the right idea or if you have other suggestions.
Take care and stay safe,
Don "Lakota"
Joel_W
Joined: December 04, 2010
KitMaker: 11,666 posts
Auto Modeler: 2,974 posts
Posted: Wednesday, July 08, 2020 - 07:50 AM UTC
Don,
I've never heard of Transparent Gray. What is the color used for? As for the Graphite Metallic, it sounds as if it's to represent Carbon Fiber. If so, You can use any semi gloss dark Gray as well as Metallic Gun Metal.
Joel
I've never heard of Transparent Gray. What is the color used for? As for the Graphite Metallic, it sounds as if it's to represent Carbon Fiber. If so, You can use any semi gloss dark Gray as well as Metallic Gun Metal.
Joel
Lakota
#123
Joined: November 17, 2008
KitMaker: 1,202 posts
Auto Modeler: 15 posts
Posted: Wednesday, July 08, 2020 - 09:41 AM UTC
Joel,
Thank you for the info. I'll feel safe mixing a little Gun Metal with Dark Gray for Graphite Metallic.
The Transparent Gray is used on parts labeled as: Headlight Reflector and the two Tailights. The headlight is molded in white plastic. The two tailights are clear red plastic. Perhaps a better color could be "Smoke" or other clear color? I just could not find a transparent color that was gray.
Take care and stay safe,
Don "Lakota"
Lakota
#123
Joined: November 17, 2008
KitMaker: 1,202 posts
Auto Modeler: 15 posts
Posted: Wednesday, July 08, 2020 - 09:56 AM UTC
Howdy Y'all
I just went ahead and bought the Testor's Aztek Transparent Gray for about $10. I figured I'm saving on the Graphite Metallic by mixing existing paints I already have.
Now why would you cover the clear red tailights with transparent gray paint? Oh well, every part on this model is getting painted. I remember when I was a kid you could build a model car with very little painting...
Take care and stay safe,
Don "Lakota"
rv1963
Joined: December 07, 2004
KitMaker: 1,888 posts
Auto Modeler: 806 posts
Posted: Wednesday, July 08, 2020 - 10:30 PM UTC
All you guys are doing some great work on your builds.
Not much chance of me getting any work done on my second build at least for a while as my mom went to the hospital last night with a broken leg, she is 84 doesn't look to good for her. Good luck on your builds.
Not much chance of me getting any work done on my second build at least for a while as my mom went to the hospital last night with a broken leg, she is 84 doesn't look to good for her. Good luck on your builds.
Joel_W
Joined: December 04, 2010
KitMaker: 11,666 posts
Auto Modeler: 2,974 posts
Posted: Thursday, July 09, 2020 - 12:18 AM UTC
Robert,
Sure hope that your mother completely recovers from the broken leg. I'm 72, so she's not that much older then I am.
Joel
Sure hope that your mother completely recovers from the broken leg. I'm 72, so she's not that much older then I am.
Joel
Lakota
#123
Joined: November 17, 2008
KitMaker: 1,202 posts
Auto Modeler: 15 posts
Posted: Thursday, July 09, 2020 - 01:02 AM UTC
Quoted Text
Robert,
Sure hope that your mother completely recovers from the broken leg. I'm 72, so she's not that much older then I am.
Joel
Yes, praying for a speedy recovery for your mother.
Take care and stay safe,
Don "Lakota"
pnance26
Joined: January 22, 2016
KitMaker: 766 posts
Auto Modeler: 140 posts
Posted: Thursday, July 09, 2020 - 12:33 PM UTC
Damian,
That engine bay looks incredible... sorry if I came off snarky about the decals.
To all the others here, keep it up! All looks good for this build.
I was on the verge of tossing it in on the 956 and starting the T2 but I am going to keep going! Just going to take a little time to get caught up on the chores. So it won't be at least another week to be back throwing around glue and paint and decals.
Anyone facing any troubles at all... don't let it stand in the way of your dreams... and models. It will all work out.
AussieReg
#007
Joined: June 09, 2009
KitMaker: 8,156 posts
Auto Modeler: 2,953 posts
Posted: Thursday, July 09, 2020 - 01:53 PM UTC
Quoted Text
Damian,
That engine bay looks incredible... sorry if I came off snarky about the decals.
Thanks mate, and no need to apologise, I didn't take it that way at all Patrick. I've had the same question about the "bleed" effect on a couple of other forums as well.
I'm hoping to get the new decal clear coated this weekend and some more work on the interior.
Cheers, D
Joel_W
Joined: December 04, 2010
KitMaker: 11,666 posts
Auto Modeler: 2,974 posts
Posted: Friday, July 10, 2020 - 07:43 AM UTC
Finally time for another small update on the Audi R8 LMS GT3.
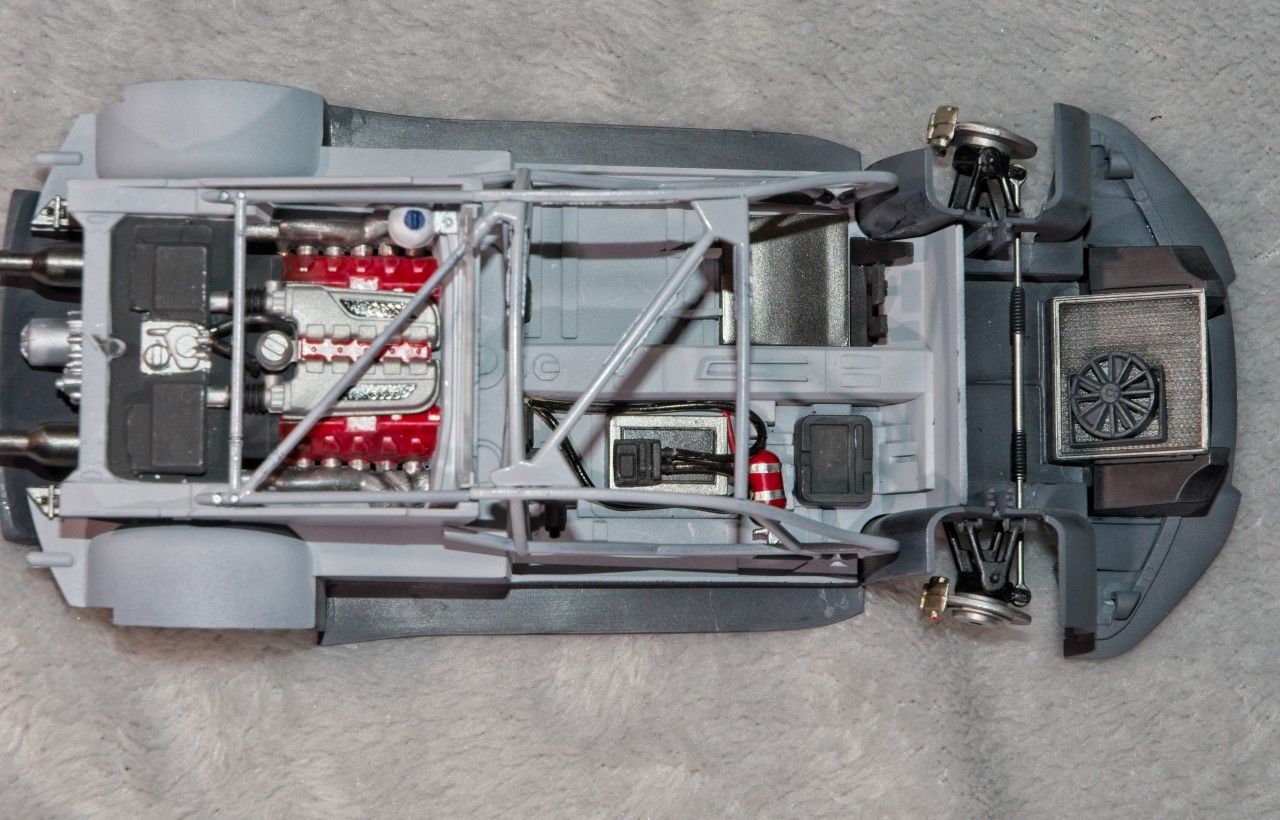
I started working on the driver's compartment which is comprised of various sub assemblies. The 1st one is the floor pan. Various electronic components were painted Flat Black then glued into position. I added three rubber clad electronic cables that I painted in Semi Gloss Black so that they just didn't disappear over the tops of the various Black boxes. Unfortunately, the lights just reflected way to much light back towards the camera. After seeing these pictures, maybe I should consider toning them down a tad. finally the fire extinguisher was painted bright gloss Red, and the holding straps were made from BMF. For me that's way easier said then done, but eventually I got both strips into place.

The exhausts are each just two halves that needed a little Tamiya putty to blend in the seams. I primed them Gloss Black then Alcad 2 Stainless Steel was air brushed on. The two engine compartment supports were also painted with Gloss Black followed by Alcad 2 Steel for a slightly different look.

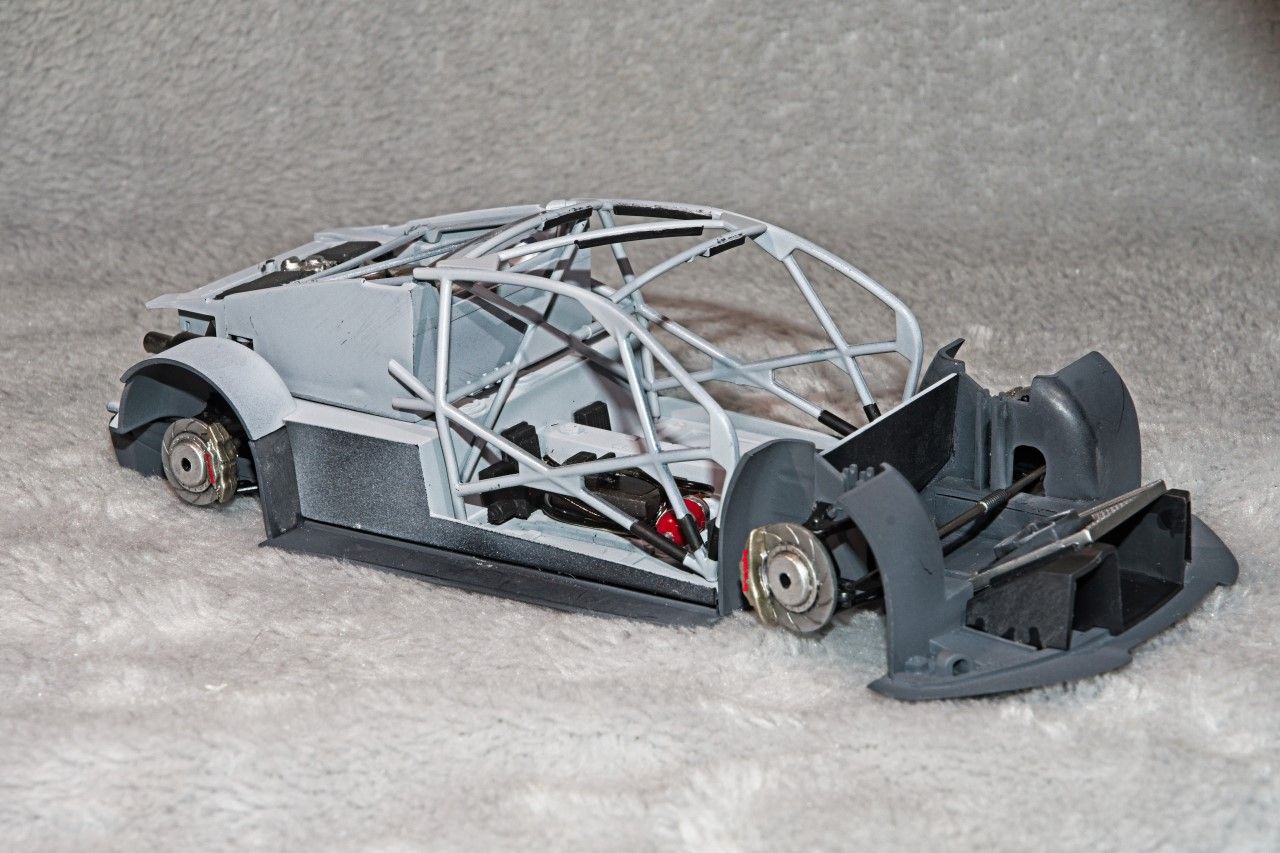
I then built up the interior roll cage that fits like a glove. Primed then painted a Neutral Gray followed by a coat of Mr. Color clear Gloss. When dry, I hand painted all the rubber pads flat Black.
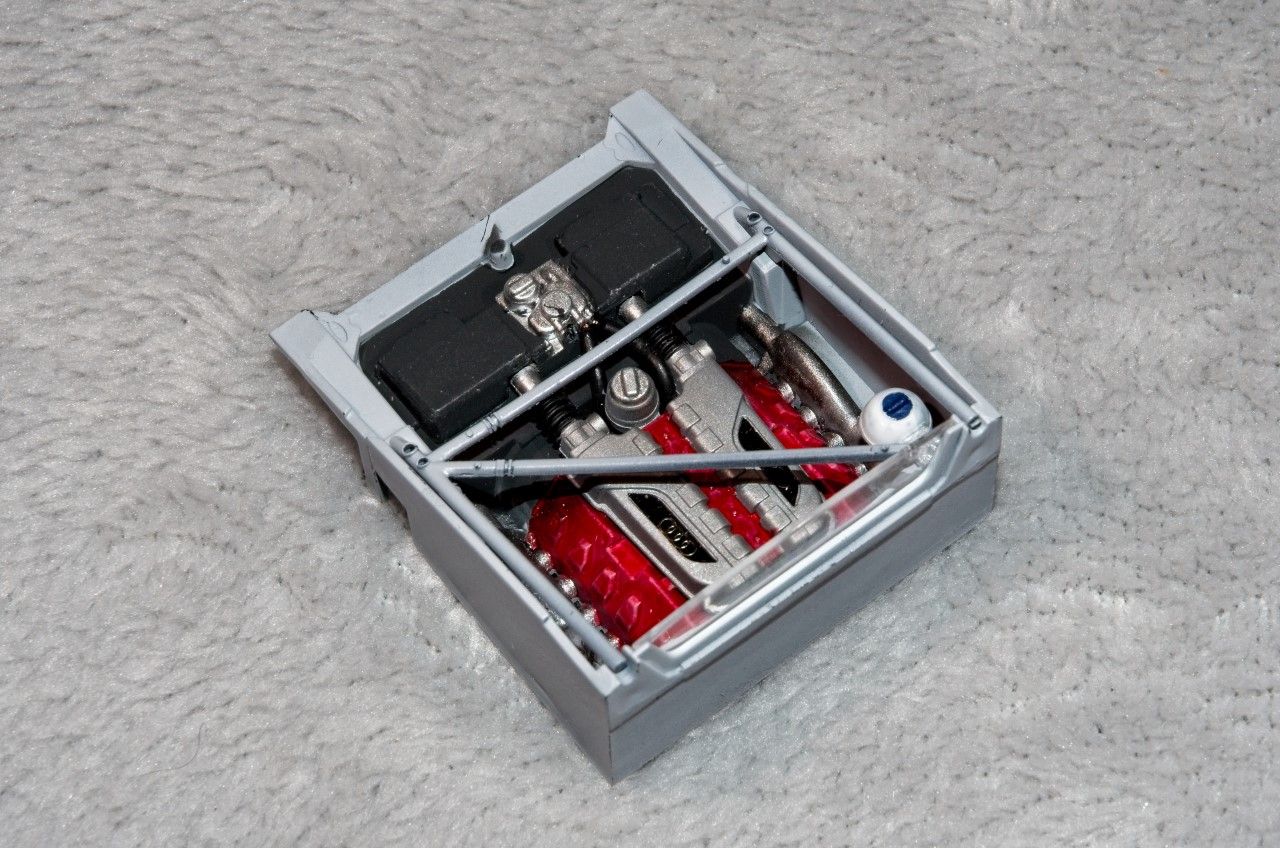
Up next is the engine compartment sub assembly. The engine and exhaust are molded into the compartment. This created the need for quite alot of masking as the compartment is neutral Gray, the back panel is Flat Black, the exhuasts are Metallic Metal, and the engine is a dull Red. So I decided to paint the engine and exhausts by hand. The engine fuel injection covers were air brushed Mr. Color Metallic 2 Silver which looks more like polished Aluminum, which is the metallic color I was looking for. When dry, the Audi decals were applied. The two intake lines were painted with Aluminum, and Nato Tamiya Rubber for the boots. The engine compartment support rails were painted exactly the same as the roll cage.
Now for the fun part. I dry fitted all the assemblies. The fit is nearly perfect, but some tweaking of the roll cage where it meets the engine compartment railing is necessary. Still it's starting to come together nicely.
And thanks for stopping by and checking out my build to date. As always, it's greatly appreciated.
Joel
I started working on the driver's compartment which is comprised of various sub assemblies. The 1st one is the floor pan. Various electronic components were painted Flat Black then glued into position. I added three rubber clad electronic cables that I painted in Semi Gloss Black so that they just didn't disappear over the tops of the various Black boxes. Unfortunately, the lights just reflected way to much light back towards the camera. After seeing these pictures, maybe I should consider toning them down a tad. finally the fire extinguisher was painted bright gloss Red, and the holding straps were made from BMF. For me that's way easier said then done, but eventually I got both strips into place.
The exhausts are each just two halves that needed a little Tamiya putty to blend in the seams. I primed them Gloss Black then Alcad 2 Stainless Steel was air brushed on. The two engine compartment supports were also painted with Gloss Black followed by Alcad 2 Steel for a slightly different look.
I then built up the interior roll cage that fits like a glove. Primed then painted a Neutral Gray followed by a coat of Mr. Color clear Gloss. When dry, I hand painted all the rubber pads flat Black.
Up next is the engine compartment sub assembly. The engine and exhaust are molded into the compartment. This created the need for quite alot of masking as the compartment is neutral Gray, the back panel is Flat Black, the exhuasts are Metallic Metal, and the engine is a dull Red. So I decided to paint the engine and exhausts by hand. The engine fuel injection covers were air brushed Mr. Color Metallic 2 Silver which looks more like polished Aluminum, which is the metallic color I was looking for. When dry, the Audi decals were applied. The two intake lines were painted with Aluminum, and Nato Tamiya Rubber for the boots. The engine compartment support rails were painted exactly the same as the roll cage.
Now for the fun part. I dry fitted all the assemblies. The fit is nearly perfect, but some tweaking of the roll cage where it meets the engine compartment railing is necessary. Still it's starting to come together nicely.
And thanks for stopping by and checking out my build to date. As always, it's greatly appreciated.
Joel
Dixon66
Joined: December 12, 2002
KitMaker: 1,500 posts
Auto Modeler: 645 posts
Posted: Friday, July 10, 2020 - 01:18 PM UTC
Looking great Joel. The rollcage in particular to me looks really good, the bars, gussets and padding, just looks right.
AussieReg
#007
Joined: June 09, 2009
KitMaker: 8,156 posts
Auto Modeler: 2,953 posts
Posted: Friday, July 10, 2020 - 01:24 PM UTC
Neat work Joel, looks great. Getting a complex roll cage like that to build up and basically drop in place is a really good piece of engineering and construction.
Cheers, D
Cheers, D
 |

WEB HOSTING BY


Copyright ©2021 Auto Modeler and Kitmaker Network, a subsidiary of Silver Star Enterprises
All Rights Reserved. Please read our Conditions of Use and Privacy Policy.
All Rights Reserved. Please read our Conditions of Use and Privacy Policy.