

Roll cage looks great but I have a suggestion if you don't mind...
Ever consider using black shrinkwrap for the rubber parts? It splits very easily... slip it over the roll bar with the seam hidden and apply a little hair drier heat.
Just a suggestion so you can avoid having to paint them. Otherwise, it looks nice and snug!


Go to automodeler.com for the current dynamic site!
The Garage
For general automotive modeling or non-modeling topics.
For general automotive modeling or non-modeling topics.
Hosted by Jim Starkweather
Strip, Track & Trail Official Build Thread

pnance26

Joined: January 22, 2016
KitMaker: 766 posts
Auto Modeler: 140 posts

Posted: Saturday, July 11, 2020 - 01:30 AM UTC

Joel_W
Joined: December 04, 2010
KitMaker: 11,666 posts
Auto Modeler: 2,974 posts

Posted: Saturday, July 11, 2020 - 01:43 AM UTC
David & Damian,
Thanks guys for your thumbs up. Glad that you both like the progress I've made so far.
The design of the kit is pretty different from what I'm use to as it's a mid engine rather then the more traditional front engine GT3 car I've been building of late. As I've said, the fit has been for the most part darn near perfect. The roll cage literally drops into place. Almost never had that before
I'm finally getting close to the last few laps and then the checker flag at the finish line.
Joel

Joel_W
Joined: December 04, 2010
KitMaker: 11,666 posts
Auto Modeler: 2,974 posts
Posted: Saturday, July 11, 2020 - 01:45 AM UTC
Quoted Text
Roll cage looks great but I have a suggestion if you don't mind...
Ever consider using black shrinkwrap for the rubber parts? It splits very easily... slip it over the roll bar with the seam hidden and apply a little hair drier heat.
Just a suggestion so you can avoid having to paint them. Otherwise, it looks nice and snug!
Patrick,
Now there's a great idea for sure. I just gotta remember to find them at my Local Home Depot this week as I almost never miss needing something that either broke or needs replacement from use these days.
Joel

AussieReg

#007

Joined: June 09, 2009
KitMaker: 8,156 posts
Auto Modeler: 2,953 posts

Posted: Sunday, July 12, 2020 - 02:53 AM UTC
Yes folks, it's that time once again.
Progress reports have slowed somewhat this week. Joel is moving along beautifully with his NuNu Audi, and Don is getting paint options sorted for his C7 'Vette, but family issues have slowed progress there. Patrick's 956 was under threat from the domestic chores but is making a comeback. My '55 has clear applied to the new decal on the roof, photos will be sorted once it has cured for a day or two. I've put the rolling chassis aside for a while to focus on finishing up a P-47 and making some progress on an Me262 for a couple of Aeroscale Campaign builds, but it will be front and centre later this week when I work on adding an after-market harness to the seat assembly and finish the roll cage.
Running update on builds
15 weeks in, 38 pages with over 20,800 views and 925 posts
21 enlisted
13 builds in progress
9 completed builds
Szmann (Gabriel) - NASCAR - Chev Monte Carlo (Tony Stewart) - 1/25 AMT/ERTL kit - COMPLETED
Stickframe (Nick) - ENDURANCE - McLaren F1 GTR Longtail - 1/24 Aoshima kit - COMPLETED
Szmann (Gabriel) - NASCAR - Pontiac Grand Prix (Kyle Petty) - 1/24 Revell/Monogram kit - COMPLETED
rv1963 (Robert) - STRAIGHTLINE - '37 Chevy Gasser - 1/25 AMT kit- COMPLETED
jimb (Jim) - STRAIGHTLINE - '57 Ford Sedan Gasser - COMPLETED
Joel_W (Joel) - FORMULA 1 - Lotus 99T Honda (Ayrton Senna 1987) - 1/20 Tamiya kit - COMPLETED
pnance26 (Patrick) - FORMULA 1 - Ferrari 312T - 1/12 Tamiya kit - COMPLETED
Dixon66 (David) - TOURING GROUP 2 - 2006 Mustang GT- 1/25 Revell kit - COMPLETED
Dixon66 (David) - ENDURANCE GROUP 5 - Zakspeed Capri - 1/24 Tamiya kit - COMPLETED
Aussiereg (Damian) - STRAIGHTLINE - '55 Chev Pro Sportsman (Charles Carpenter) - 1/25 Revell kit - Engine bay detailing, rolling chassis and cage assembly. Body finished
Joel_W (Joel) - GT3 - Audi R8 LMS (2015) - 1/24 NuNu kit - Body painted and decalled, roll cage and engine completed
Joel_W (Joel) - INDY - enlisted - Lola T-8800 Newman Haas (Mario Andretti 1988) - 1/25 AMT kit
tinbanger (Richard) - GRAND PRIX - 1914 Mercedes Racer - 1/16 Lindberg kit - Engine painted, chassis started, major panel works under way, custom milled wheels/tyres and sheetmetal panels started
md72 (Mark) - INDY - Target Reynard (Jimmy Vasser) - 1/25 Revell kit - Parts Prep, sub assemblies started, parts painted
Szmann (Gabriel) - FORMULA 1 - Tyrrell P34 (Monaco 1977 #4) - 1/20 Tamiya kit kit - Engine complete, chassis plate and outer shell paint/decals
Hwa-Rang (Jesper) - NASCAR - (TBA)
PasiAhopelto (Pasi) - NASCAR - enlisted - Olds 442 (Donnie Allison) - 1/25 Salvinos JR kit
forest1000 (David) - FORMULA 1 - enlisted - Williams Renault (Jaques Villeneuve) - 1/24 Revell/Monogram kit
Cosimodo (Michael) - ENDURANCE - 1971 Porsche 917/20 - 1/12 MFH kit - Steps 1-8 of 26 completed, engine in tube frame, rear stowage assembly
bluebell914 (Patrick) - ENDURANCE - enlisted - Ferrari P4 or 512S
2002hummer (Darrell) - GRAND PRIX - Lotus Super Seven (Tamiya) - Engine assembled and painted
TacFireGuru (Mike) - NASCAR - enlisted - Chev Monte Carlo (Home Depot)
Lakota (Don) - ENDURANCE - Corvette C7.R - 1/25 Revell kit - Engine assembled, floor pan/chassis under way
RedwingNev (Neil) - GRAND PRIX - enlisted - Lotus 79 (1978 Mario Andretti?) - 1/20 Tamiya kit
heavyjagdpanzer (Bill) - STRAIGHTLINE - Blue Max Funny Car - 1/25 Revell kit - Rolling chassis completed, body painted
bmwh548 (Radu) - RALLY - '99 WRC Subaru Impreza - 1/24 Tamiya kit - Wheels and tyres
bomber14 (Joe) - STOCK CAR - '60 Ford Starliner - AMT/ERTL kit - Rolling chassis/interior done, body paint under way
rv1963 (Robert) - TRANS-AM - '73 Mustang - 1/25 MPC kit- Parts prep, front end modifications
pnance26 (Patrick) - ENDURANCE - Porsche 956 Le Mans 1984 - 1/24 Tamiya kit - Engine assembled and painted, lower pan painted
If anybody has changed or firmed up their proposed builds, or spotted anything wrong in the list, please let me know.
Cheers, D

Joel_W
Joined: December 04, 2010
KitMaker: 11,666 posts
Auto Modeler: 2,974 posts
Posted: Sunday, July 12, 2020 - 03:29 AM UTC
D,
Sure looks like the Summer time is having it's usual effect on indoor hobbies. Still more progress then I would have thought we'd get during our Northern Summer months.
Joel
Sure looks like the Summer time is having it's usual effect on indoor hobbies. Still more progress then I would have thought we'd get during our Northern Summer months.
Joel

Cosimodo

#335

Joined: September 03, 2013
KitMaker: 1,808 posts
Auto Modeler: 701 posts

Posted: Sunday, July 12, 2020 - 09:15 PM UTC
Bits of Steps 9 to 11 here with a little piece missing from each. This is mainly due to wiring and plumbing. Though MFH give you the wiring detail for the engine they have nothing for the cabin so a bit of research required before finalising the "office".


cheers
Michael
cheers
Michael
Joel_W
Joined: December 04, 2010
KitMaker: 11,666 posts
Auto Modeler: 2,974 posts
Posted: Monday, July 13, 2020 - 12:50 AM UTC
Michael,
the driver's compartment is really starting to look the part. Can't wait to see it once you're satisfied with the extra detailing you're planning on.
Just one question, the seats in each picture are a different shade of Red. Is it' more like the 2nd picture where the Red is closer to the Red of the Fire Extinguisher, which I think would be correct?
Joel
pnance26
Joined: January 22, 2016
KitMaker: 766 posts
Auto Modeler: 140 posts
Posted: Monday, July 13, 2020 - 01:15 AM UTC
Please remind me which MFH this is...
Seems odd that they emphasize the engine and do little for the compartment. Doesn't seen like something that a high end kit such as MFH should do.
Joel, I think you can account for the different shades of red due to lighting. Seems the light in the second pic is a little brighter.
Damian,
I did get a little time yesterday to do some driver's compartment assembly and body dry fit. I will probably try to prime the body sections on Thursday with the hopes of laying down some white on Friday. Then it is masking time so I can do the flat black in the headlight wells and on the underside of the main body parts. Will try to get a photo to you. Engine is seated permanently as well as driver's compartment. As I said I am doing this strictly "out of the box", so no wiring or seatbelts.
Which brings me to my IPMS question... are aftermarket decals no allowed in a very strict interpretation of "out of the box" rules? Wondering and thanks in advance for the answer.
Joel_W
Joined: December 04, 2010
KitMaker: 11,666 posts
Auto Modeler: 2,974 posts
Posted: Monday, July 13, 2020 - 09:49 AM UTC
Patrick,
Looking forward to your next update with the color coat on.
As for your question about using After Market decals for an IPMS contest OOB build, you can use any decals and paint scheme you want. You can even make your own decals or use stencils. If you're thinking of entering this model in a IPMS Regional contest, you need to have the original kit instructions with your entry form on the table. The last IPMS regional I entered a few years ago, OOB was just a check mark on your entry sheet. The model went into the proper cat as any open model would. So it got judged twice, once as an OOB, and then as a regular contest entry. You could actually win or place twice with the same model.
Joel
pnance26
Joined: January 22, 2016
KitMaker: 766 posts
Auto Modeler: 140 posts
Posted: Monday, July 13, 2020 - 10:53 AM UTC
Quoted Text
Patrick,
Looking forward to your next update with the color coat on.
As for your question about using After Market decals for an IPMS contest OOB build, you can use any decals and paint scheme you want. You can even make your own decals or use stencils. If you're thinking of entering this model in a IPMS Regional contest, you need to have the original kit instructions with your entry form on the table. The last IPMS regional I entered a few years ago, OOB was just a check mark on your entry sheet. The model went into the proper cat as any open model would. So it got judged twice, once as an OOB, and then as a regular contest entry. You could actually win or place twice with the same model.
Joel
It's going to be a multi-colored white paint scheme. I opted out of the Newman yellow/black/white and am doing the Skoal green on white car. I will be doing the white first and then the flat black underside. Does anyone use frisket paper for large areas of masking any longer?
I rarely enter contests but I may with this one... and I did not know that about entry categories. Thanks for the heads up!
Cosimodo
#335
Joined: September 03, 2013
KitMaker: 1,808 posts
Auto Modeler: 701 posts
Posted: Monday, July 13, 2020 - 12:22 PM UTC
Quoted Text
Michael,
the driver's compartment is really starting to look the part. Can't wait to see it once you're satisfied with the extra detailing you're planning on.
Just one question, the seats in each picture are a different shade of Red. Is it' more like the 2nd picture where the Red is closer to the Red of the Fire Extinguisher, which I think would be correct?
Joel
Glad you like it Joel.
The first picture is closer to the actual colour painted. Now as to which is the correct shade, that is a difficult one. I have seen models made with the bright red seats but the car photos indicate that they were darker, probably even more so than the first picture but as always the caveat with 50 year old photos.
cheers
Michael
Cosimodo
#335
Joined: September 03, 2013
KitMaker: 1,808 posts
Auto Modeler: 701 posts
Posted: Monday, July 13, 2020 - 12:29 PM UTC
Quoted Text
Please remind me which MFH this is...
Seems odd that they emphasize the engine and do little for the compartment. Doesn't seen like something that a high end kit such as MFH should do.
Hi Patrick, this is the Porsche 917/20 kit aka the Pink Pig.
MFH provide the werewithal but not the know how. You can plumb/wire it up but you won't really be able to see the detail in the cabin whereas the engine cover is hinged so can be viewed. The perennial debate, do you work on what can never be seen?
cheers
Michael
Joel_W
Joined: December 04, 2010
KitMaker: 11,666 posts
Auto Modeler: 2,974 posts
Posted: Tuesday, July 14, 2020 - 03:10 AM UTC
For what it's worth, my next to nearly useless 2 cents learned from detailing parts of aircraft and now cars that won't ever be seen is something I now never do.
Originally I did it just to see if I could add a little something extra, but slowly it dawned on me that even if I entered the model in a contest, the judges really couldn't see what I did or claimed I did, so you get zero credit.
My car builds now usually have removable body panels, and in that case I do add some additional details, especially detail painting and shading that does fools one eye.
But the bottom line is do whatever you feel like doing. If you get enjoyment out of it, then I say; go for it.
Joel
AussieReg
#007
Joined: June 09, 2009
KitMaker: 8,156 posts
Auto Modeler: 2,953 posts
Posted: Thursday, July 16, 2020 - 01:43 AM UTC
Well I got the P-47 finished and off the bench, and I'm making good progress on an Me262 for another Campaign build, so it's time to get back to the '55 and get it back on track!
Time for another first for me, an after-market harness set. This looks like fun!
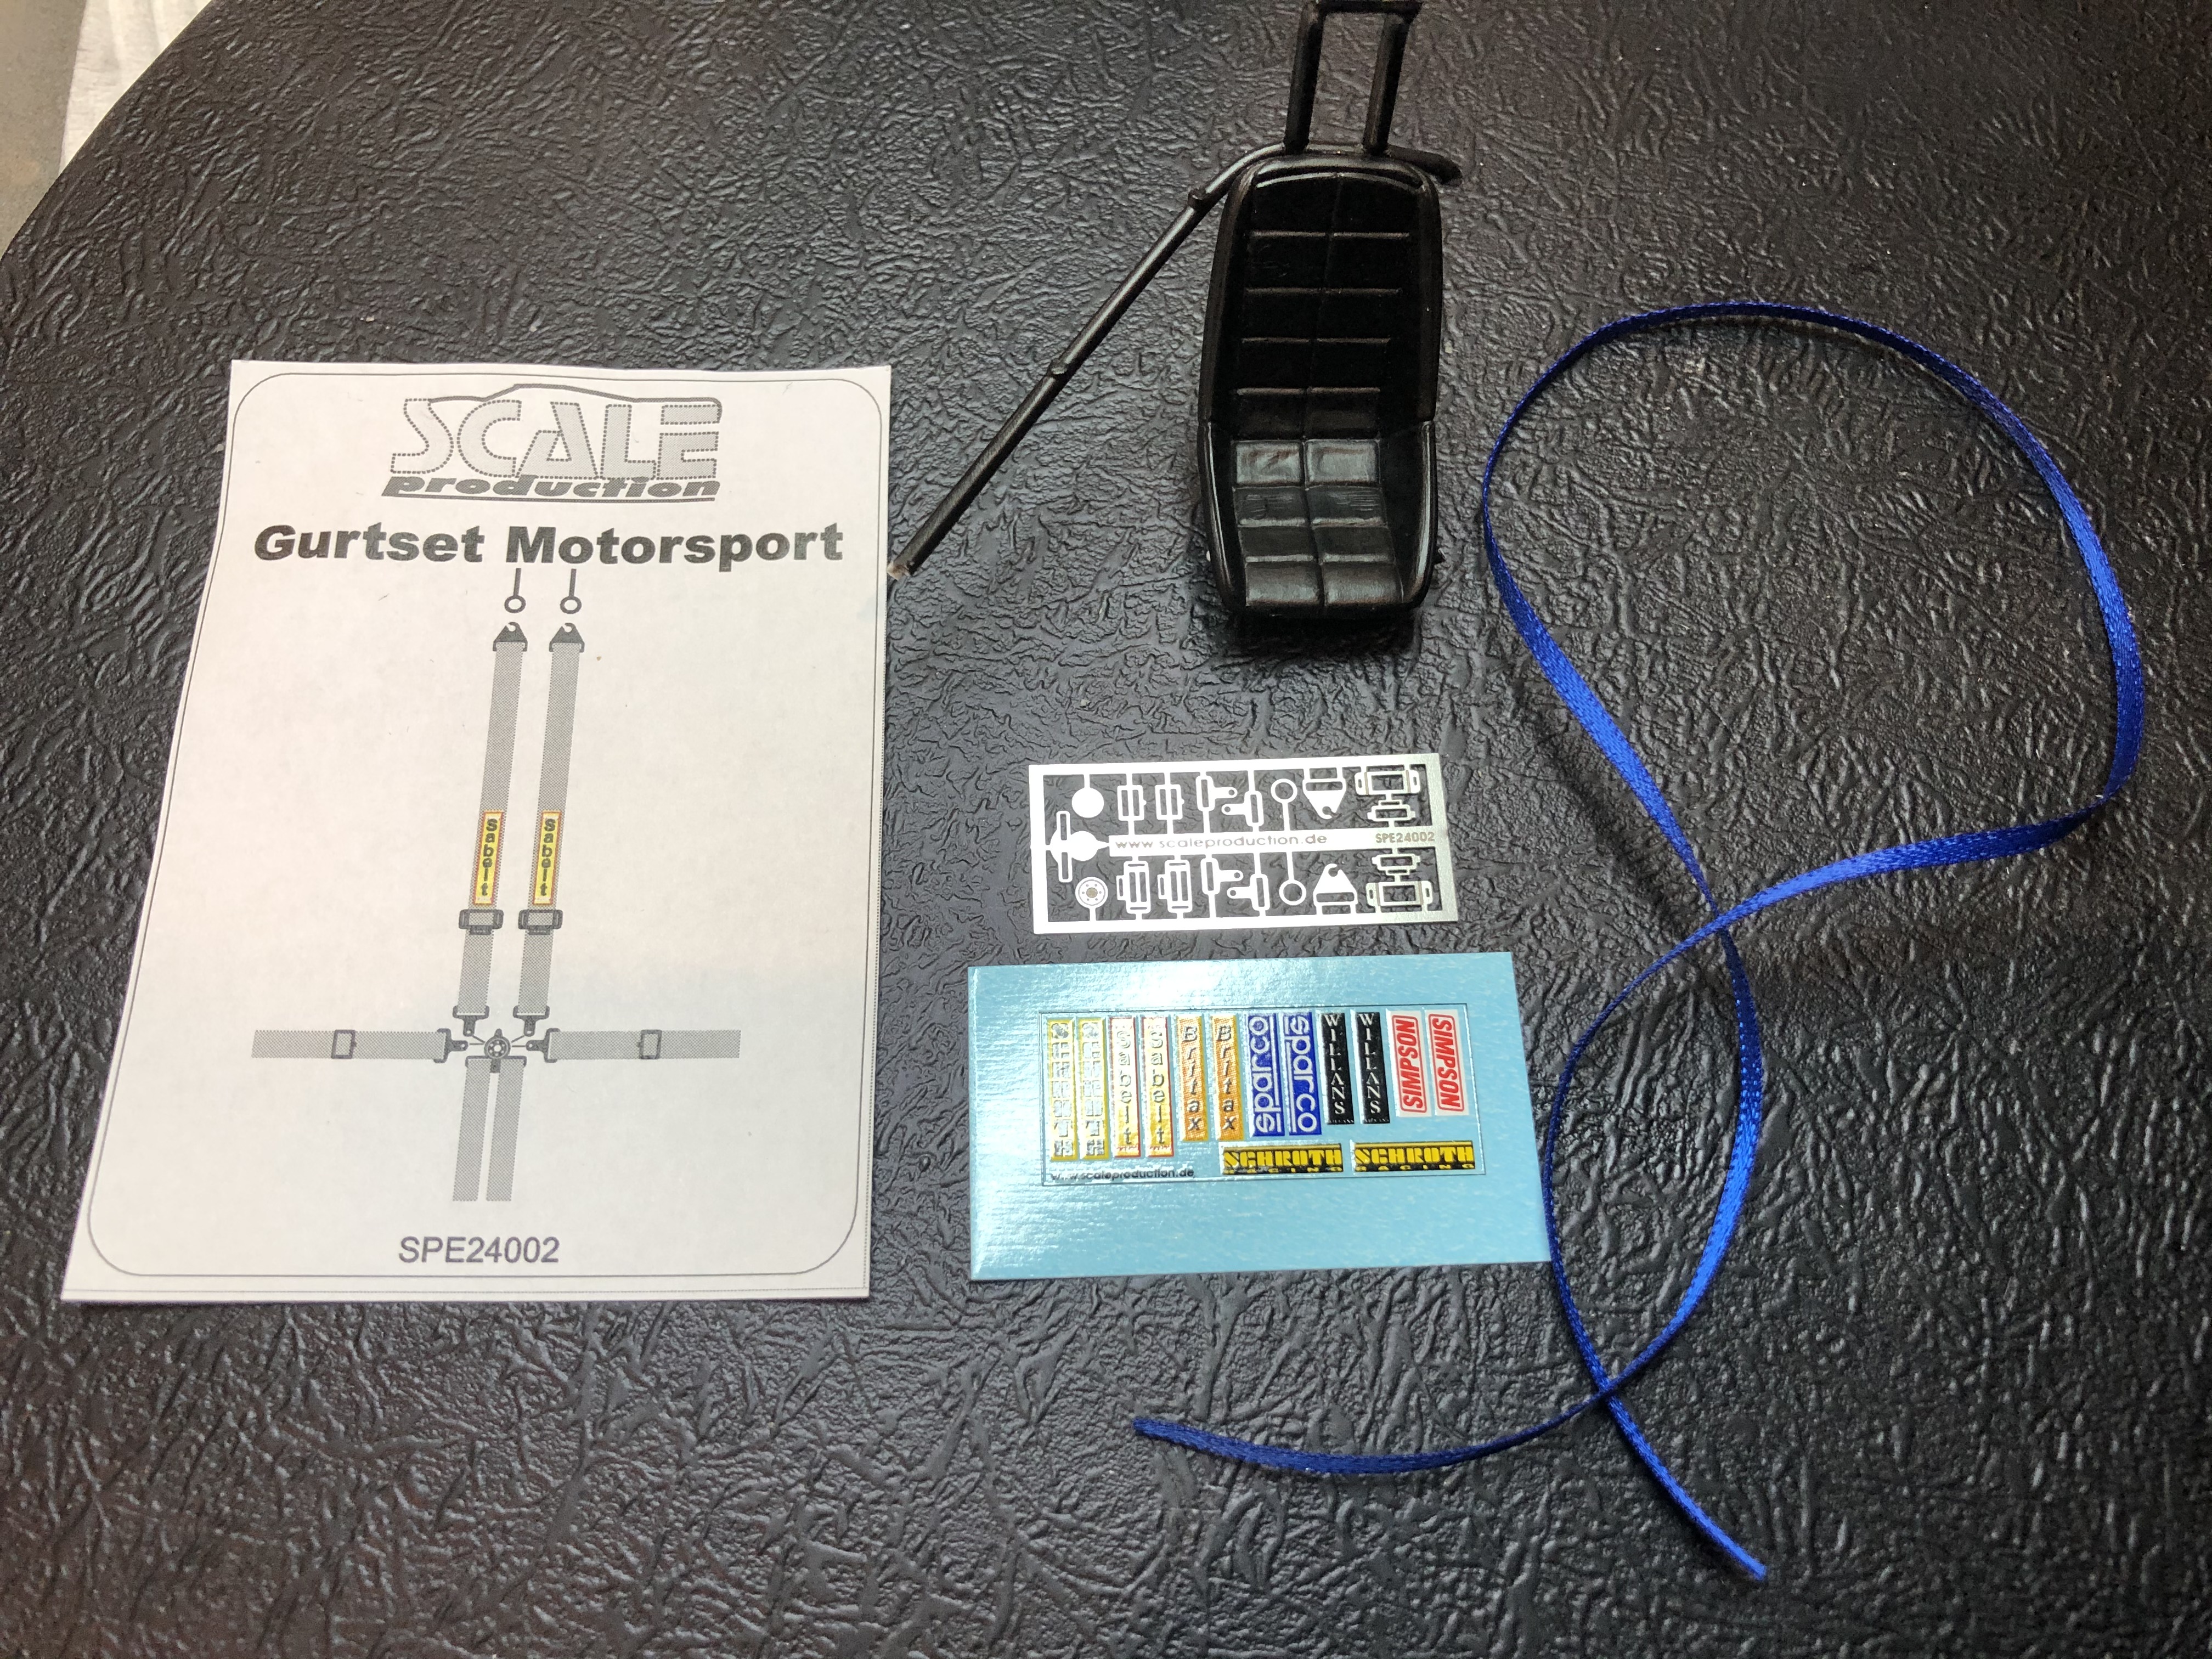
First question, what do you guys use to trim the parts off the metal fret. A blade won't even put a mark in it, so I'm thinking some little side-cutters maybe.
Cheers, D
Time for another first for me, an after-market harness set. This looks like fun!
First question, what do you guys use to trim the parts off the metal fret. A blade won't even put a mark in it, so I'm thinking some little side-cutters maybe.
Cheers, D
Joel_W
Joined: December 04, 2010
KitMaker: 11,666 posts
Auto Modeler: 2,974 posts
Posted: Thursday, July 16, 2020 - 07:24 AM UTC
D,
to tell the truth, on a lot of my builds where I need 5 or 6 belt harness, I kind wing it as my extremely poor eyesight makes working on this aspect of a build nearly impossible for me. This Tuesday I'm scheduled for the 1sr of 4 eye surgeries: Cataracts even in my nearly blind eye, and retina procedures once again in both, plus I now have to deal with Macular Degeneration via injections in both eyes for months on end if they work. Didn't the last time, but who knows.
Removing the part from the PE fret for me is done with a brand new #10 blade. I preform more of a downward chop then a sideways cut. The #10 blade allows me to kind of rock back and forth if the PE is on the thick side. I also use either a piece of safety glass or a ceramic tile as a cutting surface. our traditional cutting mats have just to much give, and I usually would bend the part I'm trying to cut off.
Tamiya makes PE snippers, but they're rather expensive and I just don't use enough PE to justify buying them.
Joel
AussieReg
#007
Joined: June 09, 2009
KitMaker: 8,156 posts
Auto Modeler: 2,953 posts
Posted: Thursday, July 16, 2020 - 11:06 AM UTC
Joel, I wish you well with your upcoming surgeries, hopefully they can set you right!
I have tried a heavy Xacto blade, even a chisel blade, on a hard surface. These things look to be nickel-plated steel and just won't cut. I can't even get a mark in the surface to be able to bend them. I will try some small side-cutters tonight and report back.
Cheers, D
I have tried a heavy Xacto blade, even a chisel blade, on a hard surface. These things look to be nickel-plated steel and just won't cut. I can't even get a mark in the surface to be able to bend them. I will try some small side-cutters tonight and report back.
Cheers, D
Joel_W
Joined: December 04, 2010
KitMaker: 11,666 posts
Auto Modeler: 2,974 posts
Posted: Thursday, July 16, 2020 - 11:17 AM UTC
D,
Thanks for the support. This round of issues I'm more then a little shall I say concerned.
Nippers would work just fine, if you can get them into the small spaces on those PE Frets.
joel
Thanks for the support. This round of issues I'm more then a little shall I say concerned.
Nippers would work just fine, if you can get them into the small spaces on those PE Frets.
joel

Dixon66
Joined: December 12, 2002
KitMaker: 1,500 posts
Auto Modeler: 645 posts

Posted: Thursday, July 16, 2020 - 11:24 AM UTC
Damian, you can try annealing a small potion of the fret to see if it will cut better after the softening effect of the annealing.
Heat a small section over a flame for about 10 seconds and then let it cool on its own.
Heat a small section over a flame for about 10 seconds and then let it cool on its own.
Cosimodo
#335
Joined: September 03, 2013
KitMaker: 1,808 posts
Auto Modeler: 701 posts
Posted: Thursday, July 16, 2020 - 01:19 PM UTC
Hi Damian,
I have done a lot of photo etch from my ship building days and I can say even if you only do it occasionally get a pair of the Tamiya scissors they make for PE. Not only are they good for removing the piece from the fret they allow you remove the little stub that is still there even if you are using a knife.
cheers
Michael
AussieReg
#007
Joined: June 09, 2009
KitMaker: 8,156 posts
Auto Modeler: 2,953 posts
Posted: Friday, July 17, 2020 - 12:37 AM UTC
Thanks Michael, I will keep an eye out for one of those!
I managed to find an old set of small side cutters in the tool box, and made it this far tonight.
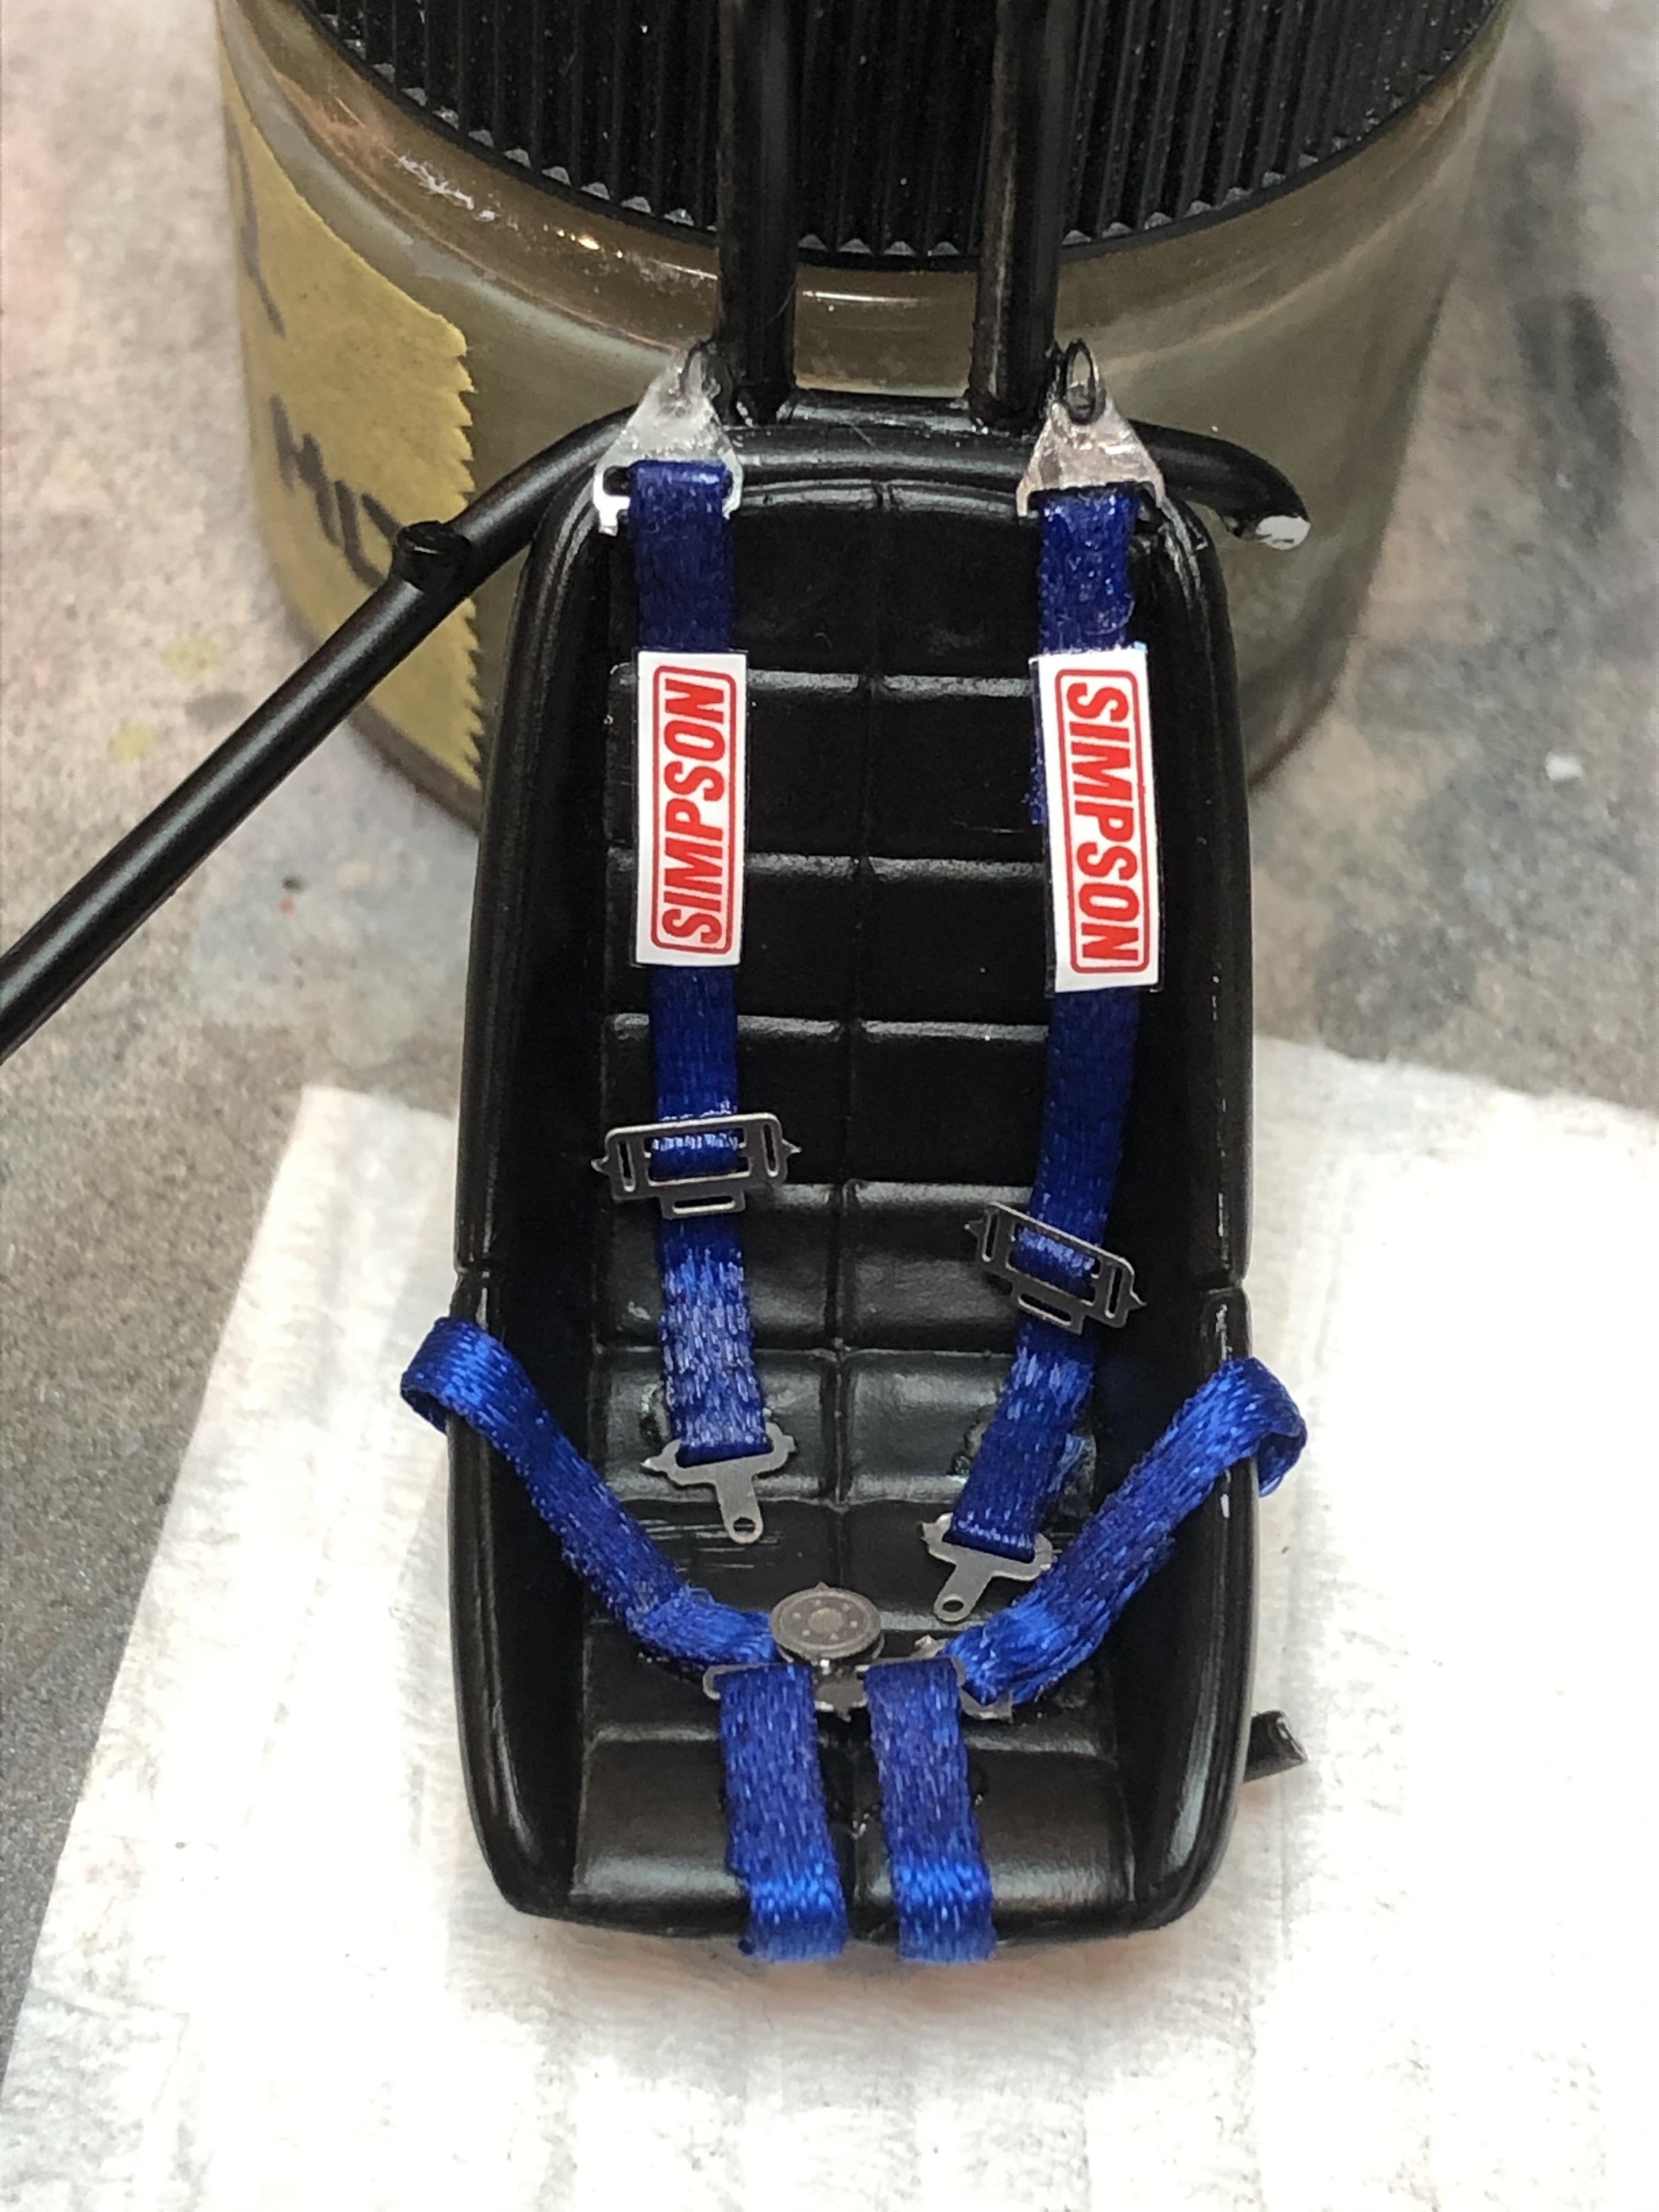
Not perfect, but for a first try at this type of product I'm pretty satisfied. I only managed to lose 1 buckle along the way
Cheers, D
I managed to find an old set of small side cutters in the tool box, and made it this far tonight.
Not perfect, but for a first try at this type of product I'm pretty satisfied. I only managed to lose 1 buckle along the way
Cheers, D
Joel_W
Joined: December 04, 2010
KitMaker: 11,666 posts
Auto Modeler: 2,974 posts
Posted: Friday, July 17, 2020 - 01:29 AM UTC
D,
That harness assembly looks fantastic. I'd say that you really nailed.
I'm also working on the harness assembly for my Audi R8, and they really need to take us modelers into their decision making when designing their cars. Another car with a black seat and a black harness assembly. I should have used my official Modeler's license and gone with Red or Blue instead.
That harness assembly looks fantastic.
I'd say that you really nailed.I'm also working on the harness assembly for my Audi R8, and they really need to take us modelers into their decision making when designing their cars. Another car with a black seat and a black harness assembly. I should have used my official Modeler's license and gone with Red or Blue instead.
AussieReg
#007
Joined: June 09, 2009
KitMaker: 8,156 posts
Auto Modeler: 2,953 posts
Posted: Friday, July 17, 2020 - 12:36 PM UTC
Quoted Text
I'm also working on the harness assembly for my Audi R8, and they really need to take us modelers into their decision making when designing their cars. Another car with a black seat and a black harness assembly. I should have used my official Modeler's license and gone with Red or Blue instead.
Indeed, it seems that we are the last consideration when they decide on interior colour schemes!
Quoted Text
That harness assembly looks fantastic.
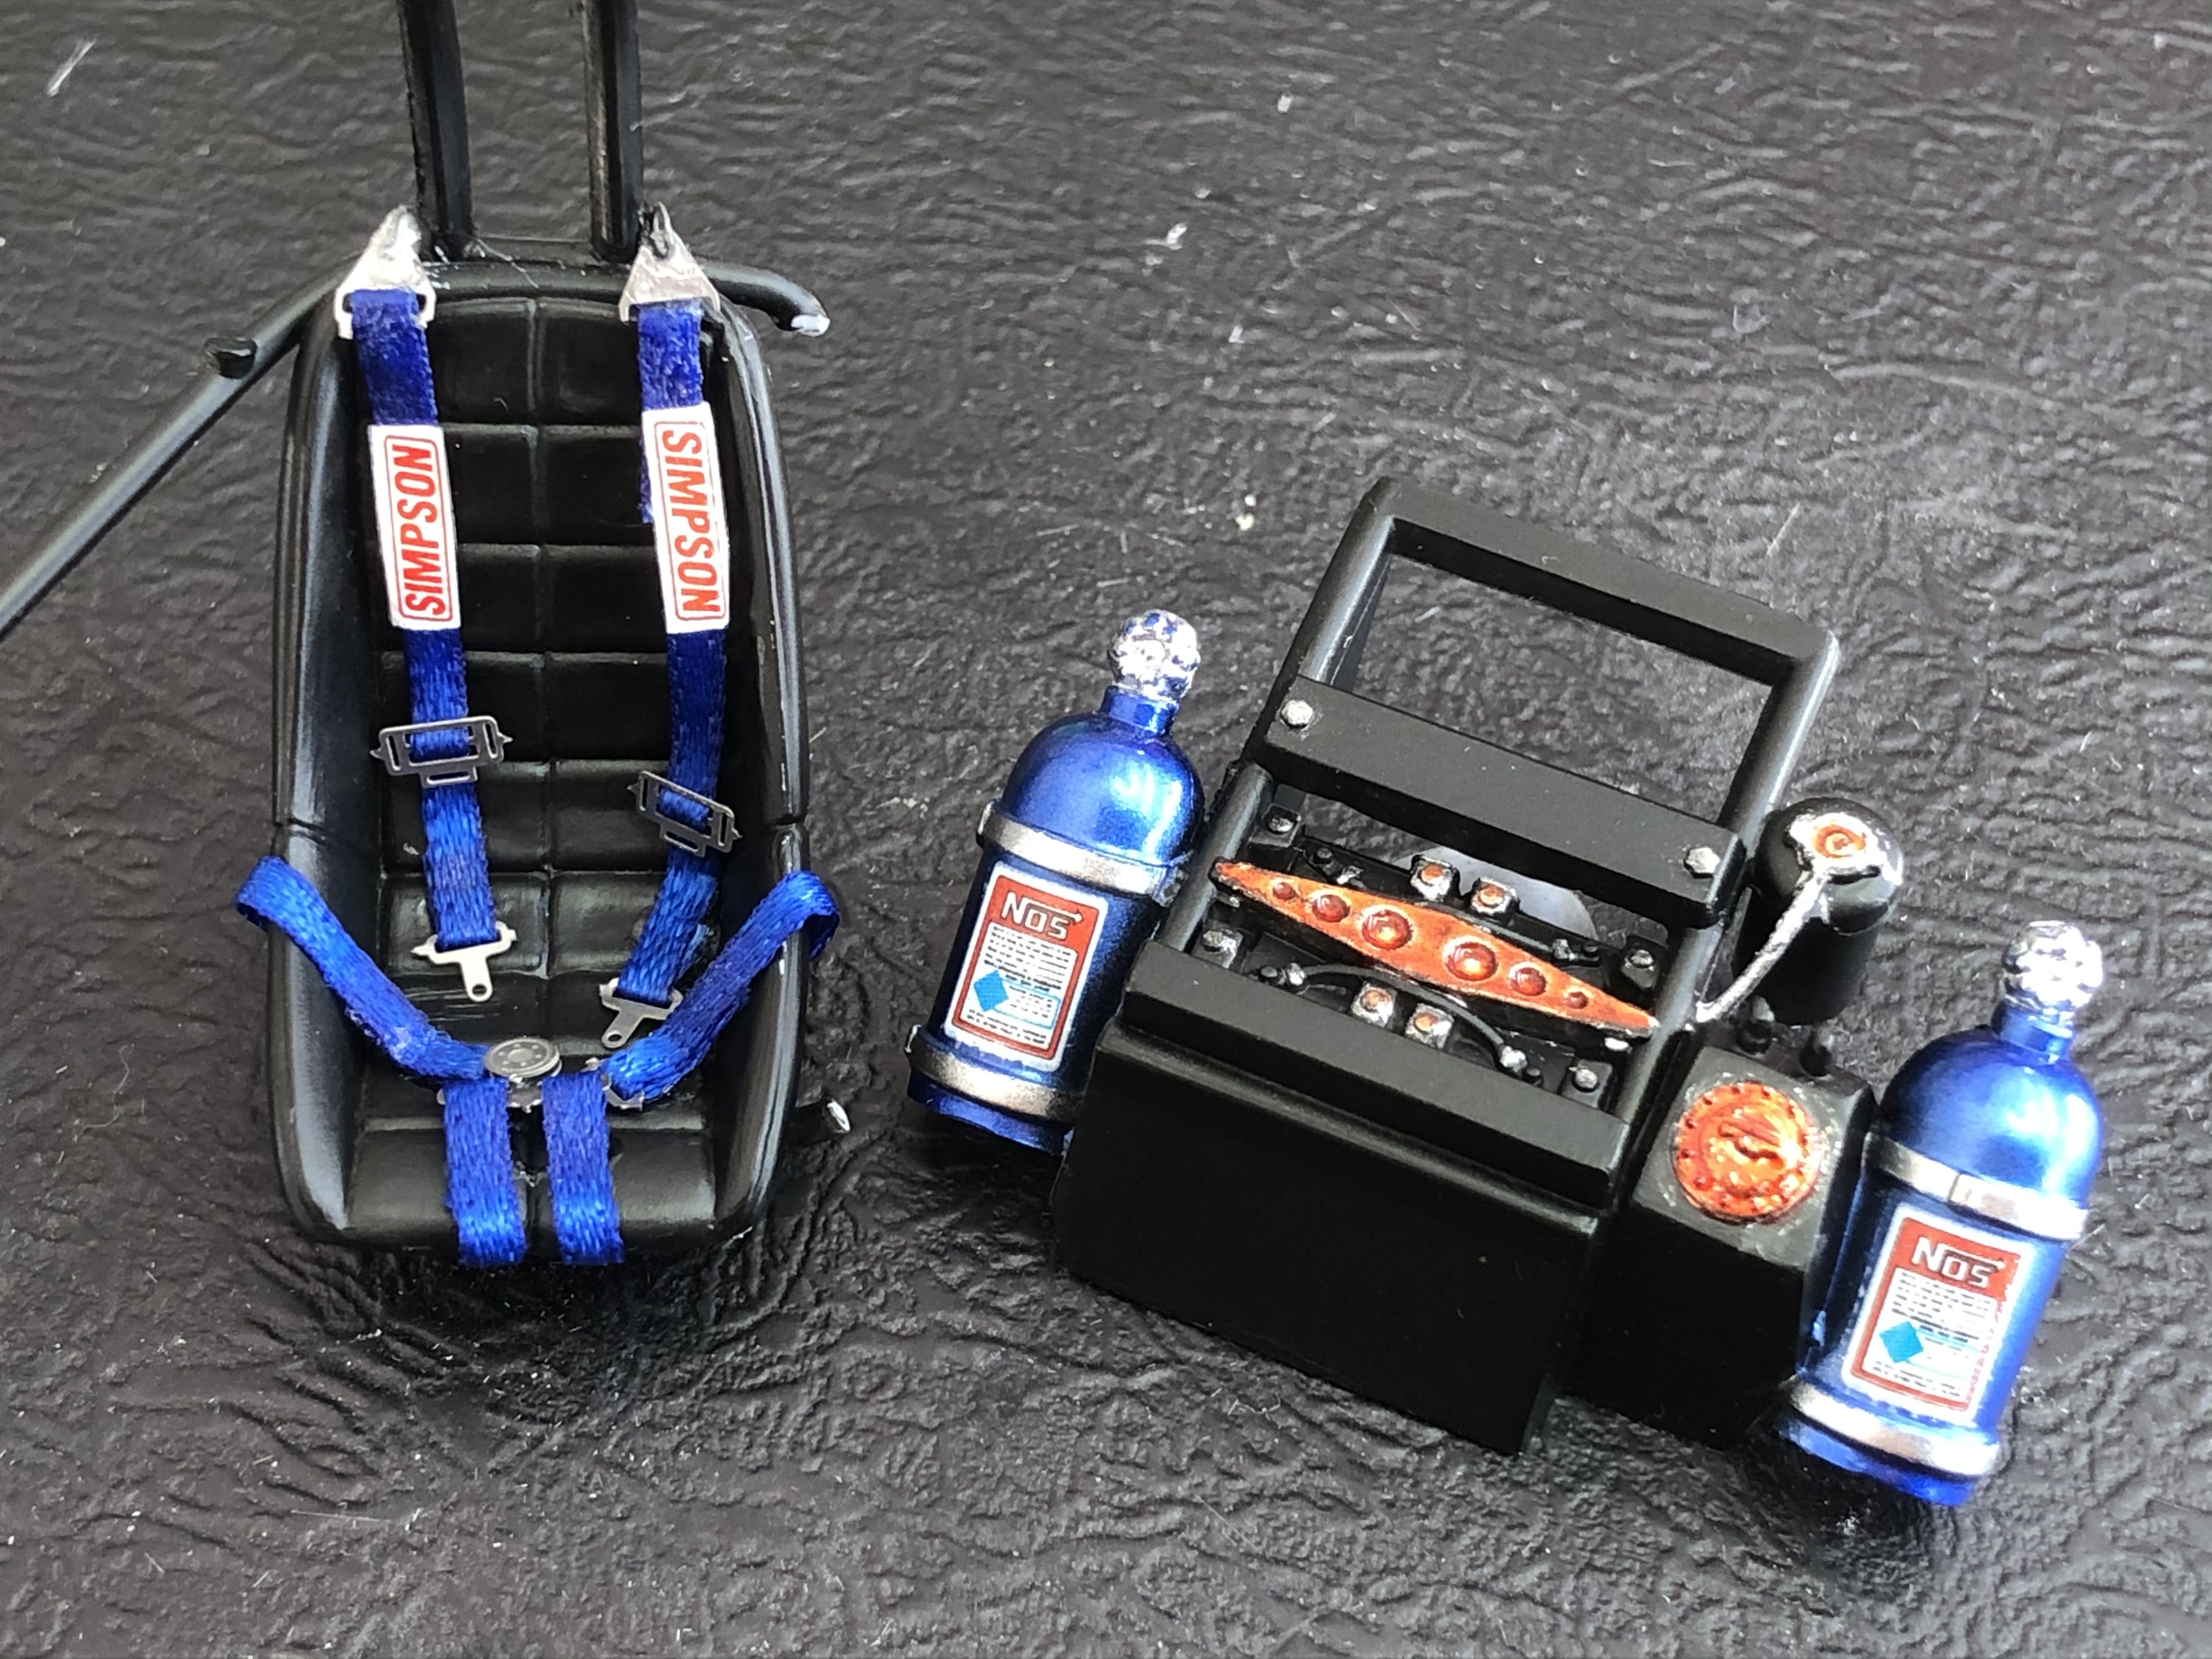
Thanks Joel. I gave the decals a couple of shots of softener as the carrier is quite thick, and once it was dried off I've given it a couple of brush coats of Alclad Aqua Gloss. The seat is ready to install now. I also did some more work on the go-faster juice station with the decals and some detail painting.
Edging towards the finish line.
Cheers, D
Dixon66
Joined: December 12, 2002
KitMaker: 1,500 posts
Auto Modeler: 645 posts
Posted: Friday, July 17, 2020 - 11:25 PM UTC
Looking great D. Nailed it.
Joel_W
Joined: December 04, 2010
KitMaker: 11,666 posts
Auto Modeler: 2,974 posts
Posted: Saturday, July 18, 2020 - 12:55 AM UTC
D,
One thing that I found with the labels on the straps which are always decals, is to really doss them with Solvaset. Eventually they actually settle into the fabric. I do need to take some pictures of the drivers interior myself as it's done including the roll cage.
And your "juice station" really looks the part.
Honestly, you've upped your game tremendously over the last few builds.
Joel
Joel_W
Joined: December 04, 2010
KitMaker: 11,666 posts
Auto Modeler: 2,974 posts
Posted: Saturday, July 18, 2020 - 04:34 AM UTC
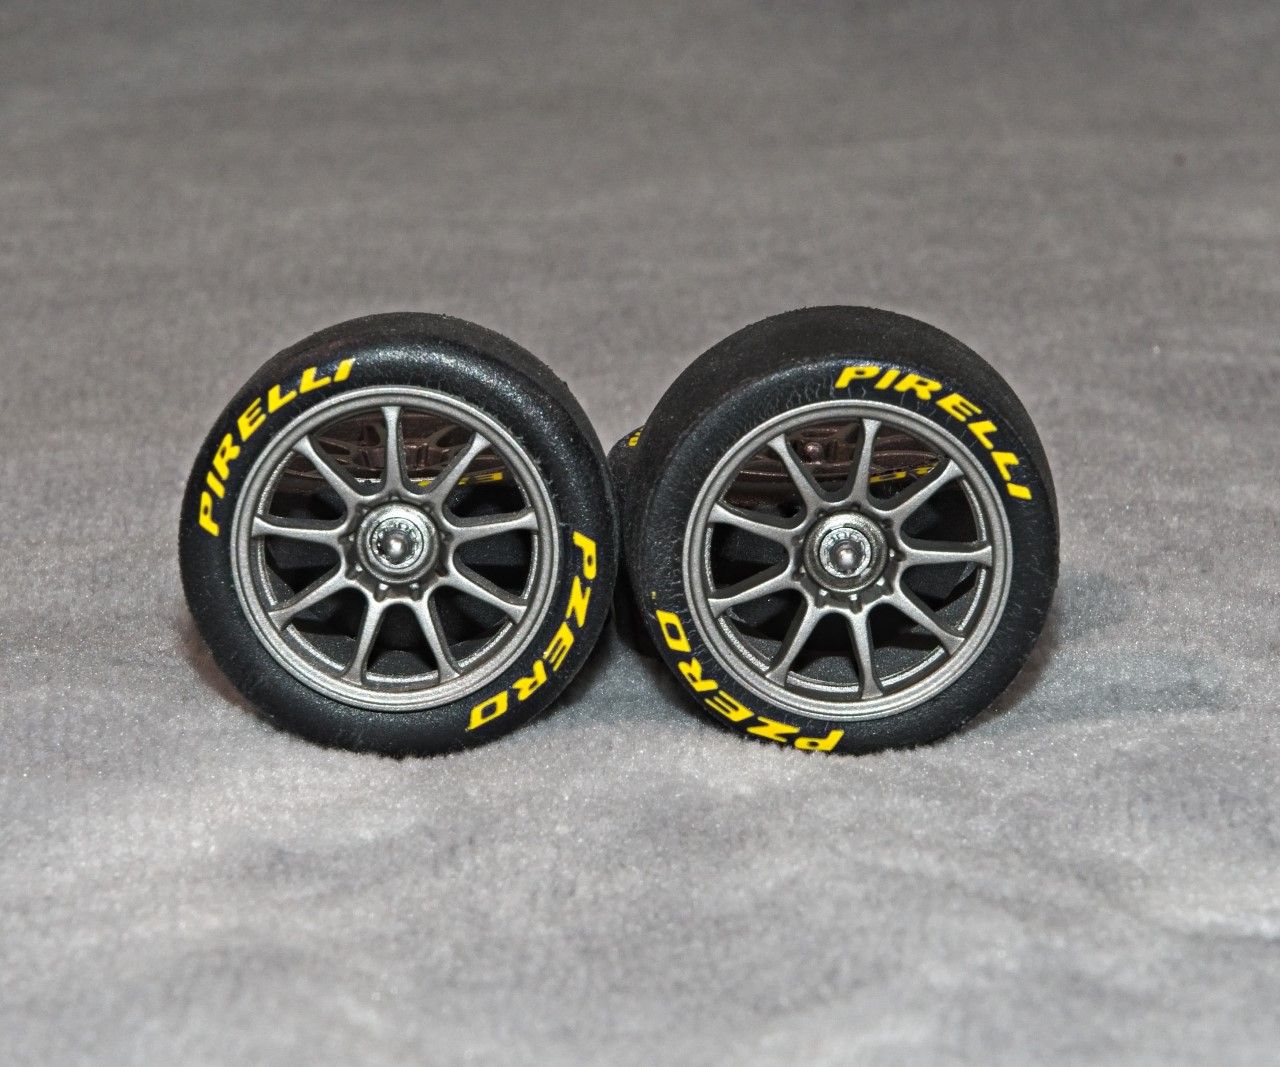
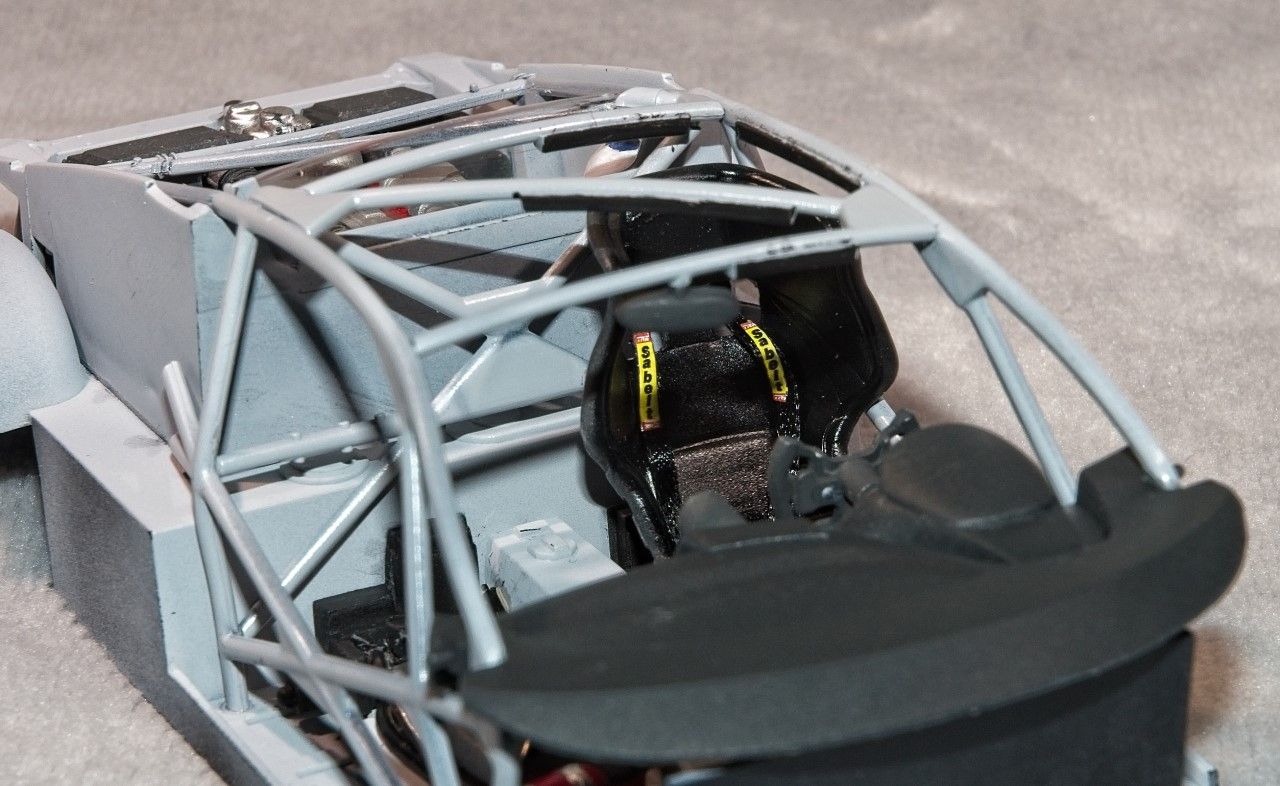
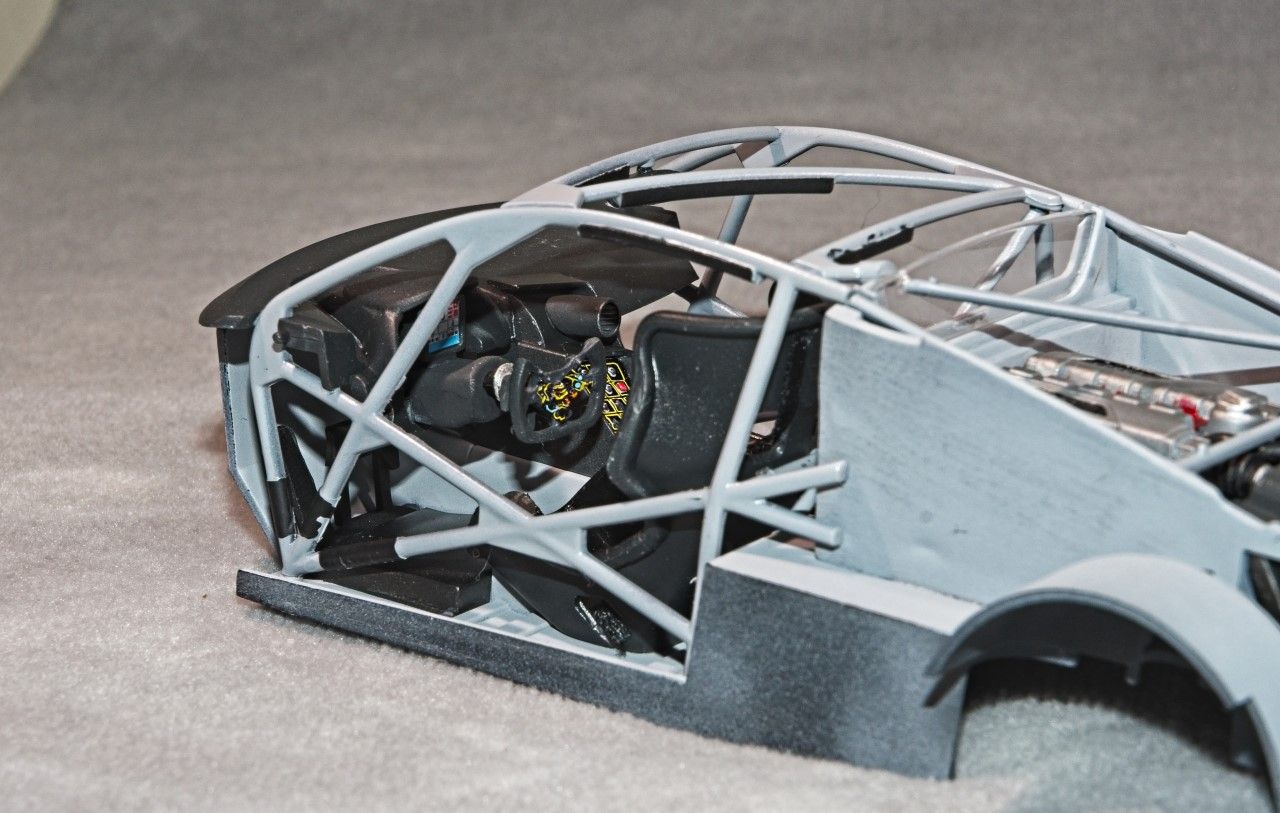
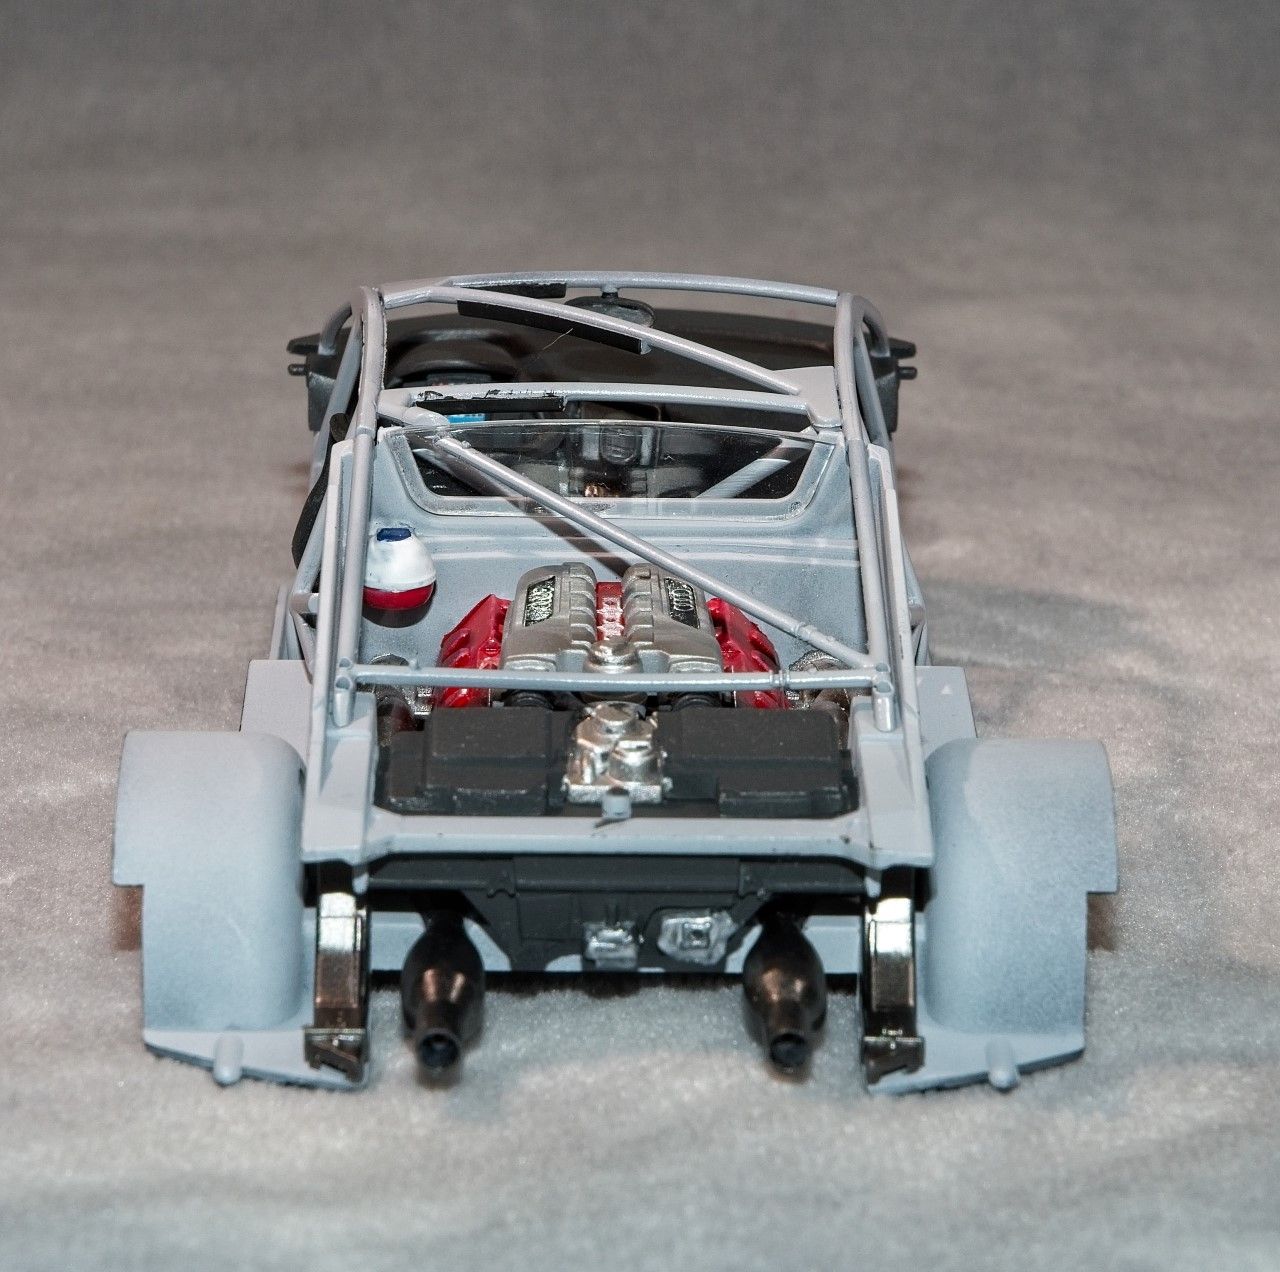
I started off the week painting the 4 wheels a Metallic Steel Gray, then the center hub stainless Steel, and finally a pin line wash of Tamiya Black panel line wash to help with the separation of wheel and hub. The tires are nicely molded, but haf this extremely rough texture that I really couldn't completely get rid of. I opted to hand brush on two coats of Pledge to help seal the tires as well as the gloss base for the Pirelli Pzeno decals. This time I did have some issues once the decals dried using my three part decaling method of Micro Sol, Micro Set, & Walther's Solvaset. So rather then air brushing on a coat of Testor's Glosscoat, I applied another hand brushed coat of Pledge. When it dried, problem solved. Gave the tires a full day to dry and cure, then I air brushed on a few coats of Testor's Dullcoat thinned 1:1 rather then my usual 2:3.
Now my attention turned to finishing up the driver's compartment. The dashboard, wheel assembly, and large button box on the right side side were all painted with Tamiya's Nato Black to kind of represent one type of Carbon fiber. Next I applied the decal to the steering wheel with all the buttons and dials, as well as the decal for the button box. Added the air vent to it, and dry brushed it with Aluminum so that the raised details kind of popped right out.
The seat is extremely well molded with clearly defined demarcation between the black leather and the Carbon Fiber seat. Nunu also took the time to include the proper openings for the 6 way harness assembly which made installing it all that much easier. I painted the CF part of the seat Nato Black, and the leather material Semi gloss Black, but is wasn't shiny enough, so I air brushed it with a coat of Testor's Gloss coat.
As with most of the Asian kits the harness assembly is just decals. So I made my own generic 6 way harness using the Gofer generic set. I still needed a main belt latch, so I dug through my PE spares and found one that would do nicely. My one complaint is that the design engineers at Audi really need to take us modelers into consideration when picking colors, as the Black Seat with a Black Harneess assembly inside the drivers compartment basically just fades into the shadows. So I used a little modelers license and found a pair of Yellow Harness labels for the Shoulder straps, and applied the decals with a very heavy dose of Solvaset so that they would settle down into the fabric's nooks and crannies.
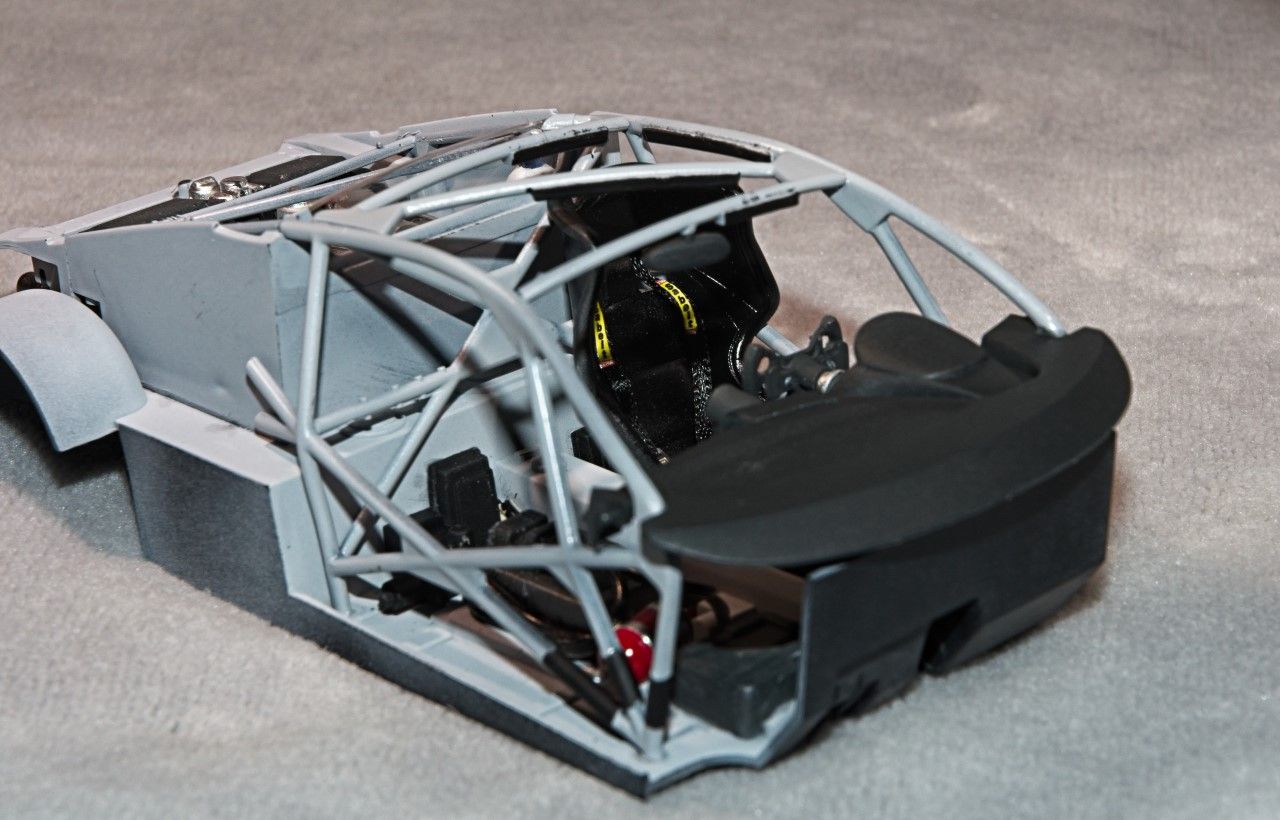
All that was left to do was assemble the various sub assemblies. The dash literally fits like a glove which just amazed me as I seem to have issues with every build. The seat was also a drop in fit. The roll cage aligned perfectly with the 4 mounting holes, and the engine compartment finished up the interior assembly with another perfect fit.
Thanks to all for stopping by and checking out my build to date. As usual, it's always greatly appreciated.
Joel
Now my attention turned to finishing up the driver's compartment. The dashboard, wheel assembly, and large button box on the right side side were all painted with Tamiya's Nato Black to kind of represent one type of Carbon fiber. Next I applied the decal to the steering wheel with all the buttons and dials, as well as the decal for the button box. Added the air vent to it, and dry brushed it with Aluminum so that the raised details kind of popped right out.
The seat is extremely well molded with clearly defined demarcation between the black leather and the Carbon Fiber seat. Nunu also took the time to include the proper openings for the 6 way harness assembly which made installing it all that much easier. I painted the CF part of the seat Nato Black, and the leather material Semi gloss Black, but is wasn't shiny enough, so I air brushed it with a coat of Testor's Gloss coat.
As with most of the Asian kits the harness assembly is just decals. So I made my own generic 6 way harness using the Gofer generic set. I still needed a main belt latch, so I dug through my PE spares and found one that would do nicely. My one complaint is that the design engineers at Audi really need to take us modelers into consideration when picking colors, as the Black Seat with a Black Harneess assembly inside the drivers compartment basically just fades into the shadows. So I used a little modelers license and found a pair of Yellow Harness labels for the Shoulder straps, and applied the decals with a very heavy dose of Solvaset so that they would settle down into the fabric's nooks and crannies.
All that was left to do was assemble the various sub assemblies. The dash literally fits like a glove which just amazed me as I seem to have issues with every build. The seat was also a drop in fit. The roll cage aligned perfectly with the 4 mounting holes, and the engine compartment finished up the interior assembly with another perfect fit.
Thanks to all for stopping by and checking out my build to date. As usual, it's always greatly appreciated.
Joel
 |

WEB HOSTING BY


Copyright ©2021 Auto Modeler and Kitmaker Network, a subsidiary of Silver Star Enterprises
All Rights Reserved. Please read our Conditions of Use and Privacy Policy.
All Rights Reserved. Please read our Conditions of Use and Privacy Policy.